Difference between revisions of "AML-90 (Israel)"
(Edits) |
(→History) (Tag: Visual edit) |
||
| (11 intermediate revisions by 4 users not shown) | |||
| Line 11: | Line 11: | ||
== Description == | == Description == | ||
<!-- ''In the description, the first part should be about the history of the creation and combat usage of the vehicle, as well as its key features. In the second part, tell the reader about the ground vehicle in the game. Insert a screenshot of the vehicle, so that if the novice player does not remember the vehicle by name, he will immediately understand what kind of vehicle the article is talking about.'' --> | <!-- ''In the description, the first part should be about the history of the creation and combat usage of the vehicle, as well as its key features. In the second part, tell the reader about the ground vehicle in the game. Insert a screenshot of the vehicle, so that if the novice player does not remember the vehicle by name, he will immediately understand what kind of vehicle the article is talking about.'' --> | ||
| − | The | + | The '''{{Specs|name}}''' is a rank {{Specs|rank}} Israeli light tank {{Battle-rating}}. It was introduced in [[Update "Wind of Change"]]. |
| − | |||
| − | |||
== General info == | == General info == | ||
| Line 19: | Line 17: | ||
{{Specs-Tank-Armour}} | {{Specs-Tank-Armour}} | ||
<!-- ''Describe armour protection. Note the most well protected and key weak areas. Appreciate the layout of modules as well as the number and location of crew members. Is the level of armour protection sufficient, is the placement of modules helpful for survival in combat? If necessary use a visual template to indicate the most secure and weak zones of the armour.'' --> | <!-- ''Describe armour protection. Note the most well protected and key weak areas. Appreciate the layout of modules as well as the number and location of crew members. Is the level of armour protection sufficient, is the placement of modules helpful for survival in combat? If necessary use a visual template to indicate the most secure and weak zones of the armour.'' --> | ||
| − | The | + | The {{PAGENAME}} lacks protection against heavy machine gun fire and is susceptible to damage by light machine gun fire. The crew is located in a rather small compartment, making the armoured car prompt to being knocked out by a single shot from almost any direction. It is also vulnerable to overpressure, meaning chemical energy ammunition will take out your vehicle regardless of where they impact. A kinetic energy ammunition can damage your AML through the projectile itself or the spalling generated but the inflicted damages are lesser and has a higher chance to knock out the crew members or critical modules than to destroy the vehicle. It should be noted that the thin armour has a chance to not activate fused shells like APHE, APCBC, etc, although it will trigger HEAT, HEATFS, HE and ATGM. |
'''Armour type:''' | '''Armour type:''' | ||
| Line 50: | Line 48: | ||
{{tankMobility|abMinHp=139|rbMinHp=80}} | {{tankMobility|abMinHp=139|rbMinHp=80}} | ||
| − | |||
| − | |||
=== Modifications and economy === | === Modifications and economy === | ||
{{Specs-Economy}} | {{Specs-Economy}} | ||
| − | |||
| − | |||
| − | |||
| − | |||
| − | |||
| − | |||
| − | |||
| − | |||
| − | |||
| − | |||
| − | |||
== Armaments == | == Armaments == | ||
| Line 73: | Line 58: | ||
<!-- ''Give the reader information about the characteristics of the main gun. Assess its effectiveness in a battle based on the reloading speed, ballistics and the power of shells. Do not forget about the flexibility of the fire, that is how quickly the cannon can be aimed at the target, open fire on it and aim at another enemy. Add a link to the main article on the gun: <code><nowiki>{{main|Name of the weapon}}</nowiki></code>. Describe in general terms the ammunition available for the main gun. Give advice on how to use them and how to fill the ammunition storage.'' --> | <!-- ''Give the reader information about the characteristics of the main gun. Assess its effectiveness in a battle based on the reloading speed, ballistics and the power of shells. Do not forget about the flexibility of the fire, that is how quickly the cannon can be aimed at the target, open fire on it and aim at another enemy. Add a link to the main article on the gun: <code><nowiki>{{main|Name of the weapon}}</nowiki></code>. Describe in general terms the ammunition available for the main gun. Give advice on how to use them and how to fill the ammunition storage.'' --> | ||
{{main|DEFA F1 (90 mm)}} | {{main|DEFA F1 (90 mm)}} | ||
| − | |||
| − | |||
{| class="wikitable" style="text-align:center" width="100%" | {| class="wikitable" style="text-align:center" width="100%" | ||
| Line 85: | Line 68: | ||
|- | |- | ||
! ''Arcade'' | ! ''Arcade'' | ||
| − | | rowspan="2" | 20 || rowspan="2" | -8°/+15° || rowspan="2" | ±180° || rowspan="2" | | + | | rowspan="2" | 20 || rowspan="2" | -8°/+15° || rowspan="2" | ±180° || rowspan="2" | N/A || 23.8 || 32.9 || 40.0 || 44.2 || 47.1 || rowspan="2" | 8.71 || rowspan="2" | 7.71 || rowspan="2" | 7.10 || rowspan="2" | 6.70 |
|- | |- | ||
! ''Realistic'' | ! ''Realistic'' | ||
| Line 112: | Line 95: | ||
'''Notes''': | '''Notes''': | ||
| − | * Shells are | + | * Shells are modeled individually and disappear after having been shot or loaded. |
* Racks 3 and 4 are first stage ammo racks. They total 10 shells and get filled first when loading up the tank. | * Racks 3 and 4 are first stage ammo racks. They total 10 shells and get filled first when loading up the tank. | ||
** These racks are also emptied early: the rack depletion order at full capacity is: 3 - 4 - 1 - 2. | ** These racks are also emptied early: the rack depletion order at full capacity is: 3 - 4 - 1 - 2. | ||
| Line 122: | Line 105: | ||
<!-- ''Offensive and anti-aircraft machine guns not only allow you to fight some aircraft but also are effective against lightly armoured vehicles. Evaluate machine guns and give recommendations on its use.'' --> | <!-- ''Offensive and anti-aircraft machine guns not only allow you to fight some aircraft but also are effective against lightly armoured vehicles. Evaluate machine guns and give recommendations on its use.'' --> | ||
{{main|A-A-F1N (7.62 mm)}} | {{main|A-A-F1N (7.62 mm)}} | ||
| − | |||
| − | |||
{| class="wikitable" style="text-align:center" width="50%" | {| class="wikitable" style="text-align:center" width="50%" | ||
| Line 133: | Line 114: | ||
| Pintle || 800 (100) || 900 || -10°/+40° || ±120° | | Pintle || 800 (100) || 900 || -10°/+40° || ±120° | ||
|- | |- | ||
| − | | Coaxial || 2,200 (100) || 900 || | + | | Coaxial || 2,200 (100) || 900 || N/A || N/A |
|- | |- | ||
|} | |} | ||
| Line 139: | Line 120: | ||
== Usage in battles == | == Usage in battles == | ||
<!-- ''Describe the tactics of playing in the vehicle, the features of using vehicles in the team and advice on tactics. Refrain from creating a "guide" - do not impose a single point of view but instead give the reader food for thought. Describe the most dangerous enemies and give recommendations on fighting them. If necessary, note the specifics of the game in different modes (AB, RB, SB).'' --> | <!-- ''Describe the tactics of playing in the vehicle, the features of using vehicles in the team and advice on tactics. Refrain from creating a "guide" - do not impose a single point of view but instead give the reader food for thought. Describe the most dangerous enemies and give recommendations on fighting them. If necessary, note the specifics of the game in different modes (AB, RB, SB).'' --> | ||
| − | + | ''Describe the tactics of playing in the vehicle, the features of using vehicles in the team and advice on tactics. Refrain from creating a "guide" - do not impose a single point of view but instead give the reader food for thought. Describe the most dangerous enemies and give recommendations on fighting them. If necessary, note the specifics of the game in different modes (AB, RB, SB).'' | |
| − | |||
| − | |||
=== Pros and cons === | === Pros and cons === | ||
| Line 148: | Line 127: | ||
'''Pros:''' | '''Pros:''' | ||
| − | * | + | * Is very short and narrow, can effectively hide itself and squeeze in-between tanks while fighting in a city |
* High speed on road (~50-80 km/h), faster than tracked light tanks like [[M41A1]], can sometimes rush through enemy fire while taking superficial damage | * High speed on road (~50-80 km/h), faster than tracked light tanks like [[M41A1]], can sometimes rush through enemy fire while taking superficial damage | ||
| − | + | * 90 mm HEATFS is lethal thanks to its high penetration. Can go through almost all common tanks like [[Leopard 1 (Family)|Leopard 1]] or [[T-44]], although it will sometimes fail to do damage to tanks like [[T32E1]] | |
| − | * 90 mm HEATFS is lethal thanks to its high penetration. Can go through almost all common tanks like [[Leopard 1 (Family)|Leopard 1]] or [[T-44]] | ||
* -18 km/h reverse speed can pull it out of a dangerous situation rather quickly | * -18 km/h reverse speed can pull it out of a dangerous situation rather quickly | ||
* Smoke grenades can conceal the vehicle when needed | * Smoke grenades can conceal the vehicle when needed | ||
| Line 161: | Line 139: | ||
* Must be used without expert crew against elite crews of other nations, making it instantly inferior to the same tank of other nations at first | * Must be used without expert crew against elite crews of other nations, making it instantly inferior to the same tank of other nations at first | ||
* Armour is so poor that even German 7.92 mm can penetrate it at close range, laughably easy to destroy with HMG even over long range, especially from the side | * Armour is so poor that even German 7.92 mm can penetrate it at close range, laughably easy to destroy with HMG even over long range, especially from the side | ||
| − | * HEATFS has limited post-penetration damage especially against spacious tanks like [[M60 (Family)|M60 | + | * HEATFS has limited post-penetration damage especially against spacious tanks like [[M60 (Family)|M60]] |
* HEATFS of AML-90 is slightly slower than general tank ammunition and thus its trajectory is quite curved, long range shots require practice | * HEATFS of AML-90 is slightly slower than general tank ammunition and thus its trajectory is quite curved, long range shots require practice | ||
* Wheeled design and low mass makes it extremely sluggish when turning or driving through obstacles | * Wheeled design and low mass makes it extremely sluggish when turning or driving through obstacles | ||
| Line 167: | Line 145: | ||
== History == | == History == | ||
<!-- ''Describe the history of the creation and combat usage of the vehicle in more detail than in the introduction. If the historical reference turns out to be too long, take it to a separate article, taking a link to the article about the vehicle and adding a block "/History" (example: <nowiki>https://wiki.warthunder.com/(Vehicle-name)/History</nowiki>) and add a link to it here using the <code>main</code> template. Be sure to reference text and sources by using <code><nowiki><ref></ref></nowiki></code>, as well as adding them at the end of the article with <code><nowiki><references /></nowiki></code>. This section may also include the vehicle's dev blog entry (if applicable) and the in-game encyclopedia description (under <code><nowiki>=== In-game description ===</nowiki></code>, also if applicable).'' --> | <!-- ''Describe the history of the creation and combat usage of the vehicle in more detail than in the introduction. If the historical reference turns out to be too long, take it to a separate article, taking a link to the article about the vehicle and adding a block "/History" (example: <nowiki>https://wiki.warthunder.com/(Vehicle-name)/History</nowiki>) and add a link to it here using the <code>main</code> template. Be sure to reference text and sources by using <code><nowiki><ref></ref></nowiki></code>, as well as adding them at the end of the article with <code><nowiki><references /></nowiki></code>. This section may also include the vehicle's dev blog entry (if applicable) and the in-game encyclopedia description (under <code><nowiki>=== In-game description ===</nowiki></code>, also if applicable).'' --> | ||
| − | + | During World War II, the French Army and their Free French successors used a wide variety of vehicles for reconnaissance duties, ranging from the compact ''Laffly S15'' to the ''Panhard 178'', which could mount the same 75 mm armament as contemporary heavy tanks, and multi-wheeled designs such as the ''Type 201''. After the war it became less desirable to maintain this plethora of armoured cars. In July 1945 Paris issued a requirement for a postwar design combining those features of previous assets – especially the Type 201 – that had shown potential both during and prior to the Battle of France. This led to the 8x8 Panhard EBR (''Type 212'') which entered service in 1950. Similarly, in 1956 the French Ministry of Defense was persuaded to commission a replacement for the Daimler Ferret scout car. Also manufactured by Panhard, the successor was the AML (''Type 245'') which entered service in 1961. | |
| − | |||
| − | |||
| − | |||
| − | |||
| − | |||
| − | |||
| − | + | As with much postwar hardware based on the experience of subsequent colonial theatres, the AML was recognized for its outstanding ruggedness, dependability, firepower-to-weight ratio, and adaptability to the numerous minor conflicts waged since 1945. This reputation has led to export success in over forty countries, Africa being one of its biggest markets. | |
== Media == | == Media == | ||
| Line 197: | Line 169: | ||
* ''topic on the official game forum;'' | * ''topic on the official game forum;'' | ||
* ''other literature.'' --> | * ''other literature.'' --> | ||
| + | ''Paste links to sources and external resources, such as:'' | ||
| − | ''' | + | * ''topic on the official game forum;'' |
| − | + | * ''other literature.'' | |
| − | |||
{{TankManufacturer Panhard}} | {{TankManufacturer Panhard}} | ||
{{Israel light tanks}} | {{Israel light tanks}} | ||
[[Category:Wheeled ground vehicles]] | [[Category:Wheeled ground vehicles]] | ||
Revision as of 14:50, 28 April 2023
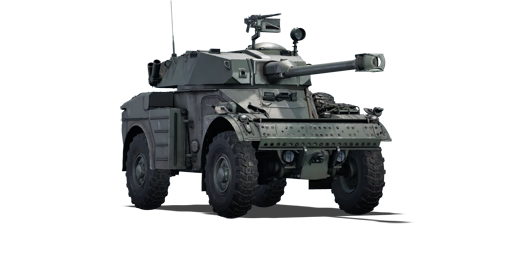
| This page is about the light tank AML-90 (Israel). For other versions, see AML-90 (Family). |
.jpg)
Contents
Description
The AML-90 is a rank IV Israeli light tank with a battle rating of 7.0 (AB) and 7.7 (RB/SB). It was introduced in Update "Wind of Change".
General info
Survivability and armour
The AML-90 (Israel) lacks protection against heavy machine gun fire and is susceptible to damage by light machine gun fire. The crew is located in a rather small compartment, making the armoured car prompt to being knocked out by a single shot from almost any direction. It is also vulnerable to overpressure, meaning chemical energy ammunition will take out your vehicle regardless of where they impact. A kinetic energy ammunition can damage your AML through the projectile itself or the spalling generated but the inflicted damages are lesser and has a higher chance to knock out the crew members or critical modules than to destroy the vehicle. It should be noted that the thin armour has a chance to not activate fused shells like APHE, APCBC, etc, although it will trigger HEAT, HEATFS, HE and ATGM.
Armour type:
- Rolled homogeneous armour (hull, turret)
- Structural steel (mudguards, storage boxes)
- Wheel (tires)
| Armour | Front (Slope angle) | Sides | Rear | Roof |
|---|---|---|---|---|
| Hull | 10 mm (51°) Upper glacis 10 mm (17°) Upper glacis |
10 mm (4°) Front half 10 mm (6°) Rear half |
10 mm Upper plate 10 mm (46°) Upper glacis 10 mm (20°) Lower glacis |
10 mm (40°) Front glacis 10 mm (44°) Rear glacis |
| Turret | 12 mm (30°) Turret front 12 mm (8°) Gun mantlet |
10 mm (17-21°) 10 mm Viewports |
10 mm (16°) | 10 mm (16°) Front part 10 mm Rear part 8 mm Gunner hatch |
| Cupola | 8 mm (spherical) | |||
Notes:
- Wheels are 10 mm thick and a spare wheel covers the left side of the hull.
- Storage boxes and mudguards are 5 mm thick.
- The belly is 8 mm thick.
- The gun barrel is 20 mm thick.
Mobility
| Game Mode | Max Speed (km/h) | Weight (tons) | Engine power (horsepower) | Power-to-weight ratio (hp/ton) | |||
|---|---|---|---|---|---|---|---|
| Forward | Reverse | Stock | Upgraded | Stock | Upgraded | ||
| Arcade | 101 | 20 | 5.5 | 139 | 172 | 25.27 | 31.27 |
| Realistic | 91 | 18 | 80 | 90 | 14.55 | 16.36 | |
Modifications and economy
| Mobility | Protection | Firepower | ||||||||||||||||||||||||
|---|---|---|---|---|---|---|---|---|---|---|---|---|---|---|---|---|---|---|---|---|---|---|---|---|---|---|
|
|
|
Armaments
Main armament
| 90 mm DEFA F1 | Turret rotation speed (°/s) | Reloading rate (seconds) | |||||||||||
|---|---|---|---|---|---|---|---|---|---|---|---|---|---|
| Mode | Capacity | Vertical | Horizontal | Stabilizer | Stock | Upgraded | Full | Expert | Aced | Stock | Full | Expert | Aced |
| Arcade | 20 | -8°/+15° | ±180° | N/A | 23.8 | 32.9 | 40.0 | 44.2 | 47.1 | 8.71 | 7.71 | 7.10 | 6.70 |
| Realistic | 14.9 | 17.5 | 21.3 | 23.5 | 25.0 | ||||||||
Ammunition
| Penetration statistics | |||||||
|---|---|---|---|---|---|---|---|
| Ammunition | Type of warhead |
Penetration @ 0° Angle of Attack (mm) | |||||
| 10 m | 100 m | 500 m | 1,000 m | 1,500 m | 2,000 m | ||
| OCC 60-62 | HEATFS | 320 | 320 | 320 | 320 | 320 | 320 |
| OE 90 F1 | HE | 14 | 14 | 13 | 13 | 13 | 13 |
| Shell details | ||||||||||||
|---|---|---|---|---|---|---|---|---|---|---|---|---|
| Ammunition | Type of warhead |
Velocity (m/s) |
Projectile mass (kg) |
Fuse delay (m) |
Fuse sensitivity (mm) |
Explosive mass (TNT equivalent) (g) |
Ricochet | |||||
| 0% | 50% | 100% | ||||||||||
| OCC 60-62 | HEATFS | 750 | 8.95 | 0.05 | 0.1 | 877.7 | 65° | 72° | 77° | |||
| OE 90 F1 | HE | 640 | 10.45 | 0.2 | 0.1 | 945 | 79° | 80° | 81° | |||
| Smoke shell characteristics | ||||||
|---|---|---|---|---|---|---|
| Ammunition | Velocity (m/s) |
Projectile mass (kg) |
Screen radius (m) |
Screen deploy time (s) |
Screen hold time (s) |
Explosive mass (TNT equivalent) (g) |
| OFUM PH90-F2 | 640 | 10.2 | 13 | 5 | 20 | 50 |
Ammo racks

| Full ammo |
1st rack empty |
2nd rack empty |
3rd rack empty |
4th rack empty |
Visual discrepancy |
|---|---|---|---|---|---|
| 20 | 17 (+3) | 11 (+9) | 6 (+14) | 1 (+19) | No |
Notes:
- Shells are modeled individually and disappear after having been shot or loaded.
- Racks 3 and 4 are first stage ammo racks. They total 10 shells and get filled first when loading up the tank.
- These racks are also emptied early: the rack depletion order at full capacity is: 3 - 4 - 1 - 2.
- Simply not firing when the gun is loaded will move ammunition from rack 1 then 2 into ready rack 4 then 3. Firing will interrupt the restocking of the ready racks.
Machine guns
| 7.62 mm A-A-F1N | ||||
|---|---|---|---|---|
| Mount | Capacity (Belt) | Fire rate | Vertical | Horizontal |
| Pintle | 800 (100) | 900 | -10°/+40° | ±120° |
| Coaxial | 2,200 (100) | 900 | N/A | N/A |
Usage in battles
Describe the tactics of playing in the vehicle, the features of using vehicles in the team and advice on tactics. Refrain from creating a "guide" - do not impose a single point of view but instead give the reader food for thought. Describe the most dangerous enemies and give recommendations on fighting them. If necessary, note the specifics of the game in different modes (AB, RB, SB).
Pros and cons
Pros:
- Is very short and narrow, can effectively hide itself and squeeze in-between tanks while fighting in a city
- High speed on road (~50-80 km/h), faster than tracked light tanks like M41A1, can sometimes rush through enemy fire while taking superficial damage
- 90 mm HEATFS is lethal thanks to its high penetration. Can go through almost all common tanks like Leopard 1 or T-44, although it will sometimes fail to do damage to tanks like T32E1
- -18 km/h reverse speed can pull it out of a dangerous situation rather quickly
- Smoke grenades can conceal the vehicle when needed
- Stable hull, driving at maximum speed on flat terrain does not affect accuracy too much
Cons:
- Cannon itself isn't stabilised in any way, needs significant amount of time to aim after driving over a hill or any slope (particularly with the low "targeting" crew skill)
- Must be used without expert crew against elite crews of other nations, making it instantly inferior to the same tank of other nations at first
- Armour is so poor that even German 7.92 mm can penetrate it at close range, laughably easy to destroy with HMG even over long range, especially from the side
- HEATFS has limited post-penetration damage especially against spacious tanks like M60
- HEATFS of AML-90 is slightly slower than general tank ammunition and thus its trajectory is quite curved, long range shots require practice
- Wheeled design and low mass makes it extremely sluggish when turning or driving through obstacles
History
During World War II, the French Army and their Free French successors used a wide variety of vehicles for reconnaissance duties, ranging from the compact Laffly S15 to the Panhard 178, which could mount the same 75 mm armament as contemporary heavy tanks, and multi-wheeled designs such as the Type 201. After the war it became less desirable to maintain this plethora of armoured cars. In July 1945 Paris issued a requirement for a postwar design combining those features of previous assets – especially the Type 201 – that had shown potential both during and prior to the Battle of France. This led to the 8x8 Panhard EBR (Type 212) which entered service in 1950. Similarly, in 1956 the French Ministry of Defense was persuaded to commission a replacement for the Daimler Ferret scout car. Also manufactured by Panhard, the successor was the AML (Type 245) which entered service in 1961.
As with much postwar hardware based on the experience of subsequent colonial theatres, the AML was recognized for its outstanding ruggedness, dependability, firepower-to-weight ratio, and adaptability to the numerous minor conflicts waged since 1945. This reputation has led to export success in over forty countries, Africa being one of its biggest markets.
Media
- Skins
See also
- Related development
External links
Paste links to sources and external resources, such as:
- topic on the official game forum;
- other literature.
| Panhard | |
|---|---|
| Armoured Cars | AML-90 |
| AMD.35 | AMD.35 · AMD.35 (SA35) |
| E.B.R. | E.B.R. (1951) · E.B.R. (1954) · E.B.R. (1963) |
| Export | AML-90 |
| Israel light tanks | |
|---|---|
