
The unusual Rarden cannon found on a few British light vehicles is something of a Marmite weapon. It is either loved or loathed by most who use it and by those who face it in battle. In this article I’ll cover the history behind this unusual piece of equipment and share a few tips on its use in War Thunder.
Design
Work began on designing the gun in 1966, the same year in which the Soviet Union introduced the BMP-1, which was more heavily armed and armoured than previous IFVs. The specification called for a weapon that was capable of knocking out such vehicles at ranges up to 1,000 m and of penetrating the side armour of a Main Battle Tank while also being capable of engaging soft-skinned vehicles, troops and low-flying aircraft. In addition, the weapon had to take up as little space in the turret as possible and have a short trunnion pull (as little recoil as possible). This meant that existing 25- and 30mm weapons were ruled out due to having inadequate power, having a long recoil or taking up too much space with long feed chutes and ammunition tanks.
It is often suggested that the RARDEN was designed to be as simple as possible to allow it to work in a nuclear war. I was unable to find any documentation suggesting this was the case. The fact it would have continued to work after a nuclear blast would have been a bonus, but it was unlikely a conscious design choice.
Work on the L21E2 — as it was known — began with the ammunition. A 30 mm calibre weapon was deemed adequate for dealing with both current threats and with more heavily armoured vehicles that might be introduced in the future. An APDS round was put forward by the Royal Armament Research and Development Establishment — or RARDE — which also manufactured APDS shells for the 20-pounder, the 105mm L7, and the 120mm L1 cannons. The High Explosive and Armour-Piercing High Explosive rounds from the Hispano-Suiza 831L — the cannon used on the Falcon AA — were selected for use against other targets. Despite using the same 30×170mm shells as the HS 831L, the L21's ammunition was not interchangeable due to using a steel cartridge rather than brass.
The feed system utilised 3-round clips, pushed into the rear of the breech. The gun could hold 2 clips at a time for 6 rounds total with another round “up the spout” — ready to fire in the breech. This limited the ability of the cannon to fire sustained bursts of automatic fire, but, due to the weapon’s accuracy, this was not considered to be much of an issue. The system had the benefit of allowing the internal length of the gun to be barely longer than the length of the ammunition. The breech was roughly 25 cm long inside the turret — again roughly half the length of similar weapons. Spent casings were ejected from the front of the gun, under the barrel.
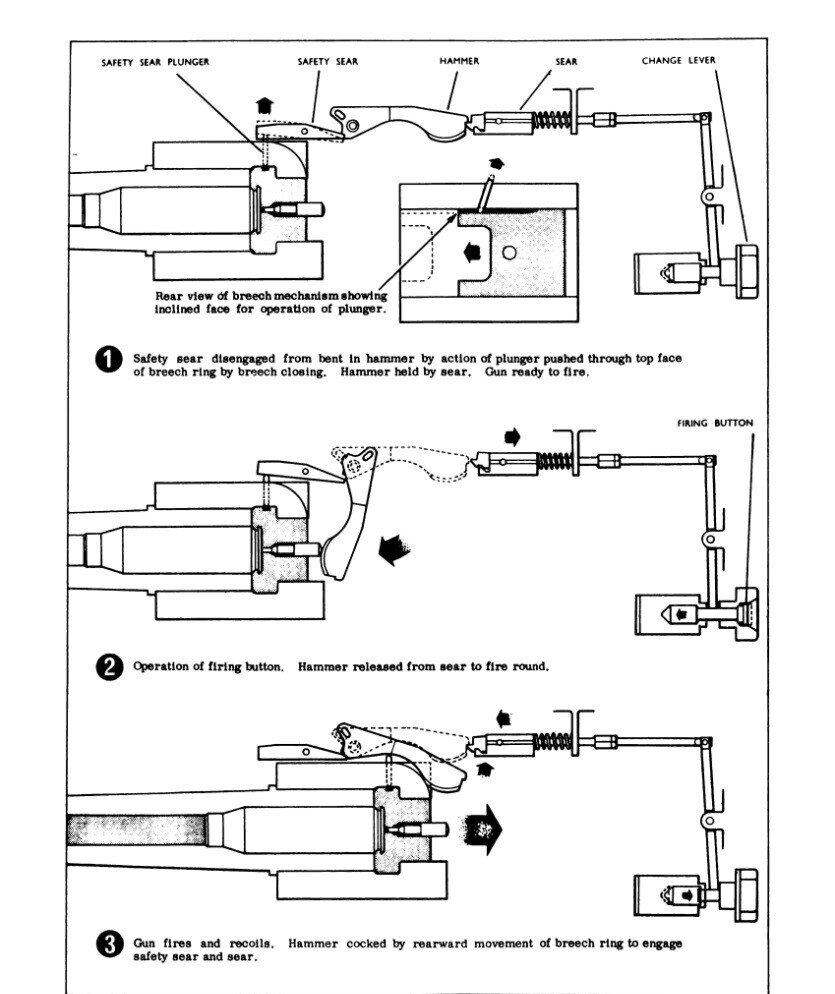
A long recoil system was decided upon for the new design. The system allowed the cannon’s mounting to be very light and compact, perfect for the intended platforms. The long recoil cycle also absorbed a lot of the energy produced by the rounds, meaning that the cannon only had approximately 4,000J of trunnion pull — half that of a similar 30mm cannon.
The most notable outcome of the design process was the L21's characteristically slow rate of fire of approximately 100 rpm. The slow RoF was beneficial to the weapon’s accuracy, as the barrel could return to battery before another shot was sent screaming downrange. Typically, sub-1m groupings could be achieved at ranges of 1000m, and the delay between shots reduced wear and tear on the cannon’s mountings. This trade-off was deemed acceptable by the MoD, and production of the L21 cannon was authorised. By 1970 the L21 was in production at RSAF Enfield. In the early 80s, Royal Ordnance Factories acquired RSAF Enfield but were then, in turn, bought by BAe Systems in April 1987. The Enfield factory was closed that August, and production moved to Nottingham.
The L21's more common name — RARDEN — comes from an amalgamation of RARDE (Royal Armament Research and Development Establishment) and ENfield. It is unclear where this name originated.
Service History
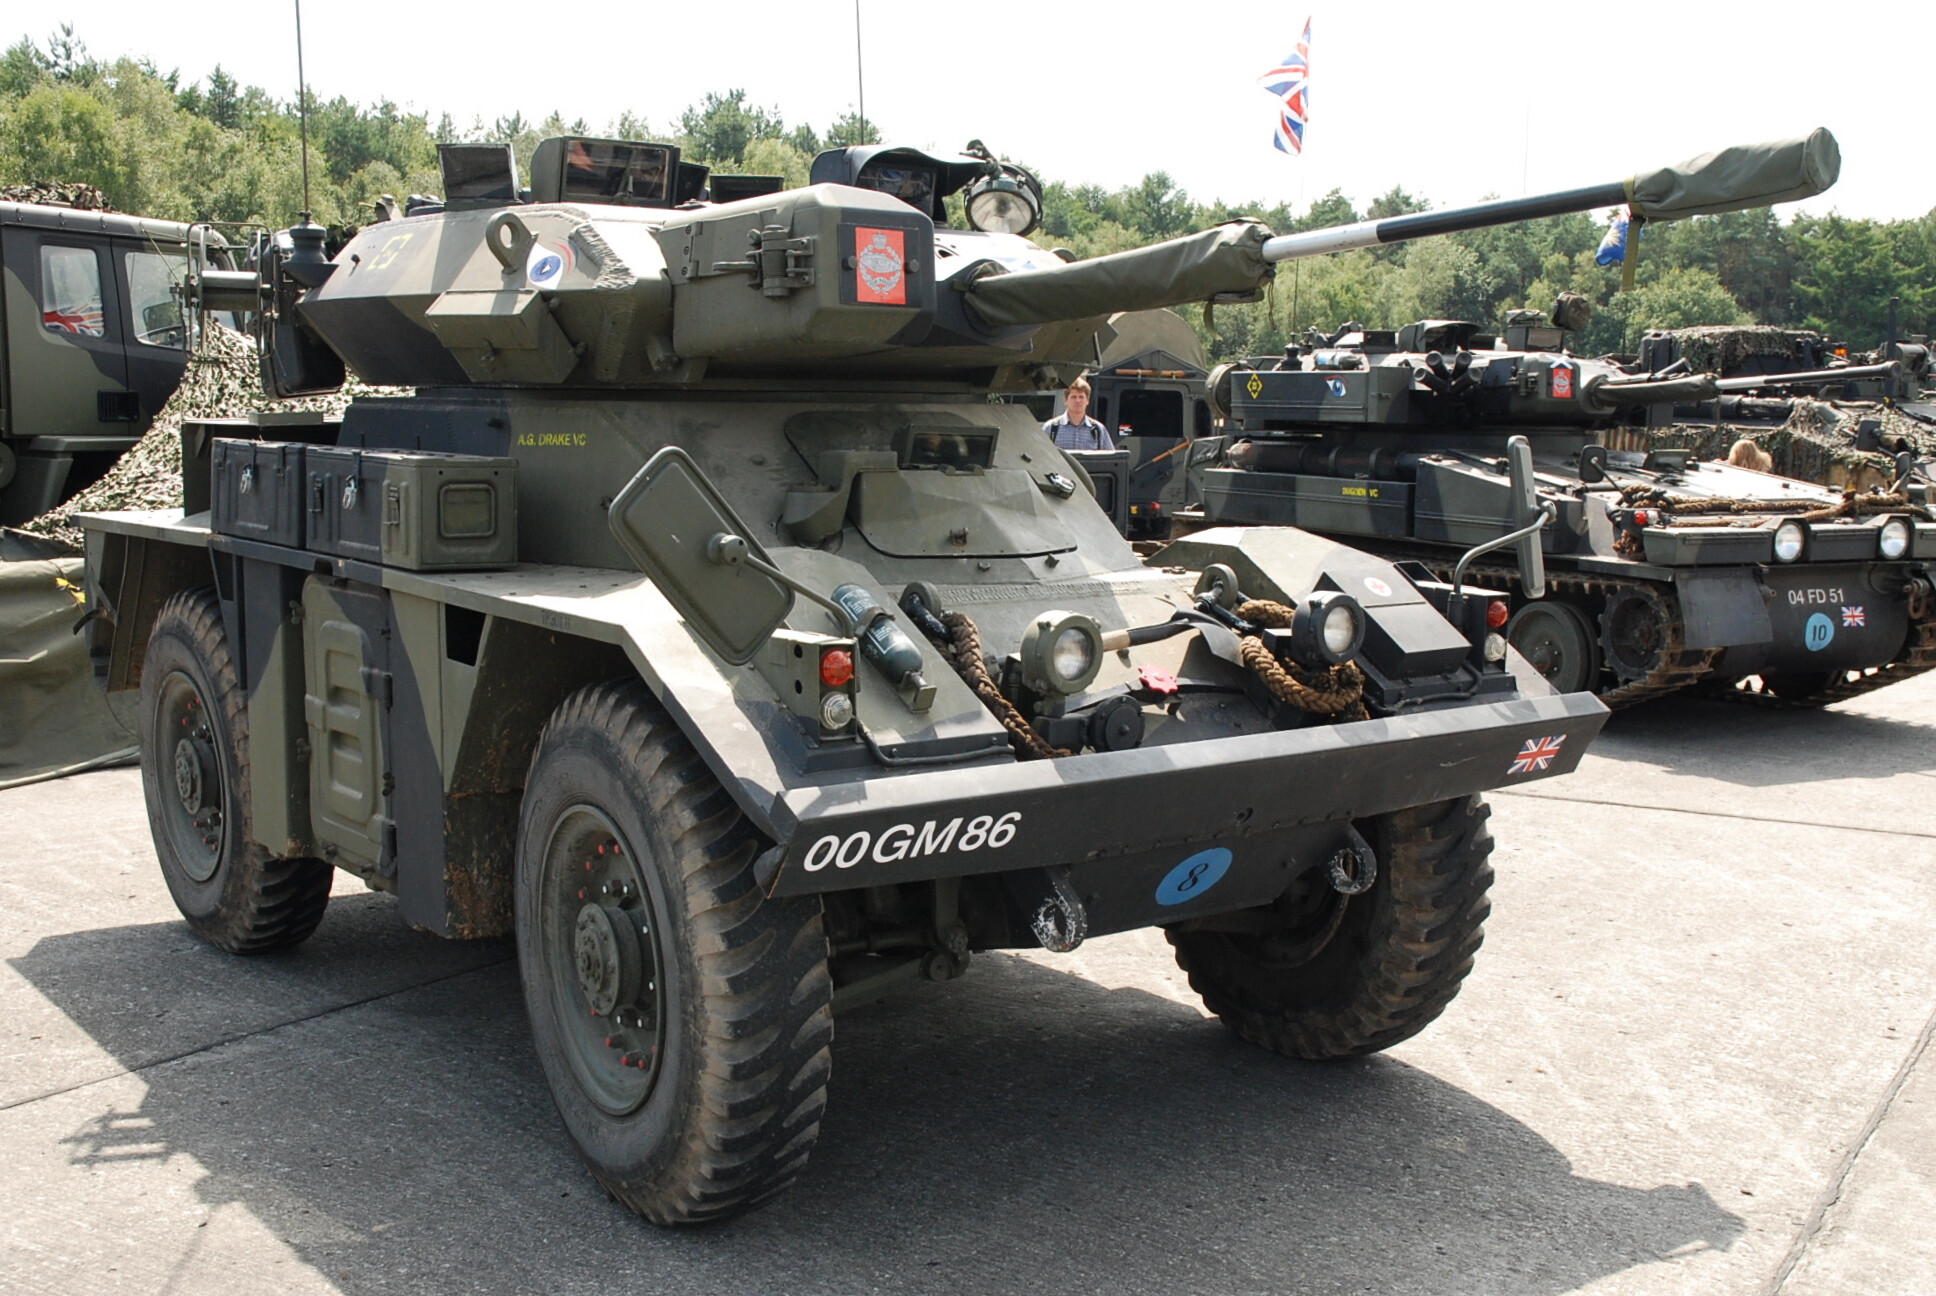
Fox
The first vehicle to be fitted with the RARDEN was the FV721 Fox — a development of the 1950s Ferret scout car. The Fox entered British service in 1974, and 180 served with the British Army in the armed reconnaissance role. Another 145 were exported, and some are still in use today.
FV432/30
Another mount was a variant of the FV432 Armoured Personnel Carrier. A Fox turret was bolted onto a slightly modified 432 hull to enable it to provide fire support to the troops that it would carry into battle. Initial tests of the FV432/30 had mixed results, and due to excessive vibrations and blast damage when firing, the turret had to be raised 3 inches above the hull, giving the “RARDEN Ripper” a somewhat peculiar “neck”.
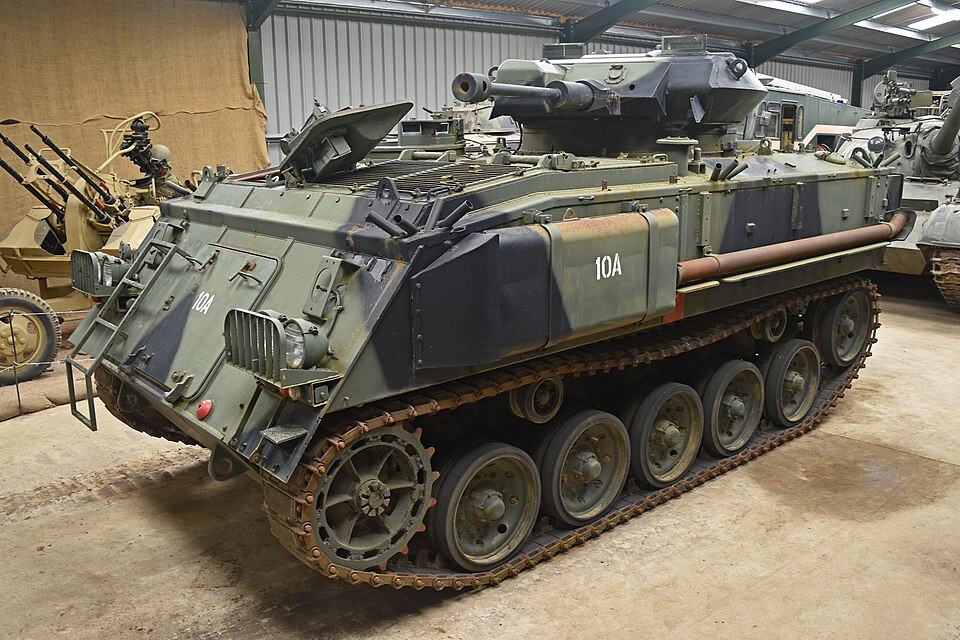
Due to the British Army’s reluctance to deploy its Chieftain Main Battle Tanks to the enclave of West Berlin, vehicles such as the FV432/30 were created to provide British forces with armoured support which was capable of fighting effectively in tight city spaces against the expected swarms of BMPs. Officially 13 FV432/30s were built, and they saw service for many years in West Berlin and with the training units in the UK. They were downgraded to playing OPFOR on training exercises in the 2000s before many, if not all, were acquired by private owners, notably including a paintball venue.
CVR (T)
The RARDEN has a long and storied relationship with the British Army’s famous Combat Vehicle Reconnaissance (Tracked), or CVR (T), series of vehicles. The first variant to tote the RARDEN was the FV107 Scimitar. This variant saw service all over the world, from the icy marshes of the Falklands to the burning deserts of Iraq. Impressively, the Scimitars of the Blues and Royals regiment are credited with downing two Argentinian jets during the Falklands War, and Scimitars from the Queen’s Royal Hussars knocked out several Iraqi T-62s during the first Gulf War. This is a tribute to the solid design of the RARDEN that it was still capable of doing what it was designed to do 20-30 years after its inception.
The Scimitar was joined by the hybrid Sabre, which used a refurbished FV101 Scorpion hull fitted with a Fox’s turret. These were fewer in number than the Scimitars but saw equally wide service. The final CVR (T) to carry the RARDEN was the FV107 Scimitar Mk.II which used a modified hull from the FV103 Spartan APC and the turret from a Scimitar Mk.I to create a vehicle that was much more resistant to mine and IED blasts for the asymmetrical warfare in Afghanistan and Iraq.
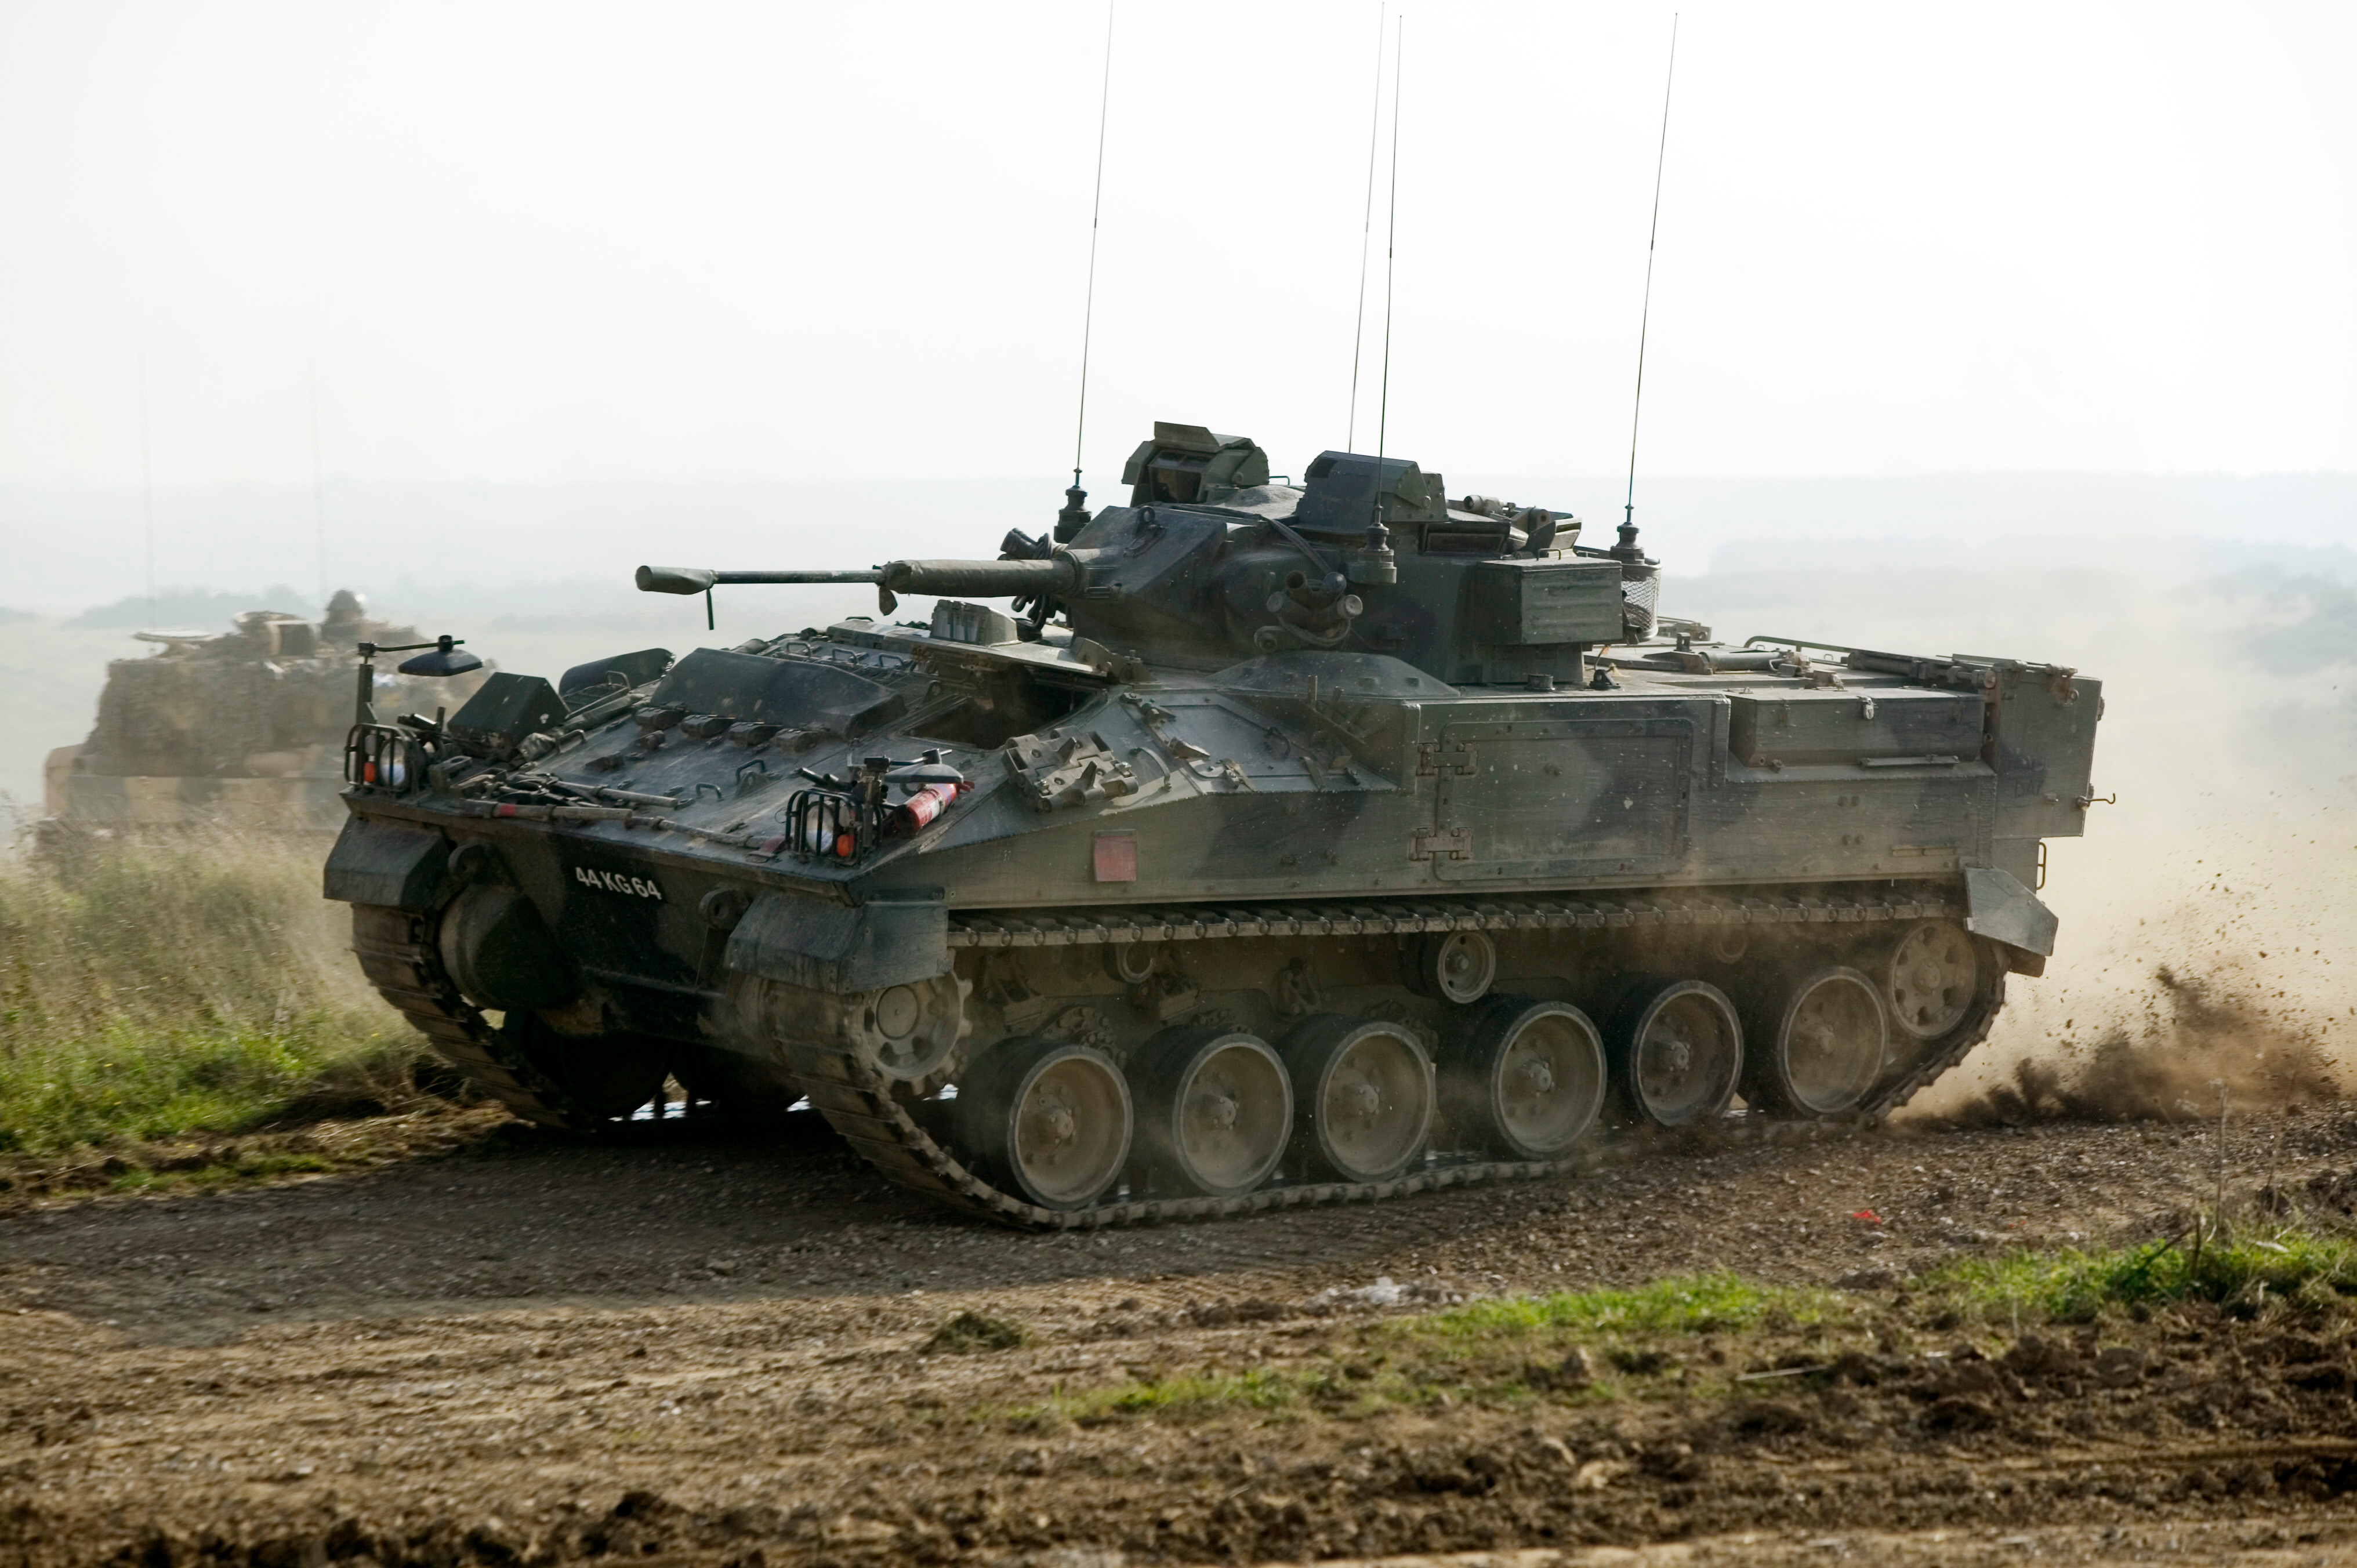
Warrior
Finally, the now venerable FV510 Warrior Infantry Fighting Vehicle was one of the last vehicles to be equipped with the RARDEN. It entered service in 1974 and is still serving in the British Army to this day. The Warrior has seen extensive service from Bosnia to Afghanistan, where its good protection, mobility, and firepower make it a valuable asset. In Bosnia in particular, their intimidating size was a good complement to the diminutive, yet nimble, Scimitars.
Current Service
Although there have been many attempts over the decades to replace the RARDEN and the vehicles to which it is attached, none have yet borne much fruit. The Ajax programme, which is to replace the CVR (T)s, continues to be hugely over-budget, unreliable, and unsafe and, at the time of writing, 6 years behind schedule. BAe and Rheinmetall have put forward modernisation packages for the Warrior, giving it a new turret and gun, but the latest ones are still in relatively early stages of development. So, it seems that the RARDEN will continue to soldier on for many years to come.
The Crew’s View
Many crews were positive about the RARDEN, appreciating its accuracy and power. Some crews reported being able to land their first shots on target at distances of up to 1.8-2 km with a skilled gunner. Crews also enjoyed the power of the gun, as it allowed them to deal with most threats quickly, whether armoured, infantry, or static — many buildings in Afghan and Iraq were levelled by 30 mm shells.
The 6-7 round automatic fire limit drew some criticism — particularly from crews who had to engage aircraft or helicopters — as being rather a hindrance, but as the RARDEN was credited with two aerial kills in the Falklands, most crews were largely satisfied with their weapons and the vehicles to which they were attached.
One thing of note is that due to the RARDEN’s 3-round feeding mechanism, if only one or two rounds were fired, the gun would have to be unloaded before more clips could be loaded. Otherwise, there would be a gap in the ammunition feed, leading to the gun ceasing to operate. Crews were typically taught that engagements should be of three rounds, and the commander had to keep track of how many rounds had been fired, as a gap in the ammunition feed leading to a manual unloading process could cost valuable time. This became more of an issue in the asymmetrical warfare of Iraq and Afghanistan, where a gunner might only use one HE round to deal with an enemy with an RPG. Some crews took to keeping loose rounds in the turret to fill in the gaps caused by one- or two-round engagements.
Usage in War Thunder
Using the RARDEN in War Thunder can be a tricky experience at times. Before the potent APDS rounds are unlocked, you are (mostly) limited to fighting other light tanks and SPAAs. The APDS allows you to more consistently and easily tackle a wider array of targets but still takes a bit of getting used to, and many targets can be a challenge to deal with.

Brawling/ Flanking
The RARDEN is universally mounted on light tanks, which on the whole are fast and nippy enough to pull off successful flanks. The Fox in particular is infamous for its flanking prowess. Getting alongside enemy tanks is where the RARDEN is most effective. Its rounds generally hit hard, and when aimed well, can one- or two-tap a wide variety of targets.
The stock APHE is most effective at dealing with light vehicles — a single shell can and will one-tap many SPAAs or IFVs. However, you can still punch through targets you might not expect to be able to penetrate, often doing more damage than the APDS would.
Beware, however, of the low rate of fire and the propensity of the Fox and Scimitar to sway considerably during firing. The low fire rate may not give you enough shots to disable or knock out an enemy before they can return fire, and the sway can cause you to miss shots and weak spots, costing you valuable time.
Sniping
Surprisingly for an autocannon, the RARDEN can be used as a reasonably effective sniping weapon. This tactic works best with the Warrior due to its laser rangefinder and stable hull — the Fox and Scimitar tend to wobble too much. The powerful weapon is more than capable of knocking out certain targets from over 1km away. Using the APDS is recommended as it’s more likely you’ll be able to penetrate at long ranges, though the APHE can be used against lightly armoured targets for a quicker kill.
Targets of Note
Russian MBTs
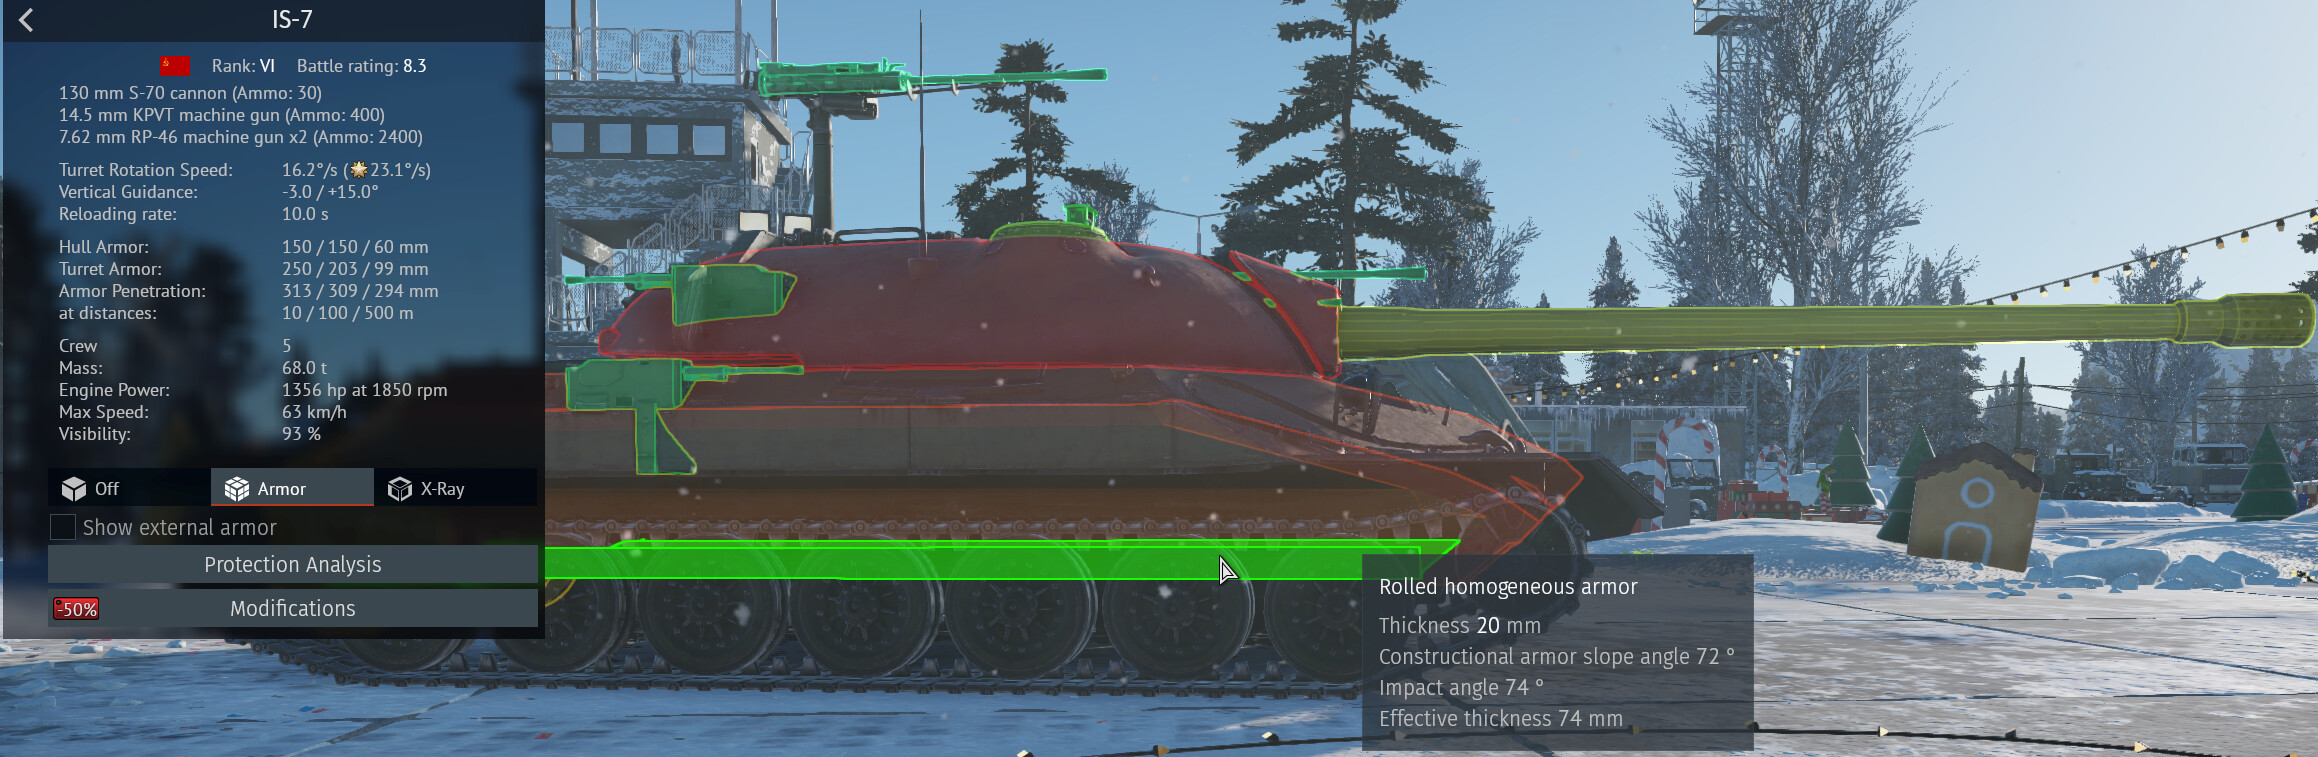
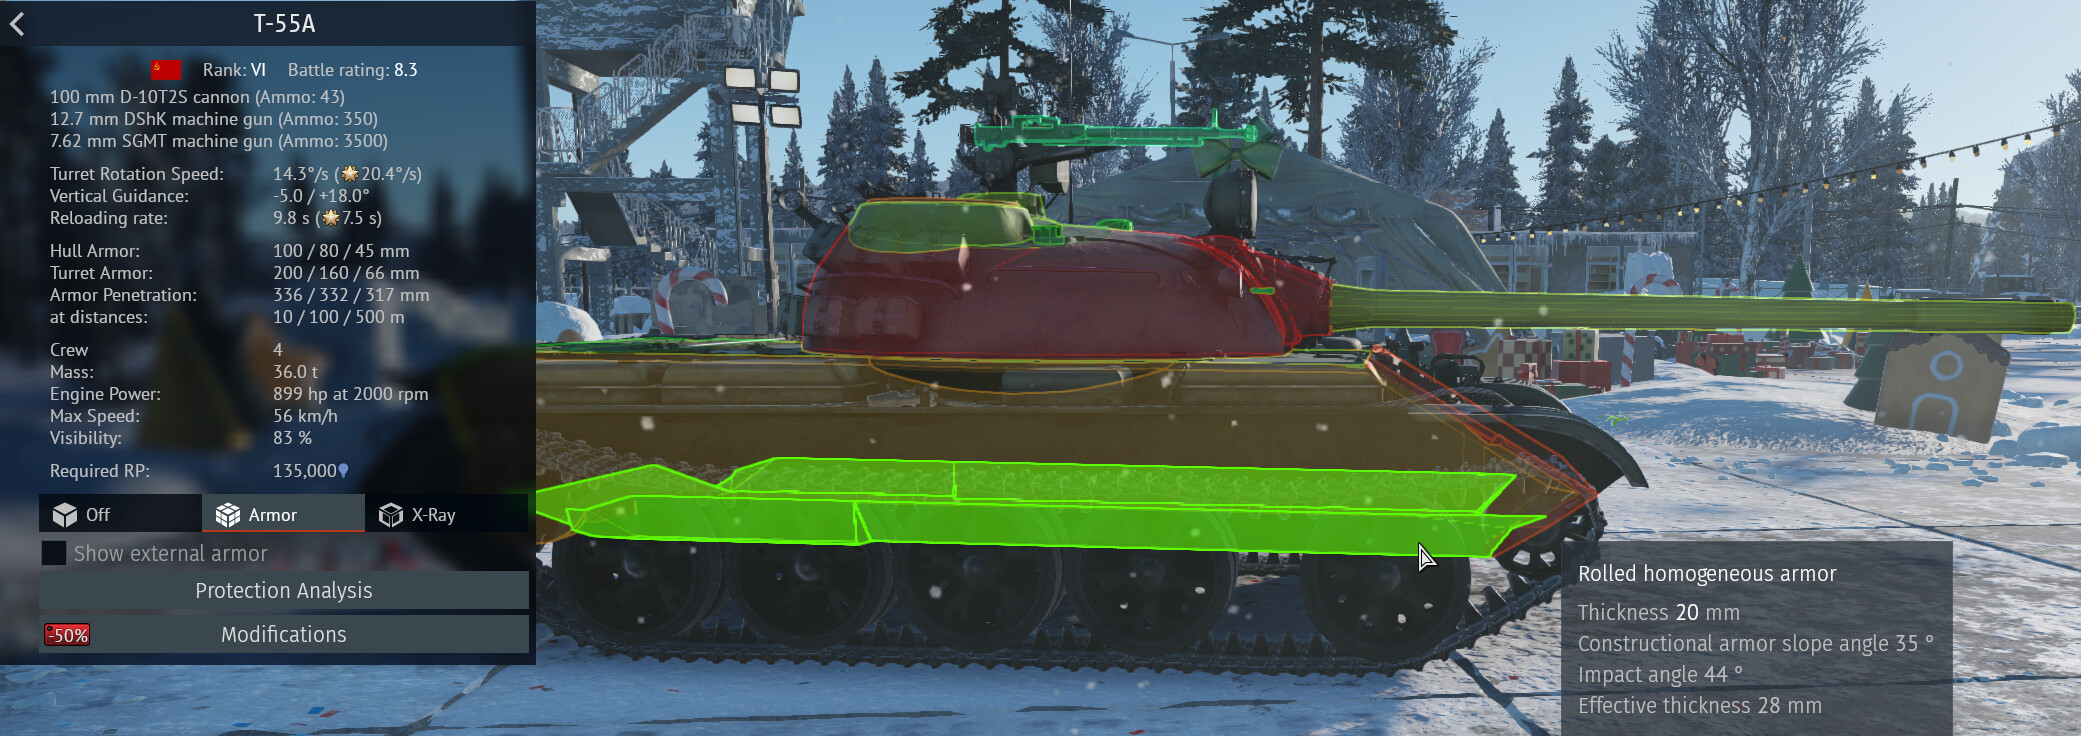
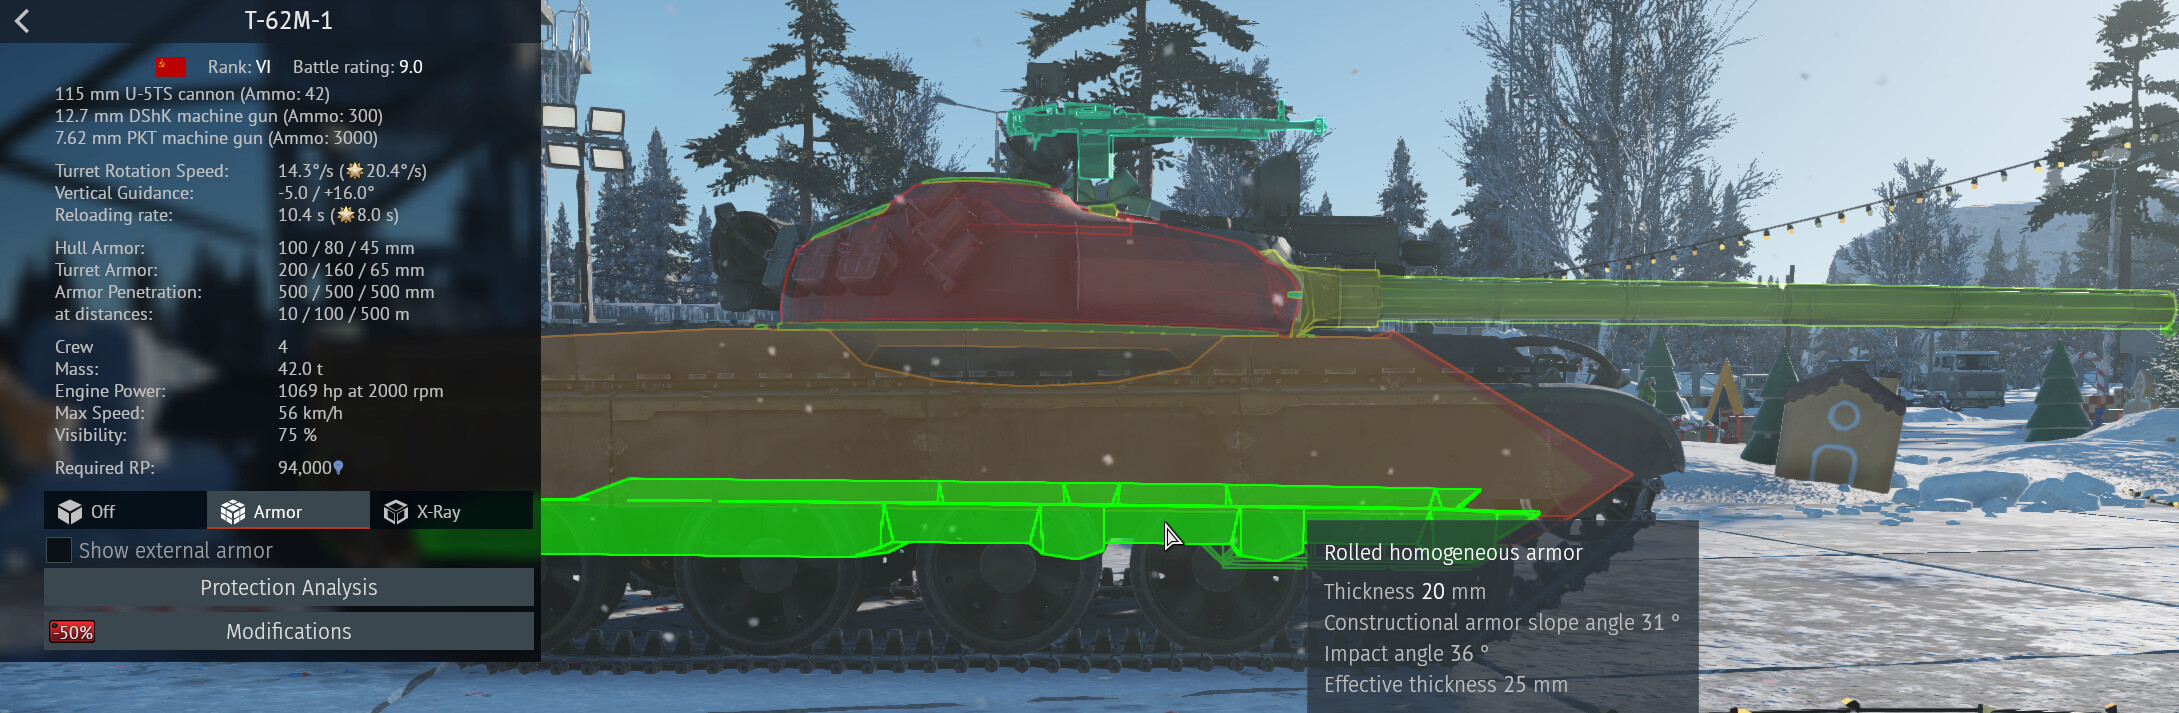
From the T-54 onwards, every Russian MBT has a particular weak spot that can be well exploited. The lower sides of the hull are only 20mm thick. This means that the RARDEN’s shells can easily penetrate and, if aimed under the turret, can achieve a kill in 1-2 shots, either by knocking out the turret crew or by detonating the ammunition carousel. I find the APHE to be the most effective round here. However, be careful if you’re attacking from the right of the tank, as the fuel tanks shield the driver. The rear of the turret on almost every Russian tank — even some of the heavy tanks — can also be penetrated with APDS.
Two further weak spots on Russian mediums are the hatches atop the turret. These can be penetrated easily by the APHE or APDS rounds if struck from slightly above, knocking out the turret crew.
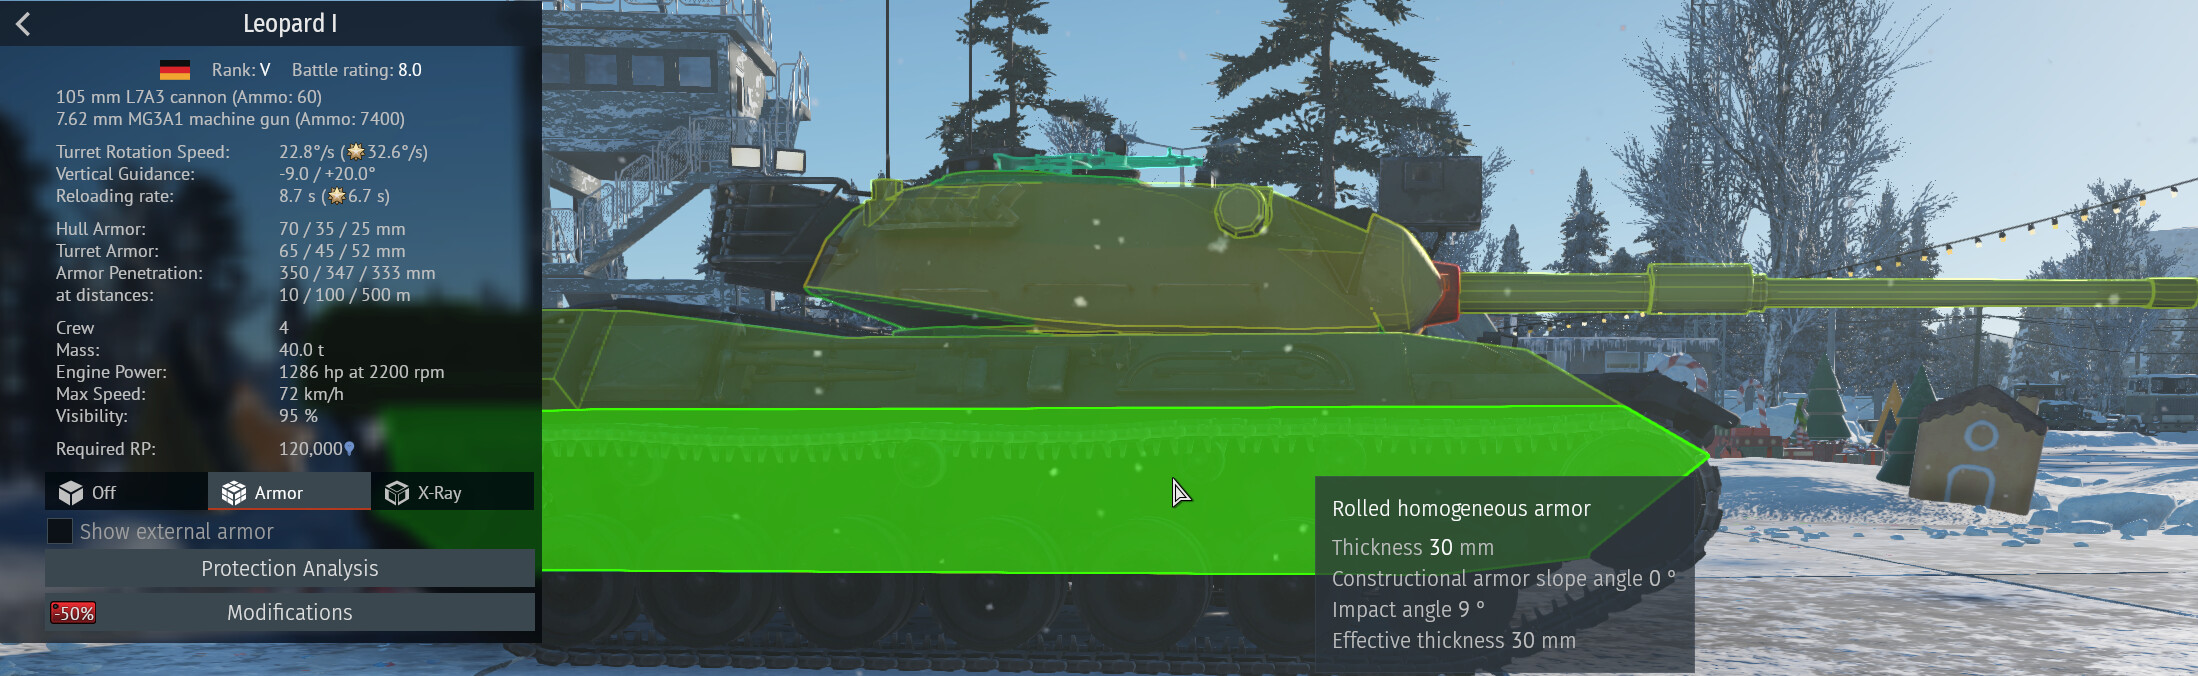
Leopards
These tanks are comparatively easy to penetrate from most angles with the APDS, though the well-angled upper front plate can cause problems. It usually pays to aim for the turret or slightly under, giving you a good chance of knocking out the crew or setting off the ammo in the hull.
American Heavies
These are routinely some of the toughest nuts to crack for any RARDEN-armed vehicle, especially if you haven’t got any missiles. Most of these tanks are essentially impenetrable from almost all angles, especially the turrets which routinely have upwards of 80mm on all sides. The hull sides are technically vulnerable, but, in my experience, the intricate suspension systems can cause shells to shatter or bounce in unusual ways — especially if either you or the target are moving — preventing a quick kill.
Although one can reliably punch through the rear of the hull and knock out the engine with APDS, killing these tanks from anywhere other than point-blank range is very difficult. Combined with the multitudinous .50cals, which can easily chew through your lightly armoured tank, it is advisable to avoid these machines where possible, unless you are very confident or have managed to get the jump on them.
PzH 2000s and Similar SPGs
These vehicles are some of the most dangerous enemies on the battlefield due to their fast reload and powerful proximity-fused shells. They can be easily penetrated by the RARDEN, but due to their large internal space, killing them with APDS can be very tricky, and switching to APHE is easily overlooked in the heat of battle. It is often best to try and knock out the cannon breech first rather than aiming for crew. Once you are sure the SPG has been disabled, you can finish it off by taking out individual crew members with your shot or shell of choice. Note that the APDS rounds seem to do very little damage to the ammo stored in these vehicles, which is a little frustrating at times.
SPAAs
These vehicles are universally capable of shredding any of the RARDEN-equipped vehicles in-game. When facing vehicles such as the Gepard frontally, it usually pays to aim for the centre of the turret, where you will be very likely to knock out the Fire Control System and/or turret crew, which will at least disable your opponent, if not give you the kill.
Final Thoughts
The RARDEN is a peculiar weapon, created, like many Cold War-era British vehicles and weapons, to be exceptional at one thing above all else. Like the Chieftain had its formidable armour and the Scimitar had its speed and small size, the RARDEN was very good at hitting and killing whatever it was pointed at, even from a long way away. It gave British light armour units a powerful and surprisingly versatile weapon that proved to be extremely useful in the conflicts that the British Armed Forces found themselves in the late Cold War and early 2000s. In-game, the RARDEN can be a difficult weapon to use in the hectic situations a light-tank player usually finds themselves in, but once one has gotten used to its quirks, it becomes at least as deadly as faster-firing autocannons found on other vehicles. Many, myself included, enjoy the RARDEN and the vehicles it’s mounted on immensely and can often be found whizzing around maps, plinking away at much heavier vehicles with glee.
Bibliography
Tanks and AFV News (2017). From the Vault: The RARDEN Cannon
Anon (?) Army Guide L21A1 RARDEN [Accessed 19/12/2025]


