Difference between revisions of "Do 17 Z-7"
(New Specs-Card Artimage. Old picture moved to Media: Images) |
m (→Pros and cons) (Tag: Visual edit) |
||
| (41 intermediate revisions by 17 users not shown) | |||
| Line 1: | Line 1: | ||
| − | {{ | + | {{Specs-Card|code=do_17z_7}} |
| − | | about | + | {{Notice|''This page is about the aircraft '''{{PAGENAME}}'''. For other uses, see [[Do_17_(Disambiguation)|Do 17 (Disambiguation)]]''}} |
| − | |||
| − | | | ||
| − | |||
| − | |||
| − | |||
| − | |||
| − | }} | ||
| − | |||
== Description == | == Description == | ||
| − | <!-- ''In the description, the first part | + | <!--''In the description, the first part needs to be about the history of and the creation and combat usage of the aircraft, as well as its key features. In the second part, tell the reader about the aircraft in the game. Insert a screenshot of the vehicle. If the novice player does not remember the vehicle by name, he will immediately understand what kind of vehicle it is talking about.''--> |
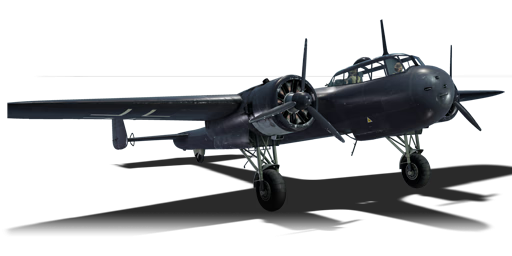
| − | The '''{{Specs|name}}''' is a | + | [[File:GarageImage_Do17Z7.jpg|420px|thumb|left]] |
| + | {{break}} | ||
| + | The '''{{Specs|name}}''' is a Rank {{Specs|rank}} German twin-engine fighter {{Battle-rating|5}}. It was introduced in [[Update_1.53_"Firestorm"|Update 1.53 "Firestorm"]]. | ||
== General info == | == General info == | ||
| − | === Flight | + | === Flight Performance === |
| − | + | <!--''Describe how the aircraft behaves in the air. Maximum speed, maneuverability, speed and allowable loads - these are the most important characteristics of the vehicle.''--> | |
| − | <!-- ''Describe how the aircraft behaves in the air. | + | {| class="wikitable" style="text-align:center" |
| − | + | |- | |
| − | + | ! colspan="8" | Characteristics | |
| − | {| class="wikitable" style="text-align:center" | + | |- |
| − | ! | + | ! colspan="8" | ''Stock'' |
| + | |- | ||
! colspan="2" | Max Speed<br>(km/h at 5,000 m) | ! colspan="2" | Max Speed<br>(km/h at 5,000 m) | ||
| − | ! rowspan="2" | Max altitude<br>( | + | ! rowspan="2" | Max altitude<br>(meters) |
! colspan="2" | Turn time<br>(seconds) | ! colspan="2" | Turn time<br>(seconds) | ||
| − | ! colspan="2" | Rate of climb<br>( | + | ! colspan="2" | Rate of climb<br>(meters/second) |
| − | ! rowspan="2" | Take-off run<br>( | + | ! rowspan="2" |Take-off run<br>(meters) |
|- | |- | ||
| − | ! AB | + | ! AB |
| + | ! RB | ||
| + | ! AB | ||
| + | ! RB | ||
| + | ! AB | ||
| + | ! RB | ||
|- | |- | ||
| − | + | | 416 || 410 || 8,500 || 36.0 || 37.2 || 5.0 || 6.4 || 350 | |
| − | | | ||
|- | |- | ||
| − | ! Upgraded | + | ! colspan="8" | ''Upgraded'' |
| − | | | + | |- |
| + | ! colspan="2" | Max Speed<br>(km/h at 5,000 m) | ||
| + | ! rowspan="2" |Max altitude (meters) | ||
| + | ! colspan="2" | Turn time (seconds) | ||
| + | ! colspan="2" | Rate of climb<br>(meters/second) | ||
| + | ! rowspan="2" |Take-off run (meters) | ||
| + | |- | ||
| + | ! AB | ||
| + | ! RB | ||
| + | ! AB | ||
| + | ! RB | ||
| + | ! AB | ||
| + | ! RB | ||
| + | |- | ||
| + | | 482 || 448 || 8,500 || 32.1 || 34.0 || 18.2 || 10.0 || 350 | ||
|- | |- | ||
|} | |} | ||
| − | ==== Details ==== | + | ====Details==== |
| − | {| class="wikitable" style="text-align:center | + | {| class="wikitable" style="text-align:center" |
|- | |- | ||
! colspan="5" | Features | ! colspan="5" | Features | ||
|- | |- | ||
| − | ! Combat | + | ! Combat flap |
| + | ! Take-off flap | ||
| + | ! Landing flap | ||
| + | ! Air brakes | ||
| + | ! Arrestor gear | ||
|- | |- | ||
| ✓ || ✓ || ✓ || X || X <!-- ✓ --> | | ✓ || ✓ || ✓ || X || X <!-- ✓ --> | ||
| Line 48: | Line 65: | ||
|} | |} | ||
| − | {| class="wikitable" style="text-align:center | + | {| class="wikitable" style="text-align:center" |
|- | |- | ||
| − | ! colspan=" | + | ! colspan="5" | Limits |
|- | |- | ||
| − | ! rowspan="2" | | + | ! rowspan="2" | Wing-break speed<br>(km/h) |
| − | ! rowspan="2" | Gear (km/h) | + | ! rowspan="2" | Gear limit<br>(km/h) |
| − | ! | + | ! rowspan="2" | Combat flap<br> (km/h) |
! colspan="2" | Max Static G | ! colspan="2" | Max Static G | ||
|- | |- | ||
| − | + | ! + | |
| + | ! - | ||
|- | |- | ||
| − | | | + | | 620 || 350 || 500 || ~3 || ~1 |
|- | |- | ||
|} | |} | ||
| Line 65: | Line 83: | ||
{| class="wikitable" style="text-align:center" | {| class="wikitable" style="text-align:center" | ||
|- | |- | ||
| − | ! colspan="4" | Optimal velocities | + | ! colspan="4" | Optimal velocities |
|- | |- | ||
| − | ! Ailerons | + | ! Ailerons<br>(km/h) |
| + | ! Rudder<br>(km/h) | ||
| + | ! Elevators<br>(km/h) | ||
| + | ! Radiator<br>(km/h) | ||
|- | |- | ||
| − | | < 290 || < 300 || < 300 || > | + | | < 290 || < 300 || < 300 || > 140 |
|- | |- | ||
|} | |} | ||
| Line 83: | Line 104: | ||
! WEP Engine power | ! WEP Engine power | ||
|- | |- | ||
| − | | 1,600 m || | + | | 1,600 m || 1,630 hp || 2,236 hp |
|- | |- | ||
! colspan="3" | Setting 2 | ! colspan="3" | Setting 2 | ||
| Line 91: | Line 112: | ||
! WEP Engine power | ! WEP Engine power | ||
|- | |- | ||
| − | | 4,300 m || | + | | 4,300 m || 1,560 hp || 2,140 hp |
|- | |- | ||
| + | <!--! colspan="3" | Setting 3 | ||
| + | |- | ||
| + | ! Optimal altitude | ||
| + | ! 100% Engine power | ||
| + | ! WEP Engine power | ||
| + | |- | ||
| + | | ?,??? m || ?,??? hp || ?,??? hp | ||
| + | |- --> | ||
|} | |} | ||
=== Survivability and armour === | === Survivability and armour === | ||
| − | + | <!--''Examine the survivability of the aircraft. Note how vulnerable the structure is and how secure the pilot is, whether the fuel tanks are armoured. Describe the armour, if there is any, also mention the vulnerability of other critical aircraft systems.''--> | |
| − | <!-- ''Examine the survivability of the aircraft. Note how vulnerable the structure is and how secure the pilot is, whether the fuel tanks are armoured | ||
* 8.5 mm Steel - Fore-cockpit plate | * 8.5 mm Steel - Fore-cockpit plate | ||
* 8.5 mm Steel - Pilot's seat | * 8.5 mm Steel - Pilot's seat | ||
| − | |||
* 6 mm Steel - Belly gunner's plate | * 6 mm Steel - Belly gunner's plate | ||
* 8.5 mm Steel - Rear cockpit plate | * 8.5 mm Steel - Rear cockpit plate | ||
* 6 mm Steel - Rear gunner's upper plate | * 6 mm Steel - Rear gunner's upper plate | ||
* 6 mm Steel - Rear gunner's window frame | * 6 mm Steel - Rear gunner's window frame | ||
| − | |||
| − | |||
| − | |||
== Armaments == | == Armaments == | ||
| − | |||
=== Offensive armament === | === Offensive armament === | ||
| − | + | <!--''Describe the offensive armament of the aircraft, if any. Describe how effective the cannons and machine guns are in a battle, and also what belts or drums are better to use. If there is no offensive weaponry, delete this subsection.''--> | |
| − | <!-- ''Describe the offensive armament of the aircraft, if any. Describe how effective the cannons and machine guns are in a battle, and also what belts or drums are better to use. If there is no offensive weaponry, delete this subsection.'' --> | + | {{main|MG 151/20 (20 mm)|MG 17 (7.92 mm)}} |
| − | {{main|MG 151 (20 mm)|MG 17 (7.92 mm)}} | ||
The '''''{{PAGENAME}}''''' is armed with: | The '''''{{PAGENAME}}''''' is armed with: | ||
* 1 x 20 mm MG 151 cannon, nose-mounted (400 rpg) | * 1 x 20 mm MG 151 cannon, nose-mounted (400 rpg) | ||
| − | * 3 x 7.92 mm MG 17 | + | * 3 x 7.92 mm MG 17, nose-mounted (1,000 rpg = 3,000 total) |
=== Suspended armament === | === Suspended armament === | ||
| − | + | <!--''Describe the aircraft's suspended armament: additional cannons under the wings, bombs, rockets and torpedoes. This section is especially important for bombers and attackers. If there is no suspended weaponry remove this subsection.''--> | |
| − | <!-- ''Describe the aircraft's suspended armament: additional cannons under the wings, bombs, rockets and torpedoes. This section is especially important for bombers and attackers. If there is no suspended weaponry remove this subsection.'' --> | + | {{main|SC50JA (50 kg)|SC250JA (250 kg)}} |
| − | {{main|SC50JA (50 kg)|SC250JA (250 kg) | ||
| − | The '''''{{PAGENAME}}''''' can be outfitted with the following | + | The '''''{{PAGENAME}}''''' can be outfitted with the following ordinance: |
| − | + | * 10 x 50 kg SC50JA bombs (2,500 kg total) | |
| − | * 10 x 50 kg SC50JA bombs (500 kg total) | ||
* 1 x 250 kg SC250JA bomb (250 kg total) | * 1 x 250 kg SC250JA bomb (250 kg total) | ||
| − | |||
=== Defensive armament === | === Defensive armament === | ||
| − | + | <!--''Defensive armament with turret machine guns or cannons, crewed by gunners. Examine the number of gunners and what belts or drums are better to use. If defensive weaponry is not available remove this subsection.''--> | |
| − | <!-- ''Defensive armament with turret machine guns or cannons, crewed by gunners. Examine the number of gunners and what belts or drums are better to use. If defensive weaponry is not available | + | {{main|MG 17 (7.92 mm)}} |
| − | {{main|MG | ||
The '''''{{PAGENAME}}''''' is defended by: | The '''''{{PAGENAME}}''''' is defended by: | ||
| − | * 1 x 7.92 mm MG | + | * 1 x 7.92 mm MG 17 machine gun, dorsal turret (750 rpg) |
| − | * 1 x 7.92 mm MG | + | * 1 x 7.92 mm MG 17 machine gun, ventral turret (375 rpg) |
== Usage in battles == | == Usage in battles == | ||
| − | <!-- ''Describe the tactics of playing in | + | <!--''Describe the tactics of playing in an aircraft, the features of using vehicles in a team and advice on tactics. Refrain from creating a "guide" - do not impose a single point of view but give the reader food for thought. Examine the most dangerous enemies and give recommendations on fighting them. If necessary, note the specifics of the game in different modes (AB, RB, SB).''--> |
| − | The Do 17 Z-7 is the first twin-engine heavy fighter that is unlocked in a long line of German "Zerstörer" ( | + | The Do 17 Z-7 is the first twin-engine heavy fighter that is unlocked in a long line of German "Zerstörer" (''German for "Heavy fighter"'') aircraft. Like all of it's successors, the Do 17 Z-7 is a full-bred Boom & Zoom fighter, through and through. This means the Do 17 should, under any circumstance always strive to maintain an altitude advantage over enemy aircraft. Utilize the potential energy to dive on them and make a high speed pass while firing, then quickly make an escape. There is however, a couple of caveats for the Do 17 Z-7 that is worth considering when flying it. For starters, it's energy retention and climb rate is bad and mediocre at best. So begin to climb to altitude immediately making a 2nd pass will generally be a bad idea, as it will attract a lot planes with ample opportunity to return fire. Instead, utilize the high air speed from the dive, to gain as much horizontal distance from enemy planes as possible before starting to climb. Also, remember to never commit to chasing after a specific plane since the plane will lose too much speed and energy in doing so. Pick out a target from high altitude, roll over and dive down in a vertical position as soon as possible, in order to maximize the altitude-speed trade off. When at first possible moment get a gun solution on the target, and once the solution is lost, level the plane out and speed away at high speed, potentially destroying other players that may cross the path along the way with the same principle. |
| − | + | The Do 17 Z-7's primary source of damage comes with it's single 20 mm MG 151 cannon. While not spitting as much lead downrange as the Bf-110's dual MG FF/M's do. It makes up for it by having access to the MG 151's air target belt, which contains a lot more minengeschoß, which is highly effective against unarmoured planes, which the Do 17 Z-7 will regularly face. While the MG 15's also can do some damage to biplanes, any aware fighter pilot will be able to move away from the gun sight and end up on the Do 17's tail, if solely using the machine guns. | |
| − | The | + | The best way to deal with this plane is to fly fast and aim for the engines. Don't tail right behind the plane because then the gunner will have an easy target. If ailing behind the plane, dip down a little bit, the gunner at the top won't be able to hit the plane this way and the gunner at the bottom is pointed down to much. At this battle rating, there are a lot of newer players, who most likely didn't put points into the gunners vitality. If the gunners are taken out, then the plane is a flying duck. Avoid a head-on at all cost, it has armour at the front and a 20 mm cannon which will shred any plane to bits. This plane cannot turn fight, if it's behind tailing the plane, then simply turn sharply to one direction. If in a bomber it's best to aim for the engines and not the cockpit, the cockpit has 58 mm of armour angled, it would be difficult for bullets to go through and snipe the pilot. |
| − | + | ===Manual Engine Control=== | |
| − | |||
| − | |||
| − | |||
| − | |||
| − | |||
| − | |||
| − | === Manual Engine Control === | ||
{| class="wikitable" style="text-align:center" | {| class="wikitable" style="text-align:center" | ||
|- | |- | ||
! colspan="7" | MEC elements | ! colspan="7" | MEC elements | ||
|- | |- | ||
| − | ! rowspan="2" | Mixer | + | ! rowspan="2" |Mixer |
| − | ! rowspan="2" | Pitch | + | ! rowspan="2" |Pitch |
| − | ! colspan="3" | Radiator | + | ! colspan="3" |Radiator |
| − | ! rowspan="2" | Supercharger | + | ! rowspan="2" |Supercharger |
| − | ! rowspan="2" | Turbocharger | + | ! rowspan="2" |Turbocharger |
| + | |- | ||
| + | ! Oil | ||
| + | ! Water | ||
| + | ! Type | ||
| + | |- | ||
| + | | Controllable || rowspan="2" | Not controllable || rowspan="2" | Not controllable || rowspan="2" | Not controllable || rowspan="2" | Separate || rowspan="2" | Not ontrollable || rowspan="2" | Not controllable | ||
| + | |- | ||
| + | |} | ||
| + | |||
| + | ===Modules=== | ||
| + | {| class="wikitable" | ||
| + | ! Tier | ||
| + | ! Flight performance | ||
| + | ! Survivability | ||
| + | ! Weaponry | ||
| + | |- | ||
| + | | I | ||
| + | | Fuselage Repair, Radiator | ||
| + | | | ||
| + | | Offensive 7 mm | ||
| + | |- | ||
| + | | II | ||
| + | | Compressor | ||
| + | | Airframe | ||
| + | | Turret 7 mm, EHVC 500 | ||
|- | |- | ||
| − | + | | III | |
| + | | Wing Repair, Engine | ||
| + | | | ||
| + | | New 7 mm MGs, Offensive 20 mm | ||
|- | |- | ||
| − | | | + | | IV |
| + | | Engine Injection | ||
| + | | Cover | ||
| + | | New 7 mm MGs (turret), New 20 mm Cannons | ||
|- | |- | ||
|} | |} | ||
=== Pros and cons === | === Pros and cons === | ||
| − | <!-- '' | + | <!--''Summarize and briefly evaluate the vehicle in terms of its characteristics and combat effectiveness. Mark its pros and cons in the bulleted list. Try not to use more than 6 points for each of the characteristics. Avoid using categorical definitions such as "bad", "good" and the like - they have a substitution in the form of softer "inadequate", "effective".''--> |
| − | |||
'''Pros:''' | '''Pros:''' | ||
| − | * Exclusively nose-mounted armament, resulting in very little | + | * Exclusively nose-mounted armament, resulting in very little convergence. |
| − | * Can take a lot of machine gun fire before going down | + | * Can take a lot of machine gun fire before going down. |
* Armed with an 20 mm MG 151, capable of using the air targets belt, giving the plane absolutely devastating firepower | * Armed with an 20 mm MG 151, capable of using the air targets belt, giving the plane absolutely devastating firepower | ||
* 2 x rear gunners for covering both above and below the aircraft | * 2 x rear gunners for covering both above and below the aircraft | ||
| − | |||
| − | |||
| − | |||
'''Cons:''' | '''Cons:''' | ||
| Line 193: | Line 231: | ||
* Mediocre climb rate at best when upgraded | * Mediocre climb rate at best when upgraded | ||
* Slow even when upgraded (Hurricanes will be able to outrun it in level flight) | * Slow even when upgraded (Hurricanes will be able to outrun it in level flight) | ||
| − | * | + | * Horrible roll rate |
| − | * Overall poor handling characteristics | + | * Overall poor handling characteristics. |
* Lousy energy retention | * Lousy energy retention | ||
| − | * Best performs as a Boom & Zoom aircraft, although | + | * Best performs as a Boom & Zoom aircraft, although it's poor flight characteristics makes it inefficient at it. |
| − | * Defensive armament has poor coverage to fend of attacking enemies | + | * Defensive armament has poor coverage and does not produce enough stopping power to reliably fend of attacking enemies. |
| − | * | + | * Tends to burst into flames |
== History == | == History == | ||
| − | + | ''Describe the history of the creation and combat usage of the aircraft in more detail than in the introduction. If the historical reference turns out to be too big, take it to a separate article, taking a link to an article about the vehicle and adding a block "/ History" (example: <nowiki>https://wiki.warthunder.com/(Vehicle-name)/History</nowiki>) and add a link to it here using the <code>main</code> template. Be sure to reference text and sources by using <code><nowiki><ref></nowiki></code>, as well as adding them at the end of the article.'' | |
| − | |||
| − | |||
| − | |||
| − | |||
| − | |||
| − | |||
== Media == | == Media == | ||
| − | + | ''An excellent addition to the article will be video guides, as well as screenshots from the game and photos.'' | |
| − | |||
| − | |||
| − | |||
| − | |||
| − | |||
| − | |||
| − | |||
| − | |||
| − | |||
| − | |||
| − | |||
== See also == | == See also == | ||
| Line 230: | Line 251: | ||
== External links == | == External links == | ||
| − | + | ''Paste links to sources and external resources, such as:'' | |
| + | |||
* ''topic on the official game forum;'' | * ''topic on the official game forum;'' | ||
| − | * ''other literature.'' | + | * ''encyclopedia page on aircraft;'' |
| − | + | * ''other literature.'' | |
| − | |||
| − | |||
{{Germany twin-engine fighters}} | {{Germany twin-engine fighters}} | ||
Revision as of 01:37, 7 April 2019
Contents
| This page is about the aircraft Do 17 Z-7. For other uses, see Do 17 (Disambiguation) |
Description

The Do 17 Z-7 is a Rank I German twin-engine fighter
with a battle rating of 1.7 (AB) and 1.3 (RB/SB). It was introduced in Update 1.53 "Firestorm".
General info
Flight Performance
| Characteristics | |||||||
|---|---|---|---|---|---|---|---|
| Stock | |||||||
| Max Speed (km/h at 5,000 m) |
Max altitude (meters) |
Turn time (seconds) |
Rate of climb (meters/second) |
Take-off run (meters) | |||
| AB | RB | AB | RB | AB | RB | ||
| 416 | 410 | 8,500 | 36.0 | 37.2 | 5.0 | 6.4 | 350 |
| Upgraded | |||||||
| Max Speed (km/h at 5,000 m) |
Max altitude (meters) | Turn time (seconds) | Rate of climb (meters/second) |
Take-off run (meters) | |||
| AB | RB | AB | RB | AB | RB | ||
| 482 | 448 | 8,500 | 32.1 | 34.0 | 18.2 | 10.0 | 350 |
Details
| Features | ||||
|---|---|---|---|---|
| Combat flap | Take-off flap | Landing flap | Air brakes | Arrestor gear |
| ✓ | ✓ | ✓ | X | X |
| Limits | ||||
|---|---|---|---|---|
| Wing-break speed (km/h) |
Gear limit (km/h) |
Combat flap (km/h) |
Max Static G | |
| + | - | |||
| 620 | 350 | 500 | ~3 | ~1 |
| Optimal velocities | |||
|---|---|---|---|
| Ailerons (km/h) |
Rudder (km/h) |
Elevators (km/h) |
Radiator (km/h) |
| < 290 | < 300 | < 300 | > 140 |
| Compressor (RB/SB) | ||
|---|---|---|
| Setting 1 | ||
| Optimal altitude | 100% Engine power | WEP Engine power |
| 1,600 m | 1,630 hp | 2,236 hp |
| Setting 2 | ||
| Optimal altitude | 100% Engine power | WEP Engine power |
| 4,300 m | 1,560 hp | 2,140 hp |
Survivability and armour
- 8.5 mm Steel - Fore-cockpit plate
- 8.5 mm Steel - Pilot's seat
- 6 mm Steel - Belly gunner's plate
- 8.5 mm Steel - Rear cockpit plate
- 6 mm Steel - Rear gunner's upper plate
- 6 mm Steel - Rear gunner's window frame
Armaments
Offensive armament
The Do 17 Z-7 is armed with:
- 1 x 20 mm MG 151 cannon, nose-mounted (400 rpg)
- 3 x 7.92 mm MG 17, nose-mounted (1,000 rpg = 3,000 total)
Suspended armament
The Do 17 Z-7 can be outfitted with the following ordinance:
- 10 x 50 kg SC50JA bombs (2,500 kg total)
- 1 x 250 kg SC250JA bomb (250 kg total)
Defensive armament
The Do 17 Z-7 is defended by:
- 1 x 7.92 mm MG 17 machine gun, dorsal turret (750 rpg)
- 1 x 7.92 mm MG 17 machine gun, ventral turret (375 rpg)
Usage in battles
The Do 17 Z-7 is the first twin-engine heavy fighter that is unlocked in a long line of German "Zerstörer" (German for "Heavy fighter") aircraft. Like all of it's successors, the Do 17 Z-7 is a full-bred Boom & Zoom fighter, through and through. This means the Do 17 should, under any circumstance always strive to maintain an altitude advantage over enemy aircraft. Utilize the potential energy to dive on them and make a high speed pass while firing, then quickly make an escape. There is however, a couple of caveats for the Do 17 Z-7 that is worth considering when flying it. For starters, it's energy retention and climb rate is bad and mediocre at best. So begin to climb to altitude immediately making a 2nd pass will generally be a bad idea, as it will attract a lot planes with ample opportunity to return fire. Instead, utilize the high air speed from the dive, to gain as much horizontal distance from enemy planes as possible before starting to climb. Also, remember to never commit to chasing after a specific plane since the plane will lose too much speed and energy in doing so. Pick out a target from high altitude, roll over and dive down in a vertical position as soon as possible, in order to maximize the altitude-speed trade off. When at first possible moment get a gun solution on the target, and once the solution is lost, level the plane out and speed away at high speed, potentially destroying other players that may cross the path along the way with the same principle.
The Do 17 Z-7's primary source of damage comes with it's single 20 mm MG 151 cannon. While not spitting as much lead downrange as the Bf-110's dual MG FF/M's do. It makes up for it by having access to the MG 151's air target belt, which contains a lot more minengeschoß, which is highly effective against unarmoured planes, which the Do 17 Z-7 will regularly face. While the MG 15's also can do some damage to biplanes, any aware fighter pilot will be able to move away from the gun sight and end up on the Do 17's tail, if solely using the machine guns.
The best way to deal with this plane is to fly fast and aim for the engines. Don't tail right behind the plane because then the gunner will have an easy target. If ailing behind the plane, dip down a little bit, the gunner at the top won't be able to hit the plane this way and the gunner at the bottom is pointed down to much. At this battle rating, there are a lot of newer players, who most likely didn't put points into the gunners vitality. If the gunners are taken out, then the plane is a flying duck. Avoid a head-on at all cost, it has armour at the front and a 20 mm cannon which will shred any plane to bits. This plane cannot turn fight, if it's behind tailing the plane, then simply turn sharply to one direction. If in a bomber it's best to aim for the engines and not the cockpit, the cockpit has 58 mm of armour angled, it would be difficult for bullets to go through and snipe the pilot.
Manual Engine Control
| MEC elements | ||||||
|---|---|---|---|---|---|---|
| Mixer | Pitch | Radiator | Supercharger | Turbocharger | ||
| Oil | Water | Type | ||||
| Controllable | Not controllable | Not controllable | Not controllable | Separate | Not ontrollable | Not controllable |
Modules
| Tier | Flight performance | Survivability | Weaponry |
|---|---|---|---|
| I | Fuselage Repair, Radiator | Offensive 7 mm | |
| II | Compressor | Airframe | Turret 7 mm, EHVC 500 |
| III | Wing Repair, Engine | New 7 mm MGs, Offensive 20 mm | |
| IV | Engine Injection | Cover | New 7 mm MGs (turret), New 20 mm Cannons |
Pros and cons
Pros:
- Exclusively nose-mounted armament, resulting in very little convergence.
- Can take a lot of machine gun fire before going down.
- Armed with an 20 mm MG 151, capable of using the air targets belt, giving the plane absolutely devastating firepower
- 2 x rear gunners for covering both above and below the aircraft
Cons:
- Mediocre climb rate at best when upgraded
- Slow even when upgraded (Hurricanes will be able to outrun it in level flight)
- Horrible roll rate
- Overall poor handling characteristics.
- Lousy energy retention
- Best performs as a Boom & Zoom aircraft, although it's poor flight characteristics makes it inefficient at it.
- Defensive armament has poor coverage and does not produce enough stopping power to reliably fend of attacking enemies.
- Tends to burst into flames
History
Describe the history of the creation and combat usage of the aircraft in more detail than in the introduction. If the historical reference turns out to be too big, take it to a separate article, taking a link to an article about the vehicle and adding a block "/ History" (example: https://wiki.warthunder.com/(Vehicle-name)/History) and add a link to it here using the main template. Be sure to reference text and sources by using <ref>, as well as adding them at the end of the article.
Media
An excellent addition to the article will be video guides, as well as screenshots from the game and photos.
See also
Links to the articles on the War Thunder Wiki that you think will be useful for the reader, for example:
- reference to the series of the aircraft;
- links to approximate analogues of other nations and research trees.
External links
Paste links to sources and external resources, such as:
- topic on the official game forum;
- encyclopedia page on aircraft;
- other literature.
| Germany twin-engine fighters | |
|---|---|
| Messerschmitt | Bf 109 Z-1 |
| Me 410 A-1/U2 · Me 410 B-1/U2 | |
| Dornier | Do 17 Z-7 · Do 217 J-1 · Do 217 J-2 · Do 217 N-1 · Do 217 N-2 |
| Focke-Wulf | Ta 154 A-1 |
| Junkers | Ju 88 C-6 · Ju 388 J |
