Difference between revisions of "Kungstiger"
Colok76286 (talk | contribs) (→Media: Added video) |
(→Ammo racks: Copied info from the II p) (Tag: Visual edit) |
||
| (3 intermediate revisions by 2 users not shown) | |||
| Line 12: | Line 12: | ||
{{Specs-Tank-Armour}} | {{Specs-Tank-Armour}} | ||
<!-- ''Describe armour protection. Note the most well protected and key weak areas. Appreciate the layout of modules as well as the number and location of crew members. Is the level of armour protection sufficient, is the placement of modules helpful for survival in combat? If necessary use a visual template to indicate the most secure and weak zones of the armour.'' --> | <!-- ''Describe armour protection. Note the most well protected and key weak areas. Appreciate the layout of modules as well as the number and location of crew members. Is the level of armour protection sufficient, is the placement of modules helpful for survival in combat? If necessary use a visual template to indicate the most secure and weak zones of the armour.'' --> | ||
| − | '' | + | '''''Armour type:''''' |
| − | ''' | + | *''Rolled homogeneous armour'' |
| − | + | *''Cast homogeneous armour (Gun mantlet, Cupola, Turret front)'' | |
| − | |||
{| class="wikitable" | {| class="wikitable" | ||
|- | |- | ||
| − | ! Armour !! Front (Slope angle) !! Sides !! Rear !! Roof | + | !''Armour''!!''Front (Slope angle)''!!''Sides (Slope angle)''!!''Rear (Slope angle)''!!''Roof'' |
|- | |- | ||
| − | | Hull || | + | |''Hull''||''150 mm (50°) Front glacis'' |
| + | ''100 mm (50°) Lower glacis'' | ||
| + | |''80 mm (25-26°) Top'' | ||
| + | ''80 + 5 mm Bottom'' | ||
| + | |''80 mm (28°)''||''40 mm'' | ||
|- | |- | ||
| − | | Turret || | + | |''Turret''||''100 mm (17-57°) Turret front'' |
| + | ''120 mm Gun mantlet'' | ||
| + | |''82 mm (28-29°)''||''80 mm (30°)'' | ||
| + | ''25 mm Turret underside'' | ||
| + | |''40 mm'' | ||
|- | |- | ||
| − | | Cupola || | + | |''Cupola''||''100 mm''||''100 mm''||''100 mm''||''40 mm'' |
|- | |- | ||
| − | |} | + | |}'''''Notes:''''' |
| − | ''' | + | *''Turret front armour is only 100 mm thick, but it is rounded, with varying angles (between 0-55°). Middle part is unangled and is the weakest part of the turret.'' |
| − | + | *''Turret has some major flaws, like a shot trap, and exposed, vulnerable turret ring (80-100 mm thick and no angle at all).'' | |
| + | *''Commander's cupola on top of the turret is 100 mm thick, but quite well angled.'' | ||
| + | *''Lower glacis is only 100 mm thick, but it is not a weak spot (over 200 mm effective angled).'' | ||
| + | *''Machine gun port could be marked as close-range weak spot. Although most of it is still 150 mm thick, the angling is much worse. But targeting the turret is preferable.'' | ||
=== Mobility === | === Mobility === | ||
| Line 83: | Line 93: | ||
! Visual<br>discrepancy | ! Visual<br>discrepancy | ||
|- | |- | ||
| − | | '''70''' || | + | | '''70''' ||65 (+5)|| 59 ''(+11)'' || 48 ''(+22)'' || 37 ''(+33)'' || 30 ''(+40)'' || 23 ''(+47)'' || __ |
|- | |- | ||
|} | |} | ||
| + | '''Notes:''' | ||
| + | |||
| + | *Recommended ammo load is 23 to keep the hull empty and both ready racks full. | ||
| + | *Ammo racks 7 and 8 are ready racks, and takes priority in being filled at the beginning of the battle, then fills 1 through 6 in that order. | ||
| + | *Full reload speed will be realized as long as ammo exists in either ready rack. If both ready racks are empty, a penalty to reload speed will occur. | ||
| + | *Simply not firing the main gun when it is loaded will load ammo from racks 1-6 into 8 then 7, as long as there is ammo in racks 1-6. Firing the main gun will interrupt the loading of the ready racks. | ||
| + | *Thanks to the ready rack feature found on this tank, the first and second ammo racks found in the back of the turret will always be full of ammo, making it the prime target for enemy tankers who are looking to detonate your ammo rack. Even solid shots like APCR and APDS that commonly pierce your front turret can make their way to the rear of the turret, potentially hitting the ready rack and can cause a critical hit to become a deadly one. | ||
=== Machine guns === | === Machine guns === | ||
| Line 111: | Line 128: | ||
'''Pros:''' | '''Pros:''' | ||
| + | |||
* | * | ||
'''Cons:''' | '''Cons:''' | ||
| + | |||
* | * | ||
| Line 130: | Line 149: | ||
* ''reference to the series of the vehicles;'' | * ''reference to the series of the vehicles;'' | ||
* ''links to approximate analogues of other nations and research trees.'' --> | * ''links to approximate analogues of other nations and research trees.'' --> | ||
| − | + | ||
| − | + | ;Related development | |
| − | * | + | |
| + | * [[Tiger II (Family)]] | ||
== External links == | == External links == | ||
| Line 139: | Line 159: | ||
* ''other literature.'' --> | * ''other literature.'' --> | ||
''Paste links to sources and external resources, such as:'' | ''Paste links to sources and external resources, such as:'' | ||
| + | |||
* ''topic on the official game forum;'' | * ''topic on the official game forum;'' | ||
* ''other literature.'' | * ''other literature.'' | ||
Latest revision as of 08:38, 29 May 2024

Contents
Description
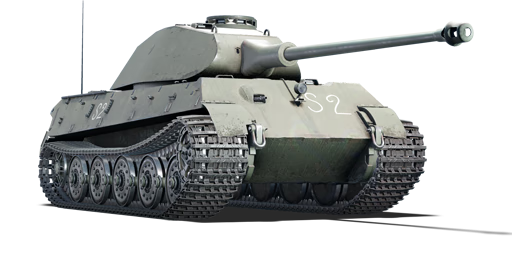
The Kungstiger is a premium gift rank IV Swedish heavy tank with a battle rating of 6.7 (AB/RB/SB). It was introduced during Update "Alpha Strike" as a reward for Battle Pass: Season XV, "Northern King".
General info
Survivability and armour
Armour type:
- Rolled homogeneous armour
- Cast homogeneous armour (Gun mantlet, Cupola, Turret front)
| Armour | Front (Slope angle) | Sides (Slope angle) | Rear (Slope angle) | Roof |
|---|---|---|---|---|
| Hull | 150 mm (50°) Front glacis
100 mm (50°) Lower glacis |
80 mm (25-26°) Top
80 + 5 mm Bottom |
80 mm (28°) | 40 mm |
| Turret | 100 mm (17-57°) Turret front
120 mm Gun mantlet |
82 mm (28-29°) | 80 mm (30°)
25 mm Turret underside |
40 mm |
| Cupola | 100 mm | 100 mm | 100 mm | 40 mm |
- Turret front armour is only 100 mm thick, but it is rounded, with varying angles (between 0-55°). Middle part is unangled and is the weakest part of the turret.
- Turret has some major flaws, like a shot trap, and exposed, vulnerable turret ring (80-100 mm thick and no angle at all).
- Commander's cupola on top of the turret is 100 mm thick, but quite well angled.
- Lower glacis is only 100 mm thick, but it is not a weak spot (over 200 mm effective angled).
- Machine gun port could be marked as close-range weak spot. Although most of it is still 150 mm thick, the angling is much worse. But targeting the turret is preferable.
Mobility
Write about the mobility of the ground vehicle. Estimate the specific power and manoeuvrability, as well as the maximum speed forwards and backwards.
| Game Mode | Max Speed (km/h) | Weight (tons) | Engine power (horsepower) | Power-to-weight ratio (hp/ton) | |||
|---|---|---|---|---|---|---|---|
| Forward | Reverse | Stock | Upgraded | Stock | Upgraded | ||
| Arcade | 45 | 12 | 68 | 904 | 1,336 | 13.29 | 19.65 |
| Realistic | 42 | 12 | 619 | 700 | 9.1 | 10.29 | |
Modifications and economy
| Mobility | Protection | Firepower | ||||||||||||||||||||
|---|---|---|---|---|---|---|---|---|---|---|---|---|---|---|---|---|---|---|---|---|---|---|
|
|
|
Armaments
Main armament
| 88 mm KwK43 | Turret rotation speed (°/s) | Reloading rate (seconds) | |||||||||||
|---|---|---|---|---|---|---|---|---|---|---|---|---|---|
| Mode | Capacity | Vertical | Horizontal | Stabilizer | Stock | Upgraded | Full | Expert | Aced | Stock | Full | Expert | Aced |
| Arcade | 70 | -8°/+15° | ±180° | - | 15.4 | 21.3 | 25.8 | 28.6 | 30.4 | 9.75 | 8.63 | 7.95 | 7.50 |
| Realistic | 11.3 | 13.3 | 16.2 | 17.9 | 19.0 | ||||||||
Ammunition
| Penetration statistics | |||||||
|---|---|---|---|---|---|---|---|
| Ammunition | Type of warhead |
Penetration @ 0° Angle of Attack (mm) | |||||
| 10 m | 100 m | 500 m | 1,000 m | 1,500 m | 2,000 m | ||
| PzGr 39/43 | APCBC | 237 | 234 | 222 | 207 | 193 | 180 |
| Sprgr.43 | HE | 19 | 19 | 17 | 16 | 14 | 14 |
| PzGr 40/43 | APCR | 279 | 273 | 252 | 227 | 205 | 185 |
| Shell details | ||||||||||||
|---|---|---|---|---|---|---|---|---|---|---|---|---|
| Ammunition | Type of warhead |
Velocity (m/s) |
Projectile mass (kg) |
Fuse delay (m) |
Fuse sensitivity (mm) |
Explosive mass (TNT equivalent) (g) |
Ricochet | |||||
| 0% | 50% | 100% | ||||||||||
| PzGr 39/43 | APCBC | 1,000 | 10.16 | 1.2 | 14 | 108.8 | 48° | 63° | 71° | |||
| Sprgr.43 | HE | 820 | 9.4 | 0.2 | 0.1 | 1,000 | 79° | 80° | 81° | |||
| PzGr 40/43 | APCR | 1,130 | 7.3 | - | - | - | 66° | 70° | 72° | |||
Ammo racks
| Full ammo |
1st rack empty |
2nd rack empty |
3rd rack empty |
4th rack empty |
5th rack empty |
6th rack empty |
Visual discrepancy |
|---|---|---|---|---|---|---|---|
| 70 | 65 (+5) | 59 (+11) | 48 (+22) | 37 (+33) | 30 (+40) | 23 (+47) | __ |
Notes:
- Recommended ammo load is 23 to keep the hull empty and both ready racks full.
- Ammo racks 7 and 8 are ready racks, and takes priority in being filled at the beginning of the battle, then fills 1 through 6 in that order.
- Full reload speed will be realized as long as ammo exists in either ready rack. If both ready racks are empty, a penalty to reload speed will occur.
- Simply not firing the main gun when it is loaded will load ammo from racks 1-6 into 8 then 7, as long as there is ammo in racks 1-6. Firing the main gun will interrupt the loading of the ready racks.
- Thanks to the ready rack feature found on this tank, the first and second ammo racks found in the back of the turret will always be full of ammo, making it the prime target for enemy tankers who are looking to detonate your ammo rack. Even solid shots like APCR and APDS that commonly pierce your front turret can make their way to the rear of the turret, potentially hitting the ready rack and can cause a critical hit to become a deadly one.
Machine guns
| 7.92 mm MG34 | ||||
|---|---|---|---|---|
| Mount | Capacity (Belt) | Fire rate | Vertical | Horizontal |
| Coaxial | 3,000 (150) | 900 | - | - |
Usage in battles
Describe the tactics of playing in the vehicle, the features of using vehicles in the team and advice on tactics. Refrain from creating a "guide" - do not impose a single point of view but instead give the reader food for thought. Describe the most dangerous enemies and give recommendations on fighting them. If necessary, note the specifics of the game in different modes (AB, RB, SB).
Pros and cons
Summarise and briefly evaluate the vehicle in terms of its characteristics and combat effectiveness. Mark its pros and cons in a bulleted list. Try not to use more than 6 points for each of the characteristics. Avoid using categorical definitions such as "bad", "good" and the like - use substitutions with softer forms such as "inadequate" and "effective".
Pros:
Cons:
History
Describe the history of the creation and combat usage of the vehicle in more detail than in the introduction. If the historical reference turns out to be too long, take it to a separate article, taking a link to the article about the vehicle and adding a block "/History" (example: https://wiki.warthunder.com/(Vehicle-name)/History) and add a link to it here using the main template. Be sure to reference text and sources by using <ref></ref>, as well as adding them at the end of the article with <references />. This section may also include the vehicle's dev blog entry (if applicable) and the in-game encyclopedia description (under === In-game description ===, also if applicable).
Media
- Videos
See also
- Related development
External links
Paste links to sources and external resources, such as:
- topic on the official game forum;
- other literature.
| Sweden heavy tanks | |
|---|---|
| Germany | Kungstiger |
| Sweden premium ground vehicles | |
|---|---|
| Light tanks | ▄T-26E · Strv m/39 · Pbil m/40 · Strv m/41 S-I · CV 90105 |
| Medium tanks | Sherman III/IV · Strv 81 (RB 52) · Strv 103-0 · Leopard 1A5NO2 · Christian II |
| Heavy tanks | Kungstiger |
| Tank destroyers | Ikv 73 · SAV 20.12.48 · VIDAR |
