
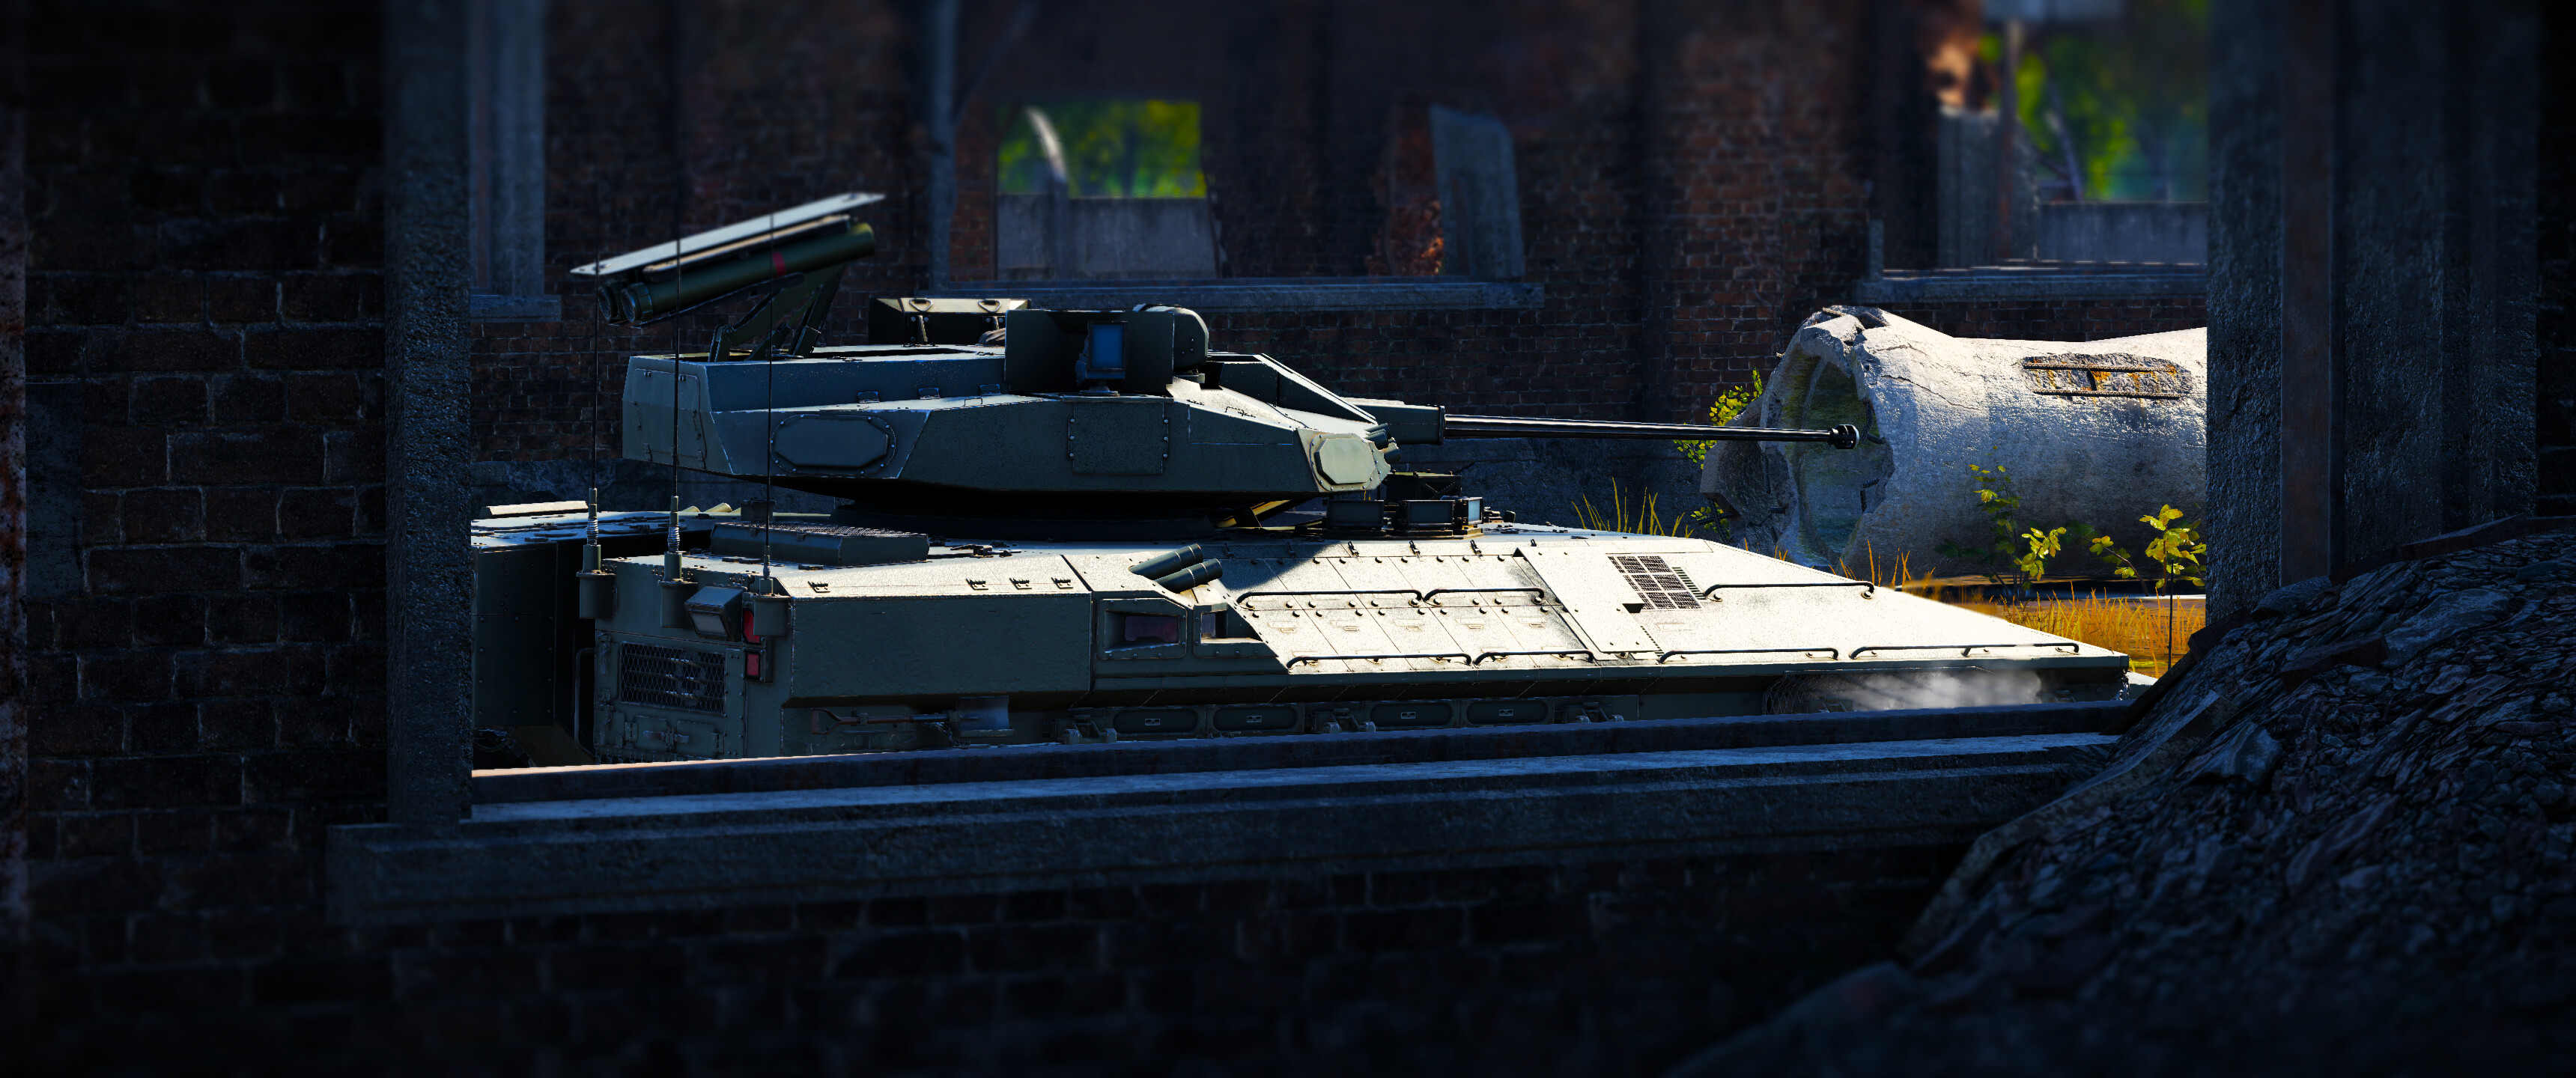
The Namer Tsrikhon is an experimental IFV based on the Israeli Namer APC, with the Namer itself being derived from the Merkava Mk.4 main battle tank. The Tsrikhon uses an unmanned turret which replaces the exposed weapons mount on the preceding Namer 30. Additionally, the turret is also fitted with the Trophy active protection system which can intercept ATGMs and other guided missiles. With its thick armor and spacious interior inherited from the Merkava, the Namer Tsrikhon is a relatively well-protected vehicle with good survivability, capable of withstanding much more punishment than contemporary light tanks and IFVs. However, the Tsrikhon also inherits the Merkava’s heavy weight, which limits its mobility in battle.
| Pros | Cons |
|---|---|
| Excellent protection for a light tank, able to shrug off autocannon fire and HEAT rounds | Armor can be frontally penetrated by nearly all APFSDS rounds from MBTs |
| Good crew survivability and spacious interior | Ammo in the turret is vulnerable to detonation |
| Equipped with Trophy APS (6 charges/uses) | Slow due to its heavy weight (64.4 t) |
| Plenty of ammunition for the 30 mm autocannon (400 rounds) | ATGM launcher angle cannot be lowered to engage close range targets |
| Versatile, able to effectively combat most ground targets and helicopters | SPIKE-LR II missiles can be inconsistent and are frequently disrupted by ERA |
Armor
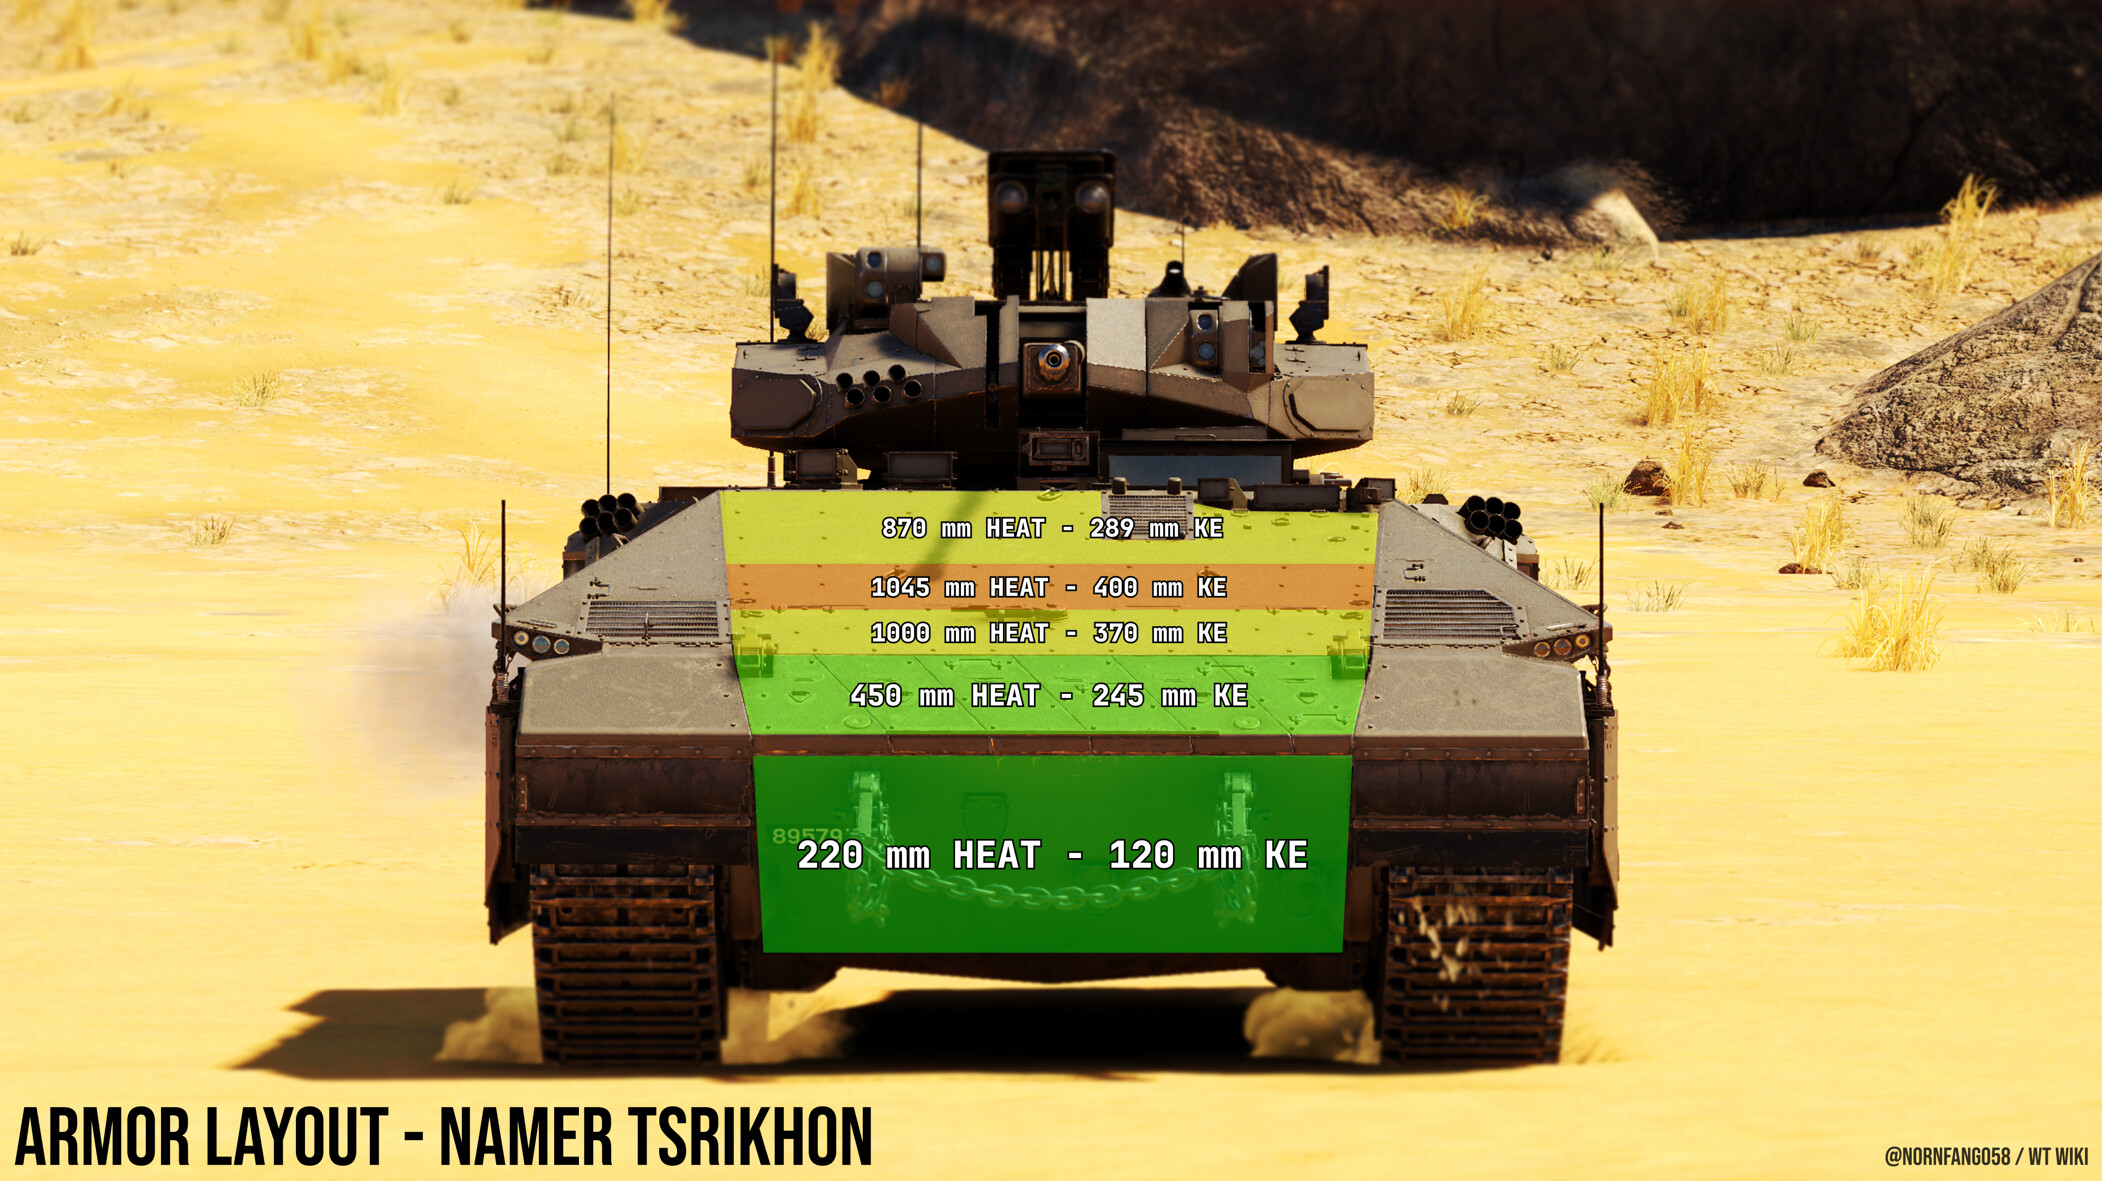
The Namer Tsrikhon has great armor for a light tank due to it inheriting most of the armor layout from the Merkava Mk.4. When compared to other light vehicles like the BMP-2M and the M3A3 Bradley, the Tsrikhon has much better frontal protection due to its extensive use of composite armor. However, the armor of the Tsrikhon is not up to par with most MBTs due to the armor’s poor KE protection.
Note: Aside from the addition of the unmanned turret on the Tsrikhon, there is no difference in the armor layout between the Namer 30 and the Namer Tsrikhon.
Armor layout
Most of the armor is located at the front of the vehicle in the UFP, which is composed of a 70 mm thick composite screen, 50 mm of RHA, and 50 mm of external NERA composite armor. Two smaller 200 mm NERA composite screens protect the left and rightmost areas of the UFP.
The upper sides of the vehicle are protected by some external NERA, while the lower sides are covered by 95 mm composite skirts. The rear of the vehicle has negligible armor, with most armor there being 20 to 35 mm in thickness. The hull of the Tsrikhon is constructed of 50 mm thick RHA.
Note: Unlike the Merkava Mk.4 tanks, the Namer Tsrikhon does not have the internal NERA composite blocks at the upper sides of the tank.
Like the Merkavas, the roof armor of the vehicle is quite good and is ~120 mm thick and composed of NERA composite.
There are also two 20 mm plates of RHA in the interior of the vehicle separating the crew from the engine bay. A single 10 mm plate of RHA is located at the front of the vehicle, separating the exterior fuel tanks from the engine bay.
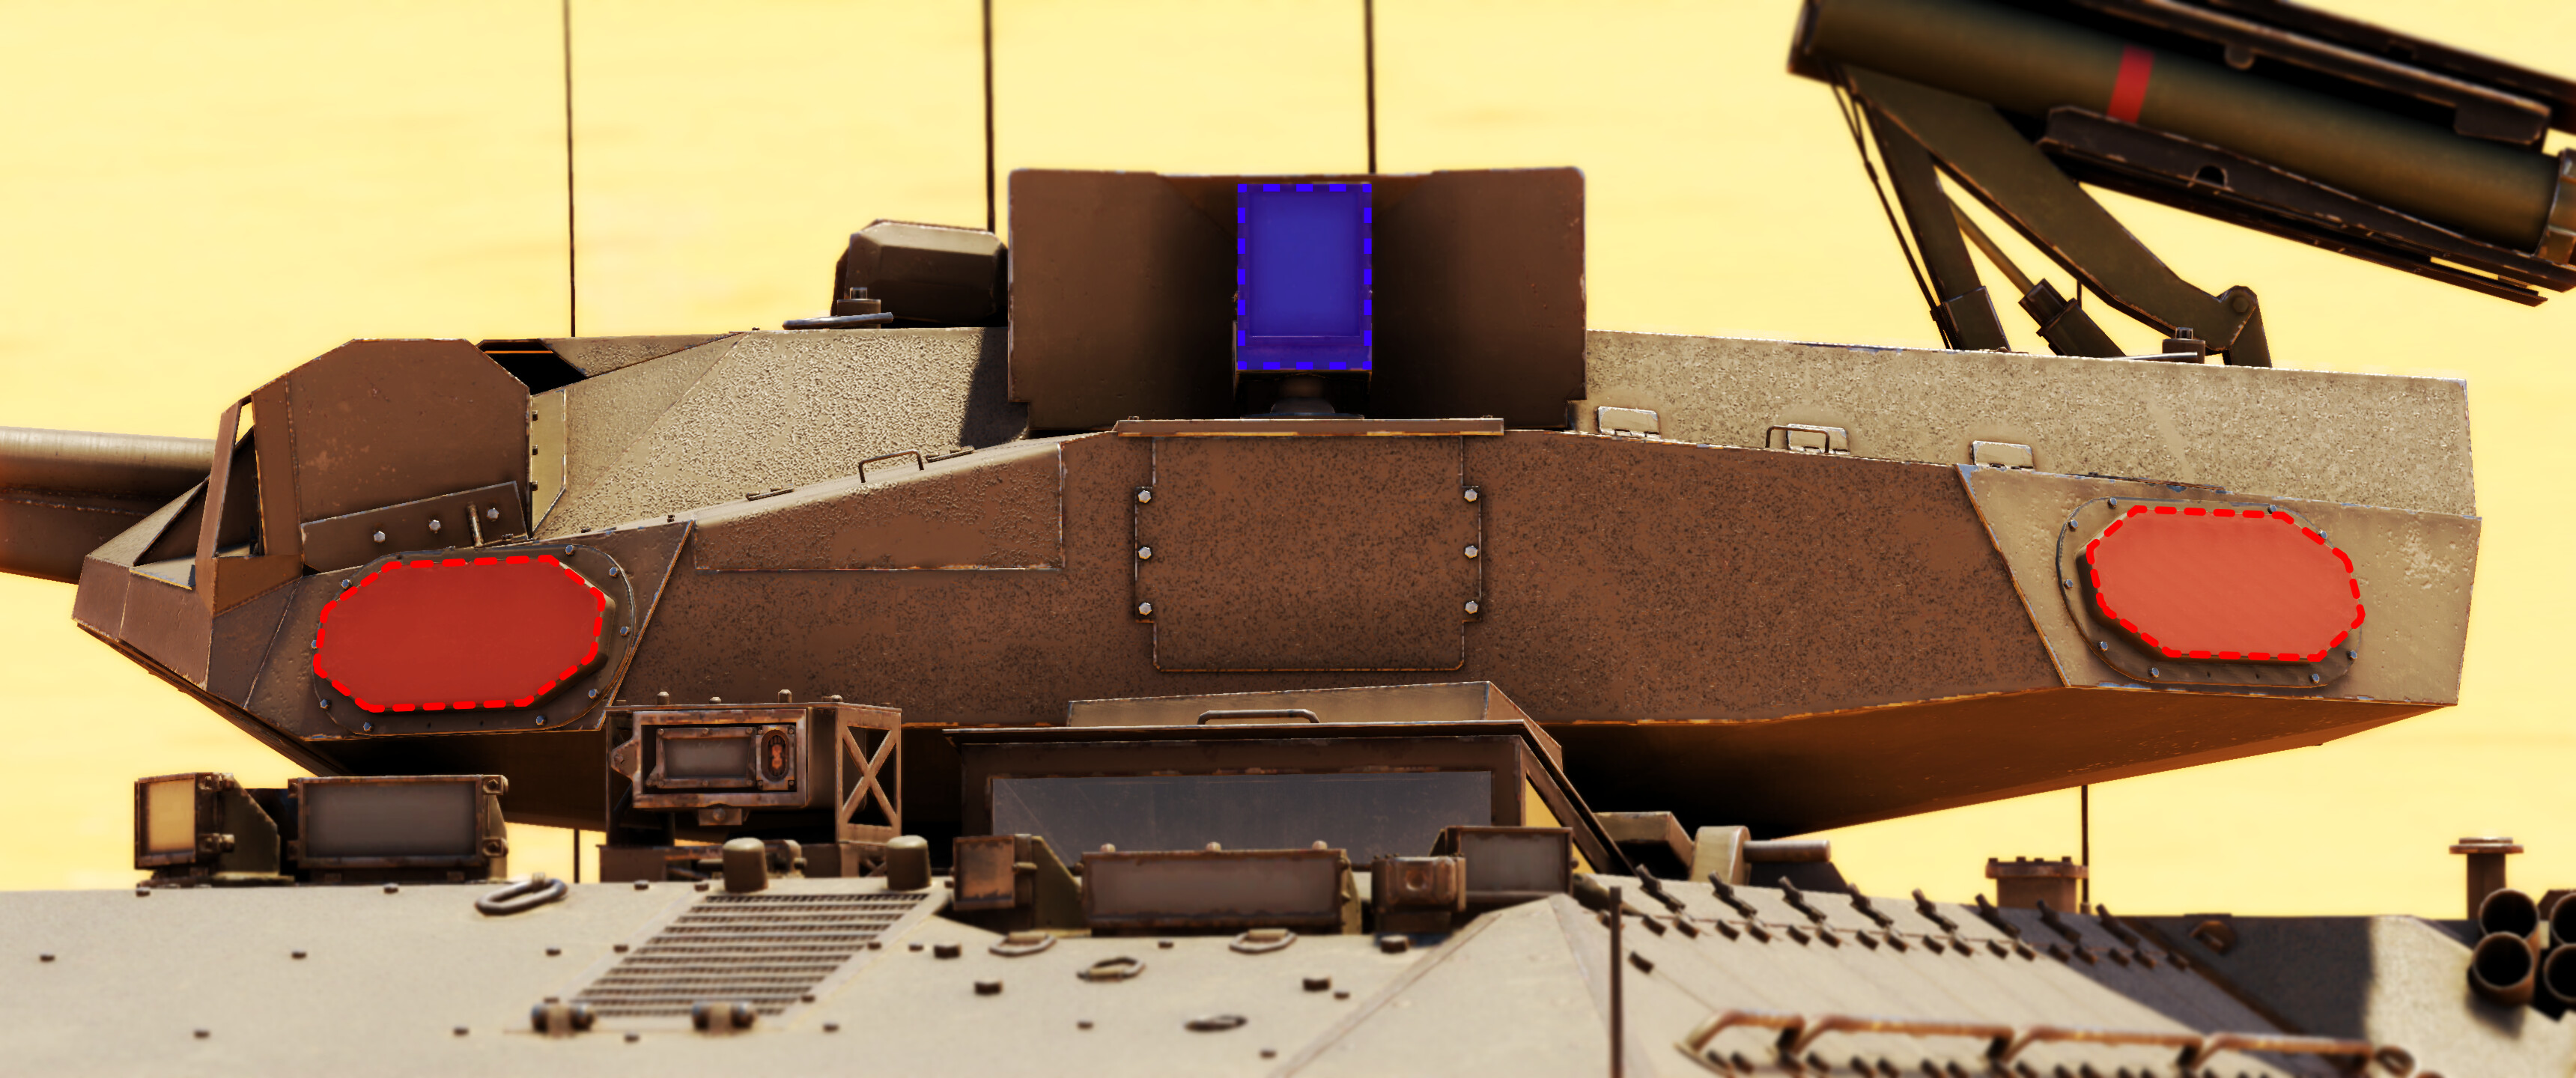
Notable weakspots
- LFP, relatively thin (50 mm RHA) and can be penetrated by autocannon fire.
- The turret is composed of 20 mm RHA and does not protect the autocannon ammo sufficiently (prone to being detonated)
- Side of the vehicle can be penetrated by autocannon fire.
- Grilles in the UFP are not protected by composite armor and can be penetrated by autocannon fire.
It is recommended to always keep the front of the Tsrikhon facing the enemy to maximize the effectiveness of the armor.
Armor effectiveness
The composite armor on the Namer Tsrikhon provides good protection against HEAT rounds and autocannon fire but struggles to withstand large-caliber APFSDS rounds from MBTs. The center of the UFP is the strongest area of armor on the Tsrikhon.
Survivability
The interior of the Namer Tsrikhon is quite spacious, which contributes to the vehicle’s impressive survivability. From the side, there is a large deadzone at the middle-rear area and rounds that penetrate here will typically cause little to no damage. Spall from HEAT rounds or ATGMs will commonly be absorbed by the frontally mounted engine; however, the engine does not offer much protection or benefit against APFSDS and other kinetic penetrators.
The turret of the vehicle is also compartmentalized from where the crew are located since it is mounted on top of the thick roof armor. Ammo detonations in the turret will not affect the rest of the vehicle, and most HE shells that hit the turret will not overpressure the crew.
Additionally, the survivability of the Namer Tsrikhon is further enhanced by the Trophy Active Protection System, a LWS, and plenty of smoke grenades.
Trophy APS
The Trophy Active Protection System (APS) is a hard-kill active protection system that intercepts and destroys threats fired at the vehicle that are travelling at 1000 m/s or less in velocity. Trophy APS has a total of 6 “charges” that can be used to intercept a threat. Four flat-panel radars are mounted on the Tsrikhon’s turret to detect incoming threats (two on each side of the turret), and two projectile launchers that launch an EFP to destroy the threat are mounted on the top of the turret (one on each side). Each projectile launcher contains 3 charges.

The Trophy APS can detect targets in a 360-degree zone around the vehicle and can intercept nearly all ATGMs and some guided missiles. However, there is a large deadzone above the vehicle where the APS cannot detect nor intercept threats, so Trophy will be unable to stop GBUs or AGMs that are fired from above.
Note that the explosion from the APS destroying a threat may damage the flat panel radars or the coaxial machine gun.
Laser Warning System
The Namer Tsrikhon’s Laser Warning System (LWS) will alert the player to any laser emissions that are directed toward the vehicle, provide the direction that the emission was detected from, and also emit a beeping warning tone.
Typical reasons for an LWS warning
- Enemy rangefinding the vehicle with their laser rangefinder (short warning)
- Enemy locking onto the vehicle with a laser lock for guided weapons (long/extended warning)
- Friendly accidentally rangefinding the vehicle with their LRF (short warning)
The LWS is an extremely useful tool to have in toptier tank battles, as it gives players the ability to preemptively react to threats. If the LWS is continuously emitting a tone or warning, deploy smoke grenades or seek cover immediately. A prolonged warning from the LWS usually indicates that an ATGM or a guided bomb is being directed at the player.
Smoke grenades and ESS
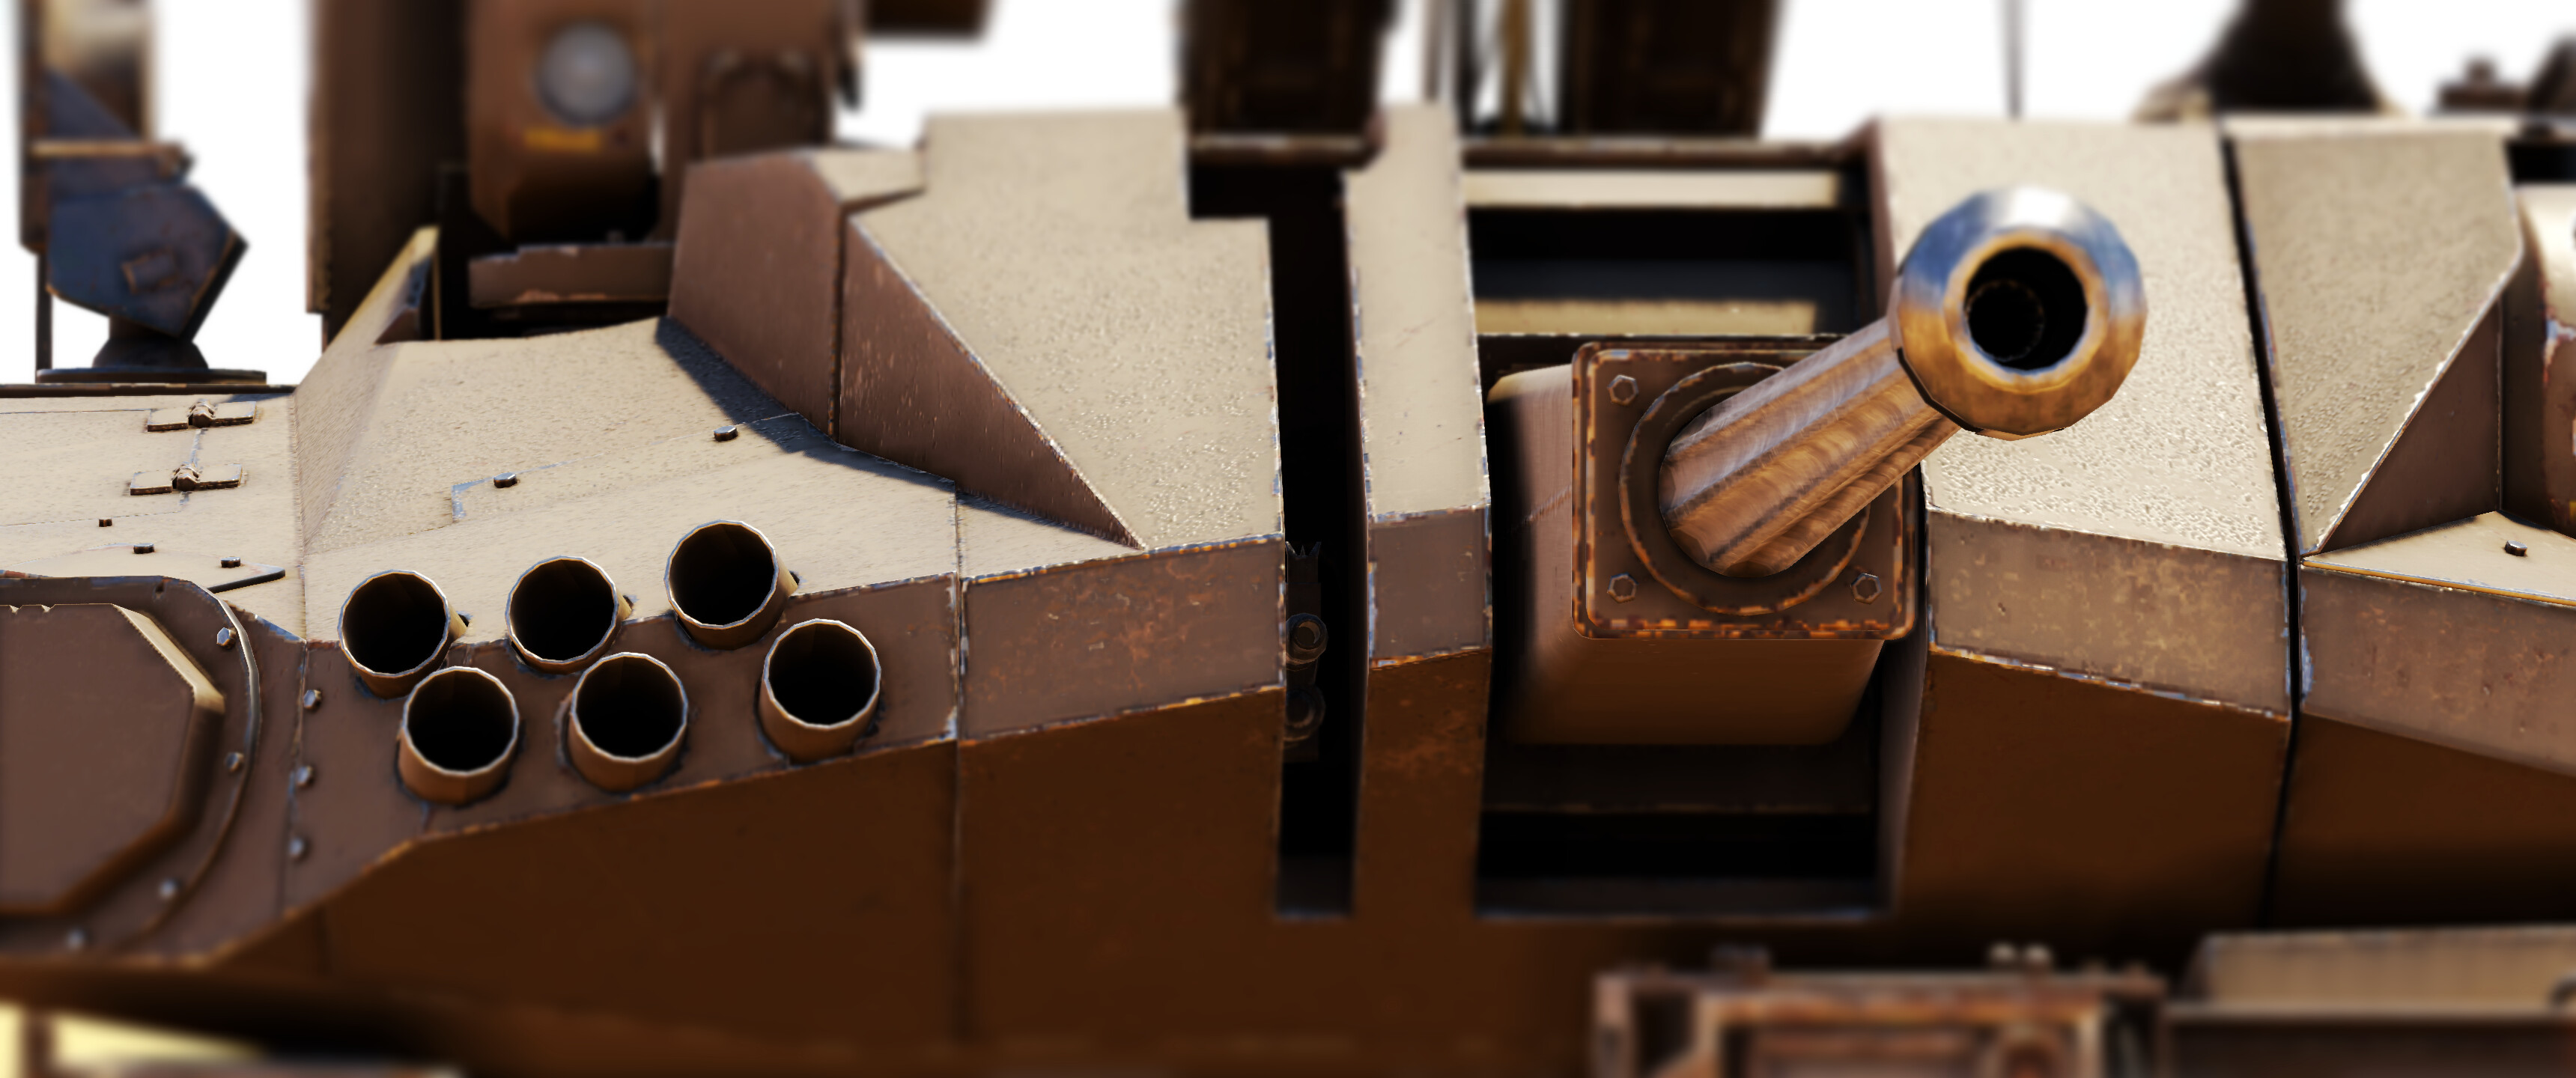
The Namer Tsrikhon is equipped with more than enough smoke grenades for an entire battle, a feature common to most modern Israeli vehicles. There are 12 smoke grenade launchers on the hull and 6 launchers on the turret. Additionally, there is also a mortar built into the turret roof that can fire up to 30 smoke grenades.
Smoke grenades should be used when needing instant cover (i.e. retreating after being critically damaged) or when covering exposed sightlines.
While not as effective or useful as smoke grenades for providing instant cover, the Namer Tsrikhon can create a smoke screen from its engine exhaust using the ESS feature. However, keep in mind that thermal imaging technology can see through ESS smoke screens.
Mobility
The Namer Tsrikhon weighs in at a monstrous 64.4 tons, resulting in relatively mediocre mobility. All other light tanks and some MBTs will travel faster, and the Tsrikhon is usually one of the last vehicles to reach a capture point.
However, the engine produces a good amount of horsepower (1,200 hp) and the Tsrikhon has a respectable power-to-weight ratio of 18.6 hp/ton. With a top speed of 54 km/h and a reverse speed of 23 km/h, the Tsrikhon is able to traverse nearly all kinds of terrain without any problems, albeit at a slower pace than other teammates.
Armaments
The Namer Tsrikhon is armed with one 30 mm Bushmaster autocannon, four SPIKE-LR II anti-tank guided missiles, and a coaxial 7.62 mm FN-MAG machine gun. All of the Namer Tsrikhon’s armaments are located in its unmanned turret. Additionally, the Tsrikhon has access to 3rd Generation thermals (1200×800 resolution), a laser rangefinder, and an IRST autotracker to aid with targeting enemy vehicles.

30 mm Bushmaster autocannon
The Namer Tsrikhon’s primary weapon is its 30 mm Bushmaster autocannon which can fire 30 mm rounds at a rate of 200 rounds per minute. Up to four 100-round belts of ammunition can be taken (400 rounds total), with all ammunition being stored in the unmanned turret. The maximum effective range is between 0 to 2 km.

The Bushmaster is quite powerful for a small-caliber autocannon, with the APFSDS rounds in the MK258 belt able to penetrate up to 116 mm of armor. Destroying lightly armored vehicles and aircraft with the Bushmaster is extremely easy, but most MBTs have enough armor to stop rounds from the front. However, the APFSDS rounds can tear through the sides and rear of all vehicles, including MBTs.
| Name | Type | Max penetration at 10 meters | What should I use it against? |
|---|---|---|---|
| Default | APDS | 87 mm | Same as MK258, but use MK258 instead if possible |
| MK258 | APFSDS | 116 mm | All ground targets, also effective against aircraft |
| MK266 | HEI-T | 9 mm | Aircraft only |
Note that the Bushmaster has a dual-feed system, which allows the gun to swap between different types of ammo without having to expend the current ammo belt.
When combating MBTs or any vehicle with a significant amount of armor from the front, it is recommended to first destroy the gun barrel and then flank the vehicle to penetrate the thin side armor. Shooting out the vehicle’s tracks may also be necessary to prevent it from escaping.
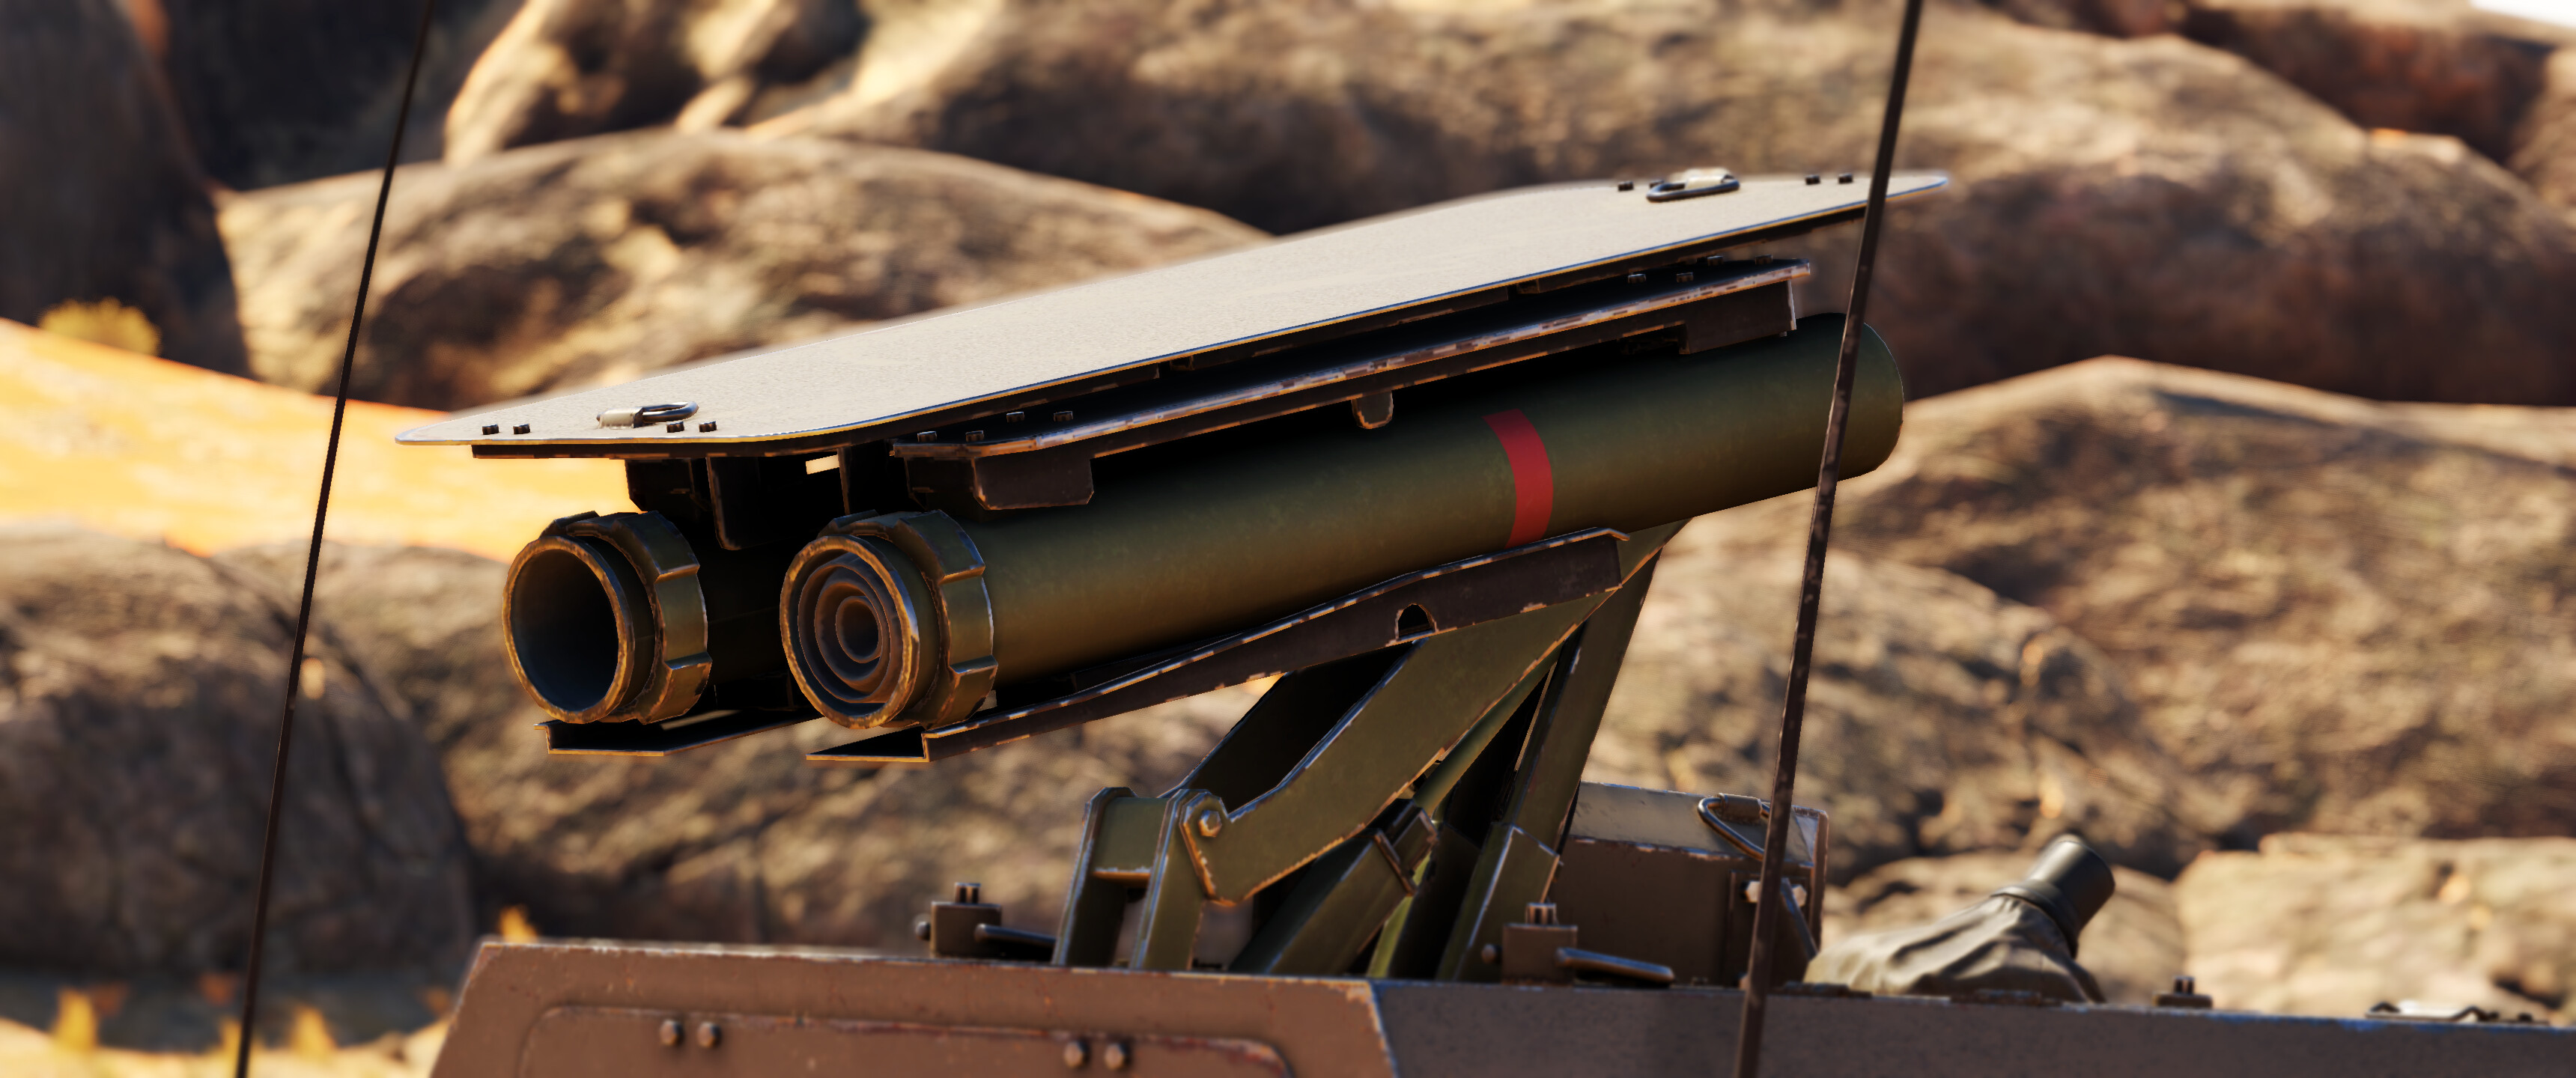
SPIKE-LR II anti-tank guided missiles
The SPIKE-LR II is a fire-and-forget IR-guided anti-tank guided missile (ATGM). The SPIKE is very useful for engaging targets beyond the effective range of the Bushmaster. Four SPIKE missiles are loaded in the Tsrikhon: 2 missiles are pre-loaded in the turret’s tandem ATGM launcher, and the other 2 missiles are stored in the hull. The recommended maximum range for the SPIKE is around 4 km.

The SPIKE-LR II is quite versatile, being able to combat ground targets, helicopters, and low-flying aircraft. It is also fire-and-forget, so tankers will not have to worry about exposing the Tsrikhon for too long while firing.
However, the SPIKE does lack the precision of a manually guided ATGM which makes it less effective against MBTs since it cannot be guided to precisely hit weakspots in the armor, so it performs rather inconsistently against MBTs.
Warning: The angle of the tandem ATGM launcher cannot be adjusted. This makes the SPIKE missiles unusable at close distances since they loft upwards before hitting the target.
7.62 mm FN-MAG machine gun
The FN-MAG machine gun is coaxially mounted next to the Bushmaster autocannon. Due to the FN-MAG’s meager armor penetration of 13 mm, it does not have much anti-tank use and is primarily useful for pinging targets or for clearing obstacles.
Recommended loadout
- Ammo: 3/1 belt ratio of MK258 APFSDS and MK266 HEI-T rounds
- Camoflague: Default/Tricolor camouflage for urban areas and forest, Desert camouflage for desert terrain
Usage in battles
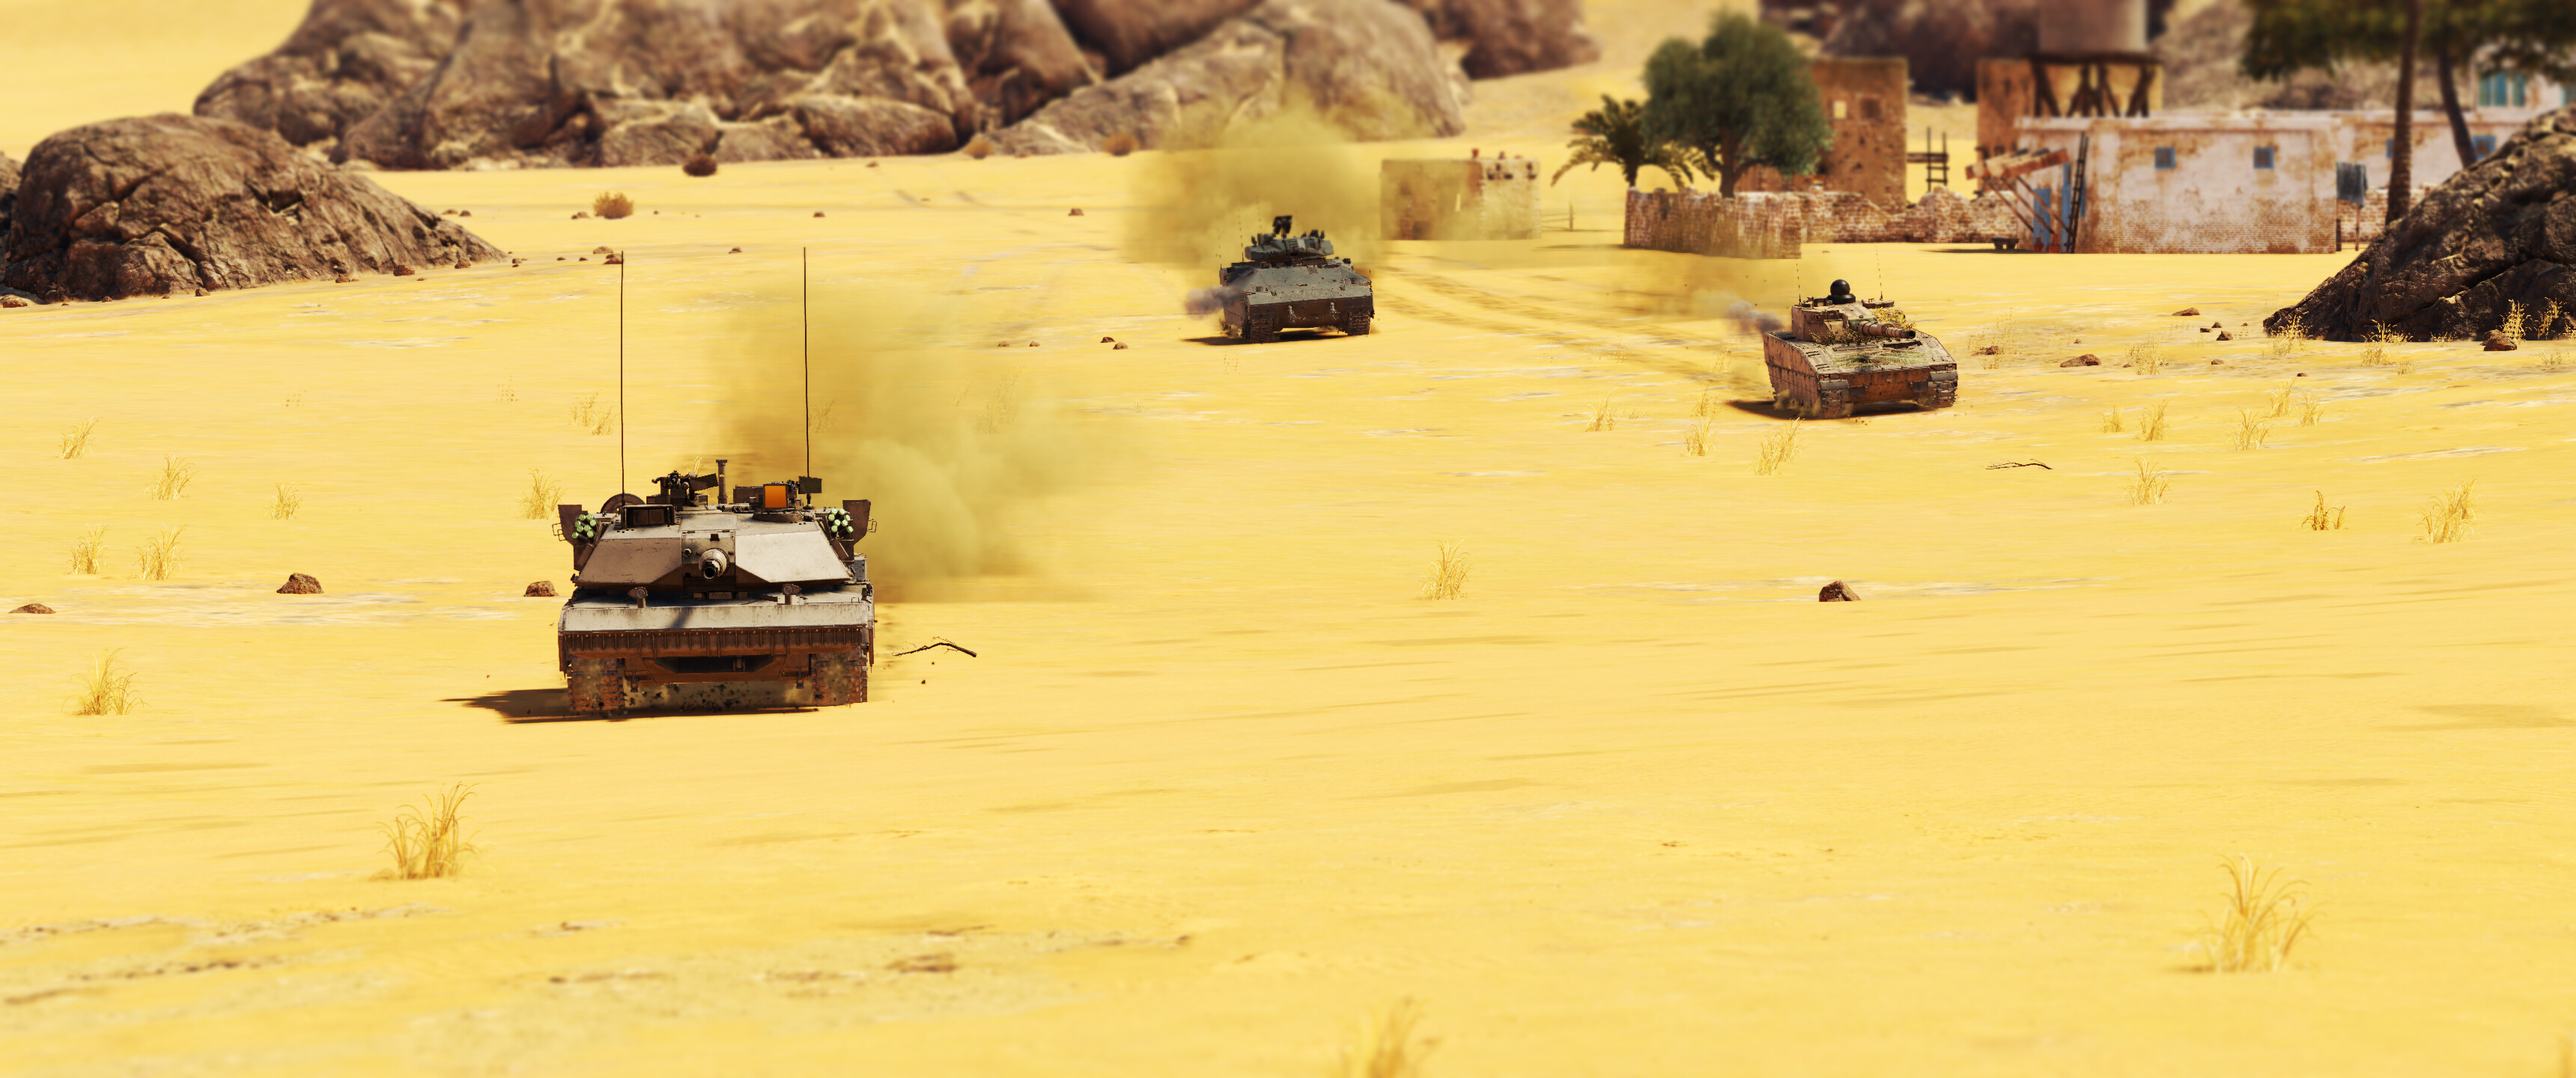
The Namer Tsrikhon’s playstyle largely depends on the map. However, it performs well as a support vehicle in all environments.
Large and open maps — Sinai, Fields of Poland, El Alamein
On long range maps, the Namer Tsrikhon will rely on its SPIKE missiles to secure kills from a distance (the Bushmaster can also work on lightly armored targets). Prioritize lightly armored vehicles and helicopters for easy kills. The SPIKE is able to crack open MBTs on occasion, but don’t count on it.

The Tsrikhon can either accompany their team to capture zones, or it can sit back behind friendly lines and use the scout UAV drone to manually locate and mark targets for teammates. Also, make sure to utilize the scouting feature to automatically mark enemies on the minimap and to reduce the spawn point cost of aircraft.
Pay attention to the LWS, as CAS is a bigger threat on open maps without cover. Pop some smoke grenades if necessary. Remember that helicopters can be easily dealt with by shooting a SPIKE missile at them.
Smaller close-range maps — Alaska, Breslau, Abandoned Factory
The Namer Tsrikhon excels as a flanker on close-range maps, where it can make use of good positioning and the element of surprise to piece apart enemies from the front or sides. As always, make sure to listen for enemy engine noises and pay attention to the minimap.
An effective method to get kills is by ambushing MBTs or other vehicles. Sit around a corner near a common map route, destroy unaware vehicles, reposition, and repeat. Using the scout drone is also a good way to locate enemies and to setup an ambush.
The Tsrikhon can easily hold its own against light vehicles but be careful when engaging enemy MBTs. When fighting enemy MBTs from the front, prioritize the destruction of the cannon barrel, destroy their tracks, and then flank for the kill. If an enemy MBT presents its side, simply shoot under the turret or where the driver is located for an easy kill.

