Difference between revisions of "IJN Kako"
Jareel_Skaj (talk | contribs) (Restored external links) |
Jareel_Skaj (talk | contribs) m (→Modules: Removed 3rd column) |
||
| (41 intermediate revisions by 15 users not shown) | |||
| Line 1: | Line 1: | ||
| + | {{Specs-Card|code=jp_cruiser_kako}} | ||
{{About | {{About | ||
| about = Japanese heavy cruiser '''{{PAGENAME}}''' | | about = Japanese heavy cruiser '''{{PAGENAME}}''' | ||
| − | | usage = other | + | | usage = other uses |
| link = Furutaka (Family) | | link = Furutaka (Family) | ||
}} | }} | ||
| − | |||
| − | |||
| − | |||
| − | |||
| − | |||
== Description == | == Description == | ||
| − | <!-- | + | <!--In the first part of the description, cover the history of the ship’s creation and military application. In the second part, tell the reader about using this ship in the game. Add a screenshot. If a beginner player has a hard time remembering vehicles by name, a picture will help them identify the ship in question.--> |
| − | + | [[File:GarageImage_{{PAGENAME}}.jpg|420px|thumb|left]] | |
| − | + | {{Break}} | |
| − | + | The '''{{specs|name}}''' is a rank {{specs|rank}} Japanese heavy cruiser {{Battle-rating}}. It was introduced in [[Update 1.89 "Imperial Navy"]]. | |
| − | |||
| − | |||
| − | |||
== General info == | == General info == | ||
=== Survivability and armour === | === Survivability and armour === | ||
| − | + | ''Talk about the vehicle's armour. Note the most well-defended and most vulnerable zones, e.g. the ammo magazine. Evaluate the composition of components and assemblies responsible for movement and manoeuvrability. Evaluate the survivability of the primary and secondary armament separately. Don't forget to mention the size of the crew, which plays an important role in fleet mechanics. Save tips for preserving survivability in the "Use in battle" section.'' | |
| − | |||
| − | |||
| − | |||
| − | |||
| − | + | ''If necessary, use a graphics template to show the most well-protected or most vulnerable points in the armour.'' | |
=== Mobility === | === Mobility === | ||
| − | + | ''Write about the ship’s mobility. Evaluate its power and manoeuvrability, rudder rerouting speed, stopping speed at full tilt, with its maximum forward speed and reverse speed.'' | |
| − | |||
| − | |||
| − | |||
| − | |||
| − | |||
| − | |||
| − | |||
== Armament == | == Armament == | ||
| − | |||
=== Primary armament === | === Primary armament === | ||
| − | |||
| − | |||
{{main|20 cm 3rd year type No.1 (200 mm)}} | {{main|20 cm 3rd year type No.1 (200 mm)}} | ||
| + | ''Provide information about the characteristics of the primary armament. Evaluate their efficacy in battle based on their reload speed, ballistics and the capacity of their shells.'' | ||
| − | + | ''Broadly describe the ammunition available for the primary armament, and provide recommendations on how to use it and which ammunition to choose.'' | |
| − | |||
| − | |||
| − | |||
| − | |||
| − | |||
| − | |||
| − | |||
=== Secondary armament === | === Secondary armament === | ||
| − | |||
| − | |||
{{main|120 mm/45 10th year type (120 mm)}} | {{main|120 mm/45 10th year type (120 mm)}} | ||
| − | + | ''Some ships are fitted with weapons of various calibres. The secondary armament is defined as the weapon chosen with the control <code>Select secondary weapon</code>. Evaluate the secondary armament and give advice on how to use them. Describe the ammunition available for the secondary armament. Provide recommendations on how to use them and which ammunition to choose. Remember that anti-air armament, even heavy calibre weapons, belong in the next section.'' | |
| − | The secondary armament | ||
| − | |||
| − | |||
=== Anti-aircraft armament === | === Anti-aircraft armament === | ||
| − | |||
| − | |||
| − | |||
{{main|Type 93 (13.2 mm)}} | {{main|Type 93 (13.2 mm)}} | ||
| + | ''An important part of the ship’s armament responsible for air raid defence. Anti-aircraft armament is defined by the weapon chosen with the control <code>Select anti-aircraft weapons</code>. Talk about the ship’s anti-air cannons and machine guns, the number of guns and their positions, their effective range, and about their overall effectiveness – including against surface targets.'' | ||
| − | + | === Torpedo armament === | |
| − | |||
| − | === | ||
| − | |||
| − | |||
{{main|Type 8 No.2 (610 mm)}} | {{main|Type 8 No.2 (610 mm)}} | ||
| + | ''Torpedoes launchers are standard equipment on many ships and boats. Torpedoes are a significant means of defeating an opponent. Evaluate the position of the torpedo launchers, discuss the ammunition available, firing specifics such as dead zones, features of the torpedoes themselves, etc.'' | ||
| − | + | == Usage in battles == | |
| − | + | ''Describe the technique of using this ship, the characteristics of her use in a team and tips on strategy. Abstain from writing an entire guide – don’t try to provide a single point of view, but give the reader food for thought. Talk about the most dangerous opponents for this vehicle and provide recommendations on fighting them. If necessary, note the specifics of playing with this vehicle in various modes (AB, RB, SB).'' | |
| − | |||
| − | |||
| − | + | === Modules === | |
| − | + | {| class="wikitable" | |
| − | == | + | ! Tier |
| − | + | ! Seakeeping | |
| − | + | ! colspan="2" | Unsinkability | |
| + | ! colspan="2" | Firepower | ||
| + | |- | ||
| + | | I | ||
| + | | Dry-Docking | ||
| + | | Tool Set|| | ||
| + | | Anti-Air Armament Targeting||200 mm Type 88 APC | ||
| + | |- | ||
| + | | II | ||
| + | | Rudder Replacement | ||
| + | | Fire Protection System||Smokescreen | ||
| + | | Auxiliary Armament Targeting||120 mm Type 0 HE | ||
| + | |- | ||
| + | | III | ||
| + | | Propeller Replacement | ||
| + | | Shrapnel Protection||Ventilation | ||
| + | | Primary Armament Targeting||Improved Rangefinder | ||
| + | |- | ||
| + | | IV | ||
| + | | Engine Maintenance | ||
| + | | New Pumps||Ammo Wetting | ||
| + | | Torpedo Mode|| | ||
| + | |- | ||
| + | |} | ||
=== Pros and cons === | === Pros and cons === | ||
| − | + | ''Summarize and briefly evaluate the vehicle in terms of its characteristics and combat effectiveness. Mark its pros and cons in the bulleted list. Try not to use more than 6 points for each of the characteristics. Avoid using categorical definitions such as "bad", "good" and the like - use substitutions with softer forms such as "inadequate" and "effective".'' | |
'''Pros:''' | '''Pros:''' | ||
| − | * | + | * |
| − | |||
| − | |||
| − | |||
| − | |||
| − | |||
| − | |||
| − | |||
| − | |||
| − | |||
| − | |||
'''Cons:''' | '''Cons:''' | ||
| − | * | + | * Torpedo launchers are fixed, unable to be traversed without moving the hull |
| − | + | * Guns have a slow traverse speed | |
| − | |||
| − | * | ||
| − | |||
| − | |||
== History == | == History == | ||
| − | <!-- ''Describe the history of the creation and combat usage of the ship in more detail than in the introduction. If the historical reference turns out to be too long, take it to a separate article, taking a link to the article about the | + | <!--''Describe the history of the creation and combat usage of the ship in more detail than in the introduction. If the historical reference turns out to be too long, take it to a separate article, taking a link to the article about the vehicle and adding a block "/ History" (example: <nowiki>https://wiki.warthunder.com/(Vehicle-name)/History</nowiki>) and add a link to it here using the <code>main</code> template. Be sure to reference text and sources by using <code><nowiki><ref></nowiki></code>, as well as adding them at the end of the article.''--> |
| − | Created as a counter to the American Omaha and British Hawkins class cruisers, the Furutaka class was designed to act as a scouting cruiser capable of protecting the main fleet from enemy scouts. While the ship was designed before the Washington Naval Treaty, she still fell within the displacement and calibre limits with 7,500 tons of displacement and the main armament of six 7.9 in/20 cm cannons mounted in single turrets; she also had a torpedo armament of 12 x 21-inch torpedo tubes mounted in the hull. These armaments would change as both Furutaka and Kako were modernized shortly after being completed, with their single mounted guns being replaced with three twin turrets and two quad-torpedo launchers being added near the aft. | + | Created as a counter to the American Omaha and British Hawkins class cruisers, the Furutaka class was designed to act as a scouting cruiser capable of protecting the main fleet from enemy scouts. While the ship was designed before the Washington Naval Treaty, she still fell within the displacement and calibre limits with 7,500 tons of displacement and the main armament of six 7.9 in/20 cm cannons mounted in single turrets; she also had a torpedo armament of 12 x 21-inch torpedo tubes mounted in the hull. These armaments would change as both Furutaka and Kako were modernized shortly after being completed, with their single mounted guns being replaced with three twin turrets and two quad-torpedo launchers being added near the aft. |
| − | During the first months of the Pacific War against the United States, Kako was assigned to Sentai 6 and tasked in covering the invasions of several islands including Guam, Wake, and New Guinea. Sentai 6 was then assigned to Operation MO, the invasion of Port Morseby, and partook in the Battle of the Coral Sea on May 7, 1942. Their next major action would not be until August, but would also be their largest. Kako and Sentai 6 had been assigned to the new Eighth Fleet. In response to the American invasion of Guadalcanal, the Eighth Fleet sortied out to counter the invasion force. On the night of August 8-9, 1942, Kako and the fleet of 4 heavy cruisers, 2 light cruisers, and a destroyer surprised the Allied Fleet in a night attack off Savo Island. | + | During the first months of the Pacific War against the United States, Kako was assigned to Sentai 6 and tasked in covering the invasions of several islands including Guam, Wake, and New Guinea. Sentai 6 was then assigned to Operation MO, the invasion of Port Morseby, and partook in the Battle of the Coral Sea on May 7, 1942. Their next major action would not be until August, but would also be their largest. Kako and Sentai 6 had been assigned to the new Eighth Fleet. In response to the American invasion of Guadalcanal, the Eighth Fleet sortied out to counter the invasion force. On the night of August 8-9, 1942, Kako and the fleet of 4 heavy cruisers, 2 light cruisers, and a destroyer surprised the Allied Fleet in a night attack off Savo Island. |
Fighting at close ranges with searchlights, flares, and star shells, Japanese naval artillery devastated the Allied fleet, sinking 4 heavy cruisers and forcing the American support ships to abandon the Marines on the island. While the battle was a stunning victory for the Japanese, they failed to sink any of the landing ships and fled the area for fear of retaliation from American carrier planes; However, it was the American submarine S-44 who got revenge. On August 10, while the Eighth fleet was returning to Rabaul, the S-44 fired four torpedoes at Kako, scoring three hits. The Kako quickly took on a list before her boilers detonated, sinking the cruiser but only taking 68 sailors with her. Kako was struck from the Japanese Naval list a month later. | Fighting at close ranges with searchlights, flares, and star shells, Japanese naval artillery devastated the Allied fleet, sinking 4 heavy cruisers and forcing the American support ships to abandon the Marines on the island. While the battle was a stunning victory for the Japanese, they failed to sink any of the landing ships and fled the area for fear of retaliation from American carrier planes; However, it was the American submarine S-44 who got revenge. On August 10, while the Eighth fleet was returning to Rabaul, the S-44 fired four torpedoes at Kako, scoring three hits. The Kako quickly took on a list before her boilers detonated, sinking the cruiser but only taking 68 sailors with her. Kako was struck from the Japanese Naval list a month later. | ||
== Media == | == Media == | ||
| − | + | ''Excellent additions to the article would be video guides, screenshots from the game, and photos.'' | |
| − | |||
| − | |||
| − | |||
| − | |||
| − | |||
== See also == | == See also == | ||
| − | ''Links to articles on the War Thunder Wiki that you think will be useful for the reader, for example:'' | + | ''Links to the articles on the War Thunder Wiki that you think will be useful for the reader, for example:'' |
* ''reference to the series of the ship;'' | * ''reference to the series of the ship;'' | ||
| Line 137: | Line 102: | ||
== External links == | == External links == | ||
| − | + | ''Paste links to sources and external resources, such as:'' | |
* ''topic on the official game forum;'' | * ''topic on the official game forum;'' | ||
| − | * '' | + | * ''encyclopedia page on the ship;'' |
| − | * | + | * ''other literature.'' |
| − | |||
| − | |||
| − | |||
{{Japan heavy cruisers}} | {{Japan heavy cruisers}} | ||
Revision as of 17:03, 10 May 2020
Contents
| This page is about the Japanese heavy cruiser IJN Kako. For other uses, see Furutaka (Family). |
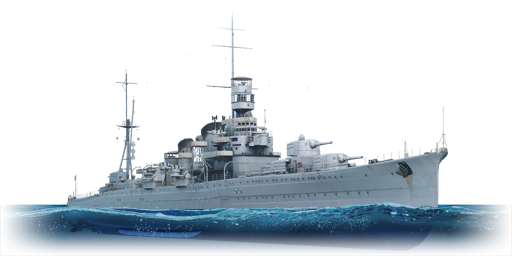
Description

The Furutaka-class, IJN Kako, (1935) is a rank III Japanese heavy cruiser
with a battle rating of 4.7 (AB/RB/SB). It was introduced in Update 1.89 "Imperial Navy".
General info
Survivability and armour
Talk about the vehicle's armour. Note the most well-defended and most vulnerable zones, e.g. the ammo magazine. Evaluate the composition of components and assemblies responsible for movement and manoeuvrability. Evaluate the survivability of the primary and secondary armament separately. Don't forget to mention the size of the crew, which plays an important role in fleet mechanics. Save tips for preserving survivability in the "Use in battle" section.
If necessary, use a graphics template to show the most well-protected or most vulnerable points in the armour.
Mobility
Write about the ship’s mobility. Evaluate its power and manoeuvrability, rudder rerouting speed, stopping speed at full tilt, with its maximum forward speed and reverse speed.
Armament
Primary armament
Provide information about the characteristics of the primary armament. Evaluate their efficacy in battle based on their reload speed, ballistics and the capacity of their shells.
Broadly describe the ammunition available for the primary armament, and provide recommendations on how to use it and which ammunition to choose.
Secondary armament
Some ships are fitted with weapons of various calibres. The secondary armament is defined as the weapon chosen with the control Select secondary weapon. Evaluate the secondary armament and give advice on how to use them. Describe the ammunition available for the secondary armament. Provide recommendations on how to use them and which ammunition to choose. Remember that anti-air armament, even heavy calibre weapons, belong in the next section.
Anti-aircraft armament
An important part of the ship’s armament responsible for air raid defence. Anti-aircraft armament is defined by the weapon chosen with the control Select anti-aircraft weapons. Talk about the ship’s anti-air cannons and machine guns, the number of guns and their positions, their effective range, and about their overall effectiveness – including against surface targets.
Torpedo armament
Torpedoes launchers are standard equipment on many ships and boats. Torpedoes are a significant means of defeating an opponent. Evaluate the position of the torpedo launchers, discuss the ammunition available, firing specifics such as dead zones, features of the torpedoes themselves, etc.
Usage in battles
Describe the technique of using this ship, the characteristics of her use in a team and tips on strategy. Abstain from writing an entire guide – don’t try to provide a single point of view, but give the reader food for thought. Talk about the most dangerous opponents for this vehicle and provide recommendations on fighting them. If necessary, note the specifics of playing with this vehicle in various modes (AB, RB, SB).
Modules
| Tier | Seakeeping | Unsinkability | Firepower | ||
|---|---|---|---|---|---|
| I | Dry-Docking | Tool Set | Anti-Air Armament Targeting | 200 mm Type 88 APC | |
| II | Rudder Replacement | Fire Protection System | Smokescreen | Auxiliary Armament Targeting | 120 mm Type 0 HE |
| III | Propeller Replacement | Shrapnel Protection | Ventilation | Primary Armament Targeting | Improved Rangefinder |
| IV | Engine Maintenance | New Pumps | Ammo Wetting | Torpedo Mode | |
Pros and cons
Summarize and briefly evaluate the vehicle in terms of its characteristics and combat effectiveness. Mark its pros and cons in the bulleted list. Try not to use more than 6 points for each of the characteristics. Avoid using categorical definitions such as "bad", "good" and the like - use substitutions with softer forms such as "inadequate" and "effective".
Pros:
Cons:
- Torpedo launchers are fixed, unable to be traversed without moving the hull
- Guns have a slow traverse speed
History
Created as a counter to the American Omaha and British Hawkins class cruisers, the Furutaka class was designed to act as a scouting cruiser capable of protecting the main fleet from enemy scouts. While the ship was designed before the Washington Naval Treaty, she still fell within the displacement and calibre limits with 7,500 tons of displacement and the main armament of six 7.9 in/20 cm cannons mounted in single turrets; she also had a torpedo armament of 12 x 21-inch torpedo tubes mounted in the hull. These armaments would change as both Furutaka and Kako were modernized shortly after being completed, with their single mounted guns being replaced with three twin turrets and two quad-torpedo launchers being added near the aft.
During the first months of the Pacific War against the United States, Kako was assigned to Sentai 6 and tasked in covering the invasions of several islands including Guam, Wake, and New Guinea. Sentai 6 was then assigned to Operation MO, the invasion of Port Morseby, and partook in the Battle of the Coral Sea on May 7, 1942. Their next major action would not be until August, but would also be their largest. Kako and Sentai 6 had been assigned to the new Eighth Fleet. In response to the American invasion of Guadalcanal, the Eighth Fleet sortied out to counter the invasion force. On the night of August 8-9, 1942, Kako and the fleet of 4 heavy cruisers, 2 light cruisers, and a destroyer surprised the Allied Fleet in a night attack off Savo Island.
Fighting at close ranges with searchlights, flares, and star shells, Japanese naval artillery devastated the Allied fleet, sinking 4 heavy cruisers and forcing the American support ships to abandon the Marines on the island. While the battle was a stunning victory for the Japanese, they failed to sink any of the landing ships and fled the area for fear of retaliation from American carrier planes; However, it was the American submarine S-44 who got revenge. On August 10, while the Eighth fleet was returning to Rabaul, the S-44 fired four torpedoes at Kako, scoring three hits. The Kako quickly took on a list before her boilers detonated, sinking the cruiser but only taking 68 sailors with her. Kako was struck from the Japanese Naval list a month later.
Media
Excellent additions to the article would be video guides, screenshots from the game, and photos.
See also
Links to the articles on the War Thunder Wiki that you think will be useful for the reader, for example:
- reference to the series of the ship;
- links to approximate analogues of other nations and research trees.
External links
Paste links to sources and external resources, such as:
- topic on the official game forum;
- encyclopedia page on the ship;
- other literature.
| Japan heavy cruisers | |
|---|---|
| Furutaka-class | IJN Furutaka · IJN Kako |
| Aoba-class | IJN Aoba |
| Myōkō-class | IJN Myoko |
| Mogami-class | IJN Mogami |
| Tone-class | IJN Tone |
