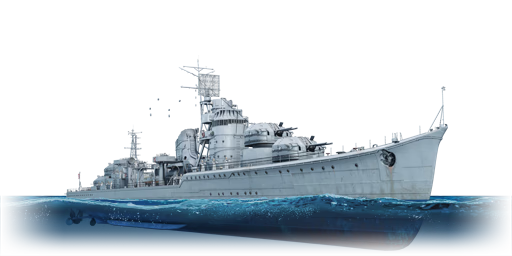
IJN Akizuki

From War Thunder Wiki
Jump to: navigation, search
Rank VI USA | Premium | Golden Eagles
A-10A Thunderbolt (Early)
jp_destroyer_akizuki.png
GarageImage IJN Akizuki.jpg
ArtImage IJN Akizuki.png
IJN Akizuki
AB RB SB
4.7 4.7 4.7
Class:
Research:18 000 Specs-Card-Exp.png
Purchase:47 000 Specs-Card-Lion.png
Show in game

Description

The Akizuki-class, IJN Akizuki, 1944 (秋月, namesake: Autumn Moon) was the lead ship of the Imperial Japanese Navy's new Type B destroyer category. They were originally designed as anti-air, carrier-screening destroyers, but the Imperial Japanese Navy General Staff Office intervened to make them more general purpose by adding a quadruple torpedo launcher and depth charges. During the war, the class proved to be a very capable multipurpose platform and was well-regarded in the IJN.

Introduced in Update 1.89 "Imperial Navy". The Akizuki has excellent air defense, numerous and fast-firing 100 mm cannons, and powerful torpedo armament; however, her design as an anti-air escort destroyer limits her top speed and only provides HE ammunition, dampening her surface combat capabilities.

General info

Survivability and armour

Armourfront / side / back
Main fire tower3 / 3 / 3 mm
Hull16 mm (steel)
Superstructure4 mm (steel)
Number of section8
Displacement3 700 t
Crew263 people

Akizuki has the following armour layout:

  • Main turrets: 3.175 mm, anti-fragmentation armour
  • Fire-control system: 3.175 mm, anti-fragmentation armour
  • Hull: 23 mm, steel
  • Superstructure: 8 mm, steel
Msg-info.png Steel has an armour multiplier of 0.45. The hull and superstructure are equivalent to 10.35 mm and 3.6 mm RHA, respectively.

The only real armour protection on Akizuki is the thin 3.175 mm anti-fragmentation armour plates protecting the main turrets and the fire-control system situated on top of the superstructure above the bridge. While it may protect against shrapnel, the armour offers trivial protection from any direct hit with destroyer-grade shells, which will always disable the turrets.

Akizuki has a crew complement of 263 people, which is roughly average for a destroyer. The ammunition magazines for the main battery are stored underneath each turret below the waterline, lowering the chance of an ammunition explosion from stray HE shells. There are 80-round first-stage ammo stowages directly beneath each turret, though these are small targets. Four extra torpedoes are also stored just aft of the torpedo launcher and are unarmoured.

Most of Akizuki's internals are beneath the waterline. The most notable exception to this is are the large fuel tanks that line the entire height of the ship around the engines and transmission. Direct hits in this area almost always result in a fire. Akizuki has three smokestacks that converge at their top. This makes for a smaller target from stray hits, but it increases the chances for them to all be disabled at once.

Mobility

Speedforward / back
AB75 / 35 km/h
RB61 / 29 km/h

Akizuki is the second largest destroyer currently in the game with a length of 134.2 m (after the USS Mitscher) and a total displacement of 3,700 tons. Her large displacement hampers her acceleration and stopping, while her long length and narrow beam make her sluggish in turning, with a rather large turn radius for a destroyer. Her top speed is 61 km/h, respectable for her size but on the slow side compared to other destroyers.

Mobility Characteristics
Game Mode Upgrade Status Maximum Speed (km/h) Turn Time (s) Turn Radius (m)
Forward Reverse
AB Stock 55 26 ~139.85 ~234.94
Upgraded 75 35 ___ ___
RB/SB Stock ___ ___ ___ ___
Upgraded 61 29 ___ ___

Modifications and economy

Repair costBasic → Reference
AB2 164 → 2 759 Sl icon.png
RB3 380 → 4 309 Sl icon.png
Total cost of modifications19 760 Rp icon.png
32 300 Sl icon.png
Talisman cost980 Ge icon.png
Crew training13 000 Sl icon.png
Experts47 000 Sl icon.png
Aces400 Ge icon.png
Research Aces280 000 Rp icon.png
Reward for battleAB / RB / SB
190 / 460 / 100 % Sl icon.png
136 / 136 / 136 % Rp icon.png
Modifications
Seakeeping Unsinkability Firepower
Mods new ship hull.png
Dry-Docking
Research:
990 Rp icon.png
Cost:
1 600 Sl icon.png
135 Ge icon.png
Mods new ship rudder.png
Rudder Replacement
Research:
890 Rp icon.png
Cost:
1 500 Sl icon.png
120 Ge icon.png
Mods new ship screw.png
Propeller Replacement
Research:
990 Rp icon.png
Cost:
1 600 Sl icon.png
135 Ge icon.png
Mods new ship engine.png
Engine Maintenance
Research:
1 600 Rp icon.png
Cost:
2 600 Sl icon.png
220 Ge icon.png
Mods ship damage control crew.png
Damage Control Division
Research:
990 Rp icon.png
Cost:
1 600 Sl icon.png
135 Ge icon.png
Mods ship fire control crew.png
Fire Division
Research:
890 Rp icon.png
Cost:
1 500 Sl icon.png
120 Ge icon.png
Mods engine smoke screen system.png
Smokescreen
Research:
890 Rp icon.png
Cost:
1 500 Sl icon.png
120 Ge icon.png
Mods ship anti fragmentation protection.png
Shrapnel Protection
Research:
990 Rp icon.png
Cost:
1 600 Sl icon.png
135 Ge icon.png
Mods ship venting.png
Ventilation
Research:
990 Rp icon.png
Cost:
1 600 Sl icon.png
135 Ge icon.png
Mods new ship pumps.png
New Pumps
Research:
1 600 Rp icon.png
Cost:
2 600 Sl icon.png
220 Ge icon.png
Mods ship ammo wetting.png
Ammo Wetting
Research:
1 600 Rp icon.png
Cost:
2 600 Sl icon.png
220 Ge icon.png
Mods tank ammo.png
25mm_type96_naval_ap_ammo_pack
Research:
990 Rp icon.png
Cost:
1 600 Sl icon.png
135 Ge icon.png
Mods he frag dist fuse ship.png
100mm_japan_navy_he_dist_fuse_ammo_pack
Research:
990 Rp icon.png
Cost:
1 600 Sl icon.png
135 Ge icon.png
Mods tank ammo.png
25mm_type96_naval_incendiary_ammo_pack
Research:
890 Rp icon.png
Cost:
1 500 Sl icon.png
120 Ge icon.png
Mods new aux caliber turrets.png
Auxiliary Armament Targeting
Research:
890 Rp icon.png
Cost:
1 500 Sl icon.png
120 Ge icon.png
Mods ship rangefinder.png
Improved Rangefinder
Research:
990 Rp icon.png
Cost:
1 600 Sl icon.png
135 Ge icon.png
Mods new main caliber turrets.png
Primary Armament Targeting
Research:
990 Rp icon.png
Cost:
1 600 Sl icon.png
135 Ge icon.png
Mods ship mortar.png
Bomb mortar
Research:
1 600 Rp icon.png
Cost:
2 600 Sl icon.png
220 Ge icon.png

Armament

Primary armament

4 х Turret2 x 100/65 mm Type 98 mod A cannon
Ammunition400 rounds
Vertical guidance-10° / 89°

Akizuki has eight total 100/65 mm Type 98 cannons in four two-gun turrets, with a pair superfiring forwards and a pair superfiring aft for a total broadside of eight guns. Each turret has 400 rounds of ammunition available, 80 of which are in a first-stage ammunition stowage, for a total of 1,600 rounds. With ammunition from the first-stage ammunition stowage, each gun has a rate of fire of 21 rounds per minute. Reload of the guns is 3.77 seconds with a stock crew and 2.9 seconds with an aced crew. Each turret can traverse horizontally at a rate of 12°/s and vertically at a rate of 16°/s.

Msg-info.png Superfiring: turrets mounted inline such that the rear turret(s) can fire over the top of the front turret
Msg-info.png Turrets are named sequentially, clockwise, starting at the bow
Guidance for the Main Gun Turrets
No.1 Turret No.2 Turret (superfiring) No.3 Turret (superfiring) No.4 Turret
Horizontal Vertical Horizontal Vertical Horizontal Vertical Horizontal Vertical
±154° -10°/+89° ±165° -10°/+89° ±160° -10°/+89° ±150° -10°/+89°

As expected for a smaller calibre guns, the 100 mm guns have very poor burst damage output per hit, but this is offset by very fast reload time, this allows the Akizuki to repeatedly hit an enemy, disabling their main guns over and over again to preventing them from fighting back, and slowly beat them into submission.

Penetration statistics
Ammunition Type of
warhead
Penetration @ 0° Angle of Attack (mm)
100 m 1,000 m 2,000 m 3,000 m 4,000 m 5,000 m
100 mm HE HE 13 13 13 13 13 13
100 mm HE-TF HE-TF 13 13 13 13 13 13
Shell details
Ammunition Type of
warhead
Velocity
(m/s)
Projectile
mass (kg)
Fuse delay
(m)
Fuse sensitivity
(mm)
Explosive mass
(TNT equivalent) (g)
Ricochet
0% 50% 100%
100 mm HE HE 1,000 13 0 0.1 950 79° 80° 81°
100 mm HE-TF HE-TF 1,000 13 0 0.1 950 79° 80° 81°

Secondary armament

20 х Turret25 mm/60 Type 96 automatic cannon
Ammunition1500 rounds
Belt capacity15 rounds
Fire rate261 shots/min
5 х Turret3 x 25 mm/60 Type 96 automatic cannon
Ammunition4500 rounds
Belt capacity15 rounds
Fire rate261 shots/min


Akizuki has a total of 35 Type 96 25 mm cannons, 10 single mounts along each broadside and 5 triple mounts in the centre. Each gun has a rate of fire of 261 rounds per minute and has a magazine size of 15 rounds. The single turrets have 1950 rounds of ammunition available while triple turrets have 5850 rounds available (1950 for each gun), for a total of 68,250 rounds. They can be reloaded in 1.61 seconds with a stock crew and in 1 second with an aced crew. Both the single and triple mounts can traverse horizontally at a rate of 50°/s and vertically at a rate of 55°/s.

Guidance for Secondary Gun Turrets (Click Expand to view)

Msg-info.png Turrets are ordered sequentially, clockwise, starting at the bow
Guidance for Secondary Gun Turrets
Gun Horizontal Vertical
25 mm/60 Type 96 (1x) +5°/+180° -10°/+80°
25 mm/60 Type 96 (1x) -80°/+100° -10°/+80°
25 mm/60 Type 96 (3x) ±180° -10°/+80°
25 mm/60 Type 96 (1x) -80°/+60° -10°/+80°
25 mm/60 Type 96 (1x) -80°/+75° -10°/+80°
25 mm/60 Type 96 (1x) -90°/+75° -10°/+80°
25 mm/60 Type 96 (1x) -70°/+90° -10°/+80°
25 mm/60 Type 96 (3x) ±180° -10°/+80°
25 mm/60 Type 96 (1x) -90°/+70° -10°/+80°
25 mm/60 Type 96 (1x) -50°/+80° -10°/+80°
25 mm/60 Type 96 (1x) -90°/+75° -10°/+80°
25 mm/60 Type 96 (3x) ±180° -10°/+80°
25 mm/60 Type 96 (1x) -65°/+80° -10°/+80°
25 mm/60 Type 96 (1x) -75°/+65° -10°/+80°
25 mm/60 Type 96 (3x) ±180° -10°/+80°
25 mm/60 Type 96 (1x) -140°/+80° -10°/+80°
25 mm/60 Type 96 (1x) -180°/+-5° -10°/+80°

There are three belt options available:

  • Universal: HEF-T* · HEF · AP-T · HEI
  • 25 mm APT belt: AP-T · AP-T · AP-T · HEF
  • 25 mm HEIT belts: HEF-T* · HEI · HEI · HEI

Penetration statistics
Ammunition Penetration @ 0° Angle of Attack (mm)
10 m 100 m 500 m 1,000 m 1,500 m 2,000 m
HEF-T* 2 2 2 2 2 2
HEF 2 2 2 2 2 2
AP-T 55 53 43 33 25 19
HEI 2 2 2 2 2 2
Shell details
Ammunition Velocity
(m/s)
Projectile
mass (kg)
Fuse delay
(m)
Fuse sensitivity
(mm)
Explosive mass
(TNT equivalent) (g)
Ricochet
0% 50% 100%
HEF-T* 900 0.24 0 0.1 8.5 79° 80° 81°
HEF 900 0.25 0 0.1 23.93 79° 80° 81°
AP-T 900 0.28 - - - 47° 60° 65°
HEI 900 0.26 0 0.1 5.52 79° 80° 81°

Additional armament

Setup 18 x 610 mm Type 93 Model 3 torpedo
Setup 216 x Type 95 depth charge
Setup 38 x 610 mm Type 93 Model 3 torpedo
4 x Type 95 depth charge

Akizuki has a single quadruple torpedo launcher mounted amidship. She can carry a total of eight 610 mm (24-inch) Type 93 Model 3 torpedoes, four in the torpedo tubes with an additional four directly behind them which can be used to reload the torpedo tubes after the first salvo has been launched. Important thing to note, the torpedo storage is an outside ammo rack and it will detonate if hit.

Mass (kg) Maximum speed in water (km/h) Travel distance (km) Depth stroke (m) Arming distance (m) Explosive type Explosive mass (kg) TNT equivalent (kg)
2800 91 15.00 1 50 Type 97 780 998.4

Akizuki can carry a total of 16 Type 95 depth charges with a pair of fixed Y-gun depth charge throwers mounted on her stern, each with one arm pointed towards each broadside. The depth charge throwers fire in pairs on each side and require reloading before another pair can be launched. The delay of the depth charge cannot be manually set, exploding 3 seconds after impact with the water.

Mass (kg) Explosive type Explosive mass (kg) TNT equivalent (kg)
160 Amatol 100 100

Usage in battles

Akizuki's 100 mm shells each have very little explosive mass. In fact, of any destroyer-grade HE shells, they have the second least TNT equivalence, ahead of only the HE rounds of the 4 in QF Mark V (102 mm). Despite this, Akizuki makes up for this deficiency with her very fast rate of fire of 21 rounds per minute. Her quick reloads and many guns allow her to effectively match or surpass her 5-inch armed counterparts in the amount of TNT she can send towards her target per minute. This rate of fire is Akizuki's greatest asset. As such, trading blows with enemy destroyers should be avoided at all costs as repairing, extinguishing fires, and pumping out water all incur heavy penalties on the reload rate. This is further compounded by her large, unarmoured profile and large turrets, which are easily disabled.

Akizuki naturally falls within two distinct playstyles. The first, making use of her incredibly fast 1,000 m/s main gun muzzle velocity (in fact, the fastest of any naval cannon currently in the game), Akizuki can sail into open seas where her lack of speed and manoeuvrability are less of an issue. Here, she can avoid taking damage by sitting outside the range of her opponent's weapons while being able to comfortably return fire of her own.

Conversely, the second playstyle is a result of her lack of speed, which naturally forces her to play a supportive role for the team around capture points. Here, islands provide the main safeguard against damage while Akizuki can pick off distracted enemies with a barrage of 100 mm shells. At such close ranges, it is even more important to keep the first-stage ammunition stowage filled to sustain Akizuki's rate of fire, so periodic stops in firing can be necessary. The height of the islands should be taken into account when choosing a cover, as Akizuki's fast muzzle velocity can lead to situations where an enemy can arc their shots over cover at Akizuki while she is unable to return fire. Take care when playing in cover though as Akizuki also has poor mobility, which can lead to her demise if she herself is distracted. If a PT boat gets too close, switch to the secondary 25 mm Type 96 cannons to quickly take it out.

Akizuki makes very quick work of unarmoured destroyers and PT boats. However, with no access to any AP shells and weak HE shells, Akizuki struggles with armoured destroyers, particularly the later US destroyers USS Sumner and USS Somers. These destroyers possess armoured hulls that, when angled, can deflect Akizuki's 100 mm HE shells. They also fire heavier ammunition with much more TNT equivalence at a rate that exceeds Akizuki's. However, their turrets are prominent and only lightly armoured, so disabling their guns should be prioritized. The lack of AP shells is further emphasized against light and heavy cruisers, which are completely armoured and immune to Akizuki's main gunfire. For these targets, the Type 93 Model 3 torpedo should be used.

Torpedoes

Carried onboard Akizuki is eight excellent Type 93 Model 3 torpedoes. The Type 93 Model 3 is one of the fastest torpedoes, has a very long maximum range, and has the largest TNT equivalence of any torpedo currently in the game. Because of their range and speed, they can be launched right away after spawning towards likely avenues of the approach of the enemy, possibly catching them off-guard where other torpedoes wouldn't be able to reach. In the Encounter game mode, they can be launched at the enemy convoy from the start of the match.

Four torpedoes are initially loaded in the torpedo tubes, with an additional four in storage directly behind the torpedo launcher to reload torpedo tubes once the first salvo has been launched. The initial four torpedoes should be fired off as soon as possible to remove what essentially amounts to a large, unarmoured ammunition magazine above deck. The remainder can either be launched in the same way as the first or reserved for dealing with heavily armoured targets. Although able to carry a total of eight torpedoes, Akizuki only has only a single quadruple torpedo launcher and thus only can fire four torpedoes at once.

Ammunition Choices

The 100 mm HE shell should be the primary ammunition choice against surface targets, as the HE-DF shell's fuse has a chance to set off prior to hitting the target. Several hundred HE-DF shells should still be taken for long-range anti-aircraft work to compensate for the short range of the secondary guns. To most effectively use them in this role:

  1. Fire off any ammunition currently in the breech and load HE-DF
  2. Toggle the AI gunners to target only aircraft
  3. Switch to secondary armament control and let the AI gunners fire the 100 mm cannons

There is almost no reason to take any other belt than 25 mm HEIT for the Type 96 cannons since their primary targets will be light boats and aircraft. While they provide adequate anti-aircraft cover at close ranges, their short effective range limits their use as anti-aircraft weapons.

Pros and cons

Pros:

  • Main gun turrets have a fast rate of fire, good firing arcs, and quick turret traverse
  • 100 mm main gun has the fastest muzzle velocity of any ship currently in the game
  • 25 mm Type 96 guns provide good close-range AA coverage and protection against PT boats
  • Type 93 Model 3 torpedoes: largest warhead of any torpedo, long-range, and fast speeds

Cons:

  • No AP shells for the main calibre guns, cannot effectively damage cruisers
  • Turrets are large and easily knocked out
  • Small explosive mass in main gun shells, low damage output per hit
  • Relatively slow compared to other destroyers
  • Bad manoeuvrability and large turn radius for a destroyer
  • Can only fire 4 torpedoes initially before reloading

History

The need arose in the late 1930s within the Imperial Japanese Navy for a dedicated anti-aircraft vessel for the defence of aircraft carrier task forces. The newest destroyer class in commission, the Kagerou-class armed with 12.7 cm/50 Type 3 guns, were found to be unreliable in the anti-aircraft because of their slow rate of fire, among other issues. At the time of the new design's inception, the 10.0 cm/65 Type 98 cannon had just been newly developed, and although it was a smaller calibre, it had a larger effective range and could sustain a greater rate of fire than the Type 3 cannon. Thus, in 1938, the Type 98 was chosen for what would become the Akizuki-class, or rather, the project was designed around the implementation of the new cannon. The design featured a pair of superfiring twin turrets (a first for Japanese destroyer design), with a pair fore and aft. These would be directed by two Type 94 anti-aircraft fire directors, with one mounted on the superstructure and one mounted just in front of the rear turret pair. Initial designs were presented in 1938 which lacked any sort of torpedo armament and were instead planned as gunships. However, the design was rejected and sent for revision as torpedo armament became a design requirement to meet the rising need for general-purpose destroyers. At that point in design though, only a single quadruple launcher could be mounted amidship, as well as two depth charge throwers for anti-submarine warfare. The final design was submitted in September 1938 and approved for production the following year.

The Akizuki-class were rather large destroyers with a length of 134.2 m, a beam of 11.6 m, and a total full load displacement of 3,700 tons. They had the same propulsion system as the preceding Kagerou-class, two Kampon geared steam engines, each driving a single propeller shaft, powered by steam from three Kampon boilers for a total of 52,000 shaft horsepower. However, being notably larger than the Kagerou-class, the Akizuki-class could only achieve 33 knots (61 km/h). The Akizuki-class destroyers as built would have eight total Type 98 cannons in twin Model A turrets. These were electrically driven and could train at 16° per second both horizontally and vertically, and they could fire at a rate of 21 rounds per minute, though 15 rounds per minute were more typical. Complementing this were two twin 25 mm Type 96 cannons for light AA work. Mounted amidship was the quadruple Type 92 torpedo launcher capable of firing the Type 93, of which the ships carried 8 total. At the stern were two Model 1934 depth charge throwers with a total of 54 Type 95 depth charges. Most ships of the class would be equipped shortly after completion with Type 93 sonar and the new Type 21 aerial search radar. Throughout the war, the Akizuki-class ships would undergo gradual improvements, including the removal of the rear Type 92 anti-aircraft fire director for a triple Type 96 mount; an increase in the overall amount of Type 96 cannons; the addition of four depth charge launchers with an increased depth charge capacity to 72; and various additions and upgrades to the sonar and radar suites.

A total of 54 Akizuki-class destroyers were planned to be built: 6 under the 1939 4th Naval Armaments Supplement Programme; 10 under the 1941 Rapid Naval Armaments Supplement Programme; and 16 initially, with an additional 22 planned, under the 1942 Modified 5th Naval Armaments Supplement Programme. However, due to a shortage of materials, all ships planned under the 1942 plan and four from the 1941 plan were cancelled. In total, only 12 would be built between 1940 and 1945. There were three distinct subclasses of the Akizuki-class:

  • Akizuki-class: the original design, 7 total built
  • Fuyutsuki-class: with a simplified hull for ease of production among other smaller changes, 4 total under the 1941 plan
  • Michitsuki-class: even further simplification of the Fuyutsuki-class, 16 planned under the 1942 plan with 5 conversions of Fuyutsuki-class ships, only 1 completed

Akizuki (秋月, "Autumn Moon"), the lead class of her ship, was laid down in on 30th July 1940 at Mairuzu Naval Arsenal, launched on 2nd July 1941, completed on 11th June 1942, though she never received her Type 92 radar. She was commissioned on the same day at Yokosuka Naval District and immediately departed to escort the aircraft carrier Zuikaku to the Aleutian Islands. An encounter with Allied forces was expected, though none came. Following in August 1942, Akizuki performed transport escort and shore bombardment duties in the Guadalcanal Campaign and participated in the Battle of the Eastern Solomons. While screening the light cruiser Yura, Allied air attacks scored hits and near misses on Akizuki. She returned to Yokosuka in November and entered dry docks for repairs, where she would also receive additional Type 96 cannons. Following this, Akizuki escorted Zuikaku back to the Solomons in January 1943. Later that month, on 19th January, Akizuki engaged the US submarine USS Nautilus and suffered two starboard torpedo hits, though the second failed to detonate.

Sustaining heavy damage, return to Japan was necessary. Along the way, Akizuki underwent several emergency repairs, including severing off her damaged bow and affixing a temporary bow. She would eventually make it back to Yokosuka in July 1943. The bow of her incomplete sister ship, Shimotsuki, was used to repair Akizuki, with full repairs finished in October. Afterwards, she underwent training and modernization. Returning to full duty in November, she departed once again for the Solomons where she would undergo training for the next several months. In June 1944, Akizuki participated in the Battle of the Philippine Sea, screening the aircraft carriers Taihou, Shoukaku, and Zuihaku, and returning to Japan afterwards for repairs and training. Akizuki returned to duty in October 1944 and assigned to Vice Admiral Ozawa as part of the "Northern Force" at Leyte Gulf. On 25th October 1944 during the Battle of Cape Engaño, while screening the carriers Zuikaku and Zuihou, US carrier aircraft attacked and hit Akizuki amidship, setting her afire and causing her to go dead in the water and consequently being left behind by the main force. Shortly afterwards, Akizuki suffered catastrophic explosion amidship on the starboard side, either by the detonation of her torpedoes or by a hit from an aerial torpedo of US Task Force 38, sinking her within six minutes. The destroyer Maki rescued 150 survivors, though she was forced to retreat and abandoned the rescue.

Devblog

In the late 1920s, the first Japanese aircraft carrier task force was created, consisting of two carriers and two destroyers. The two destroyers proved unsuitable as carrier escorts due to lack of capabilities and range, resulting in the need for more specialized vessels becoming apparent.

Initially, cruiser-class ships were chosen to escort carriers, considered, among other benefits, to have decent anti-air capabilities. However, the proposal was dismissed soon afterwards as a number of projected issues arose. Instead, the decision was made to construct specially designed anti-aircraft destroyers, which would fill the role of carrier escorts.

By July of 1938, a design was awaiting approval by the IJN high command. However, the initial design promised unrealistic performance figures and lacked distinct destroyer features, such as torpedo launchers. As a result, the design was ordered for revision, with a new draft being proposed by September. The final draft was then subsequently approved in April 1939 and the first construction orders for the new Akizuki-class destroyers followed shortly afterwards.

Akizuki, the lead ship of the class, was laid down in the Maizuru Naval Arsenal in July 1940 and saw completion in June 1942. Immediately after her commissioning, Akizuki took part in the Battle of the Eastern Solomons in August, followed up by participating in the Guadalcanal campaign. After her first engagements, Akizuki returned to Japan for repairs in late 1942.

In January 1943, Akizuki was engaged by the American submarine USS Nautilus, receiving severe damage as a result. The subsequent repair efforts lasted until October before the ship was deemed combat-ready again. After participating in the Battle of the Philippine Sea in June 1944, Akizuki departed for what would become her last operation in October 1944. During the Battle of Cape Engaño, Akizuki suffered a catastrophic explosion, which ultimately led to her sinking.

Media

Skins
Videos

See also

External links


Maizuru Naval Arsenal (舞鶴海軍工廠)
Torpedo Boats (TB) 
Chidori-class  Chidori
Destroyers (DD) 
Yugumo-class  IJN Yugumo · IJN Hayanami
Shimakaze-class  IJN Shimakaze
Akizuki-class  IJN Akizuki · IJN Hatsuzuki

Japan destroyers
  IJN
Momi-class  IJN Momi
Mutsuki-class  IJN Mutsuki · IJN Satsuki
Fubuki-class  IJN Ayanami
Hatsuharu-class  IJN Hatsuharu · IJN Nenohi
Shiratsuyu-class  IJN Yuudachi
Yugumo-class  IJN Yugumo · IJN Hayanami · IJN Kiyoshimo
Shimakaze-class  IJN Shimakaze
Akizuki-class  IJN Akizuki · IJN Hatsuzuki
  JMSDF
Ariake-class*  JDS Yūgure (DD-184)
Harukaze-class  JDS Harukaze (DD-101)
  * Modified Fletcher-class destroyers