Difference between revisions of "BTR-152A"
Colok76286 (talk | contribs) (Edits) |
(Tag: Visual edit) |
||
| (44 intermediate revisions by 22 users not shown) | |||
| Line 1: | Line 1: | ||
| − | + | {{Specs-Card|code=ussr_btr_152a}} | |
| − | |||
| − | |||
| − | |||
| − | |||
| − | {{Specs-Card | ||
| − | |code=ussr_btr_152a | ||
| − | |||
| − | }} | ||
== Description == | == Description == | ||
| − | <!-- ''In the description, the first part | + | <!--''In the description, the first part needs to be about the history of the creation and combat usage of the vehicle, as well as its key features. In the second part, tell the reader about the ground vehicle in the game. Insert the screenshot of the vehicle. If the novice player does not remember the vehicle by name, they will immediately understand what kind of vehicle it is talking about.''--> |
| − | The ''' | + | [[File:GarageImage_BTR-152A.jpg|420px|thumb|left]] |
| + | {{break}} | ||
| + | The '''{{specs|name}}''' is a Rank {{specs|rank}} Soviet Self-Propelled Anti-Aircraft gun {{Battle-rating|1}}. It was introduced in [[Update 1.71 "New E.R.A"]]. As with any APC, it features light armour on a spacey vehicle, a good crew count, a decent gun and good mobility. Since there is no infantry to fight, the BTR is used as an AA in-game. | ||
| − | + | The BTR-152 is an APC (Armored Personnel Carrier) on a six-wheeled, open-topped truck chassis, meaning unlike the Soviet truck-mounted AA vehicles, it can survive low-caliber MG fire from ground vehicles. However, anything above 30 caliber doesn't have much trouble taking this vehicle down. It features a top-mounted twin [[KPVT (14.5 mm)|KPVT]] gun mount with good traverse and elevation rate. Something to note is the presence of the two spare loaders in the back. Inexperienced players, or those who don't know the structure of the BTR-152A, tend to repeatedly shoot the cab of the truck, leaving these two crewmembers relatively unharmed. | |
| + | |||
| + | '''Armour'''<br> | ||
| + | While armour is nothing impressive for any BR, it is in no way rubbish or useless since it protects the crew from most light ground menaces such as MG fire, most indirect artillery shrapnel, low-caliber HE shells and even some medium-range HMG fire. These light plates have some chances not to detonate incoming APHE rounds, virtually turning them into pure AP shells. To maximize this effect, one should never face tanks upfront. It is recommended to always show side armour if fired at, as from the side, modules are quite spaced out. Avoid autocannons at all costs since any of them can shred this APC in no time from almost any angle. Anyways, in most scenarios, it is better recommended to '''just hit the gaz''' and avoid any incoming shots/artillery fire. | ||
| + | |||
| + | '''Mobility'''<br> | ||
| + | Here is an interesting feature that can provide any wise commander with a few kills : BTR-152A's speed. This light APC can carry itself over road at breakneck speeds, provided it can ride a paved road. In good circumstances, it can reach over 80km/h and keep its good speed even while turning, due to its wheeled chassis. Offroad mobility is not bad, meaning it can easily follow medium and light tanks on any terrain, making for an effective flanker. Backwards, speed tops at -20 km/h, which is enough to get out of any ugly situation if needed. With its large wheels, this truck can cross some small trenches and rivers, where its GAZ and ZIS truck counterparts would ditch. This truck's center of mass is quite low, allowing it to turn at high speeds without rolling. | ||
| + | |||
| + | '''Firepower'''<br> | ||
| + | This is where this truck shines over its predecessor and followers: it has a higher rate of fire and more ammunition while retaining a good armour penetration and having a fully rotating turret (where the 72-K trucks are unable fire directly in front). Each ammo loadout can effectively engage tanks' sides with relative ease (at close range) and easily shred even heavy planes. The guns can fire for 10 seconds before overheating, or ~150 bullets, half of their magazine. | ||
== General info == | == General info == | ||
=== Survivability and armour === | === Survivability and armour === | ||
| − | + | <!--''Describe armour protection. Note the most well protected and key weak areas. Appreciate the layout of modules as well as the number and location of crew members. Is the level of armour protection sufficient, is the placement of modules helpfull for survival in combat?'' | |
| − | <!-- ''Describe armour protection. Note the most well protected and key weak areas. Appreciate the layout of modules as well as the number and location of crew members. Is the level of armour protection sufficient, is the placement of modules | ||
| − | |||
| − | |||
| + | ''If necessary use a visual template to indicate the most secure and weak zones of the armour.''--> | ||
'''Armour type:''' | '''Armour type:''' | ||
| Line 30: | Line 31: | ||
! Armour !! Front (Slope angle) !! Sides !! Rear !! Roof | ! Armour !! Front (Slope angle) !! Sides !! Rear !! Roof | ||
|- | |- | ||
| − | | Hull || 13 mm (34-64°) ''Grille'' <br> 13 mm (41°) ''Windshield'' <br> 6 mm (84°) ''Hood'' || 10 mm (0-22°) ''Main hull''<br> 6 mm (0-38°) '' | + | | Hull || 13 mm (34-64°) ''Grille'' <br> 13 mm (41°) ''Windshield'' <br> 6 mm (84°) ''Hood'' || 10 mm (0-22°) ''Main hull''<br> 6 mm (0-38°) ''Above wheels'' || 8 mm (0°) || N/A |
|- | |- | ||
| Turret || 6 mm (15°) ''Magazine'' <br> 10 mm (0°) ''Gun rack'' || N/A || 6 mm (0°) || N/A | | Turret || 6 mm (15°) ''Magazine'' <br> 10 mm (0°) ''Gun rack'' || N/A || 6 mm (0°) || N/A | ||
| Line 40: | Line 41: | ||
=== Mobility === | === Mobility === | ||
| − | + | <!--''Write about the mobility of the ground vehicle. Estimate the specific power and maneuverability as well as the maximum speed forward and backward.''--> | |
| − | <!-- ''Write about the mobility of the ground vehicle. Estimate the specific power and | + | {| class="wikitable" style="text-align:center" |
| − | + | |- | |
| − | { | + | ! colspan="3" | Mobility characteristic |
| − | + | |- | |
| − | + | ! Weight (tons) | |
| − | + | ! colspan="1" | Add-on Armor<br>weight (tons) | |
| − | + | ! colspan="1" | Max speed (km/h) | |
| − | + | |- | |
| + | | rowspan="2" | 8.6 || colspan="1" rowspan="2" | N/A || colspan="1" | 90 (AB) | ||
| + | |- | ||
| + | |83 (RB/SB) | ||
| + | |- | ||
| + | ! colspan="3" | Engine power (horsepower) | ||
| + | |- | ||
| + | ! colspan="1" | Mode | ||
| + | !Stock | ||
| + | !Upgraded | ||
| + | |- | ||
| + | |''Arcade'' | ||
| + | |156 | ||
| + | |173 | ||
| + | |- | ||
| + | |''Realistic/Simulator'' | ||
| + | |97 | ||
| + | |103 | ||
| + | |- | ||
| + | ! colspan="3" | Power-to-weight ratio (hp/ton) | ||
| + | |- | ||
| + | ! colspan="1" | Mode | ||
| + | !Stock | ||
| + | !Upgraded | ||
| + | |- | ||
| + | |''Arcade'' | ||
| + | |18.13 | ||
| + | |20.12 | ||
| + | |- | ||
| + | |''Realistic/Simulator'' | ||
| + | |11.28 | ||
| + | |11.98 | ||
| + | |- | ||
| + | |} | ||
== Armaments == | == Armaments == | ||
| − | + | <!--''Give the reader information about the characteristics of the main gun. Assess its effectiveness in a battle based on the reloading speed, ballistics and the power of shells. Do not forget about the flexibilty of the fire, that is how quickly the cannon can be aimed at the target, open fire on it and aim at another enemy. Add a link to the main article on the gun: <code><nowiki>{{main|Name of the weapon}}</nowiki></code>. Describe in general terms the ammunition available for the main gun. Give advice on how to use them and how to fill the ammunition storage.''--> | |
| − | |||
| − | |||
| − | <!-- ''Give the reader information about the characteristics of the main gun. Assess its effectiveness in a battle based on the reloading speed, ballistics and the power of shells. Do not forget about the | ||
{{main|KPVT (14.5 mm)}} | {{main|KPVT (14.5 mm)}} | ||
| − | + | {| class="wikitable" style="text-align:center" | |
| − | + | |- | |
| − | + | ! colspan="6" | [[KPVT (14.5 mm)|14.5 mm KPVT]] | |
| + | |- | ||
| + | ! colspan="2" rowspan="1" style="width:5em" |Capacity (Belt capacity each) | ||
| + | ! rowspan="1" | Fire rate <br> (shots/minute) | ||
| + | ! rowspan="1" | Vertical <br> guidance | ||
| + | ! rowspan="1" | Horizontal <br> guidance | ||
| + | ! rowspan="1" | Stabilizer | ||
| + | |- | ||
| + | | colspan="2" | 1,200 (150) || 600 || -5°/+89° || ±180° || N/A | ||
| + | |- | ||
| + | ! colspan="6" | Turret rotation speed (°/s) | ||
| + | |- | ||
| + | ! style="width:4em" |Mode | ||
| + | ! style="width:4em" |Stock | ||
| + | ! style="width:4em" |Upgraded | ||
| + | ! style="width:4em" |Prior + Full crew | ||
| + | ! style="width:4em" |Prior + Expert qualif. | ||
| + | ! style="width:4em" |Prior + Ace qualif. | ||
| + | |- | ||
| + | | ''Arcade'' || 27.4 || 37.9 || __.__ || __.__ || __.__ | ||
|- | |- | ||
| − | + | | ''Realistic'' || 27.4 || 32.2 || __.__ || __.__ || __.__ | |
|- | |- | ||
| − | ! | + | ! colspan="4" | Reloading rate (seconds) |
| − | |||
| − | |||
|- | |- | ||
| − | ! | + | ! colspan="1" style="width:4em" |Stock |
| − | + | ! colspan="1" style="width:4em" |Prior + Full crew | |
| + | ! colspan="1" style="width:4em" |Prior + Expert qualif. | ||
| + | ! colspan="1" style="width:4em" |Prior + Ace qualif. | ||
|- | |- | ||
| − | + | | 10.4 || __.__ || __.__ || __.__ | |
| − | | | ||
|- | |- | ||
|} | |} | ||
| − | ==== Ammunition ==== | + | === Belt statistics === |
| + | {| class="wikitable sortable" style="text-align:center" | ||
| + | |- | ||
| + | ! rowspan="2" data-sort-type="text" | Ammunition | ||
| + | ! colspan="6" | '''Penetration''' '''''in mm''''' '''@ 90°''' | ||
| + | |- | ||
| + | ! style="width:4em" |10m | ||
| + | ! style="width:4em" |100m | ||
| + | ! style="width:4em" |500m | ||
| + | ! style="width:4em" |1000m | ||
| + | ! style="width:4em" |1500m | ||
| + | ! style="width:4em" |2000m | ||
| + | |- | ||
| + | | Universal || 31 || 27 || 22 || 17 || 15 || 13 | ||
| + | |- | ||
| + | | API-T || 45 || 42 || 29 || 21 || 19 || 17 | ||
| + | |- | ||
| + | | IAI || 27 || 26 || 19 || 16 || 14 || 12 | ||
| + | |} | ||
| − | + | ===Belt types=== | |
| − | + | {| class="wikitable" | |
| − | + | | '''Belts''' || '''Shell composition''' || '''Combat usage''' | |
| + | |- | ||
| + | | align="left" |'''''Universal ''''' || align="left" | AP-I, API-T, IAI || align="left" | This is the default belt in usage up until unlocking the API-T belt. It can effectively engage both tanks and planes but is not as good against tanks as the API-T belt. | ||
| + | |- | ||
| + | | align="left" |'''''API-T''''' || align="left" | API-T, AP-I(c), IAI|| align="left" | Once unlocked, this is the best belt for dealing with both ground and air target. 1/3 of its bullets can rip trough some side armour (close range) at this BR. Another 1/3 of this belt is specifically purposed against planes. The last 1/3 is general-purpose API-T, ''okay'' but not ''good'' against both tanks and planes | ||
| + | |- | ||
| + | | align="left" |'''''IAI''''' || align="left" | IAI, API-T || align="left" | Specific belt for hunting planes 1/2 of this belt is IAI ammo, which has no penetration but sets fires to planes quite easily. In emergency situations, can be used against tanks. | ||
| + | |} | ||
| − | + | === [[Ammo racks|Ammo racks]] === | |
| − | + | [[File:Ammoracks BTR-152A.jpg|right|thumbnail|x250px|Ammo racks of the BTR-152A.]] | |
| − | + | {| class="wikitable sortable" style="text-align:center" | |
| − | [[File: | ||
| − | |||
| − | {| class="wikitable" style="text-align:center" | ||
|- | |- | ||
| − | ! Full<br>ammo | + | ! class="wikitable unsortable" |Full<br /> ammo |
| − | ! 1st<br>rack empty | + | ! class="wikitable unsortable" |1st<br /> rack empty |
| − | ! 2nd<br>rack empty | + | ! class="wikitable unsortable" |2nd<br /> rack empty |
| − | ! Visual<br>discrepancy | + | ! class="wikitable unsortable" |Visual<br /> discrepancy |
|- | |- | ||
| − | | ''' | + | || '''1,200''' || 600 ''(+600)'' || 0 ''(+1,200)'' || style="text-align:left" | no |
|- | |- | ||
|} | |} | ||
| − | == Usage in battles == | + | == Usage in the battles == |
| − | <!-- ''Describe the tactics of playing in the vehicle, the features of using vehicles in the team and advice on tactics. Refrain from creating a "guide" - do not impose a single point of view but | + | <!--''Describe the tactics of playing in the vehicle, the features of using vehicles in the team and advice on tactics. Refrain from creating a "guide" - do not impose a single point of view but give the reader food for thought. Describe the most dangerous enemies and give recommendations on fighting them. If necessary, note the specifics of the game in different modes (AB, RB, SB).''--> |
| − | + | As an AA Vehicle this thing is deadly to CAS that gets close. The MGs have good RPM and a good spread which is important in AA. As long as you lead correctly this vehicle can be used to shield you from 250lbs-1000lbs from the Allied aircraft or the 500 kgs from the Germans. If downtiered, it should do alright against most tanks as it has quite good pen, but if uptiered, you need to get on the sides or rear of most tanks. | |
| − | As an AA | ||
Stick close to the middle of the pack, but not too close to anyone to avoid becoming too obvious a target for tanks or aircraft. It is a good idea to stay close to the front lines, to help protect against aircraft and spot enemy tanks. It does have somewhat poor ammo capacity, so one might benefit from staying on a point to reload while swatting planes out of the sky. | Stick close to the middle of the pack, but not too close to anyone to avoid becoming too obvious a target for tanks or aircraft. It is a good idea to stay close to the front lines, to help protect against aircraft and spot enemy tanks. It does have somewhat poor ammo capacity, so one might benefit from staying on a point to reload while swatting planes out of the sky. | ||
| Line 106: | Line 176: | ||
This vehicle can easily be used as a frontline AA and skilled players can even flank with such a truck. | This vehicle can easily be used as a frontline AA and skilled players can even flank with such a truck. | ||
| − | '''Frontline AA''' | + | '''Frontline AA'''<br> |
| − | |||
Stick to allies and watch the skies. Team play is key with this SPAA since it cannot effectively destroy most ground targets from the front; it will often have to rely on ally firepower. When the battle gets hot, do not hesitate to hit the gas and reach cover while keeping an eye on the sky. Watch out for fighters since they will try to strafe this juicy open-topped target. Loading the API-T belt is recommended, as it can engage both tanks and planes (both of them can appear in sight at any moment). | Stick to allies and watch the skies. Team play is key with this SPAA since it cannot effectively destroy most ground targets from the front; it will often have to rely on ally firepower. When the battle gets hot, do not hesitate to hit the gas and reach cover while keeping an eye on the sky. Watch out for fighters since they will try to strafe this juicy open-topped target. Loading the API-T belt is recommended, as it can engage both tanks and planes (both of them can appear in sight at any moment). | ||
'''Flanker'''<br> | '''Flanker'''<br> | ||
| − | Be sneaky. Any tank can end this truck (or at least critically damage it) at any range. Use | + | Be sneaky. Any tank can end this truck (or at least critically damage it) at any range. Use road to maximize mobility and strike quickly. Take out tanks by their sides, empty your magazines and retreat to cover, and make sure to not stay in the same spot for too long. If the enemy knows your presence (turret turned towards you), abort flanking maneuvers and return to the safety of the team. |
=== Pros and cons === | === Pros and cons === | ||
| − | <!-- '' | + | <!--''Summarize and briefly evaluate the vehicle in terms of its characteristics and combat effectiveness. Mark its pros and cons in a bulleted list. Do not use more than 6 points for each of the characteristics. Avoid using categorical definitions such as "bad", "good" and the like - they have a substitution in the form of softer "inadequate", "effective".''--> |
| − | |||
'''Pros:''' | '''Pros:''' | ||
| − | * | + | * Good rate of fire (effective AA). |
| − | * | + | * All ammo loads contains AP shells with at least 25 mm of penetration. |
| − | * Small turret and high mounted guns | + | * Elevation of 89° and 360° rotating turret means no AA blind spot. |
| − | * Can fire a whole | + | * Small turret and high mounted guns makes hull-down position extremely effective. |
| − | * Huge | + | * Can fire a whole 10s before weapons jams due to heat. |
| − | * Fast turret traverse and elevation | + | * Huge magazines, reloading is rare. |
| + | * Huge ammo load means it is not likely to go dry. | ||
| + | * Decent damage. | ||
| + | * Can cross small trenches. | ||
| + | * Fast turret traverse and elevation. | ||
| + | * Small ammo racks. | ||
* Less likely to be destroyed by ramming compared to the GAZ trucks | * Less likely to be destroyed by ramming compared to the GAZ trucks | ||
'''Cons:''' | '''Cons:''' | ||
| − | * | + | * AP rounds loose a lot of penetration between 100 and 500 m. |
| − | * Long reload time | + | * |
| − | * | + | * Relatively high vehicle. |
| − | * | + | * Long reload time. |
| − | * | + | * If firing continuously, can only fire half of its mag before having to unjam weapons. |
| − | + | * Open-topped, fears strafing planes and artilery. | |
| + | * Vulnerable to HMG and autocannons. | ||
== History == | == History == | ||
| − | + | ''Describe the history of the creation and combat usage of the ground vehicle in more detail than in the introduction. If the historical reference turns out to be too big, take it to a separate article, taking a link to an article about the vehicle and adding a block "/historical reference" (example: https://wiki.warthunder.com/Name-vehicles/historical reference) and add a link to it here using the <code>main</code> template. Be sure to include links to sources at the end of the article.'' | |
| − | |||
| − | |||
| − | |||
| − | |||
| − | |||
| − | |||
| − | |||
| − | |||
== Media == | == Media == | ||
| − | + | ''An excellent addition to the article will be video guides, as well as screenshots from the game and photos.'' | |
| − | |||
| − | |||
| − | + | == Read also == | |
| − | + | * [https://warthunder.com/en/news/4901-development-btr-152a-ztpu-2-skeet-shooter-en [Devblog<nowiki>]</nowiki> BTR-152A (ZTPU-2): Skeet Shooter] | |
| − | |||
| − | |||
| − | |||
| − | </ | ||
| − | == | + | == Sources == |
| − | + | ''Paste links to sources and external resources, such as:'' | |
| − | |||
| − | |||
| − | |||
| − | |||
| − | |||
| − | |||
| − | |||
* ''topic on the official game forum;'' | * ''topic on the official game forum;'' | ||
| − | * ''other literature.'' | + | * ''other literature.'' |
| − | |||
| − | |||
| − | |||
{{USSR anti-aircraft vehicles}} | {{USSR anti-aircraft vehicles}} | ||
| − | |||
Revision as of 14:22, 18 April 2019
Contents
Description

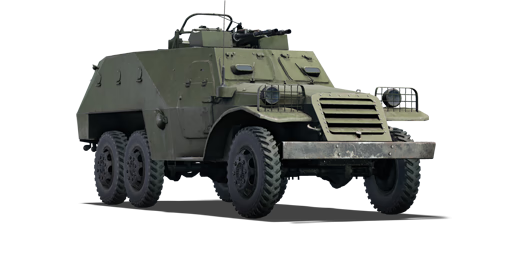
The KB ZIS BTR-152A is a Rank II Soviet Self-Propelled Anti-Aircraft gun
with a battle rating of 3.0 (AB) and 2.7 (RB/SB). It was introduced in Update 1.71 "New E.R.A". As with any APC, it features light armour on a spacey vehicle, a good crew count, a decent gun and good mobility. Since there is no infantry to fight, the BTR is used as an AA in-game.
The BTR-152 is an APC (Armored Personnel Carrier) on a six-wheeled, open-topped truck chassis, meaning unlike the Soviet truck-mounted AA vehicles, it can survive low-caliber MG fire from ground vehicles. However, anything above 30 caliber doesn't have much trouble taking this vehicle down. It features a top-mounted twin KPVT gun mount with good traverse and elevation rate. Something to note is the presence of the two spare loaders in the back. Inexperienced players, or those who don't know the structure of the BTR-152A, tend to repeatedly shoot the cab of the truck, leaving these two crewmembers relatively unharmed.
Armour
While armour is nothing impressive for any BR, it is in no way rubbish or useless since it protects the crew from most light ground menaces such as MG fire, most indirect artillery shrapnel, low-caliber HE shells and even some medium-range HMG fire. These light plates have some chances not to detonate incoming APHE rounds, virtually turning them into pure AP shells. To maximize this effect, one should never face tanks upfront. It is recommended to always show side armour if fired at, as from the side, modules are quite spaced out. Avoid autocannons at all costs since any of them can shred this APC in no time from almost any angle. Anyways, in most scenarios, it is better recommended to just hit the gaz and avoid any incoming shots/artillery fire.
Mobility
Here is an interesting feature that can provide any wise commander with a few kills : BTR-152A's speed. This light APC can carry itself over road at breakneck speeds, provided it can ride a paved road. In good circumstances, it can reach over 80km/h and keep its good speed even while turning, due to its wheeled chassis. Offroad mobility is not bad, meaning it can easily follow medium and light tanks on any terrain, making for an effective flanker. Backwards, speed tops at -20 km/h, which is enough to get out of any ugly situation if needed. With its large wheels, this truck can cross some small trenches and rivers, where its GAZ and ZIS truck counterparts would ditch. This truck's center of mass is quite low, allowing it to turn at high speeds without rolling.
Firepower
This is where this truck shines over its predecessor and followers: it has a higher rate of fire and more ammunition while retaining a good armour penetration and having a fully rotating turret (where the 72-K trucks are unable fire directly in front). Each ammo loadout can effectively engage tanks' sides with relative ease (at close range) and easily shred even heavy planes. The guns can fire for 10 seconds before overheating, or ~150 bullets, half of their magazine.
General info
Survivability and armour
Armour type:
- Rolled homogeneous armour
| Armour | Front (Slope angle) | Sides | Rear | Roof |
|---|---|---|---|---|
| Hull | 13 mm (34-64°) Grille 13 mm (41°) Windshield 6 mm (84°) Hood |
10 mm (0-22°) Main hull 6 mm (0-38°) Above wheels |
8 mm (0°) | N/A |
| Turret | 6 mm (15°) Magazine 10 mm (0°) Gun rack |
N/A | 6 mm (0°) | N/A |
Notes:
- Wheels are 2 mm thick.
Mobility
| Mobility characteristic | ||
|---|---|---|
| Weight (tons) | Add-on Armor weight (tons) |
Max speed (km/h) |
| 8.6 | N/A | 90 (AB) |
| 83 (RB/SB) | ||
| Engine power (horsepower) | ||
| Mode | Stock | Upgraded |
| Arcade | 156 | 173 |
| Realistic/Simulator | 97 | 103 |
| Power-to-weight ratio (hp/ton) | ||
| Mode | Stock | Upgraded |
| Arcade | 18.13 | 20.12 |
| Realistic/Simulator | 11.28 | 11.98 |
Armaments
| 14.5 mm KPVT | |||||
|---|---|---|---|---|---|
| Capacity (Belt capacity each) | Fire rate (shots/minute) |
Vertical guidance |
Horizontal guidance |
Stabilizer | |
| 1,200 (150) | 600 | -5°/+89° | ±180° | N/A | |
| Turret rotation speed (°/s) | |||||
| Mode | Stock | Upgraded | Prior + Full crew | Prior + Expert qualif. | Prior + Ace qualif. |
| Arcade | 27.4 | 37.9 | __.__ | __.__ | __.__ |
| Realistic | 27.4 | 32.2 | __.__ | __.__ | __.__ |
| Reloading rate (seconds) | |||||
| Stock | Prior + Full crew | Prior + Expert qualif. | Prior + Ace qualif. | ||
| 10.4 | __.__ | __.__ | __.__ | ||
Belt statistics
| Ammunition | Penetration in mm @ 90° | |||||
|---|---|---|---|---|---|---|
| 10m | 100m | 500m | 1000m | 1500m | 2000m | |
| Universal | 31 | 27 | 22 | 17 | 15 | 13 |
| API-T | 45 | 42 | 29 | 21 | 19 | 17 |
| IAI | 27 | 26 | 19 | 16 | 14 | 12 |
Belt types
| Belts | Shell composition | Combat usage |
| Universal | AP-I, API-T, IAI | This is the default belt in usage up until unlocking the API-T belt. It can effectively engage both tanks and planes but is not as good against tanks as the API-T belt. |
| API-T | API-T, AP-I(c), IAI | Once unlocked, this is the best belt for dealing with both ground and air target. 1/3 of its bullets can rip trough some side armour (close range) at this BR. Another 1/3 of this belt is specifically purposed against planes. The last 1/3 is general-purpose API-T, okay but not good against both tanks and planes |
| IAI | IAI, API-T | Specific belt for hunting planes 1/2 of this belt is IAI ammo, which has no penetration but sets fires to planes quite easily. In emergency situations, can be used against tanks. |
Ammo racks

| Full ammo |
1st rack empty |
2nd rack empty |
Visual discrepancy |
|---|---|---|---|
| 1,200 | 600 (+600) | 0 (+1,200) | no |
Usage in the battles
As an AA Vehicle this thing is deadly to CAS that gets close. The MGs have good RPM and a good spread which is important in AA. As long as you lead correctly this vehicle can be used to shield you from 250lbs-1000lbs from the Allied aircraft or the 500 kgs from the Germans. If downtiered, it should do alright against most tanks as it has quite good pen, but if uptiered, you need to get on the sides or rear of most tanks.
Stick close to the middle of the pack, but not too close to anyone to avoid becoming too obvious a target for tanks or aircraft. It is a good idea to stay close to the front lines, to help protect against aircraft and spot enemy tanks. It does have somewhat poor ammo capacity, so one might benefit from staying on a point to reload while swatting planes out of the sky.
This vehicle can easily be used as a frontline AA and skilled players can even flank with such a truck.
Frontline AA
Stick to allies and watch the skies. Team play is key with this SPAA since it cannot effectively destroy most ground targets from the front; it will often have to rely on ally firepower. When the battle gets hot, do not hesitate to hit the gas and reach cover while keeping an eye on the sky. Watch out for fighters since they will try to strafe this juicy open-topped target. Loading the API-T belt is recommended, as it can engage both tanks and planes (both of them can appear in sight at any moment).
Flanker
Be sneaky. Any tank can end this truck (or at least critically damage it) at any range. Use road to maximize mobility and strike quickly. Take out tanks by their sides, empty your magazines and retreat to cover, and make sure to not stay in the same spot for too long. If the enemy knows your presence (turret turned towards you), abort flanking maneuvers and return to the safety of the team.
Pros and cons
Pros:
- Good rate of fire (effective AA).
- All ammo loads contains AP shells with at least 25 mm of penetration.
- Elevation of 89° and 360° rotating turret means no AA blind spot.
- Small turret and high mounted guns makes hull-down position extremely effective.
- Can fire a whole 10s before weapons jams due to heat.
- Huge magazines, reloading is rare.
- Huge ammo load means it is not likely to go dry.
- Decent damage.
- Can cross small trenches.
- Fast turret traverse and elevation.
- Small ammo racks.
- Less likely to be destroyed by ramming compared to the GAZ trucks
Cons:
- AP rounds loose a lot of penetration between 100 and 500 m.
- Relatively high vehicle.
- Long reload time.
- If firing continuously, can only fire half of its mag before having to unjam weapons.
- Open-topped, fears strafing planes and artilery.
- Vulnerable to HMG and autocannons.
History
Describe the history of the creation and combat usage of the ground vehicle in more detail than in the introduction. If the historical reference turns out to be too big, take it to a separate article, taking a link to an article about the vehicle and adding a block "/historical reference" (example: https://wiki.warthunder.com/Name-vehicles/historical reference) and add a link to it here using the main template. Be sure to include links to sources at the end of the article.
Media
An excellent addition to the article will be video guides, as well as screenshots from the game and photos.
Read also
Sources
Paste links to sources and external resources, such as:
- topic on the official game forum;
- other literature.
| USSR anti-aircraft vehicles | |
|---|---|
| GAZ-AAA | GAZ-AAA (4M) · GAZ-AAA (DShK) |
| BTR-152 | BTR-152A · BTR-152D |
| Wheeled/Half-tracked | GAZ-MM (72-K) · ZiS-12 (94-KM) · ZiS-43 |
| Radar SPAAG | ZSU-23-4 · ZSU-37-2 |
| SAM | ZSU-23-4M4 · Strela-10M2 · 2S6 · Pantsir-S1 |
| Other | ZUT-37 · ZSU-37 · BTR-ZD · ZSU-57-2 |
| Czechoslovakia | M53/59 |
| North Vietnam | ▂Phòng không T-34 |
