Difference between revisions of "AF D3"
Colok76286 (talk | contribs) (Edits) |
|||
| Line 6: | Line 6: | ||
== Description == | == Description == | ||
<!-- ''In the first part of the description, cover the history of the ship's creation and military application. In the second part, tell the reader about using this ship in the game. Add a screenshot: if a beginner player has a hard time remembering vehicles by name, a picture will help them identify the ship in question.'' --> | <!-- ''In the first part of the description, cover the history of the ship's creation and military application. In the second part, tell the reader about using this ship in the game. Add a screenshot: if a beginner player has a hard time remembering vehicles by name, a picture will help them identify the ship in question.'' --> | ||
| − | The '''{{Specs|name}}''' (abbreviated as '''{{Specs|pseudonym}}''') is a rank {{Specs|rank}} German naval ferry barge {{Battle-rating}}. It was introduced in [[Update 1.79 "Project X"]] in the fleet closed beta test. It is essentially the [[AF D1]] equipped with a larger | + | The '''{{Specs|name}}''' (abbreviated as '''{{Specs|pseudonym}}''') is a rank {{Specs|rank}} German naval ferry barge {{Battle-rating}}. It was introduced in [[Update 1.79 "Project X"]] in the fleet closed beta test. It is essentially the [[AF D1]] equipped with a larger 105 mm cannons. |
== General info == | == General info == | ||
| Line 15: | Line 15: | ||
Although the armour doesn't cover the whole boat, the survivability is not that bad as it is a very long boat with lots of empty space inside for shells to go through. It is thus important that enemies with rapid-firing guns do not get too close to the {{PAGENAME}} as they can riddle the entire boat with shells and hit critical components through the armour. | Although the armour doesn't cover the whole boat, the survivability is not that bad as it is a very long boat with lots of empty space inside for shells to go through. It is thus important that enemies with rapid-firing guns do not get too close to the {{PAGENAME}} as they can riddle the entire boat with shells and hit critical components through the armour. | ||
| − | Staying far from the enemies and attacking them with the 10. | + | Staying far from the enemies and attacking them with the 10.5 cm guns is the best way to improve the lifespan of the {{PAGENAME}}. |
=== Mobility === | === Mobility === | ||
| Line 21: | Line 21: | ||
<!-- ''Write about the ship's mobility. Evaluate its power and manoeuvrability, rudder rerouting speed, stopping speed at full tilt, with its maximum forward and reverse speed.'' --> | <!-- ''Write about the ship's mobility. Evaluate its power and manoeuvrability, rudder rerouting speed, stopping speed at full tilt, with its maximum forward and reverse speed.'' --> | ||
| + | {{NavalMobility}} | ||
| + | |||
| + | Like other German naval barges, the {{PAGENAME}} has an abysmal top speed of just 20 km/h (RB) and very sluggish turn time. Due to the long hull design, the {{PAGENAME}} has a trouble navigating through various narrow passages and avoiding obstacles and incoming torpedoes. | ||
| − | |||
| − | |||
=== Modifications and economy === | === Modifications and economy === | ||
{{Specs-Economy}} | {{Specs-Economy}} | ||
| Line 34: | Line 35: | ||
{{main|10.5 cm SK C/32 (105 mm)}} | {{main|10.5 cm SK C/32 (105 mm)}} | ||
| − | The {{PAGENAME}} has two | + | The {{PAGENAME}} has two 105 mm SK C/32 turrets as its main armament which is a direct improvement from the 88 mm FlaK from its predecessor. It has higher explosive mass and penetration with a fast reload time of just 4.64 seconds. The main gun can fire the following ammo types: HE (effective against most targets), HE with base fuse (effective against armoured targets), and HE-TF (for anti-aircraft purposes). The barges can carry up to 200 shells in total. |
| − | + | {| class="wikitable sortable" style="text-align:center" width="100%" | |
| − | + | ! colspan="8" | Penetration statistics | |
| − | HE | + | |- |
| − | + | ! rowspan="2" data-sort-type="text" | Ammunition | |
| − | HE | + | ! rowspan="2" | Type of<br>warhead |
| − | + | ! colspan="6" | Penetration @ 0° Angle of Attack (mm) | |
| − | HE-TF | + | |- |
| − | + | ! 1,000 m !! 2,500 m !! 5,000 m !! 7,500 m !! 10,000 m !! 15,000 m | |
| − | + | |- | |
| + | | 10.5 cm Sprgr. L/4.4 Kpf.Z || HE || 20 || 20 || 20 || 20 || 20 || 20 | ||
| + | |- | ||
| + | | 10.5 cm Sprgr. L/4.4 Bd.Z || HE w/ base fuze || 50 || 42 || 33 || 28 || 25 || 21 | ||
| + | |- | ||
| + | | 10.5 cm Sprgr. L/4.4 Zt.Z || HE-TF || 20 || 20 || 20 || 20 || 20 || 20 | ||
| + | |- | ||
| + | |} | ||
| + | {| class="wikitable sortable" style="text-align:center" width="100%" | ||
| + | ! colspan="10" | Shell details | ||
| + | |- | ||
| + | ! rowspan="2" data-sort-type="text" | Ammunition | ||
| + | ! rowspan="2" | Type of<br>warhead | ||
| + | ! rowspan="2" | Velocity<br>(m/s) | ||
| + | ! rowspan="2" | Projectile<br>Mass (kg) | ||
| + | ! rowspan="2" | Fuse delay<br>(m) | ||
| + | ! rowspan="2" | Fuse sensitivity<br>(mm) | ||
| + | ! rowspan="2" | Explosive Mass<br>(TNT equivalent) (g) | ||
| + | ! colspan="3" | Ricochet | ||
| + | |- | ||
| + | ! 0% !! 50% !! 100% | ||
| + | |- | ||
| + | | 10.5 cm Sprgr. L/4.4 Kpf.Z || HE || 900 || 15.1 || 0 || 0.1 || 1,550 || 79° || 80° || 81° | ||
| + | |- | ||
| + | | 10.5 cm Sprgr. L/4.4 Bd.Z || HE w/ base fuze || 900 || 15.1 || 4 || 5 || 1,550 || 79° || 80° || 81° | ||
| + | |- | ||
| + | | 10.5 cm Sprgr. L/4.4 Zt.Z || HE-TF || 900 || 15.1 || 0 || 0.1 || 1,550 || 79° || 80° || 81° | ||
| + | |- | ||
| + | |} | ||
=== Secondary armament === | === Secondary armament === | ||
| Line 50: | Line 79: | ||
<!-- ''Some ships are fitted with weapons of various calibres. Secondary armaments are defined as weapons chosen with the control <code>Select secondary weapon</code>. Evaluate the secondary armaments and give advice on how to use them. Describe the ammunition available for the secondary armament. Provide recommendations on how to use them and which ammunition to choose. Remember that any anti-air armament, even heavy calibre weapons, belong in the next section. If there is no secondary armament, remove this section.'' --> | <!-- ''Some ships are fitted with weapons of various calibres. Secondary armaments are defined as weapons chosen with the control <code>Select secondary weapon</code>. Evaluate the secondary armaments and give advice on how to use them. Describe the ammunition available for the secondary armament. Provide recommendations on how to use them and which ammunition to choose. Remember that any anti-air armament, even heavy calibre weapons, belong in the next section. If there is no secondary armament, remove this section.'' --> | ||
{{main|2 cm/65 Flakvierling 38 (20 mm)|MG M38(t) (15 mm)}} | {{main|2 cm/65 Flakvierling 38 (20 mm)|MG M38(t) (15 mm)}} | ||
| − | |||
| − | 20 mm | + | The {{PAGENAME}} is equipped with two 20 mm Flakvierling AA guns placed at the bridge and stern each. In [[SF40 Leichte]], these guns were proven to be very deadly against most targets the {{PAGENAME}} might have to face. Due to the gun placement and two less gun mount than the SF40 Leichte, it is somewhat less effective due to less concentrated firepower. However, it is relatively easier to target, as the two gun mount were placed directly frontally and in the rear (as opposed to SF 40 Leichte's diamond placement), this allows the {{PAGENAME}} to hit the target frontally with relative ease. |
| + | |||
| + | * '''Universal:''' {{Annotation|AP-T|Armour-piercing tracer}}{{-}}{{Annotation|AP|Armour-piercing}}{{-}}{{Annotation|HEF-T|High-explosive fragmentation tracer}}{{-}}{{Annotation|HEF|High-explosive fragmentation}} | ||
| + | * '''20 mm HET magazines:''' {{Annotation|HEF|High-explosive fragmentation}}{{-}}{{Annotation|HEF-T|High-explosive fragmentation tracer}}{{-}}{{Annotation|HEF|High-explosive fragmentation}}{{-}}{{Annotation|AP|Armour-piercing}} | ||
| + | * '''20 mm APT magazines:''' {{Annotation|AP|Armour-piercing}}{{-}}{{Annotation|AP-T|Armour-piercing tracer}}{{-}}{{Annotation|AP|Armour-piercing}}{{-}}{{Annotation|HEF|High-explosive fragmentation}} | ||
| − | + | {| class="wikitable sortable" style="text-align:center" width="100%" | |
| − | + | ! colspan="7" | Penetration statistics | |
| − | + | |- | |
| + | ! rowspan="2" data-sort-type="text" | Belt | ||
| + | ! colspan="6" | '''Penetration @ 0° Angle of Attack (mm)''' | ||
| + | |- | ||
| + | ! 10 m !! 100 m !! 500 m !! 1,000 m !! 1,500 m !! 2,000 m | ||
| + | |- | ||
| + | | Universal || 36 || 34 || 28 || 23 || 20 || 17 | ||
| + | |- | ||
| + | | 20 mm HET magazines || 36 || 34 || 28 || 23 || 20 || 17 | ||
| + | |- | ||
| + | | 20 mm APT magazines || 36 || 34 || 28 || 23 || 20 || 17 | ||
| + | |- | ||
| + | |} | ||
=== Anti-aircraft armament === | === Anti-aircraft armament === | ||
| Line 69: | Line 113: | ||
! colspan="8" | [[3.7 cm SK C/30 (37 mm)|3.7 cm SK C/30]] | ! colspan="8" | [[3.7 cm SK C/30 (37 mm)|3.7 cm SK C/30]] | ||
|- | |- | ||
| − | ! scope="row" | Ammo capacity | + | ! scope="row" | Ammo capacity || 2,000 |
| − | | | ||
|- | |- | ||
| − | ! scope="row" | Fire rate | + | ! scope="row" | Fire rate || 30 rounds/minute |
| − | | 30 rounds/minute | ||
|- | |- | ||
| − | ! scope="row" | Reloading rate | + | ! scope="row" | Reloading rate || 2 seconds |
| − | | 2 seconds | ||
|- | |- | ||
| − | ! scope="row" | Vertical guidance | + | ! scope="row" | Vertical guidance || -10°/+80° |
| − | | -10°/+80° | ||
|- | |- | ||
| − | ! scope="row" | Horizontal guidance | + | ! scope="row" | Horizontal guidance || ±180° |
| − | | ±180° | ||
|- | |- | ||
| − | ! scope="row" | Targeting speed | + | ! scope="row" | Targeting speed || 17°/s |
| − | | 17°/s | ||
|- | |- | ||
| − | ! scope="row" | Targeting vertical speed | + | ! scope="row" | Targeting vertical speed || 13°/s |
| − | | 13°/s | ||
|- | |- | ||
|} | |} | ||
| Line 97: | Line 134: | ||
{{main|WBD depth charge}} | {{main|WBD depth charge}} | ||
| − | There are 4 WBD depth charges on the boat. These can be used as a close range weapon, although they only | + | There are 4 WBD depth charges on the boat. These can be used as a close range weapon, although they only drop behind in your wake. |
== Usage in battles == | == Usage in battles == | ||
<!-- ''Describe the technique of using this ship, the characteristics of her use in a team and tips on strategy. Abstain from writing an entire guide – don't try to provide a single point of view, but give the reader food for thought. Talk about the most dangerous opponents for this vehicle and provide recommendations on fighting them. If necessary, note the specifics of playing with this vehicle in various modes (AB, RB, SB).'' --> | <!-- ''Describe the technique of using this ship, the characteristics of her use in a team and tips on strategy. Abstain from writing an entire guide – don't try to provide a single point of view, but give the reader food for thought. Talk about the most dangerous opponents for this vehicle and provide recommendations on fighting them. If necessary, note the specifics of playing with this vehicle in various modes (AB, RB, SB).'' --> | ||
| − | Similar to the [[AF D1]], the {{PAGENAME}} | + | Similar to the [[AF D1]], the {{PAGENAME}} excels in a fire support role. Try to stay at long ranges, where the guns and armour work good together. At close range try to angle or peeking, the downside is you will only be able to use the frontal or rear guns. |
| − | It might be tempting to do boardside with the {{PAGENAME}}. Be advised, however, that the {{PAGENAME}}'s side | + | It might be tempting to do boardside with the {{PAGENAME}}. Be advised, however, that the {{PAGENAME}}'s side armour is flat and became very weak when unangled, coupled with terrible mobility, this made you exposed to all source of incoming fire, including torpedoes. |
| − | Players seeking to defeat the {{PAGENAME}} will try to close in from a blind spot or when the {{PAGENAME}} is occupied with other opponents. Use the secondary armaments to deal with these fast-moving boats as the main | + | Players seeking to defeat the {{PAGENAME}} will try to close in from a blind spot or when the {{PAGENAME}} is occupied with other opponents. Use the secondary armaments to deal with these fast-moving boats as the main 105 mm guns would be too slow to react to new, close-by threats. |
=== Pros and cons === | === Pros and cons === | ||
| Line 113: | Line 150: | ||
'''Pros:''' | '''Pros:''' | ||
| − | * | + | * 105 mm cannons are very effective against all kinds of targets, with high destructive power and quick reload time |
| − | * | + | * 20 mm AA cannons are very useful against fast-moving targets and aircraft |
* Relatively good survivability when angled correctly | * Relatively good survivability when angled correctly | ||
* High crew count | * High crew count | ||
| − | |||
'''Cons:''' | '''Cons:''' | ||
| − | * Terrible top speed and very sluggish to | + | * Terrible top speed and very sluggish to manoeuvre |
* Large, slow targets makes it very vulnerable against bombs, torpedoes, and rockets | * Large, slow targets makes it very vulnerable against bombs, torpedoes, and rockets | ||
* Armour quite easily to defeat if not angled | * Armour quite easily to defeat if not angled | ||
| − | * Angling armour only | + | * Angling armour only allows some guns to be used in combat |
== History == | == History == | ||
| Line 132: | Line 168: | ||
<!-- ''Excellent additions to the article would be video guides, screenshots from the game, and photos.'' --> | <!-- ''Excellent additions to the article would be video guides, screenshots from the game, and photos.'' --> | ||
| − | {{Youtube-gallery|NeZe7Rrc_Qo| | + | ;Skins |
| + | * [https://live.warthunder.com/feed/camouflages/?vehicleCountry=germany&vehicleType=ship&vehicleClass=naval_ferry_barge&vehicle=germ_artilleriefahrprahm_typ_d3 Skins and camouflages for the {{PAGENAME}} from live.warthunder.com.] | ||
| + | |||
| + | ;Videos | ||
| + | {{Youtube-gallery|NeZe7Rrc_Qo|''' AF D3''' - ''Wulfbane''}} | ||
== See also == | == See also == | ||
| Line 138: | Line 178: | ||
* ''reference to the series of the ship;'' | * ''reference to the series of the ship;'' | ||
* ''links to approximate analogues of other nations and research trees.'' --> | * ''links to approximate analogues of other nations and research trees.'' --> | ||
| − | + | ||
| − | * | + | * [[AF D1]] |
| − | |||
== External links == | == External links == | ||
Revision as of 22:39, 10 March 2021

Contents
Description
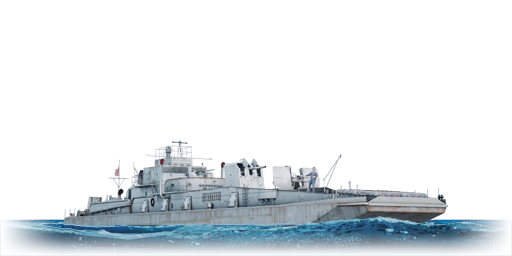
The D3-class, AF D3 (abbreviated as AF D3) is a rank IV German naval ferry barge with a battle rating of 3.3 (AB/RB/SB). It was introduced in Update 1.79 "Project X" in the fleet closed beta test. It is essentially the AF D1 equipped with a larger 105 mm cannons.
General info
Survivability and armour
Although the armour doesn't cover the whole boat, the survivability is not that bad as it is a very long boat with lots of empty space inside for shells to go through. It is thus important that enemies with rapid-firing guns do not get too close to the AF D3 as they can riddle the entire boat with shells and hit critical components through the armour.
Staying far from the enemies and attacking them with the 10.5 cm guns is the best way to improve the lifespan of the AF D3.
Mobility
| Mobility Characteristics | |||
|---|---|---|---|
| Game Mode | Upgrade Status | Maximum Speed (km/h) | |
| Forward | Reverse | ||
| AB | |||
| Upgraded | 23 | 11 | |
| RB/SB | |||
| Upgraded | 20 | 10 | |
Like other German naval barges, the AF D3 has an abysmal top speed of just 20 km/h (RB) and very sluggish turn time. Due to the long hull design, the AF D3 has a trouble navigating through various narrow passages and avoiding obstacles and incoming torpedoes.
Modifications and economy
| Seakeeping | Unsinkability | Firepower | ||||||||||||||||||||||||
|---|---|---|---|---|---|---|---|---|---|---|---|---|---|---|---|---|---|---|---|---|---|---|---|---|---|---|
|
|
|
Armament
Primary armament
The AF D3 has two 105 mm SK C/32 turrets as its main armament which is a direct improvement from the 88 mm FlaK from its predecessor. It has higher explosive mass and penetration with a fast reload time of just 4.64 seconds. The main gun can fire the following ammo types: HE (effective against most targets), HE with base fuse (effective against armoured targets), and HE-TF (for anti-aircraft purposes). The barges can carry up to 200 shells in total.
| Penetration statistics | |||||||
|---|---|---|---|---|---|---|---|
| Ammunition | Type of warhead |
Penetration @ 0° Angle of Attack (mm) | |||||
| 1,000 m | 2,500 m | 5,000 m | 7,500 m | 10,000 m | 15,000 m | ||
| 10.5 cm Sprgr. L/4.4 Kpf.Z | HE | 20 | 20 | 20 | 20 | 20 | 20 |
| 10.5 cm Sprgr. L/4.4 Bd.Z | HE w/ base fuze | 50 | 42 | 33 | 28 | 25 | 21 |
| 10.5 cm Sprgr. L/4.4 Zt.Z | HE-TF | 20 | 20 | 20 | 20 | 20 | 20 |
| Shell details | |||||||||
|---|---|---|---|---|---|---|---|---|---|
| Ammunition | Type of warhead |
Velocity (m/s) |
Projectile Mass (kg) |
Fuse delay (m) |
Fuse sensitivity (mm) |
Explosive Mass (TNT equivalent) (g) |
Ricochet | ||
| 0% | 50% | 100% | |||||||
| 10.5 cm Sprgr. L/4.4 Kpf.Z | HE | 900 | 15.1 | 0 | 0.1 | 1,550 | 79° | 80° | 81° |
| 10.5 cm Sprgr. L/4.4 Bd.Z | HE w/ base fuze | 900 | 15.1 | 4 | 5 | 1,550 | 79° | 80° | 81° |
| 10.5 cm Sprgr. L/4.4 Zt.Z | HE-TF | 900 | 15.1 | 0 | 0.1 | 1,550 | 79° | 80° | 81° |
Secondary armament
The AF D3 is equipped with two 20 mm Flakvierling AA guns placed at the bridge and stern each. In SF40 Leichte, these guns were proven to be very deadly against most targets the AF D3 might have to face. Due to the gun placement and two less gun mount than the SF40 Leichte, it is somewhat less effective due to less concentrated firepower. However, it is relatively easier to target, as the two gun mount were placed directly frontally and in the rear (as opposed to SF 40 Leichte's diamond placement), this allows the AF D3 to hit the target frontally with relative ease.
- Universal: AP-T · AP · HEF-T · HEF
- 20 mm HET magazines: HEF · HEF-T · HEF · AP
- 20 mm APT magazines: AP · AP-T · AP · HEF
| Penetration statistics | ||||||
|---|---|---|---|---|---|---|
| Belt | Penetration @ 0° Angle of Attack (mm) | |||||
| 10 m | 100 m | 500 m | 1,000 m | 1,500 m | 2,000 m | |
| Universal | 36 | 34 | 28 | 23 | 20 | 17 |
| 20 mm HET magazines | 36 | 34 | 28 | 23 | 20 | 17 |
| 20 mm APT magazines | 36 | 34 | 28 | 23 | 20 | 17 |
Anti-aircraft armament
A single 37 mm SK C/30 cannon is available in the anti-aircraft weapon slot for the AF D3.
| 3.7 cm SK C/30 | |||||||
|---|---|---|---|---|---|---|---|
| Ammo capacity | 2,000 | ||||||
| Fire rate | 30 rounds/minute | ||||||
| Reloading rate | 2 seconds | ||||||
| Vertical guidance | -10°/+80° | ||||||
| Horizontal guidance | ±180° | ||||||
| Targeting speed | 17°/s | ||||||
| Targeting vertical speed | 13°/s | ||||||
Additional armament
There are 4 WBD depth charges on the boat. These can be used as a close range weapon, although they only drop behind in your wake.
Usage in battles
Similar to the AF D1, the AF D3 excels in a fire support role. Try to stay at long ranges, where the guns and armour work good together. At close range try to angle or peeking, the downside is you will only be able to use the frontal or rear guns.
It might be tempting to do boardside with the AF D3. Be advised, however, that the AF D3's side armour is flat and became very weak when unangled, coupled with terrible mobility, this made you exposed to all source of incoming fire, including torpedoes.
Players seeking to defeat the AF D3 will try to close in from a blind spot or when the AF D3 is occupied with other opponents. Use the secondary armaments to deal with these fast-moving boats as the main 105 mm guns would be too slow to react to new, close-by threats.
Pros and cons
Pros:
- 105 mm cannons are very effective against all kinds of targets, with high destructive power and quick reload time
- 20 mm AA cannons are very useful against fast-moving targets and aircraft
- Relatively good survivability when angled correctly
- High crew count
Cons:
- Terrible top speed and very sluggish to manoeuvre
- Large, slow targets makes it very vulnerable against bombs, torpedoes, and rockets
- Armour quite easily to defeat if not angled
- Angling armour only allows some guns to be used in combat
History
Describe the history of the creation and combat usage of the ship in more detail than in the introduction. If the historical reference turns out to be too long, take it to a separate article, taking a link to the article about the ship and adding a block "/History" (example: https://wiki.warthunder.com/(Ship-name)/History) and add a link to it here using the main template. Be sure to reference text and sources by using <ref></ref>, as well as adding them at the end of the article with <references />. This section may also include the ship's dev blog entry (if applicable) and the in-game encyclopedia description (under === In-game description ===, also if applicable).
Media
- Skins
- Videos
See also
External links
Paste links to sources and external resources, such as:
- topic on the official game forum;
- other literature.
| Germany barges | |
|---|---|
| Anti-air ferries | SF40 Light · SF40 Heavy |
| Naval ferry barges | AF D1 · AF D3 |
