Difference between revisions of "Sweden (Ground Forces)"
(Complete article for Sweden tank map) |
(Edits) |
||
| Line 13: | Line 13: | ||
!colspan="3"|Full tank area size ||colspan="3"|Real world location | !colspan="3"|Full tank area size ||colspan="3"|Real world location | ||
|- | |- | ||
| − | |colspan="3"|4 km x 4 km ||colspan="3"|[[File:CountryIcon SWE.png]] Stockholm, Sweden | + | |colspan="3"|4 km x 4 km ||colspan="3"|[[File:CountryIcon SWE.png]] Stockholm, Sweden |
|} | |} | ||
</center> | </center> | ||
| Line 23: | Line 23: | ||
[[File:MapLayout Ground Sweden.jpg|thumbnail|right|300px|The Sweden Map]] | [[File:MapLayout Ground Sweden.jpg|thumbnail|right|300px|The Sweden Map]] | ||
| − | '''Sweden''' is a ground forces map available in all modes. It was added to the game in [[Update 1.97 "Viking Fury"]]. As the name of the map suggests it is set in a Swedish town. The map consists entirely of urban built up area, although there | + | '''Sweden''' is a ground forces map available in all modes. It was added to the game in [[Update 1.97 "Viking Fury"]]. As the name of the map suggests it is set in a Swedish town. The map consists entirely of urban built-up area, although there are some parks and other open spaces which allow for slightly longer range combat; the battle area is littered with barricades and features providing cover, as well as allowing tanks to go "hull-down". |
| − | The north and south edges of the map consist of mostly two story residential buildings ( | + | The north and south edges of the map consist of mostly two story residential buildings (some buildings in the north are taller), with wide streets and open parks, there is less hard cover available in these areas compared to other parts of the map. It is in these areas where the spawn points are typically placed. |
| − | The eastern edge of the map consists of a long promenade, with little in the way of hard cover. The area to the west of the promenade is mainly city streets with tall (5-6 storey) residential buildings, however there are some open parks and most notably an open area of raised land with a government looking building and monument on it. A capture point is typically placed here and tanks can use the terrain or various concrete blocks for cover. | + | The eastern edge of the map consists of a long promenade, with little in the way of hard cover. The area to the west of the promenade is mainly city streets with tall (5-6 storey) residential buildings, however there are some open parks and most notably an open area of raised land with a government-looking building and monument on it. A capture point is typically placed here and tanks can use the terrain or various concrete blocks for cover. |
The middle area of the map consists of large open gardens with four large government buildings in the centre and a courtyard between them. Again players can use the terrain as well as concrete blocks and other objects for hard cover. A capture point is sometimes placed in the middle of the courtyard between the buildings. | The middle area of the map consists of large open gardens with four large government buildings in the centre and a courtyard between them. Again players can use the terrain as well as concrete blocks and other objects for hard cover. A capture point is sometimes placed in the middle of the courtyard between the buildings. | ||
| − | The west of the map is a largely residential area. The buildings here are shorter than in the rest of the map; the streets are fairly wide and there are several open park areas. The west of the map also houses an industrial complex with large factory buildings and storage tanks; where a capture point is sometimes located | + | The west of the map is a largely residential area. The buildings here are shorter than in the rest of the map; the streets are fairly wide and there are several open park areas. The west of the map also houses an industrial complex with large factory buildings and storage tanks; where a capture point is sometimes located. |
The tank battles map is 4 km x 4 km, but this area is restricted in battles; see the table below for the exact battle area sizes in each mode. The air battles area is 32 km x 32 km. | The tank battles map is 4 km x 4 km, but this area is restricted in battles; see the table below for the exact battle area sizes in each mode. The air battles area is 32 km x 32 km. | ||
| Line 72: | Line 72: | ||
===Historical Background=== | ===Historical Background=== | ||
<!--''Describe historical context of the location.''--> | <!--''Describe historical context of the location.''--> | ||
| − | This map is a fictional location inspired by the Gamla Stan district of Stockholm. Although the design of the map | + | This map is a fictional location inspired by the Gamla Stan district of Stockholm. Although the design of the map bears resemblance to the real life location there is very little similarity between the layout of the map and that of the real Gamla Stan. |
==Map configuration== | ==Map configuration== | ||
| Line 89: | Line 89: | ||
! Domination Mode - Map Layouts | ! Domination Mode - Map Layouts | ||
|- align="center" | |- align="center" | ||
| − | | | + | | |
<div style="float: none;" class="ttx-ab">[[File:MapLayout Domination Sweden ABRBSB.jpg|300px]]</div> | <div style="float: none;" class="ttx-ab">[[File:MapLayout Domination Sweden ABRBSB.jpg|300px]]</div> | ||
<div style="float: none;" class="ttx-rb">[[File:MapLayout Domination Sweden ABRBSB.jpg|300px]]</div> | <div style="float: none;" class="ttx-rb">[[File:MapLayout Domination Sweden ABRBSB.jpg|300px]]</div> | ||
<div style="float: none;" class="ttx-sb">[[File:MapLayout Domination Sweden ABRBSB.jpg|300px]]</div> | <div style="float: none;" class="ttx-sb">[[File:MapLayout Domination Sweden ABRBSB.jpg|300px]]</div> | ||
|- align="center" | |- align="center" | ||
| − | | | + | | |
<span class="ttx-ab">1.5 km x 1.5 km</span> | <span class="ttx-ab">1.5 km x 1.5 km</span> | ||
<span class="ttx-rb">1.5 km x 1.5 km</span> | <span class="ttx-rb">1.5 km x 1.5 km</span> | ||
| Line 100: | Line 100: | ||
|- | |- | ||
| | | | ||
| − | <span class="ttx-ab">In AB point A is in the east of the town on the raised area between the government building and the monument, B is in the courtyard between the buildings in the middle of the map, and C is in the industrial complex in the west of the map.</span> | + | <span class="ttx-ab">In AB, point A is in the east of the town on the raised area between the government building and the monument, B is in the courtyard between the buildings in the middle of the map, and C is in the industrial complex in the west of the map.</span> |
| − | <span class="ttx-rb">In RB point A is in the east of the town on the raised area between the government building and the monument, B is in the courtyard between the buildings in the middle of the map, and C is in the industrial complex in the west of the map.</span> | + | <span class="ttx-rb">In RB, point A is in the east of the town on the raised area between the government building and the monument, B is in the courtyard between the buildings in the middle of the map, and C is in the industrial complex in the west of the map.</span> |
| − | <span class="ttx-sb">In SB point A is in the east of the town on the raised area between the government building and the monument, B is in the courtyard between the buildings in the middle of the map, and C is in the industrial complex in the west of the map.</span> | + | <span class="ttx-sb">In SB, point A is in the east of the town on the raised area between the government building and the monument, B is in the courtyard between the buildings in the middle of the map, and C is in the industrial complex in the west of the map.</span> |
|} | |} | ||
| Line 115: | Line 115: | ||
! Conquest #3 | ! Conquest #3 | ||
|- align="center" | |- align="center" | ||
| − | | | + | | |
<div style="float: none;" class="ttx-ab">[[File:MapLayout Conquest1 Sweden ABRBSB.jpg|300px]]</div> | <div style="float: none;" class="ttx-ab">[[File:MapLayout Conquest1 Sweden ABRBSB.jpg|300px]]</div> | ||
<div style="float: none;" class="ttx-rb">[[File:MapLayout Conquest1 Sweden ABRBSB.jpg|300px]]</div> | <div style="float: none;" class="ttx-rb">[[File:MapLayout Conquest1 Sweden ABRBSB.jpg|300px]]</div> | ||
<div style="float: none;" class="ttx-sb">[[File:MapLayout Conquest1 Sweden ABRBSB.jpg|300px]]</div> | <div style="float: none;" class="ttx-sb">[[File:MapLayout Conquest1 Sweden ABRBSB.jpg|300px]]</div> | ||
| − | | | + | | |
<div style="float: none;" class="ttx-ab">[[File:MapLayout Conquest2 Sweden ABRBSB.jpg|300px]]</div> | <div style="float: none;" class="ttx-ab">[[File:MapLayout Conquest2 Sweden ABRBSB.jpg|300px]]</div> | ||
<div style="float: none;" class="ttx-rb">[[File:MapLayout Conquest2 Sweden ABRBSB.jpg|300px]]</div> | <div style="float: none;" class="ttx-rb">[[File:MapLayout Conquest2 Sweden ABRBSB.jpg|300px]]</div> | ||
<div style="float: none;" class="ttx-sb">[[File:MapLayout Conquest2 Sweden ABRBSB.jpg|300px]]</div> | <div style="float: none;" class="ttx-sb">[[File:MapLayout Conquest2 Sweden ABRBSB.jpg|300px]]</div> | ||
| − | | | + | | |
<div style="float: none;" class="ttx-ab">[[File:MapLayout Conquest3 Sweden ABRBSB.jpg|300px]]</div> | <div style="float: none;" class="ttx-ab">[[File:MapLayout Conquest3 Sweden ABRBSB.jpg|300px]]</div> | ||
<div style="float: none;" class="ttx-rb">[[File:MapLayout Conquest3 Sweden ABRBSB.jpg|300px]]</div> | <div style="float: none;" class="ttx-rb">[[File:MapLayout Conquest3 Sweden ABRBSB.jpg|300px]]</div> | ||
<div style="float: none;" class="ttx-sb">[[File:MapLayout Conquest3 Sweden ABRBSB.jpg|300px]]</div> | <div style="float: none;" class="ttx-sb">[[File:MapLayout Conquest3 Sweden ABRBSB.jpg|300px]]</div> | ||
|- align="center" | |- align="center" | ||
| − | | | + | | |
<span class="ttx-ab">1.5 km x 1.5 km</span> | <span class="ttx-ab">1.5 km x 1.5 km</span> | ||
<span class="ttx-rb">1.5 km x 1.5 km</span> | <span class="ttx-rb">1.5 km x 1.5 km</span> | ||
| Line 142: | Line 142: | ||
|- | |- | ||
| | | | ||
| − | <span class="ttx-ab">In AB the capture point is in the east of the town on the raised area between the government building and the monument.</span> | + | <span class="ttx-ab">In AB, the capture point is in the east of the town on the raised area between the government building and the monument.</span> |
| − | <span class="ttx-rb">In RB the capture point is in the east of the town on the raised area between the government building and the monument.</span> | + | <span class="ttx-rb">In RB, the capture point is in the east of the town on the raised area between the government building and the monument.</span> |
| − | <span class="ttx-sb">In SB the capture point is in the east of the town on the raised area between the government building and the monument.</span> | + | <span class="ttx-sb">In SB, the capture point is in the east of the town on the raised area between the government building and the monument.</span> |
| | | | ||
| − | <span class="ttx-ab">In AB the capture point is in the courtyard between the buildings in the middle of the map.</span> | + | <span class="ttx-ab">In AB, the capture point is in the courtyard between the buildings in the middle of the map.</span> |
| − | <span class="ttx-rb">In RB the capture paint is in the courtyard between the buildings in the middle of the map.</span> | + | <span class="ttx-rb">In RB, the capture paint is in the courtyard between the buildings in the middle of the map.</span> |
| − | <span class="ttx-sb">In SB the capture point is in the courtyard between the buildings in the middle of the map.</span> | + | <span class="ttx-sb">In SB, the capture point is in the courtyard between the buildings in the middle of the map.</span> |
| | | | ||
| − | <span class="ttx-ab">In AB the capture point is in the industrial complex in the west of the map.</span> | + | <span class="ttx-ab">In AB, the capture point is in the industrial complex in the west of the map.</span> |
| − | <span class="ttx-rb">In RB the capture point is in the industrial complex in the west of the map.</span> | + | <span class="ttx-rb">In RB, the capture point is in the industrial complex in the west of the map.</span> |
| − | <span class="ttx-sb">In SB the capture point is in the industrial complex in the west of the map.</span> | + | <span class="ttx-sb">In SB, the capture point is in the industrial complex in the west of the map.</span> |
|} | |} | ||
| Line 163: | Line 163: | ||
! Battle Mode - Map Layouts | ! Battle Mode - Map Layouts | ||
|- align="center" | |- align="center" | ||
| − | | | + | | |
<div style="float: none;" class="ttx-ab">[[File:MapLayout Battle Sweden ABRBSB.jpg|300px]]</div> | <div style="float: none;" class="ttx-ab">[[File:MapLayout Battle Sweden ABRBSB.jpg|300px]]</div> | ||
<div style="float: none;" class="ttx-rb">[[File:MapLayout Battle Sweden ABRBSB.jpg|300px]]</div> | <div style="float: none;" class="ttx-rb">[[File:MapLayout Battle Sweden ABRBSB.jpg|300px]]</div> | ||
<div style="float: none;" class="ttx-sb">[[File:MapLayout Battle Sweden ABRBSB.jpg|300px]]</div> | <div style="float: none;" class="ttx-sb">[[File:MapLayout Battle Sweden ABRBSB.jpg|300px]]</div> | ||
|- align="center" | |- align="center" | ||
| − | | | + | | |
<span class="ttx-ab">1.5 km x 1.5 km</span> | <span class="ttx-ab">1.5 km x 1.5 km</span> | ||
<span class="ttx-rb">1.5 km x 1.5 km</span> | <span class="ttx-rb">1.5 km x 1.5 km</span> | ||
| Line 174: | Line 174: | ||
|- | |- | ||
| | | | ||
| − | <span class="ttx-ab">In AB the capture points are located in the east of the town on the raised area between the government building and the monument, and in the industrial complex in the west of the map.</span> | + | <span class="ttx-ab">In AB, the capture points are located in the east of the town on the raised area between the government building and the monument, and in the industrial complex in the west of the map.</span> |
| − | <span class="ttx-rb">In RB the capture points are located in the east of the town on the raised area between the government building and the monument, and in the industrial complex in the west of the map.</span> | + | <span class="ttx-rb">In RB, the capture points are located in the east of the town on the raised area between the government building and the monument, and in the industrial complex in the west of the map.</span> |
| − | <span class="ttx-sb">In SB the capture points are located in the east of the town on the raised area between the government building and the monument, and in the industrial complex in the west of the map.</span> | + | <span class="ttx-sb">In SB, the capture points are located in the east of the town on the raised area between the government building and the monument, and in the industrial complex in the west of the map.</span> |
|} | |} | ||
| Line 199: | Line 199: | ||
* ''other literature.''--> | * ''other literature.''--> | ||
| − | * [ | + | * [[wt:en/news/6608-development-new-location-sweden-en|[Devblog] New location: Sweden]] |
| − | [[Category:Maps_and_missions]] | + | [[Category:Maps_and_missions]] |
[[Category:Ground forces maps]] | [[Category:Ground forces maps]] | ||
Revision as of 18:11, 19 June 2020
| Layouts | |||||
|---|---|---|---|---|---|
| Full tank area size | Real world location | ||||
| 4 km x 4 km | |||||
Contents
Overview
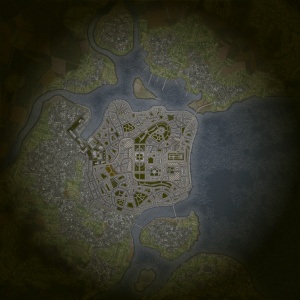
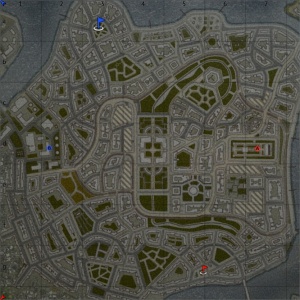
Sweden is a ground forces map available in all modes. It was added to the game in Update 1.97 "Viking Fury". As the name of the map suggests it is set in a Swedish town. The map consists entirely of urban built-up area, although there are some parks and other open spaces which allow for slightly longer range combat; the battle area is littered with barricades and features providing cover, as well as allowing tanks to go "hull-down".
The north and south edges of the map consist of mostly two story residential buildings (some buildings in the north are taller), with wide streets and open parks, there is less hard cover available in these areas compared to other parts of the map. It is in these areas where the spawn points are typically placed.
The eastern edge of the map consists of a long promenade, with little in the way of hard cover. The area to the west of the promenade is mainly city streets with tall (5-6 storey) residential buildings, however there are some open parks and most notably an open area of raised land with a government-looking building and monument on it. A capture point is typically placed here and tanks can use the terrain or various concrete blocks for cover.
The middle area of the map consists of large open gardens with four large government buildings in the centre and a courtyard between them. Again players can use the terrain as well as concrete blocks and other objects for hard cover. A capture point is sometimes placed in the middle of the courtyard between the buildings.
The west of the map is a largely residential area. The buildings here are shorter than in the rest of the map; the streets are fairly wide and there are several open park areas. The west of the map also houses an industrial complex with large factory buildings and storage tanks; where a capture point is sometimes located.
The tank battles map is 4 km x 4 km, but this area is restricted in battles; see the table below for the exact battle area sizes in each mode. The air battles area is 32 km x 32 km.
| Game Mode | AB | RB | SB |
|---|---|---|---|
| Domination | 1.5 km x 1.5 km | 1.5 km x 1.5 km | 1.5 km x 1.5 km |
| Conquest #1 | 1.5 km x 1.5 km | 1.5 km x 1.5 km | 1.5 km x 1.5 km |
| Conquest #2 | 1.5 km x 1.5 km | 1.5 km x 1.5 km | 1.5 km x 1.5 km |
| Conquest #3 | 1.5 km x 1.5 km | 1.5 km x 1.5 km | 1.5 km x 1.5 km |
| Battle | 1.5 km x 1.5 km | 1.5 km x 1.5 km | 1.5 km x 1.5 km |
Historical Background
This map is a fictional location inspired by the Gamla Stan district of Stockholm. Although the design of the map bears resemblance to the real life location there is very little similarity between the layout of the map and that of the real Gamla Stan.
Map configuration
| Change Maps by Game Modes | ||
|---|---|---|
| | ||
At present this map has the same layouts in AB, RB and SB.
Domination
| Domination Mode - Map Layouts |
|---|
|
1.5 km x 1.5 km 1.5 km x 1.5 km 1.5 km x 1.5 km |
|
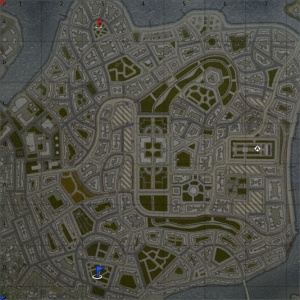
In AB, point A is in the east of the town on the raised area between the government building and the monument, B is in the courtyard between the buildings in the middle of the map, and C is in the industrial complex in the west of the map. In RB, point A is in the east of the town on the raised area between the government building and the monument, B is in the courtyard between the buildings in the middle of the map, and C is in the industrial complex in the west of the map. In SB, point A is in the east of the town on the raised area between the government building and the monument, B is in the courtyard between the buildings in the middle of the map, and C is in the industrial complex in the west of the map. |
Conquest
| Conquest Mode - Map Layouts | ||
|---|---|---|
| Conquest #1 | Conquest #2 | Conquest #3 |
|
1.5 km x 1.5 km 1.5 km x 1.5 km 1.5 km x 1.5 km |
1.5 km x 1.5 km 1.5 km x 1.5 km 1.5 km x 1.5 km |
1.5 km x 1.5 km 1.5 km x 1.5 km 1.5 km x 1.5 km |
|
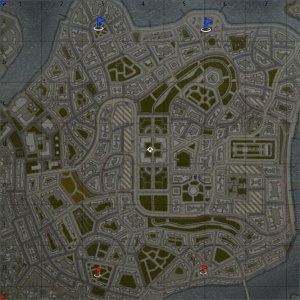
In AB, the capture point is in the east of the town on the raised area between the government building and the monument. In RB, the capture point is in the east of the town on the raised area between the government building and the monument. In SB, the capture point is in the east of the town on the raised area between the government building and the monument. |
In AB, the capture point is in the courtyard between the buildings in the middle of the map. In RB, the capture paint is in the courtyard between the buildings in the middle of the map. In SB, the capture point is in the courtyard between the buildings in the middle of the map. |
In AB, the capture point is in the industrial complex in the west of the map. In RB, the capture point is in the industrial complex in the west of the map. In SB, the capture point is in the industrial complex in the west of the map. |
Battle
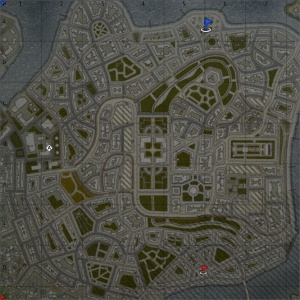
Note: In this layout the northern team get two spawn points, while the southern team only get one.
| Battle Mode - Map Layouts |
|---|
|
1.5 km x 1.5 km 1.5 km x 1.5 km 1.5 km x 1.5 km |
|
In AB, the capture points are located in the east of the town on the raised area between the government building and the monument, and in the industrial complex in the west of the map. In RB, the capture points are located in the east of the town on the raised area between the government building and the monument, and in the industrial complex in the west of the map. In SB, the capture points are located in the east of the town on the raised area between the government building and the monument, and in the industrial complex in the west of the map. |
Strategy
Describe what focus a team should have when spawning into the map


