
Triggers are an integral part of anything but the most basic of User Missions. This article covers the basic operation of triggers and what each available component does.
Contents
Overview
Triggers are a feature of the Mission Editor which allow for vastly more complicated missions to be created, they can be used for scripted events, as well as for enabling more advanced mission features such as capture points, spawn points, visible way-points, and much more. As well as being useful for making more advanced single-player missions an understanding of triggers is a necessity for creating multi-player user missions, as such missions require triggers to function.
Triggers consist of three main components (also known as elements): Events, Conditions, and Actions. An event is what causes the trigger to execute, for example, the “periodicEvent” event will execute the trigger according to the specified interval (for example once a second, or once every 15 seconds). Once a trigger is executed a condition determines whether the trigger should continue to carry out the actions assigned to it, or should not do anything / carry out any else actions assigned to it; for example the “UnitInArea” condition will carry out the triggers actions if the specified unit is within the specified area at the moment the trigger is executed. Finally, actions define what the trigger does once it is executed and the condition is met; for example “playHint” displays a message on the user’s screen and “unitDamage” can be used to damage part of, or destroy a unit. Actions can also be assigned as “elseActions” which instead of being carried out when the condition is met, will be carried out when the trigger is executed, but the condition is not met. If there are no elseActions then the trigger will do nothing when the condition is not met. Triggers can be assigned multiple events, conditions and actions. If a trigger is created with no conditions then it will carry out its actions whenever it is executed, this is useful for triggers which always need to run, for example, a trigger to draw various lines on the mini-map at the start of the mission. Be aware that if a trigger is created without conditions and “enableAfterComplete” is ticked then the trigger will run forever, repeatedly every time this event occurs (for a default trigger this means it would carry out its actions once a second, every second for the entirety of the mission, unless it is disabled by another trigger).
Creating Triggers
The Basics
In order to make a trigger you first need to display the trigger window in the mission editor, this can be done by clicking the “Properties and Triggers / Mission Obj. info” button (looks like ) on the mission editor bar at the top of the editor. This will open the “Triggers / Mission Obj. Info” window (from here on known as the “trigger window”) at the right-hand edge of your screen, this window is where you can edit triggers and mission objectives (for the time being it will be blank). Now in the properties window (where your mission settings are) scroll down until you reach the Triggers / Mission Ob. Navigation section and expand it if necessary.
This window is where all the triggers and objectives of your mission will be stored, organized under the (currently empty) “Triggers” and “Mission Objectives” folders. There are several buttons at the bottom of this section:
Trigger This button will create a new trigger, either inside the root “Triggers” folder inside the currently selected category.
Category This button will create a new category, either inside the root “Triggers” folder inside the currently selected category. Categories are essentially folders for triggers, functionally they serve no purpose to the mission and exist to allow you to organise your triggers. Categories can be created inside other categories and form folder trees which can be collapsed to hide triggers not currently of interest (collapsing categories will not disable or remove their contents). If a category is disabled all of its contents (including stuff in subcategories) will be disabled.
Mission Obj This button will create a mission objective in the “Mission Objectives” folder. Mission objectives are described in other guides.
Copy and Paste The Copy button will copy the selected trigger or mission objective. If a mission objective is selected and the copy button is pressed then a duplicate mission objective will be created. If a trigger is selected when the copy button is pressed then the Paste button will become available this allows you to select a different category for the trigger to be pasted into, once the destination is selected pressing the Paste button will create a duplicate of the copied trigger there.
Del This button will delete the selected trigger or mission objective.
Up and Down These buttons will move the selected trigger, category or mission objective up or down in the list, this does not affect the behaviour of the mission and is used to keep the lists organised.
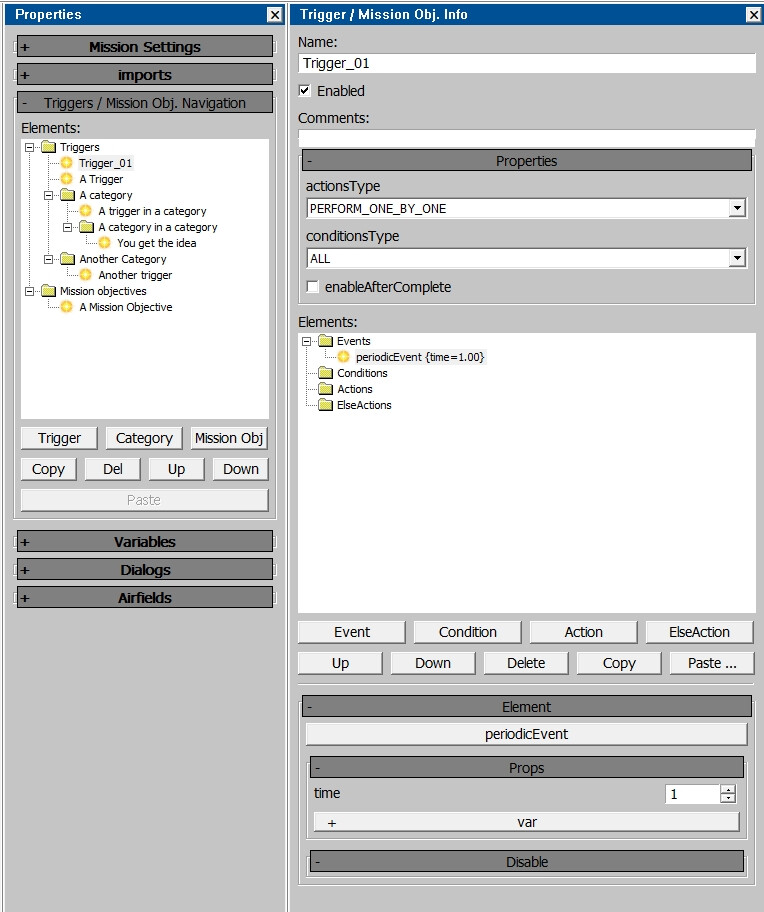
To create your first trigger click the “Trigger” button, this will create your first trigger “Trigger_01” and display it in the trigger window. What you see will look similar to the image to the right (you will only have “Trigger_01” whereas the image has several other triggers, categories and objectives for demonstration purposes). At the top of the window is the triggers name, this can be changed to whatever you want (however should not be the same as any other triggers), it is best to pick a descriptive name such as “Setup” or “Teleport Player” to keep it clear what everything does, however, this is completely optional. The next option is an “Enabled” checkbox, by default, all triggers start enabled, disabling a trigger effectively prevents it from being executed. This is useful for triggers than you want to manually activate or execute at specific moments, as triggers can be enabled, disabled and even just executed without enabling it during the mission by other triggers. The next field is a comments box, this has no effect on the trigger’s operation and is just for documenting what it does, it is completely optional.
Next is the trigger properties section this contains the following fields:
actionsType By default this is set to “PERFORM_ONE_BY_ONE” meaning the actions will be completed in the order they are present in the actions list of the trigger. This option can be changed to “PERFORM_ALL” where all actions are completed at the same time.
conditionsType By default this is set to “ALL”, but can be changed to “ANY”. For triggers with multiple conditions, this determines whether all of the conditions need to be met for the trigger to carry out its actions, or if any of the conditions being met is enough for the trigger to carry out its action (s).
enableAfterComplete By default this is set unchecked, meaning that once the trigger has carried out its actions, it becomes disabled. If it is checked then the trigger will carry out its actions every time it is executed and the condition is met, instead of just the first time.
Now we have reached the “Elements” section, and below it the “Element” section (Gaijin could have come up with better names) this is where you build your trigger; the “Elements” section is where you create the events, conditions, actions, and else actions of your trigger, while the “Element” section is where you modify the properties of each component. The elements area consists of a window with four folders where the contents of your trigger will be displayed, and underneath a collection of buttons:
Event, Condition, Action and ElseAction These buttons will display a new window with a list of all the available events, conditions and actions, depending on what button is pressed (the Action and elseAction buttons display the same list of actions, but will insert them into either the Actions or ElseActions area). There is a search box which will find the first item matching the phrase entered, it will only return the first entry in the list however, there may be more matches further down. To insert a component, select it from the list and click “Ok”.
Up and Down These buttons will move the selected element up and down in the list. Changing the order of components only affects the Actions and ElseActions area where the actions will be carried out in the order they appear in the list. If actionsType is set to “PERFORM_ONE_BY_ONE” (the default setting) in the trigger properties area.
Delete This button will delete the selected trigger component.
Copy This will copy the selected trigger component, multiple components can be copied from different triggers (or the same one) without needing to press “Paste …” each time.
Paste … This button will display a list of all the copied components (grouped by type) and allow you to select one to paste into the currently selected trigger.
The “Element” section at the bottom will update with different fields and buttons depending on the currently selected trigger component.
Working Example Trigger
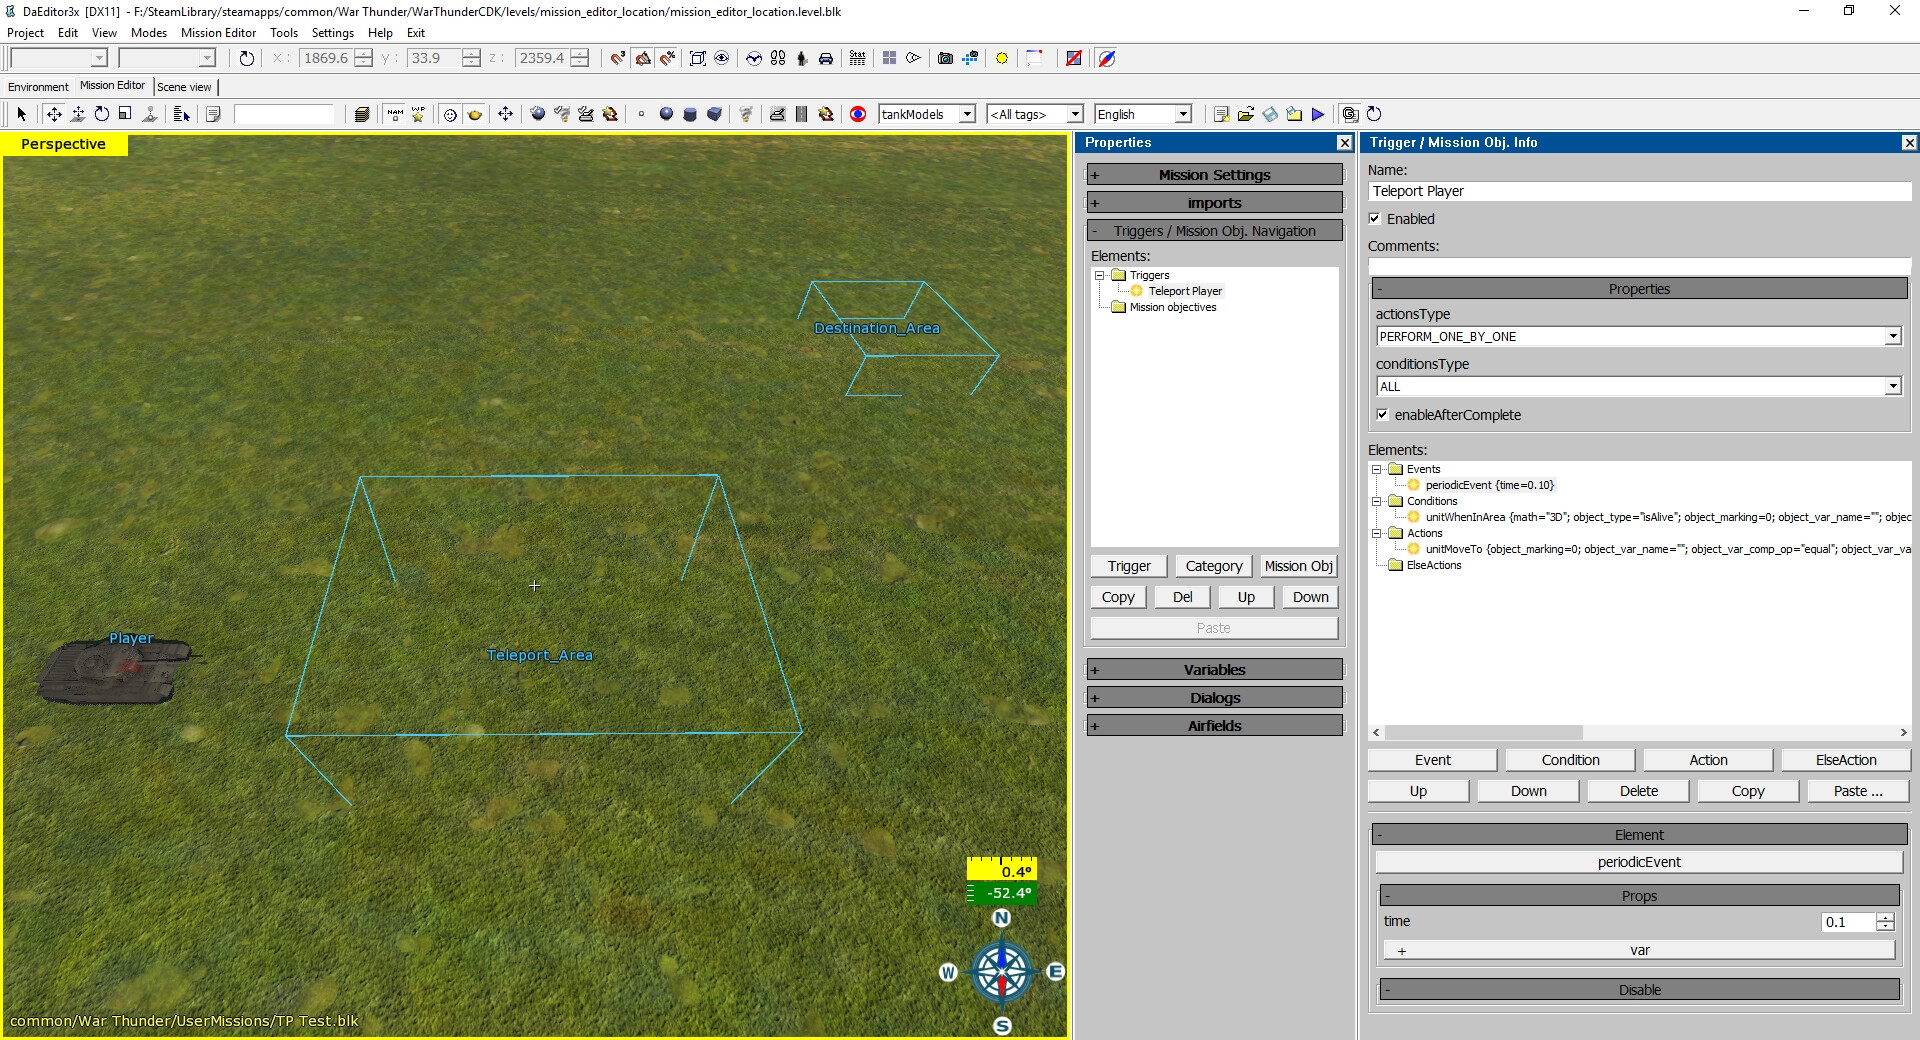
In this example, we are going to make a simple trigger which will teleport the player to a new location when the player enters a specific area. For this example the player unit will be in a tank (placed as “tankModels” in the editor) called “Player”, there will be an area called “Teleport_Area” and another called “Destination_Area” (exact setup can be seen in the image to the right). When the player tank enters “Teleport_Area” we want it to be teleported to “Destination_Area”.
To follow along with this example create a “tankModels” unit type, assign it as the player’s vehicle, call it “Player” and set it to a tank you own. Create two box areas for the teleport and destination areas (called “Teleport_Area” and “Destination_Area”). If not already present from reading the previous section create a new trigger.
You should now have a fresh trigger (likely called Trigger_01 or similar), we will begin by renaming the trigger to something more descriptive so if we come back to the mission later it is nice and clear what it does; to do this select the name field, delete the old name and type a new name for the trigger, for example “Teleport Player”. We will leave most of the properties as default, however, we will tick “enableAfterComplete” as we want the player to be teleported every time they enter the area, not just the first time. We will then select the “periodicEvent” event and set its time field in the Element area to 0.1, this means the trigger will be executed and check if the player is in the area every 0.1 seconds.
Next, we will click the “Condition” button and look for the “unitWhenInArea” condition and insert it into the trigger, this condition allows us to check whether a chosen unit is within a specified area at the moment the trigger is executed. When the condition is added it should automatically become selected in the “Element” section, scroll down in the trigger window so that all of the settings can be seen. The “object” field is what the condition is going to act on, in our case we want to check the player’s unit to see if it is in the area, so we will set this field to the player unit (in this example called “Player”); to do this simply click the field and select the player’s unit from the list of available units. The “+ object” button will create another object field, allowing you to check if multiple units are in the area. The target field, in this case, refers to what area we are checking the unit is in, so we will set this to “Teleport_Area”. The “+ target” button does the same thing for targets that the “+ objects” button does for objects. We will leave all other settings at defaults, but for future reference here is what they do:
Math allows you to specify how the unit is checked to be in the area; by default it is set to “3D” so the unit must we within the area, if it is set to 2D then along as the unit is within the 2D footprint of the area it doesn’t matter how high up the unit is (this setting is mainly useful for triggers aimed at aircraft). This field can also be set to “notNear2D” or “notNear3D”, these work the same as “2D” and “3D”, but will activate the trigger when the unit is not within the area, instead of when the unit is within the area. The “object_type” and “unit_type_ex” settings allow you to specify criteria about the unit, by default it is set to “isAlive” which means the condition will be met as long as the unit is alive while it is in the area, this can be changed to other settings such as “isDamaged” so the trigger will only activate if the player is both within the area and has damage to their vehicle. Finally, check_objects comes in useful if you have specified multiple units to check, it allows you to say whether the trigger should activate if any of the units are in the area, or if all of the specified units must be in the area for the trigger to carry out its actions. This also works if a squad has been set as the object instead of an individual unit, it let you choose whether a single unit from the squad or the entire squad is required to be in the area.
Next, click the “Action” button and from the list select “unitMoveTo” and insert it into your trigger. This action can be used to do various things relating to units movement (such as telling AI to move to a certain place in a certain way), but we will use it for its ability to teleport units, in this case, the player. Once inserted set the object to the player’s unit and target to “Destination_Area”, then click the “+ move_type” button to add the move_type field to the trigger and set the field to “teleport”. There are a lot of other fields here which will be useful for when you make more advanced missions, but they are outside the scope of this basic guide.
Our trigger is now complete; every 0.1 seconds (10 times a second) it will check if the player’s unit is within the “Teleport_Area” area and if it is it will teleport the player to the “Destination_Area” area, if the player is not in the teleport area it won’t do anything. Now finish off the mission (give it a name, assign the player unit as the player, set the map to the correct map, that sort of stuff) and test it out in-game.
| Event | Description | Available in SP or MP? |
|---|---|---|
| periodicEvent | Will execute the trigger repeatedly at a user defined interval. Fields: • time: The amount of seconds between each execution of the trigger, accurate to 2 decimal places • var: An integer variable can be assigned here to override the value of the "time" field (use of integer variable limits interval to whole seconds if this option is chosen) | Both |
| timeExpires | Will execute the trigger once after a set number of seconds from mission start Fields: • time: The number of seconds from the start of the mission after which the trigger will be executed, accurate to 2 decimal places • var: An integer variable can be assigned here to override the value of the "time" field (use of integer variable limits interval to whole seconds if this option is chosen) | Both |
| initMission | Trigger will be executed once at the start of the mission | Both |
Note: This section lists the intended functionality (where known) for each condition, some (a minority) may be legacy features, or just broken, and may not work properly if at all. “SP only”, “MP only”, “Both” and “Unknown” show whether the trigger component only works in Single-player missions, only works in Multi-player missions, works in both types of missions, or that the component is currently non-function / not enough is known about it to say.
| Condition | Description | Available in SP or MP? |
| airfieldIsModuleHP | Checks the amount of HP of selected airfield module | Both |
| gameWhenDifficulty | Will check what the current game-mode is (AB, RB, SB or custom) | Both |
| gameWhenControlMode | Will check what the control mode the user has selected (mouse-aim, etc.) | SP only |
| gameWhenControlWarning | Condition does not appear to currently be functional | Unknown |
| gameWhenHintIsNotActive | Will check if a hint is currently being displayed on the UI | Both |
| gameWhenManualGear | Will activate trigger if the user currently has “Autocontrol of landing gear” turned off in-game controls | SP only |
| gameWhenObjectivesNotDisplayed | Will activate trigger if no mission objective is currently being displayed on the screen | Unknown |
| infantryTroopWhenKilledByPlayerMatches | Will check if the number of infantry units killed by the player matches a specified value | SP only |
| isAllPlayersInGame | Will activate trigger if all the players are in the game | MP only |
| isTargetLocked | Checks if the selected unit is locked using Lock Target controls from Common tab | SP only |
| isTriggerGroupActivated | Checks if player is using weapons | SP only |
| misObjStatus | Will activate the trigger if a specified objective’s current status matches a specified value | Both |
| missionEnvironment | Will activate the trigger if a mission matches the time set in this condition | Both |
| missionNamePostfix | Checks postfix of your mission | MP only |
| missionIsBombingAreaDestroyed | Will activate the trigger if the specified bombing area is destroyed | Both |
| missionIsLZCaptured | Will activate trigger if a specified landing zone is captured by a specified team (unclear if / how LZs currently work) | Unknown |
| missionIsRespawnAllowed | Checks if respawns are allowed in mission settings | Unknown |
| missionIsSuccess | Activates trigger if the mission is completed successfully | Both |
| missionIsZoneCaptured | Will activate trigger if a specified zone is captured by a specified team | MP only |
| missionWhenAdditionalTime | Will activate trigger if a specified amount of time has passed since the successful completion of the mission | SP only |
| missionWhenInBattleArea | Will activate the trigger if any units are within the defined battle area | Both |
| missionWhenTime | Will activate the trigger if a specified amount of time has passed since the start of the mission | Both |
| objectExists | Checks if there is a selected object in the mission | Both |
| objGroupWhenStatus | Checks if selected objectGroups object exists on the map or not (it’s related to unitWakeUp and unitPutToSleep actions) | Both |
| objectGroupWhenInArea | Looks for the objectGroups in the selected area | Both |
| playerAddRoundScore | Increases the player’s score and spawn points amount during the mission | Both |
| playersDistanceBetween | Will activate the trigger if the player is within a set distance of a set object | Both |
| playersWhenEnemyNear | Will activate the trigger if the player is within a set distance of an enemy | Both |
| playersWhenInArea | Will activate the trigger if the player is within a set area | Both |
| playerWhenSpawn | Will activate when the player spawns | Both |
| playersWhenOnLZ | Checks if a player is within the landing zone (unclear if / how LZs currently work) | Unknown |
| playersWhenReachHeight | Checks if a player has reached a specified altitude | Both |
| playersWhenStatus | Checks the status of the player | Both |
| playersWhenManeuver | Checks what manoeuvre the player is carrying out | SP only |
| playersWhenOptions | Checks what options the player is currently has using | SP only |
| playersWhenOrientation | Checks what orientation the player is currently at | SP only |
| playersWhenCameraState | Checks what orientation the of the camera (in free look mode) | SP only |
| playersWhenCursorIn | Functionality unknown | SP only |
| playersWhenCurrentBullet | Checks which ammo slot the player has selected and activate trigger if it matches set value | SP only |
| triggerStatus | Checks the status of another trigger and activates trigger if it matches a set value | Both |
| unitDistanceBetween | Will activate the trigger if a unit is within a set distance of a set object | Both |
| unitFuelLess | Activates the trigger when the specified units remaining fuel is below a specified amount (possibly bugged / non-functional) | Both |
| unitAnyLess | Activates trigger if at least one unit from those specified does not match the given status | Both |
| unitWhenControls | Activates trigger if the units control positions match a given value | Both |
| unitWhenCountMatches | Activates trigger when the number of units meeting the condition is equal to the number set | Both |
| unitWhenEnemyNear | Will activate the trigger if the specified unit is within a set distance of an enemy | Both |
| unitWhenInArea | Will activate the trigger if the specified unit is within the specified area | Both |
| unitWhenOnLZ | Checks if a unit is within the landing zone (unclear if / how LZs currently work) | Unknown |
| unitWhenPartHp | Checks the health of a part of a unit | Both |
| unitWhenProperties | Activates the trigger if a unit’s current properties match specified values | Both |
| unitWhenReachHeight | Checks if the specified unit has reached a specified altitude | Both |
| unitWhenStatus | Checks the status of the specified unit | Both |
| unitCheckTag | Checks the tags of a specified unit | Both |
| unitWhenHit | Will activate the trigger if the specified unit is hit (shot) with the option of specifying which unit hit it | Both |
| unitWhenKilled | Will activate the trigger if the specified unit is killed | Both |
| unitsInLineOfSight | Checks if two units have line of sight with each other | Both |
| unitsInSearchLight | Checks if unit is caught in a search light | Both |
| varCompareBool | Activates the trigger if the specified boolean variable matches the specified value | Both |
| varCompareInt | Activates the trigger if the specified integer variable matches the specified value | Both |
| varCompareReal | Activates the trigger if the specified real (decimal number) variable matches the specified value | Both |
| varCompareString | Activates the trigger if the specified string variable matches the specified value | Both |
| playerShortcutPressed | Activates the trigger if player presses a specified control | SP only |
| playerSeesUnit | Checks if player can see a specified unit | SP only |
| playerAxisValueReached | Checks if player has reached a certain value on a specified control axis | SP only |
| destructibleInArea | Checks the number of objects destroyed within a specified area | Unknown |
| airDropsNear | Checks if an airDrop is near a unit (unclear if / how air drops currently work) | Unknown |
| areaWhenInArea | Checks if an area is within another area | Both |
This is a list of all Actions and their known behavior.
Note: This list is user-provided, there could be missing actions or the described behaviour could be incorrect.
| Action | Description | MP/SP | Working |
|---|---|---|---|
| addAirfield | Adds a virtual airfield using the given areas | Both | Yes |
| addTextToUnit | Adds text on the given unit | Both | Yes |
| airfieldSetIndication | Makes airfield flash green on map / radar | Both | Yes |
| airfieldSetVisibility | Changes the airfield’s visibility on the map / radar | Both | Yes |
| airfieldGetModuleHP | Gets the HP of a part of a modular airfield and save it to a real (decimal number) variable. | Both | Yes |
| airfieldSetModuleHP | Sets the HP of a part of a modular airfield and save it to a real (decimal number) variable. | Both | Yes |
| airfieldAddModuleHP | Adds a set number to the HP of a part of a modular airfield and save it to a real (decimal number) variable. | Both | Yes |
| airfieldSetProperties | Allows you to change some of settings for selected airfields | Both | Yes |
| awardAchievement | Functionality unknown | Unknown | Unknown |
| changeUnit | This action does not appear to currently be functional | Unknown | Unknown |
| checkEntity | Functionality unknown | Unknown | Unknown |
| comment | Adds comments to the trigger for documentation purposes | Both | Yes |
| countUnitsKilledByTeam | Counts the number of units killed by the specified team and assigns the value to a variable | Both | Yes |
| duplicateAreaAtPos | Counts the number of units killed by the specified team and assigns the value to a variable | Both | Yes |
| beginRaceMode | Starts a plane or tank race with the given settings | Both | Yes |
| bigQueryAddRecord | Functionality unknown | Unknown | Unknown |
| getNearestAreaByMask | Used to store the name of areas that are the closest to the selected target | Both | Yes |
| getOwnArea | Used to get the area name where the selected unit is located | Both | Yes |
| getUnitArmy | Used to store the army number of selected unit | Both | Yes |
| getUnitsCount | Used to store the number of selected unit | Both | Yes |
| getUnitsAttackCount | Functionality unknown | Unknown | Unknown |
| hangarGetCountryNum | Functionality unknown | Unknown | Unknown |
| makeSquad | Creates a squad from the given unit | Both | Unknown |
| makeSquadFromUnits | Makes it possible to create a squad of units after the mission is launched in game | Both | Unknown |
| setHeadSquad | Used to modify squads created by using the makeSquadFromUnits action | Both | Unknown |
| missionAttempts | Allows you to modify how many attempts the player gets at a mission | SP Only | Yes |
| missionBattleArea | Allows you to restrict the battle area to within a specified area | Both | Yes |
| missionComplete | Sets the mission as complete (victory) for the selected team, ends the battle | Both | Yes |
| missionCustomArtillery | Enables custom artillery (which can be set in Mission Settings/Versus params/customSuperArtillery) | Unknown | Unknown |
| missionDebriefing | Forces the player back to the hangar, works only after mission has been completed | SP | Yes |
| missionDestroyArea | Removes all physical objects from the selected area | Both | Yes |
| missionGetBalanceLevel | Gets the mission’s balance level (1-25) and stores it in the given variable | Both | Unknown |
| missionGetBombingAreaHP | Gets the remaining HP of a bombing area and assigns it to a variable | Both | Yes |
| missionGetMaxPlayers | Gets the maximum amount of players allowed in the game (set before mission is launched) and assigns it to a variable | MP Only | Yes |
| missionGetMaxRespawns | Gets the maximum number of respawns and assigns it to a variable (unclear if working currently) | SP | Yes |
| missionHint | This action does not appear to currently be functional | Unknown | Unknown |
| missionEnableMapAutoScale | Enables auto scaling of the in-game map | Unknown | Unknown |
| missionFailed | Sets the mission as failed for the selected team, ends the battle | Both | Yes |
| missionKillEffects | Removes effects from the selected areas | Both | Yes |
| missionForceMusic | Forces playing selected sound track | SP | Yes |
| missionForceUpdate | Functionality unknown | Unknown | Unknown |
| missionDisableRadiochat | Disabled in-game radio messages (for example Cover me etc.) | MP | Yes |
| missionMakeTorpedoNet | Creates a torpedo net | MP | Yes |
| missionMarkAsCaptureZone | Creates capture zone in selected area | Both | Yes |
| missionMarkAsLandingZone | Creates a landing zone (airfield) | Unknown | Unknown |
| missionMarkAsWaypoint | Creates a circle (waypoint) in selected area | Both | Yes |
| missionMarkUnitsForStrike | This action does not appear to currently be functional | SP | No |
| missionMarkAsRespawnPoint | Creates spawn zones in selected areas | MP | Yes |
| missionMarkAsRearmZone | Creates a rearm zone (only for players) | Both | Yes |
| missionMarkAsExitZone | Creates a zone where the player can safely quit (bailout) | MP | Yes |
| missionSetCrewLock | Functionality unknown | MP | Yes |
| missionShowMapLine | Shows a single line on the map | Both | Yes |
| missionShowMapIcon | Shows a single icon on the map | Both | Yes |
| missionCreatePickUps | Creates a small area where you can rearm your unit with an icon above it for ground units | MP | Yes |
| missionCreateRespawnBasesByTemplate | Creates spawn zones in selected areas using variables | MP | Yes |
| missionPlayDialogue | Play a dialogue | Both | Yes |
| missionSetBattleRoyaleArea | Sets an area for battle royale mode | MP | Yes |
| missionSetBombingArea | Add a bombing area in selected area | Both | Yes |
| missionBombingAreaDamage | Inflict some damage to selected bombing area | Both | Yes |
| missionSetEndReason | Set the reason of ending the mission | MP | Yes |
| missionSetFade | Add fading in or fading out of screen to the mission | Both | Yes |
| missionSetFailText | Set the text after failing the mission | SP | Yes |
| missionSetProperties | Change some basic mission’s properties | Both | Yes |
| missionSetTimeIndicator | Show a time indicator in the bottom left corner | Both | Yes |
| missionSetTimeSpeed | Changes the mission time speed | Both | Yes |
| missionSetTargetsIndicator | Shows icons with a number of remaining units in the bottom left corner | Both | Yes |
| MissionStartCutscene | Starts an in-game cutscene | Both | Yes |
| MissionStartGuiScene | Unknown functionality | SP | Yes |
| MissionStopCutscene | Stops the cutscene started by using MissionStartCutscene action | Both | Yes |
| missionStopSpeech | Stops any ongoing dialogues | SP | Yes |
| missionTerraform | Used to modify the terrain shape on the high quality maps for the ground forces, works only in the center 2×2km or 4×4km area | Both | Yes |
| missionUnitShootAtLine | Shoots an artillery salvo with shells that are selected for the unit (anything from APCR to smoke). The only rockets that can be shot are 150 mm Wgr.41 Spr rockets from the 15 cm Pz.W.42. | Both | Yes |
| missionControlJIP | Enable or disable join in progress function | MP | Unknown |
| moAddMissionObjective | Adds a new objective (if it haven’t been shown yet) | Both | Yes |
| moSetObjectiveStatus | Change the status of selected objective | Both | Yes |
| moveRespawnBase | Lets you assign a respawn base to a movable object | Both | Yes |
| objectGroupSetAirfield | Marks selected object as an airfield | Both | Yes |
| playerControls | Enables or Disables selected control keys | SP | Yes |
| playerEmulateShortcut | Presses selected control key | SP | Yes |
| playerForceMoveToRespawnScreen | Forces all players to go back to the respawn screen | MP | Yes |
| playerLockTarget | Locks selected target (it’s only related to the UI, not missiles) | SP | Yes |
| playerOptions | Change some basic player’s properties | SP | Yes |
| playHint | Shows a message on screen | Both | Yes |
| playerToggleHero | This action does not appear to currently be functional | SP | No |
| playSound | Will play a selected sound | Both | Yes |
| raceRangeEnable | Placeholder | Unknown | Unknown |
| raceParamsModify | Unknown | Unknown | Unknown |
| spawnOnAirfield | Spawn selected units on the airfield (on the ground) | Unknown | Yes |
| systemLog | Unknown functionality | Unknown | Unknown |
| systemStats | Unknown functionality | Unknown | Unknown |
| systemCommand | Unknown functionality | Unknown | Unknown |
| systemShakeCamera | Unknown functionality | Unknown | Unknown |
| systemPlayRumble | Unknown functionality | Unknown | Unknown |
| triggerActivate | Activates selected trigger | Both | Yes |
| triggerDisable | Disables selected triggers | Both | Yes |
| triggerEnable | Enables selected triggers | Both | Yes |
| tutorialArtilleryShootAtPos | Orders the artillery to shoot at selected area | SP | Yes |
| tutorialArtilleryShowWarning | Placeholder | Unknown | Unknown |
| tacticalMapForceZoom | Changes the zoom level of your map | SP | Yes |
| tacticalMapSetIconProperty | This action does not appear to currently be functional | Unknown | Unknown |
| unitBlinkPart | Shows selected part of the ground unit (can be used to show for example tank crew position) | SP | Yes |
| unitDamage | Damage or destroy selected unit | Both | Yes |
| unitDestroyMissile | Unknown functionality | Unknown | Unknown |
| unitDoBailout | Select which air units should bailout (doesn’t spawn any effects and doesn’t destroy the airplane) | Both | Yes |
| UnitDropAmmo | Makes the unit drop all of its bombs, fire all rockets and set its ammunition amount to 0 | Both | Yes |
| unitFire | Unknown functionality (probably doesn’t work) | Unknown | Unknown |
| unitForceRearmSpeed | Set the rearm speed multiplier for Arcade Battles midair reload mechanics | Both | Yes |
| unitGetDistanceToVar | Placeholder | Unknown | Unknown |
| unitGetRandomNameFromSquad | Saves the name of a squad or specific unit from it in a string variable | Both | Yes |
| unitLandOnAirfield | Orders the AI unit to land on the airfield or water | Both | Yes |
| unitLoadBehTree | Loads specific AI behaviour presets | Both | Yes |
| unitRespawn | Respawn units in selected area | Both | Yes |
| unitRespawnAfterTime | Set the respawn time for the units | Both | Yes |
| unitRestore | Rearms or repairs selected units | Both | Yes |
| unitPlayAnim | Makes the unit play one of its animations | Both | Yes |
| unitPlayEffect | Shows custom effects in or over selected units | Both | Yes |
| unitPutToSleep | Makes the selected unit disappear | Both | Yes |
| unitSpawnOnObjectGroup | Unknown functionality | Unknown | Unknown |
| unitWakeUp | Makes the selected unit appear again after using unitPutToSleep on them | Both | Yes |
| unitSetControls | Sets the control of an aircraft’s gears, control surfaces, throttle and so, to anything between a minimum or maximum value | Both | Yes |
| unitSetIndication | Makes markings and map icons of selected units blink | Both | Yes |
| unitSetStealth | Turn off any indications, markers and icons over selected units | Both | Yes |
| unitSetCalmDetection | Disables or enables blinking of enemy unit marking icon when it’s spotted | Both | Yes |
| unitFollowWaypoints | Makes selected units follow their waypoints | Both | Yes |
| unitAttackTarget | Orders AI units attack selected targets | Both | Yes |
| unitMoveTo | Orders AI units to move to selected area or unit | Both | Yes |
| unitMark | Gives a number to a selected unit | Both | Yes |
| unitMarkForEvent | Used to setting up a streak event from AB | MP | Yes |
| unitSetAttachedMenCount | Unknown functionality | Unknown | Unknown |
| unitSetDrownProperties | Unknown functionality | Unknown | Unknown |
| UnitSetProperties | Provides the option to set multiple types of properties for each unit class, as well as some basic functionalities taken from other actions. | Both | Yes |
| unitSetFormation | Changes the formation of ground units | Both | Yes |
| unitSetRoute | Assigns waypoints to units | Both | Yes |
| unitSetVar | Set a custom name and number to selected units | Both | Yes |
| unitSetZeroAmmo | Sets the ammunition amount of selected types to zero | Both | Yes |
| unitVulnerableFrom | Makes it so some units can be damaged by other specific units only and indestructible for everything else | Both | Yes |
| unitsSetColumn | Allows to set trains and following it wagons or carriages | Both | Yes |
| groupFormation | Changes the formation of selected air units | Both | Yes |
| varAddString | Adds a text or number to selected string value | Both | Yes |
| varGetIntFromString | Imports an integer value from the selected string variable to a selected integer variable | Both | Yes |
| varGetStringValue | Imports all text from the selected string value | Both | Yes |
| varModify | Modify existing real or integer variable | Both | Yes |
| varSetBool | Sets a bool value | Both | Yes |
| varSetInt | Sets an integer value | Both | Yes |
| varSetReal | Sets a real value | Both | Yes |
| varSetString | Sets a string value | Both | Yes |
| varSetRandomInt | Sets a random integer value | Both | Yes |
| wait | Adds a delay between actions | Both | Yes |
| loop | This action does not appear to currently be functional | Unknown | No |
| playerSetAmmo | This action does not appear to currently be functional | Unknown | No |
| playerSetMouseAim | Makes player’s camera view (mouse aim circle) point at selected unit or area | SP | Yes |
| playerCenterMouseAim | Centers the mouse aim circle position | SP | Yes |
| gameMPChangeScore | Change the amount of tickets in battle | Both | Yes |
| hudElementBlink | Makes selected HUD elements blink | SP | Yes |
| hudElementEnlarge | Makes selected HUD elements larger | SP | Yes |
| hudElementSelectionShade | Makes the screen darker except for selected HUD element | SP | Yes |
| hudElementShow | Used to show tutorial hints | SP | Yes |
| hudWindowsHide | This action does not appear to currently be functional | Unknown | Unknown |
| registrationKillCounter | Unknown functionality | Unknown | Unknown |
| tacticalMapControl | Change the map settings | Both | Yes |
| showSmartCutscene | Shows an in-game cutscene | Both | Yes |
| showCutsceneInfo | Shows a cutscene text | Both | Yes |
| preloadRendInsts | Unknown functionality | Unknown | Unknown |
| waitRendInst | Unknown functionality | Unknown | Unknown |
| benchmarkAction | Unknown functionality | Unknown | Unknown |
| hideAirDrops | Unknown functionality | Unknown | Unknown |
| unitAddAreasForSearchLight | Makes the AI searchlight units search through selected areas | Both | Yes |
| unitFollowSearchLight | Unknown functionality | Unknown | Unknown |
In-Depth Notes
This category is for in-depth explanations on how to use certain actions (when the explanation simply doesn’t fit in a table)
Capture Zones
Drawing the capture zone circle
There are some specific things to do in order for a capture zone to work properly and for the capture zone circle to be drawn.
First, you need to create a capture zone unit, they are found in the “objectGroups” type, under the names of “capture_zone_circle”, “capture_zone_circle_color” and “capture_zone_water”. Select the one that is the most appropriate for your use case, and put it anywhere on the map (the position really doesn’t matter, you can put it outside the battle area if needed).
(You can rename it to something meaningful like “cz_circle_01”)
Then, in the “missionMarkAsCaptureZone” action, go to the “markUnit” parameter (all the way down, before the “showBorderOnMap” parameter and after the “markUnitPreset” parameter) and select the capture zone unit you just created.
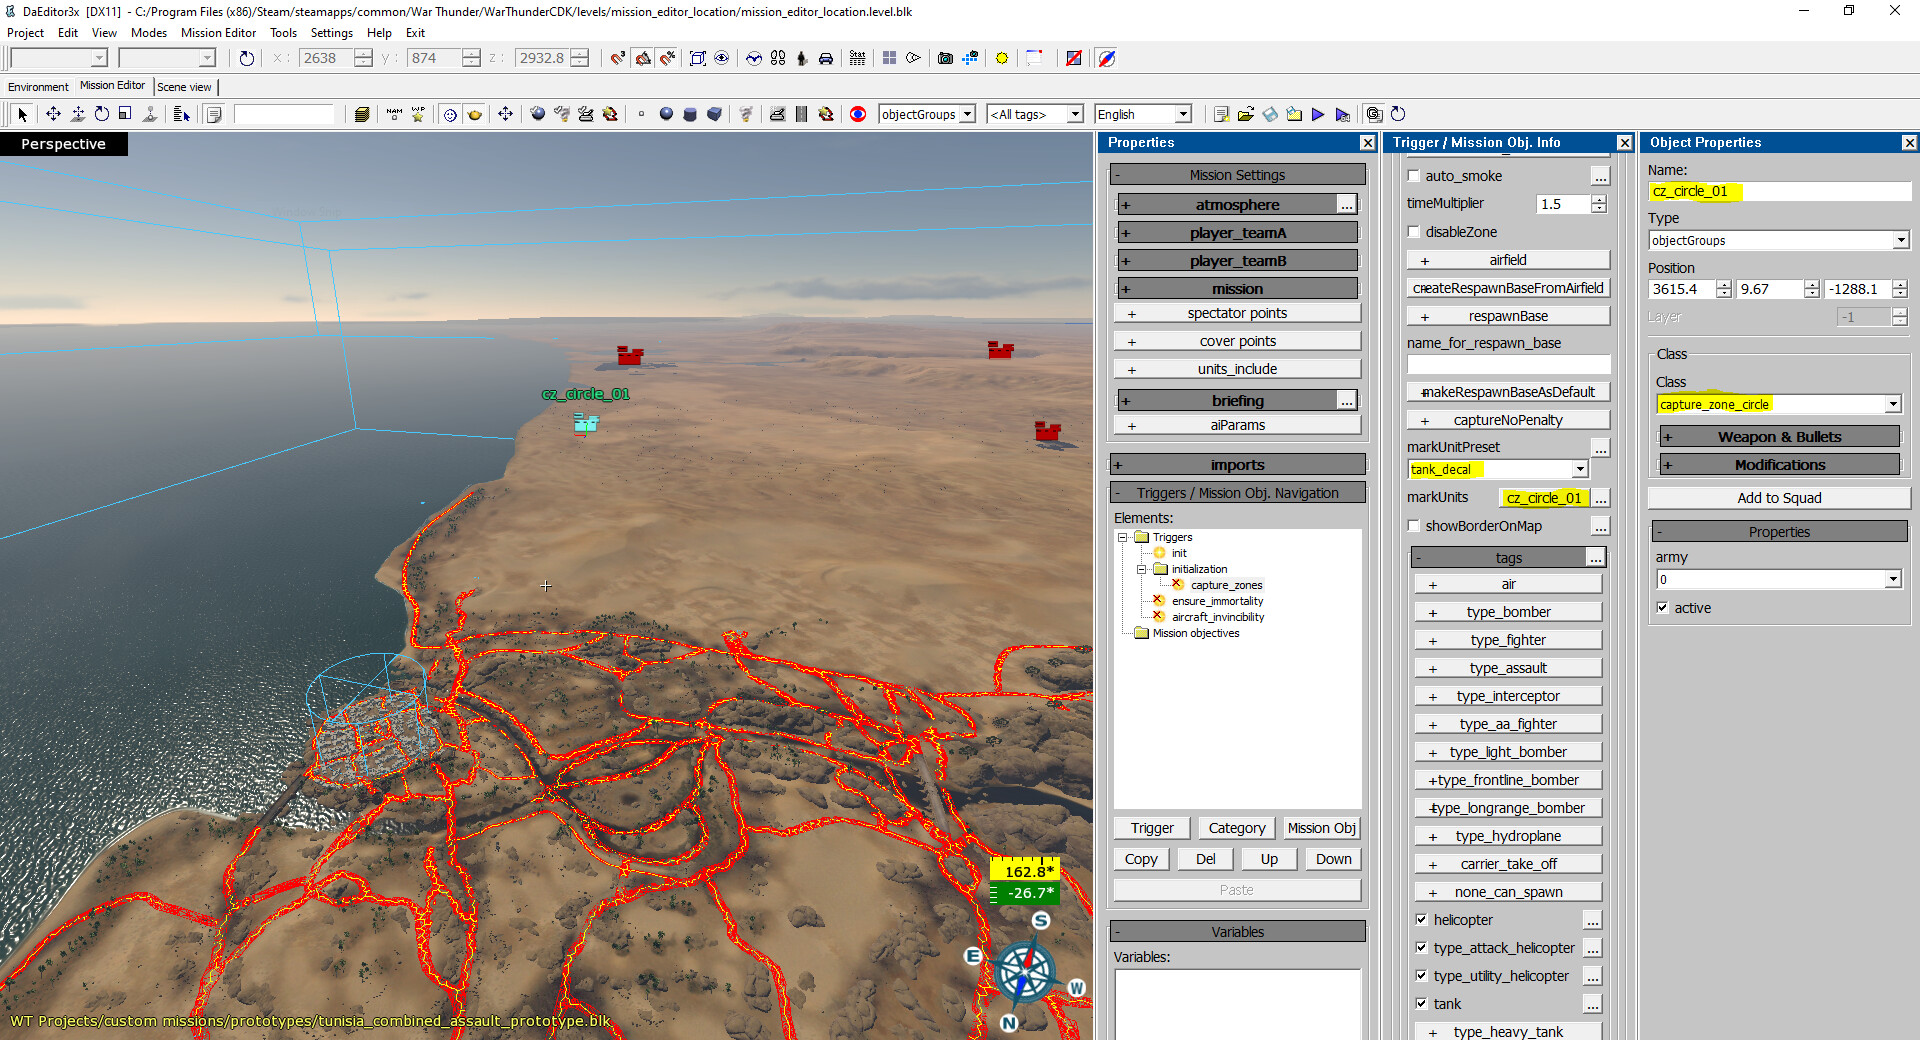
Don’t forget to make sure the “markUnitPreset” parameter is set to the relevant type (“tank_decal” if your capture zone is on the ground for ground vehicles to capture, “ship_buoys” if your capture zone is on the water for ships to capture)
Matching the capture zone circle with the capture area
This section is if you’re having an issue where the drawn capture circle does not match the actual capture area (so for example, you drive into the circle and it doesn’t start capturing until you go much deeper, or it starts capturing before you even drive into the circle).
If you’re using a cylinder area (this issue might also happen with other forms of areas), you need to have the “X” and “Z” scale axis match (see image).
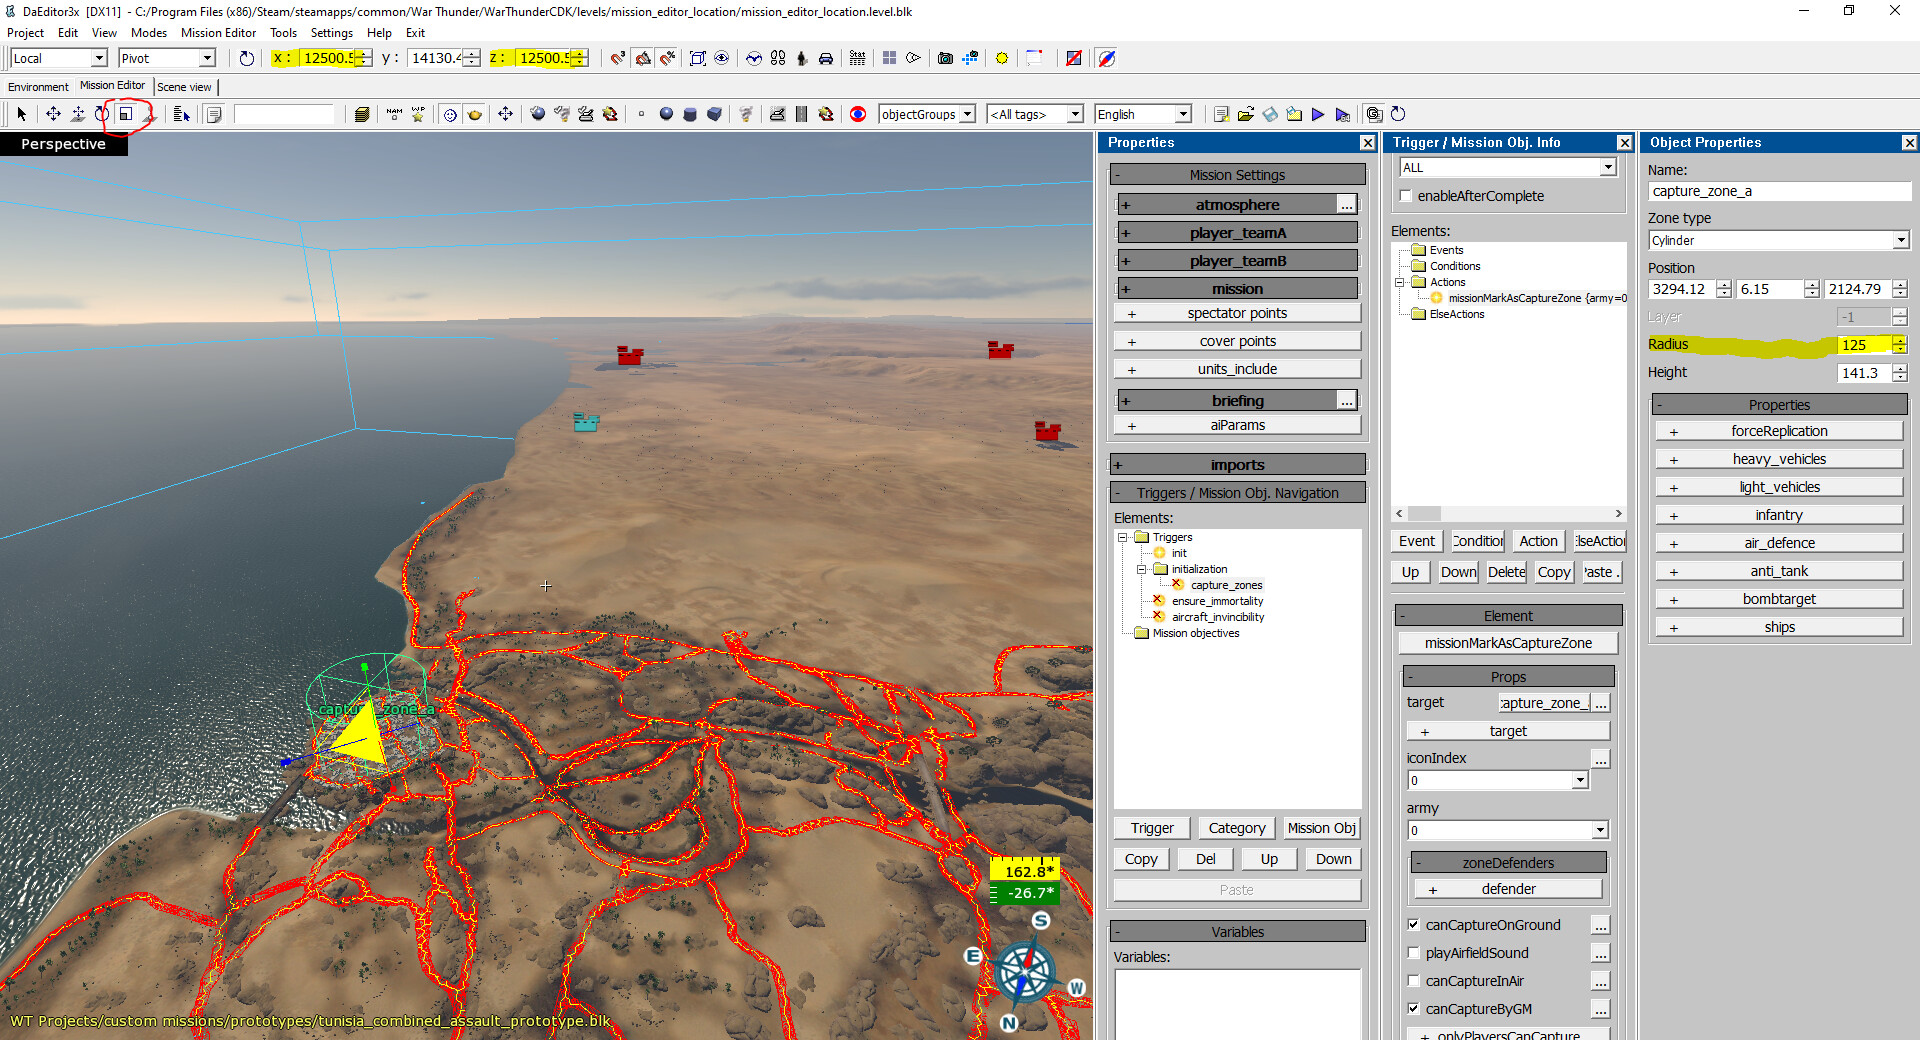
To make them match, you can either:
- (Easiest) Select the capture area, open the object properties panel if not already opened, and edit the “Radius” value (see image for reference), changing the radius will edit both the X and Z axis at the same time and make sure they’re the same
- Select the capture area and select the scale tool (the one circled on the image), then edit the X and Z values manually to be the same.
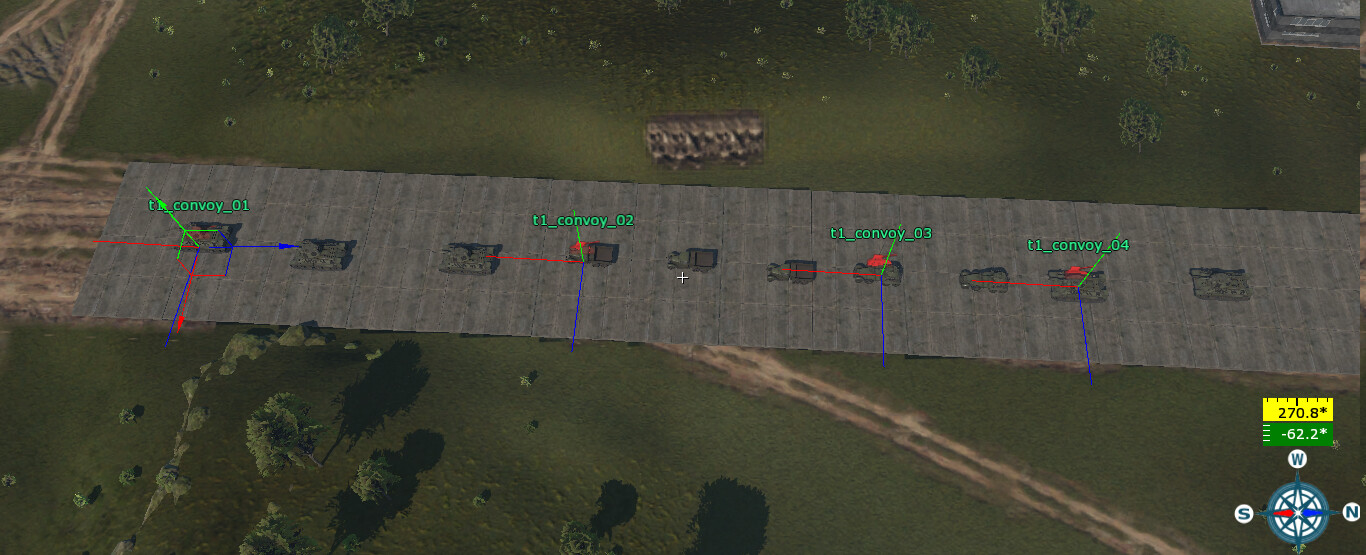
Creating a convoy
To create a convoy consisting of the AI units a few actions are required. As a start create a few AI units and put them in one line like in the picture below. Set their names to for example t1_convoy_01, t1_convoy_02 etc.
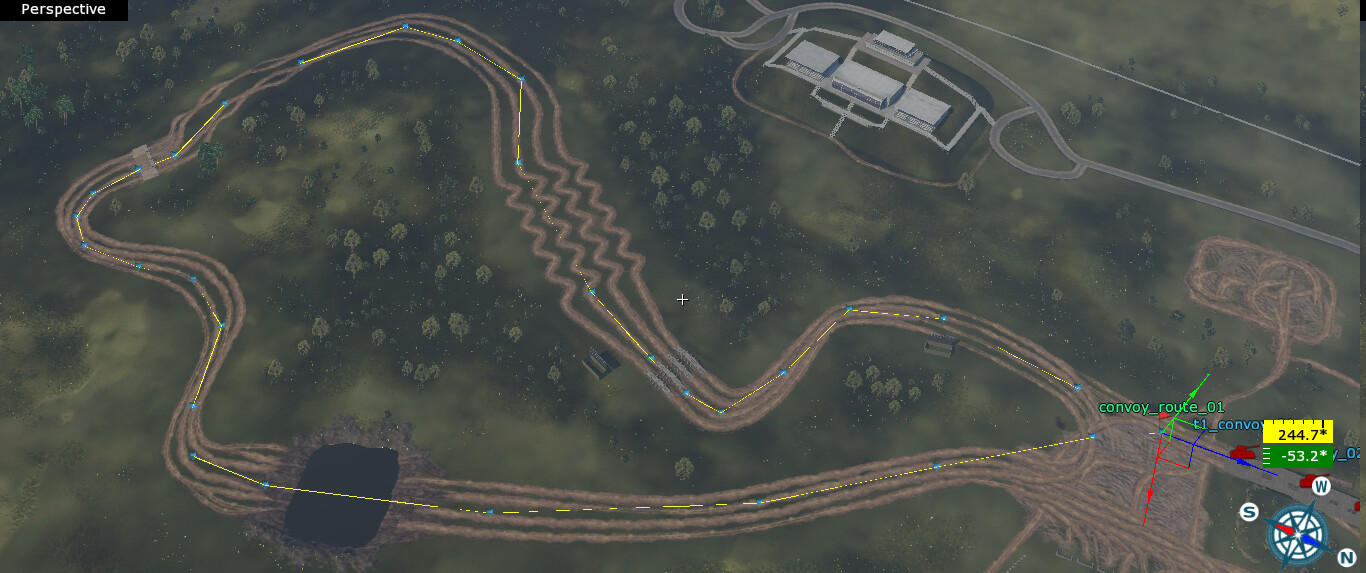
Then by using the Create way icon create a waypoints which will be used by those units. When it is done change the name to for example convoy_route_01. Do not forget to switch the speed of every waypoint point, it is the best to set it ~5 km/h lower than the maximum speed of slowest unit which will added to the squad.
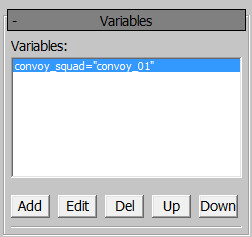
The last thing that needs to be done not related to adding actions is to add a string variable, it is required in order to make the convoy work with the action for assigning waypoints and properties. Every squad/convoy needs to have its own name.
The last part is adding actions, five of them are needed to make it work correctly:
1. makeSquadFromUnits — All that needs to be done there is to add units by using the object tab, up to 12 units can be added there.
2. setHeadSquad — The same objects needs to be added there, options removeOnKill, followLowestSpeed and useCurrentFormation needs to be enabled.
3. unitSetRoute — An action used for assigning waypoints, the variable name needs to be added there as an Object (for example @convoy_squad), then the waypoint’s name in the route tab.
4. unitSetFormation — Used for changing the formation, works the same way like option in Object Properties window after selecting some unit. The allUnitsInOneFormation option needs to be enabled.
5. unitSetProperties — The last action, used to give the AI some basic properties, destroyRIByCollision should be enabled to make the AI destroy trees and other objects, ignoreObstaclesAfterTime in case when the AI gets stuck, allowOvertakeMode in case when some units are lagging behind and movementTraceIR to make the AI register collisions.
If all options were applied correctly then the convoy should work without any issues. Sample file with an AI convoy
The same method works also for the AI ship units, the only difference is what option needs to be enabled in the unitSetProperties action. Required options are the shipTurnRadius (can be set to for example 500), enableShipCollisionAvoidance and advancedCollisionAvoidance.