Difference between revisions of "White Rock Fortress"
Colok76286 (talk | contribs) |
CammoSoldier (talk | contribs) (→Overview) (Tag: Visual edit) |
||
| (One intermediate revision by one other user not shown) | |||
| Line 22: | Line 22: | ||
==Overview== | ==Overview== | ||
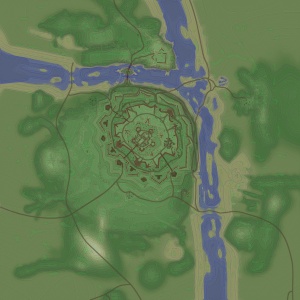
[[File:MapLayout Ground WhiteRockFortress.jpg|x300px|thumbnail|right|The full White Rock Fortress Map]] | [[File:MapLayout Ground WhiteRockFortress.jpg|x300px|thumbnail|right|The full White Rock Fortress Map]] | ||
| − | '''White Rock Fortress''' is a ground forces map it is available in all modes. It was added in [[Update 1.45 "Steel Generals"]], under the name '''White Stone Fortress'''. The map is focused mainly around a large fort, located at the | + | '''White Rock Fortress''' is a ground forces map it is available in all modes. It was added in [[Update 1.45 "Steel Generals"]], under the name '''White Stone Fortress'''. The map is focused mainly around a large fort, located at the confluence of two rivers. In AB & RB the interior of the fort takes up most of the playable area however in SB some of the surrounding area (seen in the map to the right) is playable. |
The fort has several layers, and sits at a slightly higher elevation than the surrounding area. The first perimeter of the form comes in the form of two ditches with a mound in-between them, running round most of the fort. Then comes the fort's outer wall, a mixture of mud and bricks, there are plenty of gaps in the wall allowing access, and a number of fortified buildings outside the wall. Inside the outer wall is a large dry moat like area, running all the way round the fort, at a lower elevation than the outer wall or inner fort. Players can use the moat to access the inner fort from different angles, or to capture the zones sometimes located in, or on the edge of, the moat. On the other side of the dry moat is the inner fort area, there are 7 breaks in the wall, at various points, to allow access from the moat. Alternatively players can use one of 3 bridges to gain direct access from outside the fort (although doing so leaves the player open to fire from enemy tanks hiding on the edge of the moat. The final layer of the fort is the keep; it has its own smaller dry moat and can be accessed via either 3 breaks in the wall, or through two gateways (one in the south connected to a bridge, or one in the east. | The fort has several layers, and sits at a slightly higher elevation than the surrounding area. The first perimeter of the form comes in the form of two ditches with a mound in-between them, running round most of the fort. Then comes the fort's outer wall, a mixture of mud and bricks, there are plenty of gaps in the wall allowing access, and a number of fortified buildings outside the wall. Inside the outer wall is a large dry moat like area, running all the way round the fort, at a lower elevation than the outer wall or inner fort. Players can use the moat to access the inner fort from different angles, or to capture the zones sometimes located in, or on the edge of, the moat. On the other side of the dry moat is the inner fort area, there are 7 breaks in the wall, at various points, to allow access from the moat. Alternatively players can use one of 3 bridges to gain direct access from outside the fort (although doing so leaves the player open to fire from enemy tanks hiding on the edge of the moat. The final layer of the fort is the keep; it has its own smaller dry moat and can be accessed via either 3 breaks in the wall, or through two gateways (one in the south connected to a bridge, or one in the east. | ||
| Line 43: | Line 43: | ||
==Map configuration== | ==Map configuration== | ||
| − | '''Domination'''<br/> | + | '''Domination'''<br /> |
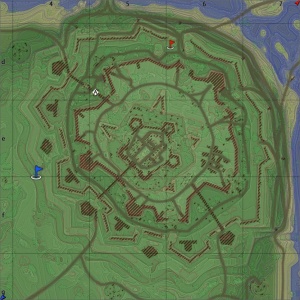
There are three Capture Points. Point A is under the collapsed bridge in the western moat, B is in the keep, and C is near a cluster of buildings and a break in the inner wall, in the east. | There are three Capture Points. Point A is under the collapsed bridge in the western moat, B is in the keep, and C is near a cluster of buildings and a break in the inner wall, in the east. | ||
[[File:MapLayout Domination WhiteRockFortress.jpg|x300px|thumbnail|none|The Domination configuration in AB & RB.]] | [[File:MapLayout Domination WhiteRockFortress.jpg|x300px|thumbnail|none|The Domination configuration in AB & RB.]] | ||
| − | '''Conquest'''<br/> | + | '''Conquest'''<br /> |
There are three configurations of the conquest mode, each with one Capture Point. The point will be either under the collapsed bridge (in the west moat), in the keep, or among the buildings in the east of the inner fort. | There are three configurations of the conquest mode, each with one Capture Point. The point will be either under the collapsed bridge (in the west moat), in the keep, or among the buildings in the east of the inner fort. | ||
[[File:MapLayout Conquest1 WhiteRockFortress.jpg|x300px|thumbnail|none|The Conquest #1 configuration in AB & RB.]] | [[File:MapLayout Conquest1 WhiteRockFortress.jpg|x300px|thumbnail|none|The Conquest #1 configuration in AB & RB.]] | ||
| Line 53: | Line 53: | ||
[[File:MapLayout Conquest3 WhiteRockFortress.jpg|x300px|thumbnail|none|The Conquest #3 configuration in AB & RB.]] | [[File:MapLayout Conquest3 WhiteRockFortress.jpg|x300px|thumbnail|none|The Conquest #3 configuration in AB & RB.]] | ||
| − | '''Battle'''<br/> | + | '''Battle'''<br /> |
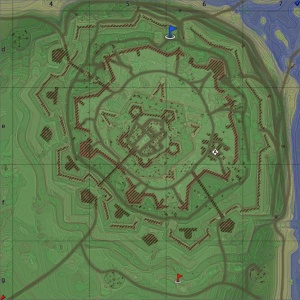
There are two capture points, each owned by one of the teams. The points are in the ditches, outside the fort in the southwest; and inside the inner fort in the northeast. | There are two capture points, each owned by one of the teams. The points are in the ditches, outside the fort in the southwest; and inside the inner fort in the northeast. | ||
[[File:MapLayout Battle WhiteRockFortress.jpg|x300px|thumbnail|none|The Battle configuration.]] | [[File:MapLayout Battle WhiteRockFortress.jpg|x300px|thumbnail|none|The Battle configuration.]] | ||
| Line 68: | Line 68: | ||
== See also == | == See also == | ||
''Links to the articles on the War Thunder Wiki that you think will be useful for the reader, for example:'' | ''Links to the articles on the War Thunder Wiki that you think will be useful for the reader, for example:'' | ||
| + | |||
* ''reference to related locations'' | * ''reference to related locations'' | ||
| Line 76: | Line 77: | ||
* ''other literature.''--> | * ''other literature.''--> | ||
| − | [[wt:en/devblog/current/692|[Devblog] White Rock Fortress]] | + | * [[wt:en/devblog/current/692|[Devblog] White Rock Fortress]] |
| − | |||
[[Category:Maps_and_missions]] | [[Category:Maps_and_missions]] | ||
[[Category:Ground forces maps]] | [[Category:Ground forces maps]] | ||
Latest revision as of 14:16, 13 January 2024
| Game Modes | ||||
|---|---|---|---|---|
Contents
Overview
White Rock Fortress is a ground forces map it is available in all modes. It was added in Update 1.45 "Steel Generals", under the name White Stone Fortress. The map is focused mainly around a large fort, located at the confluence of two rivers. In AB & RB the interior of the fort takes up most of the playable area however in SB some of the surrounding area (seen in the map to the right) is playable.
The fort has several layers, and sits at a slightly higher elevation than the surrounding area. The first perimeter of the form comes in the form of two ditches with a mound in-between them, running round most of the fort. Then comes the fort's outer wall, a mixture of mud and bricks, there are plenty of gaps in the wall allowing access, and a number of fortified buildings outside the wall. Inside the outer wall is a large dry moat like area, running all the way round the fort, at a lower elevation than the outer wall or inner fort. Players can use the moat to access the inner fort from different angles, or to capture the zones sometimes located in, or on the edge of, the moat. On the other side of the dry moat is the inner fort area, there are 7 breaks in the wall, at various points, to allow access from the moat. Alternatively players can use one of 3 bridges to gain direct access from outside the fort (although doing so leaves the player open to fire from enemy tanks hiding on the edge of the moat. The final layer of the fort is the keep; it has its own smaller dry moat and can be accessed via either 3 breaks in the wall, or through two gateways (one in the south connected to a bridge, or one in the east.
Combat tends to take place at short range on this map, in the moat and inner fort. Capture points are usually located in the keep, near some buildings and a break in the wall of the inner keep (in the east), and near a collapsed bridge in the moat in the west. Players can hide in the ditches around the outer wall to ambush or out flank those in the moat.
There are ruined buildings and rocks scattered throughout the moat, inner fort, and keep, providing good cover for players.
The tank battles map is 4km x 4km, but the battle area is restricted to 1.6km x 1.6km in AB & RB and 2.9km x 2.9km in SB. The Air battles map is 32km x 32km in all modes.
Game Description
The White Rock Fortress initially was built to protect the river. But as the river swallowed the fortress lost its meaning and in course of time was abandoned; only the storage buildings remained in use.
As the war began the fortress was manned again and reconditioning works started. However, nothing of protective or repair works had been finished at the time it was bombed.
The last of the garrison defenders have been standing against approaching enemy army.
Historical Background
The fortress is a Bastion fort, seemingly inspired by a number of different Bastion forts located across Europe. The location is fictional.
Map configuration
Domination
There are three Capture Points. Point A is under the collapsed bridge in the western moat, B is in the keep, and C is near a cluster of buildings and a break in the inner wall, in the east.
Conquest
There are three configurations of the conquest mode, each with one Capture Point. The point will be either under the collapsed bridge (in the west moat), in the keep, or among the buildings in the east of the inner fort.
Battle
There are two capture points, each owned by one of the teams. The points are in the ditches, outside the fort in the southwest; and inside the inner fort in the northeast.
Strategy
Media
- Videos
See also
Links to the articles on the War Thunder Wiki that you think will be useful for the reader, for example:
- reference to related locations


