Difference between revisions of "Knowledge Base"
Inceptor57 (talk | contribs) (Knowledgeable Draft) |
Inceptor57 (talk | contribs) m |
||
| Line 33: | Line 33: | ||
Additionally, it can also be seen in the launcher. | Additionally, it can also be seen in the launcher. | ||
| − | [[File:Knowledgebase_LauncherVersion.png| | + | [[File:Knowledgebase_LauncherVersion.png|x400px]] |
==What is a client log (.clog) and how do you obtain it?== | ==What is a client log (.clog) and how do you obtain it?== | ||
| Line 51: | Line 51: | ||
===How to obtain your client log=== | ===How to obtain your client log=== | ||
====Download from Gaijin Entertainment Website==== | ====Download from Gaijin Entertainment Website==== | ||
| − | # If you have downloaded War Thunder from the Gaijin Entertainment website, follow the installation path that you've specified during installation and locate the '.game_logs' folder [[File:Knowledgebase_GaijinInstallation_Clog.jpeg| | + | # If you have downloaded War Thunder from the Gaijin Entertainment website, follow the installation path that you've specified during installation and locate the '.game_logs' folder [[File:Knowledgebase_GaijinInstallation_Clog.jpeg|x300px]] |
# Identify the client log (.clog) file that was created during the session in which you recognized the issue or bug. This is usually the latest file created, so sorting by date is the easiest option. The files itself are also time-stamped, and follow this scheme: YEAR_MONTH_DAY_HOUR_MINUTE_SECOND_ID.clog | # Identify the client log (.clog) file that was created during the session in which you recognized the issue or bug. This is usually the latest file created, so sorting by date is the easiest option. The files itself are also time-stamped, and follow this scheme: YEAR_MONTH_DAY_HOUR_MINUTE_SECOND_ID.clog | ||
# Attach the client log to your bug report. | # Attach the client log to your bug report. | ||
| Line 57: | Line 57: | ||
====Download from Steam==== | ====Download from Steam==== | ||
| − | # If you have downloaded War Thunder using Steam, follow the standard Steam installation path and locate the '.game_logs' folder [[File:Knowledgebase_GaijinInstallation_Gamelog.jpeg| | + | # If you have downloaded War Thunder using Steam, follow the standard Steam installation path and locate the '.game_logs' folder.[[File:Knowledgebase_GaijinInstallation_Gamelog.jpeg|x300px]] |
# Identify the client log (.clog) file that was created during the session in which you recognized the issue or bug. This is usually the latest file created, so sorting by date is the easiest option. The files itself are also time-stamped, and follow this scheme: YEAR_MONTH_DAY_HOUR_MINUTE_SECOND_ID.clog | # Identify the client log (.clog) file that was created during the session in which you recognized the issue or bug. This is usually the latest file created, so sorting by date is the easiest option. The files itself are also time-stamped, and follow this scheme: YEAR_MONTH_DAY_HOUR_MINUTE_SECOND_ID.clog | ||
# Attach the client log to your bug report | # Attach the client log to your bug report | ||
| Line 70: | Line 70: | ||
#Press 'Windows Key + R' to open Microsoft's Run function | #Press 'Windows Key + R' to open Microsoft's Run function | ||
| − | #Type in 'dxdiag' in the input field and click 'OK'[[File:Knowledgebase_RunWindows.png|x200px]] | + | #Type in 'dxdiag' in the input field and click 'OK'. [[File:Knowledgebase_RunWindows.png|x200px]] |
| − | # The DirectX Diagnostic Tool opens in a new window. Wait for it to gather the necessary information.[[File:Knowledgebase_DirectXDiagnostic.jpeg| | + | # The DirectX Diagnostic Tool opens in a new window. Wait for it to gather the necessary information.[[File:Knowledgebase_DirectXDiagnostic.jpeg|x300px]] |
# When you are running a 32-bit (x86) version of Windows, click on "Save All Information..." and specify a directory and name to save the file. | # When you are running a 32-bit (x86) version of Windows, click on "Save All Information..." and specify a directory and name to save the file. | ||
# When you are running a 64-bit (x64) version of Windows, first click on Run 64-bit DxDiag, then click on "Save All Information..." and specify a directory and name to save the file. | # When you are running a 64-bit (x64) version of Windows, first click on Run 64-bit DxDiag, then click on "Save All Information..." and specify a directory and name to save the file. | ||
| Line 94: | Line 94: | ||
1. If you have downloaded War Thunder from the Gaijin Entertainment website, follow the installation path that you've specified during installation and locate the '.launcher_log' folder | 1. If you have downloaded War Thunder from the Gaijin Entertainment website, follow the installation path that you've specified during installation and locate the '.launcher_log' folder | ||
| − | [[File:Knowledgebase_GaijinFolder_LauncherLog.jpeg| | + | [[File:Knowledgebase_GaijinFolder_LauncherLog.jpeg|x300px]] |
2. Identify the launcher log (.txt) file that was created during the session in which you recognized the issue or bug. This is usually the latest file created, so sorting by date is the easiest option. | 2. Identify the launcher log (.txt) file that was created during the session in which you recognized the issue or bug. This is usually the latest file created, so sorting by date is the easiest option. | ||
| Line 107: | Line 107: | ||
1. If you have downloaded War Thunder using Steam, follow the standard Steam installation path and locate the '.launcher_log' folder | 1. If you have downloaded War Thunder using Steam, follow the standard Steam installation path and locate the '.launcher_log' folder | ||
| − | [[File:Knowledgebase_SteamFolder_LauncherLog.jpeg| | + | [[File:Knowledgebase_SteamFolder_LauncherLog.jpeg|x300px]] |
2. Identify the launcher log (.txt) file that was created during the session in which you recognized the issue or bug. This is usually the latest file created, so sorting by date is the easiest option. | 2. Identify the launcher log (.txt) file that was created during the session in which you recognized the issue or bug. This is usually the latest file created, so sorting by date is the easiest option. | ||
| Line 132: | Line 132: | ||
1. If you have downloaded War Thunder from the Gaijin Entertainment website, follow the installation path that you've specified during installation and locate the '.game_logs' folder | 1. If you have downloaded War Thunder from the Gaijin Entertainment website, follow the installation path that you've specified during installation and locate the '.game_logs' folder | ||
| − | [[File:Knowledgebase_GaijinFolder_GamesLog.jpeg| | + | [[File:Knowledgebase_GaijinFolder_GamesLog.jpeg|x300px]] |
2. Identify the problem report File (.dmp) with the associated compressed file that was created when the client crashed. This is usually the latest file of its kind created, so sorting by date is the easiest option. | 2. Identify the problem report File (.dmp) with the associated compressed file that was created when the client crashed. This is usually the latest file of its kind created, so sorting by date is the easiest option. | ||
| Line 144: | Line 144: | ||
1. If you have downloaded War Thunder using Steam, follow the standard Steam installation path and locate the '.game_logs' folder | 1. If you have downloaded War Thunder using Steam, follow the standard Steam installation path and locate the '.game_logs' folder | ||
| − | [[File:Knowledgebase_SteamFolder_GamesLog.jpeg| | + | [[File:Knowledgebase_SteamFolder_GamesLog.jpeg|x300px]] |
2. Identify the problem report File (.dmp) with the associated compressed file that was created when the client crashed. This is usually the latest file of its kind created, so sorting by date is the easiest option. | 2. Identify the problem report File (.dmp) with the associated compressed file that was created when the client crashed. This is usually the latest file of its kind created, so sorting by date is the easiest option. | ||
| Line 161: | Line 161: | ||
1. Make sure the keybind is configured correctly. You can find the keybind in 'Controls -> Common -> Interface -> Screenshot'. | 1. Make sure the keybind is configured correctly. You can find the keybind in 'Controls -> Common -> Interface -> Screenshot'. | ||
| − | [[File:Knowledgebase_Controls_Screenshot.png| | + | [[File:Knowledgebase_Controls_Screenshot.png|x300px]] |
2. When an issue occurs, press the 'Screenshot' key. | 2. When an issue occurs, press the 'Screenshot' key. | ||
3. Screenshots are stored in the 'Screenshots' folder in the game's install directory. | 3. Screenshots are stored in the 'Screenshots' folder in the game's install directory. | ||
| − | [[File:Knowledgebase_ScreenshotFolder.png| | + | [[File:Knowledgebase_ScreenshotFolder.png|x300px]] |
4. Upload your screenshot to the forums directly, or to an external filehost such as Google Drive, Dropbox etc. and attach the link to your report. Do not upload your screenshot to an image sharing provider such as Imgur, because the metadata will be lost! | 4. Upload your screenshot to the forums directly, or to an external filehost such as Google Drive, Dropbox etc. and attach the link to your report. Do not upload your screenshot to an image sharing provider such as Imgur, because the metadata will be lost! | ||
| Line 221: | Line 221: | ||
1. Follow the installation path that you've specified during installation and locate the 'cache' folder. | 1. Follow the installation path that you've specified during installation and locate the 'cache' folder. | ||
| − | [[File:Knowledgebase_CacheLocation.png| | + | [[File:Knowledgebase_CacheLocation.png|x300px]] |
2. Delete the 'cache' folder. | 2. Delete the 'cache' folder. | ||
| Line 241: | Line 241: | ||
2. Click the wrench icon on the top right corner of the launcher. | 2. Click the wrench icon on the top right corner of the launcher. | ||
| − | [[File:Knowledgebase_LauncherIntegrityWrench.png| | + | [[File:Knowledgebase_LauncherIntegrityWrench.png|x150px]] |
3. Click the 'Check files' button. | 3. Click the 'Check files' button. | ||
| − | [[File:Knowledgebase_LauncherCheck.png| | + | [[File:Knowledgebase_LauncherCheck.png|x300px]] |
4. Wait for the file check to finish. | 4. Wait for the file check to finish. | ||
| Line 255: | Line 255: | ||
2. Right click on War Thunder and select 'Properties' in the context menu. | 2. Right click on War Thunder and select 'Properties' in the context menu. | ||
| − | [[File:Knowledgebase_SteamProperties.png| | + | [[File:Knowledgebase_SteamProperties.png|x250px]] |
4. In the popup menu, select the tab 'Local files'. On this tab, click the 'Verify integrity of game files...' button. | 4. In the popup menu, select the tab 'Local files'. On this tab, click the 'Verify integrity of game files...' button. | ||
| − | [[File:Knowledgebase_SteamVerifyIntegrity.png| | + | [[File:Knowledgebase_SteamVerifyIntegrity.png|x250px]] |
5. Wait for the file integrity check to finish. You can track progress in the popup window. | 5. Wait for the file integrity check to finish. You can track progress in the popup window. | ||
| Line 283: | Line 283: | ||
1. To view client replays, go to top left corner of the hangar and select 'Community -> Replays'. | 1. To view client replays, go to top left corner of the hangar and select 'Community -> Replays'. | ||
| − | [[File:Knowledgebase_ClientReplay.png| | + | [[File:Knowledgebase_ClientReplay.png|x250px]] |
2. A window will pop up with a list of your replays. The top replay is your latest replay. Press the folder button at the bottom left corner of the window to open the replay directory in a file explorer. You can rename your replay before opening file explorer if this makes it easier to find it. | 2. A window will pop up with a list of your replays. The top replay is your latest replay. Press the folder button at the bottom left corner of the window to open the replay directory in a file explorer. You can rename your replay before opening file explorer if this makes it easier to find it. | ||
| − | [[File:Knowledgebase_FolderReplay.png| | + | [[File:Knowledgebase_FolderReplay.png|x250px]] |
3. Select the replay of the match in which the error occured and upload this to your report. Please provide a timestamp to the point at which the issue occured. | 3. Select the replay of the match in which the error occured and upload this to your report. Please provide a timestamp to the point at which the issue occured. | ||
| Line 303: | Line 303: | ||
3. Click on the link 'View Server Replay'. | 3. Click on the link 'View Server Replay'. | ||
| − | [[File:Knowledgebase_MatchServerReplay.png| | + | [[File:Knowledgebase_MatchServerReplay.png|x250px]] |
4. A browser will now open with the server replay window. Click on the 'copy link' button. | 4. A browser will now open with the server replay window. Click on the 'copy link' button. | ||
| Line 317: | Line 317: | ||
2. Check the box 'Find replays with my participation'. | 2. Check the box 'Find replays with my participation'. | ||
| − | [[File:Knowledgebase_WebReplayParticipation.png| | + | [[File:Knowledgebase_WebReplayParticipation.png|x250px]] |
3. Search for the name of the mission and click on it. | 3. Search for the name of the mission and click on it. | ||
| − | [[File:Knowledgebase_WebReplayMission.png| | + | [[File:Knowledgebase_WebReplayMission.png|x250px]] |
4. Click on the 'copy link' button. | 4. Click on the 'copy link' button. | ||
Revision as of 16:52, 16 June 2023
Contents
- 1 What is Bug Reporting?
- 2 How do you find the game version?
- 3 What is a client log (.clog) and how do you obtain it?
- 4 What is a DxDiag log and how do you obtain it?
- 5 What is a launcher log and how do you obtain it?
- 6 What are problem report files and how do you obtain them?
- 7 How do you take screenshots using the in-game functionality?
- 8 What is the performance profiler and how do you use it?
- 9 What is the cache and how do you clear it?
- 10 What is game integrity and how do you verify it?
- 11 Replays: What is the difference and how do you find them?
- 12 What is custom content and how do you disable it?
What is Bug Reporting?
We constantly strive to evolve and improve War Thunder with every passing update, taking into account your feedback, ideas and suggestions as well as delivering new features, locations, improvements and of course vehicles to expand the game to new heights.
One of the key factors that helps us to keep improving the game for everyone is bug reporting, this helps us to identify and fix any issues that unfortunately may occur. Bug reporting allows us to address and resolve matters that may interrupt or interfere with players' experience or improve the historical parts of the game by making things more accurate and true to life.
Today, we wanted to talk a little bit more about the importance of bug reporting, answer some of your key questions and also show how to correctly create a valid bug report that contributes to helping improve the game.
How to Make a Report
Anyone who has a War Thunder account can make a bug report. Our dedicated website allows anyone to create a full bug or historical report and let us know of any issues you have found.
Once there, you can choose what specific platform, category and game version you want to report the matter too. Every category area has a helpful set of notes detailing what is required for the report to be the most effective. Be sure to check the area specific (or file specific) notes before submitting your report.
In general though, the basic and core parts of a standard or gameplay related bug report are:
- Clear descriptive title of the issue
- Full description and details of the issue
- Steps how to reproduce the issue
In the case of a historical matters, one of the following two points will be required:
- One primary historical source (User/Factory/Repair Manual, Original handbooks etc)
- Two secondary sources (Reference works, museums, Biographies, Books, "expert" opinion publications, websites etc)
Once you have everything ready, you can submit your report and await its review by a Technical Moderator, developer or our QA team, who will first test and reproduce the issue where possible and then either forward the matter on or request any additional information that may be required.
How do you find the game version?
Game version
The game version must be added into the report. Depending on your platform, there are a few ways to get it.
PC, Mac, Linux
The game version can be found in the top right corner of the screen in any menu, such as the hangar.

Additionally, it can also be seen in the launcher.

What is a client log (.clog) and how do you obtain it?
|
Client Logs
|
Client logs (file extension: .clog) are files generated by the War Thunder client and show a reflection of all the actions a user has performed in one secluded game session. As soon as the launcher initialises the start of the game, a new client log is being started, which is finalised when the client is closed (the game session ends). Besides recording the actions of the user, it also records the client-side calculations and has a built-in error catching system that will allow the technical administration to identify game code or synchronisation issues efficiently.
Client logs are being saved once after a game session has ended. If you have an error that is reproducible, you can help increase the expressiveness of your client log by starting a new game session, reproducing the error and then exiting the game manually. This way, the client log is very small and the error can be identified more easily.
Please note that for all bug reports, only the .clog file ("<filename>.clog")is required. Please do not attach the .clog file that includes the cef extension.
How to obtain your client log
Download from Gaijin Entertainment Website
- If you have downloaded War Thunder from the Gaijin Entertainment website, follow the installation path that you've specified during installation and locate the '.game_logs' folder
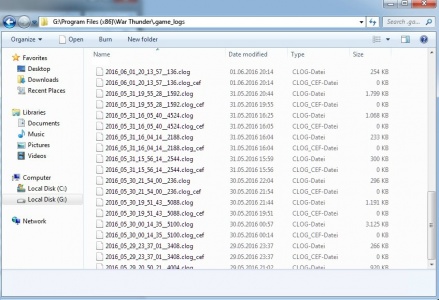
- Identify the client log (.clog) file that was created during the session in which you recognized the issue or bug. This is usually the latest file created, so sorting by date is the easiest option. The files itself are also time-stamped, and follow this scheme: YEAR_MONTH_DAY_HOUR_MINUTE_SECOND_ID.clog
- Attach the client log to your bug report.


Download from Steam
- If you have downloaded War Thunder using Steam, follow the standard Steam installation path and locate the '.game_logs' folder.
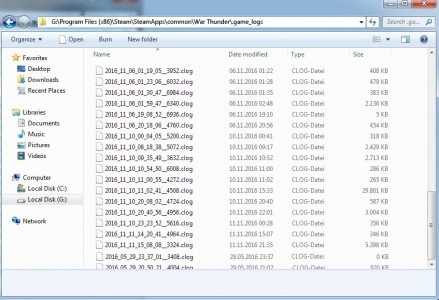
- Identify the client log (.clog) file that was created during the session in which you recognized the issue or bug. This is usually the latest file created, so sorting by date is the easiest option. The files itself are also time-stamped, and follow this scheme: YEAR_MONTH_DAY_HOUR_MINUTE_SECOND_ID.clog
- Attach the client log to your bug report

What is a DxDiag log and how do you obtain it?
The DxDiag log (file extension: .txt) is a text document that is created by Microsoft's DirectX Diagnostic Tool, showing non-personalized information about the hardware and drivers of your system. The DxDiag log file helps our technical administration to identify whether the problem you encounter is happening due to incompatibilities or issues with certain hardware or driver components on your system. It is especially important with display or sound device issues, as it helps to identify the devices and their drivers easily.
How to Obtain your DxDiag Log
Obtaining the DxDiag log is fast and easy. Just perform the following steps:
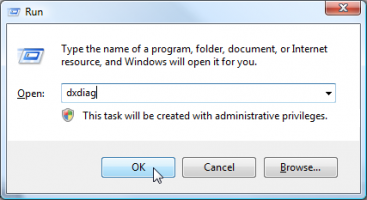
- Press 'Windows Key + R' to open Microsoft's Run function
- Type in 'dxdiag' in the input field and click 'OK'.
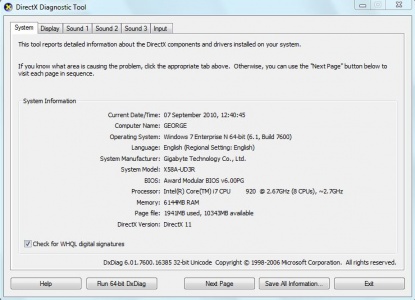
- The DirectX Diagnostic Tool opens in a new window. Wait for it to gather the necessary information.
- When you are running a 32-bit (x86) version of Windows, click on "Save All Information..." and specify a directory and name to save the file.
- When you are running a 64-bit (x64) version of Windows, first click on Run 64-bit DxDiag, then click on "Save All Information..." and specify a directory and name to save the file.
- Attach the DxDiag log to your bug report


What is a launcher log and how do you obtain it?
|
Launcher Logs
|
Launcher logs (file extension: .txt) are files generated by the War Thunder launcher. The log contains a record of all the actions the launcher tried to perform during one secluded opening session. The Launcher log is initialized as soon as the user starts the game (thus opening the launcher) and finalized when the launcher closes itself to either start the game or quit to desktop. The Launcher log helps the technical administration to identify problems within the launcher's code and is thus very important when dealing with launcher related issues.
How to obtain your launcher Log:
Launcher logs are created automatically, so the only thing you need to do is to locate them.
DOWNLOAD FROM GAIJIN ENTERTAINMENT WEBSITE
1. If you have downloaded War Thunder from the Gaijin Entertainment website, follow the installation path that you've specified during installation and locate the '.launcher_log' folder

2. Identify the launcher log (.txt) file that was created during the session in which you recognized the issue or bug. This is usually the latest file created, so sorting by date is the easiest option.
- The files itself are also time-stamped, and follow this scheme: YEAR_MONTH_DAY_HOUR_MINUTE_SECOND__ID.txt
3. Attach the launcher log to your report.
DOWNLOAD FROM STEAM
1. If you have downloaded War Thunder using Steam, follow the standard Steam installation path and locate the '.launcher_log' folder

2. Identify the launcher log (.txt) file that was created during the session in which you recognized the issue or bug. This is usually the latest file created, so sorting by date is the easiest option.
- The files itself are also time-stamped, and follow this scheme: YEAR_MONTH_DAY_HOUR_MINUTE_SECOND__ID.txt
3. Attach the launcher log to your bug report
What are problem report files and how do you obtain them?
Problem report Files (file extension: .dmp) are files generated when the War Thunder client crashes. They contain a memory image of the point when the War Thunder executable has stopped working and thus vital information for the technical administration to identify the reason for the unexpected termination of the program.
How to obtain your problem report Files:
Problem report Files are created automatically, so the only thing you need to do is to locate them.
Important note:
- If the game crashes, problem report files can be found in the .game_logs folder
- If the launcher crashes, problem report files can be found in the .launcher_log folder or in the .start_app_logs folder
DOWNLOAD FROM GAIJIN ENTERTAINMENT WEBSITE
1. If you have downloaded War Thunder from the Gaijin Entertainment website, follow the installation path that you've specified during installation and locate the '.game_logs' folder

2. Identify the problem report File (.dmp) with the associated compressed file that was created when the client crashed. This is usually the latest file of its kind created, so sorting by date is the easiest option.
3. Attach the problem report file with the associated compressed file to your bug report
DOWNLOAD FROM STEAM
1. If you have downloaded War Thunder using Steam, follow the standard Steam installation path and locate the '.game_logs' folder

2. Identify the problem report File (.dmp) with the associated compressed file that was created when the client crashed. This is usually the latest file of its kind created, so sorting by date is the easiest option.
3. Attach the problem report File with the associated compressed file to your bug report
How do you take screenshots using the in-game functionality?
- In-game screenshots
For reports we need screenshots taken using the in-game functionality. This is important because these screenshots contain metadata that is used to determine where in the log the issue occurred.
- How to take screenshots
1. Make sure the keybind is configured correctly. You can find the keybind in 'Controls -> Common -> Interface -> Screenshot'.

2. When an issue occurs, press the 'Screenshot' key.
3. Screenshots are stored in the 'Screenshots' folder in the game's install directory.

4. Upload your screenshot to the forums directly, or to an external filehost such as Google Drive, Dropbox etc. and attach the link to your report. Do not upload your screenshot to an image sharing provider such as Imgur, because the metadata will be lost!
What is the performance profiler and how do you use it?
|
Graphic
|
If you are experiencing FPS drops or other performance problems, it is necessary to create a performance log.
- How to create a performance Log
Performance logging function is bound to the F11 key.
Please carry out the following:
- Start the game and login etc and wait for hangar screen to load.
- Press these keys together to start the profiler: Fn+Alt+F11 (These three buttons together turn the profiler on and off) (If your keyboard has no Function key, press Alt+F11)
- For Windows, that means "Windows key + left alt + F11"
- For Mac, that means "Apple key + left alt + F11"
- For Linux and other operating system, either "function key + left alt + F11" or just "left alt + F11"
- Play several games (at least 3) with the profiler on.
- After the end of the last game please press Fn + F11 (F11 if no Function key). This will write the information into the .clog file. You must provide this clog in the report.
- After pressing F11 to store the log, the profiler can be disabled with the same keys used for enabling it.
The profiler tells you if it was enabled or disabled on the top left of your screen.
1. Profiler enabled

2. Storing profiler data into log

3. Profiler disabled

After the log has been saved, please provide the full .clog file as per the instructions.
What is the cache and how do you clear it?
The cache is a system that the game uses to store data downloaded while the game was running. The cache consists of items such as decals, skins and configuration files.
- How to clear the cache
When identifying issues with the game, it's best to start with a clean cache. To recreate the cache, the old cache must be deleted.
1. Follow the installation path that you've specified during installation and locate the 'cache' folder.

2. Delete the 'cache' folder.
3. Restart the game. The game will now redownload the necessary cache files.
What is game integrity and how do you verify it?
Game integrity refers to the integrity of the game files. It means that all necessary files are untampered and in their correct locations. It is necessary to ensure this before reporting technical issues.
How to verify your game integrity
Game integrity can be checked in multiple ways.
DOWNLOAD FROM GAIJIN ENTERTAINMENT WEBSITE
1. If you have downloaded War Thunder from the Gaijin Entertainment website, launch the launcher as you normally would.
2. Click the wrench icon on the top right corner of the launcher.

3. Click the 'Check files' button.

4. Wait for the file check to finish.
DOWNLOAD FROM STEAM
1. If you have downloaded War Thunder from the Gaijin Entertainment website, go to your Steam library.
2. Right click on War Thunder and select 'Properties' in the context menu.

4. In the popup menu, select the tab 'Local files'. On this tab, click the 'Verify integrity of game files...' button.

5. Wait for the file integrity check to finish. You can track progress in the popup window.
Replays: What is the difference and how do you find them?
- Client replays
Client replays are generated when you leave a match or custom battle. They are a recording created from your game's point of view of the occurences in the match. Client replays tend to lack some data from the battle since some data is not available to your game client during a match.
- Server replays
Server replays are generated for every match played in War Thunder and they are recorded from the server instead of your local computer. Because of this, server replays are found through the website. You can only submit the link to the match in question rather than the replay file itself.
All replays (both client and server) become invalid once a major patch has been released, because the new version of the game will not be able to play the old version’s replay files.
- Timestamp
Please be so kind to provide a timestamp to where the issue occured in the replay.
Finding Client Replays
1. To view client replays, go to top left corner of the hangar and select 'Community -> Replays'.

2. A window will pop up with a list of your replays. The top replay is your latest replay. Press the folder button at the bottom left corner of the window to open the replay directory in a file explorer. You can rename your replay before opening file explorer if this makes it easier to find it.

3. Select the replay of the match in which the error occured and upload this to your report. Please provide a timestamp to the point at which the issue occured.
Finding Server Replays
- THROUGH THE GAME CLIENT
1. Open the message tab in the bottom right corner of the hangar.

2. Click on the match in which the issue occured. The match details will expand.
3. Click on the link 'View Server Replay'.

4. A browser will now open with the server replay window. Click on the 'copy link' button.

5. Paste this link into your report. Please provide a timestamp to the point at which the issue occured.
- THROUGH THE WEBSITE
1. Go to https://warthunder.com/en/tournament/replay/. Make sure you are logged in on the website!
2. Check the box 'Find replays with my participation'.

3. Search for the name of the mission and click on it.

4. Click on the 'copy link' button.

5. Paste this link into your report. Please provide a timestamp to the point at which the issue occured.
What is custom content and how do you disable it?
Disabling custom content To make sure the issue is not caused by custom, user-generated content, this content must be disabled before creating a report. We cannot provide support for custom content. Here is a list of possible custom content that can interfere with the game and a link to their wiki page, which helps in disabling the content:
- Sound mods
- Custom localisation
- Custom hangar
- Custom sights
- Custom missions (both usermissions and multiplayer missions from URL)
- User skins
If you have found an issue in the CDK or functions provided by it, please report this in the General Gameplay and Balance section: https://forum.warthunder.com/index.php?/forum/592-general-gameplay-and-balance/
