
If you are bored with the look of your favorite vehicles and the available in-game camouflages are not quite right for your vehicle - a custom camouflage can be a good solution to creating a unique look for your vehicle.
You can always find interesting camouflages on the War Thunder LIVE or create your own. Custom camouflage will be set locally which means it is only visible to the player creating it themselves. For others, the tank or aircraft will remain in the camouflage that has been selected in the “Customization” menu as the basis for custom camouflage.
Camouflages published on WT Live can be added in the game as a part of an author support program. It is possible to purchase a camouflage for your vehicle on the War Thunder market or recieve it from camouflage trophy, and authors will receive a percentage from each the sale of a skin or a key for the trophy. This camouflage will be visible to all players in battle (although it is possible for them to disable visibility of some fictional camouflages).
The War Thunder developers periodically refine and update 3D models of vehicles in the game. Custom camouflages for such vehicles may need to be corrected in order to correctly display the custom camouflages created prior to the model update.
How to setup custom camouflage
Select the tank or aircraft on which you want to update the camouflage, open the “Customization” menu and click on the button to create an example of camouflage.

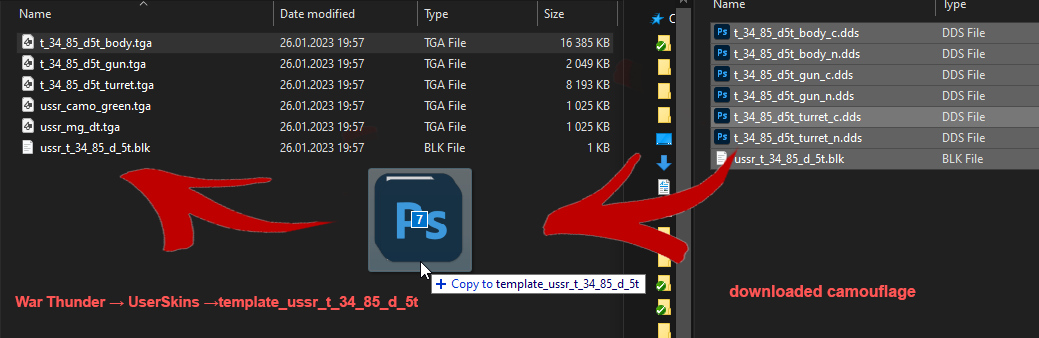
Then head to the folder with the installed War Thunder client and do the following:
- Follow the path:
War Thunder → UserSkins → *previously received folder name*(in example:template_ussr_t_34_85_d_5t). - If you want to install camouflage from War Thunder LIVE you need simply delete all the the contents of the folder then download the unique camo you like from live.warthunder.com and copy into the folder the contents of the archive, which will consist of several
.ddsor.tgafiles, as well as the camouflage configuration file*vehicle_name*.blk.
If you want to create your own camouflage then proceed to editing already contained in the folder simple graphic files in .tga format. By default a texture will be created for tanks, which will be applied to all elements of the tank.
Return to the client and update the list of available camouflages by pressing the appropriate button.
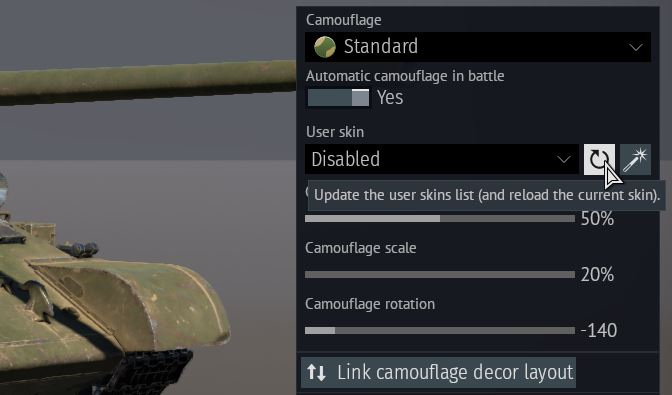
If you have done everything correctly, the camouflage you downloaded will be displayed in the list of custom camouflages when you click on it. Install it.

Creating tank camouflage
Here we will take a look at three options for creating camouflages in order of complexity:
- Scalable camouflage (via replace_tex)
- Fixed camouflage (via set_tex)
- Combined camouflage (via set_tex with replace_tex elements) — Coming Soon!
Scalable camouflage
Let's start with the simplest one. As an example, we will make a scalable camouflage for the T-34-85 (D-5T).
Using the "Create Camouflage Example" function in the customization menu and finding these files in the UserSkins folder in the root of the game, we can start editing them.

We will need the two files marked in green.
- ussr_camo_green.tga - can be edited in almost any picture editor.
- ussr_t_34_85_d_5t.blk - we may not need it, but it can also be opened and edited by almost any text editor.
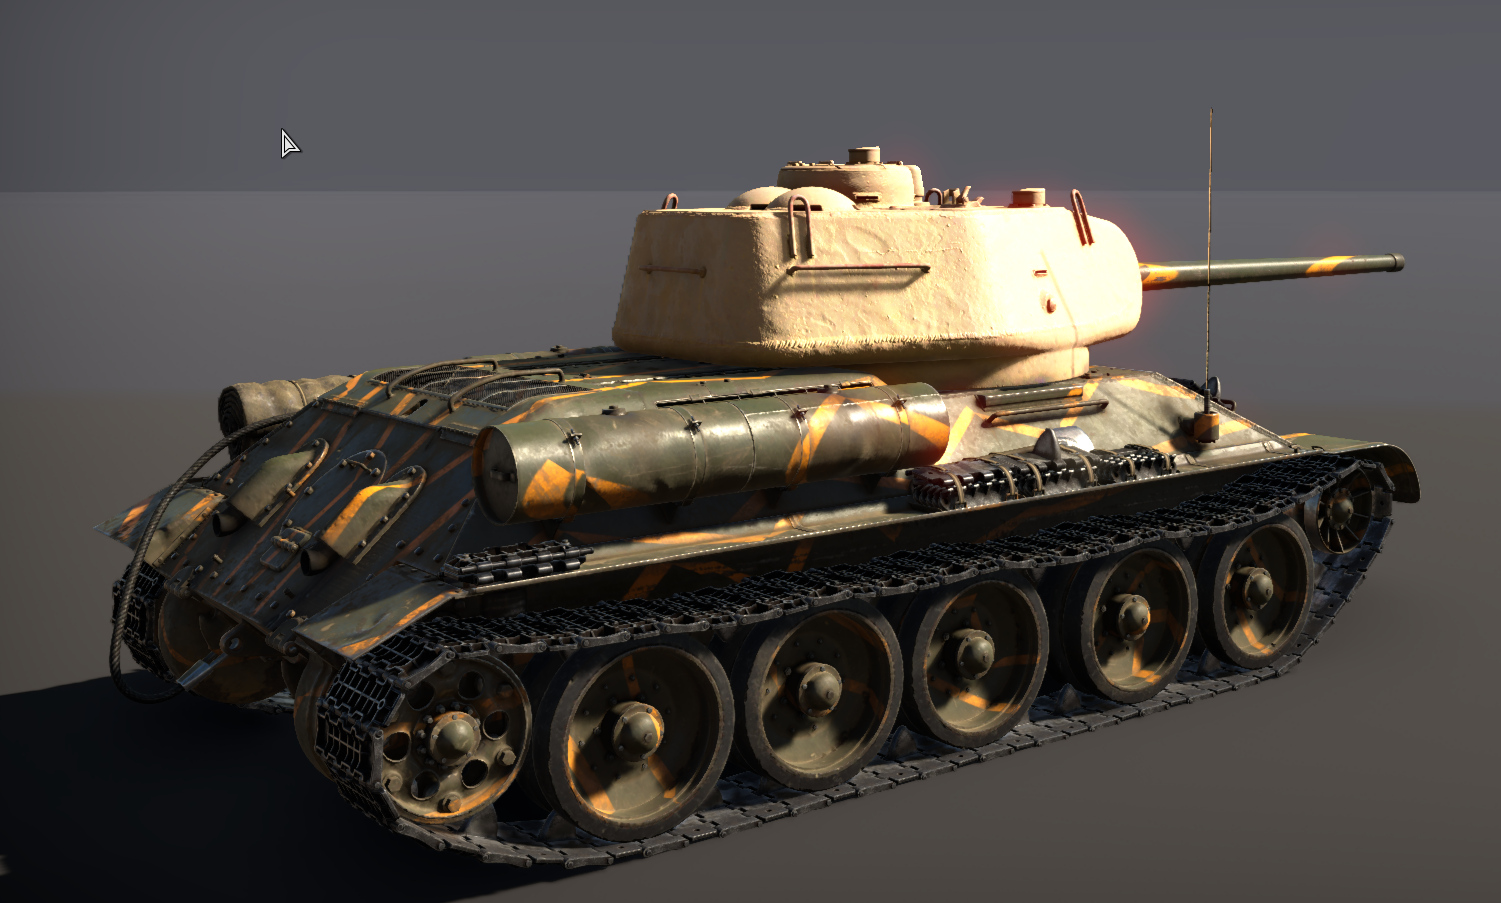
Opening ussr_camo_green.tga in the photo editor we will see the standard camouflage for the tank.

We can start editing immediately: let's draw some orange stripes as an example.

We can save the camouflage and see what we get. For simplicity save it in the same format and with the same name: ussr_camo_green.tga. So our new texture replaces the old one.
Back in the game, you don't need to close it, pressing "Update custom camouflage list" will update all textures.

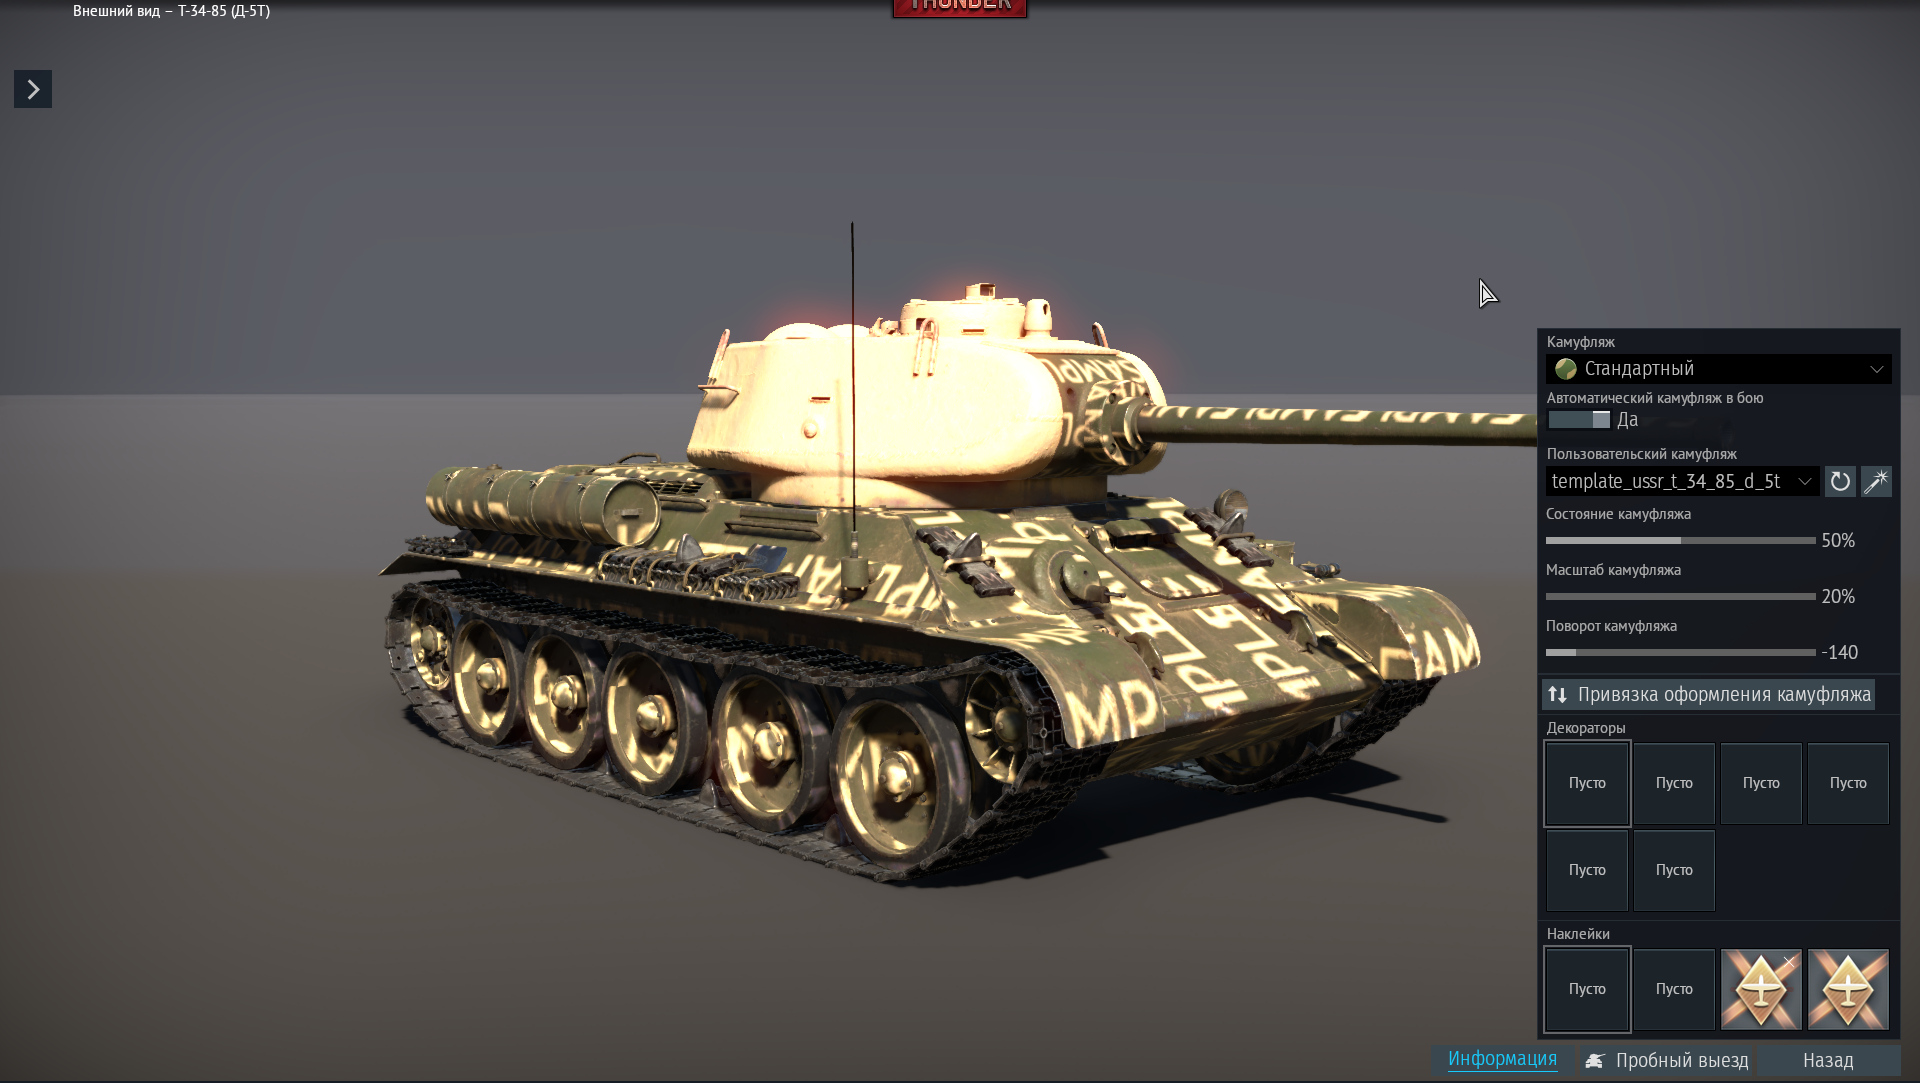
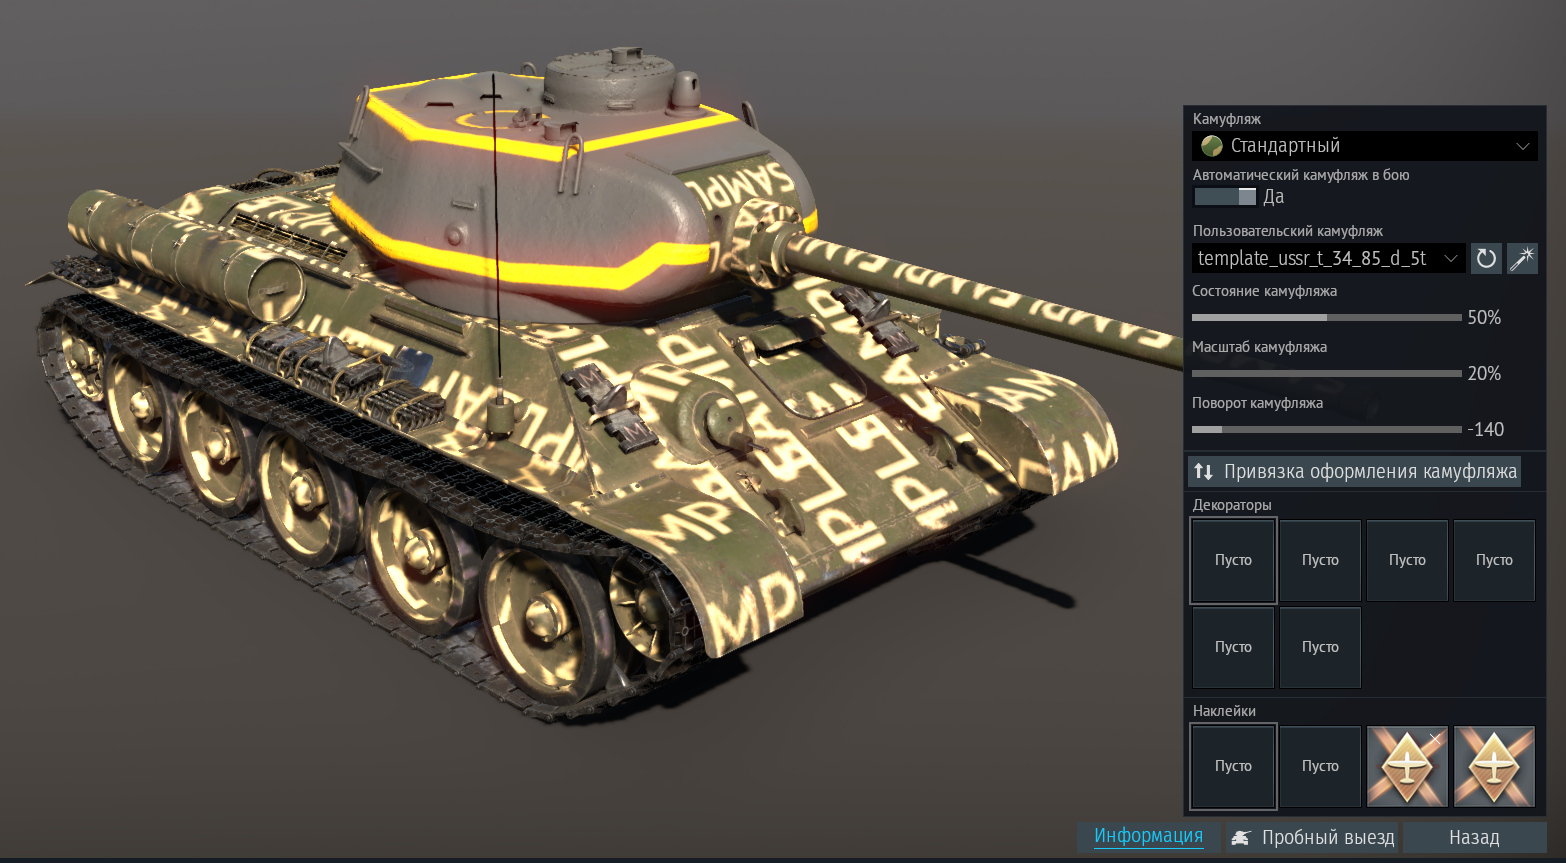
Then select our camouflage from the drop-down list and immediately see the result:


We can scale, rotate and change the state of the camouflage, just like with the other available camouflages in the game.

Note: Right away that for camouflage to work properly, the texture must be seamless. If this is not taken into account, such inconsistencies may occur:

There are quite a few guides on how to make seamless textures on the internet, it won't be hard to find it.
It is also worth mentioning that the texture may have a different name or even a different resolution.
In this case we will need to put this texture in the folder with the other textures and replace the name of the old texture in the .blk file with the new one.
For example, we have the new_tex.dds texture. We put it in the template_ussr_t_34_85_d_5t folder and in ussr_t_34_85_d_5t.blk replace ussr_camo_green.tga with new_tex.dds:

Congratulations, we have made our first camouflage!
Before we move on to a higher level in creating camouflages, a few points should be noted:
- The camouflage texture must be square.
- The texture side must be 128; 256; 512; 1024; 2048; 4096px.
- Basic textures of vehicles are best executed in a resolution no lower than 2048px on the largest side!
Possible errors
Some ground vehicles may have textures that look like this after creation:

This can be fixed in two ways:
- Edit blk
- Edit textures
How to edit blk: To do this, we will need a camouflage blk file (in this case template_ussr_t_80 / ussr_t_80.blk). In it, we remove all textures except our scalable camouflage and save.

This method is suitable if you only want to use scalable camouflage. This method is not suitable for fixed camouflage, but we will cover that next.
How to edit textures:
- Open the textures of the hull, turret and cannon:

- Find the alpha channel of the texture:

- Black out the alpha channel on all textures and save.
- Update in game!
- Done!
Scalable texture and alpha channel
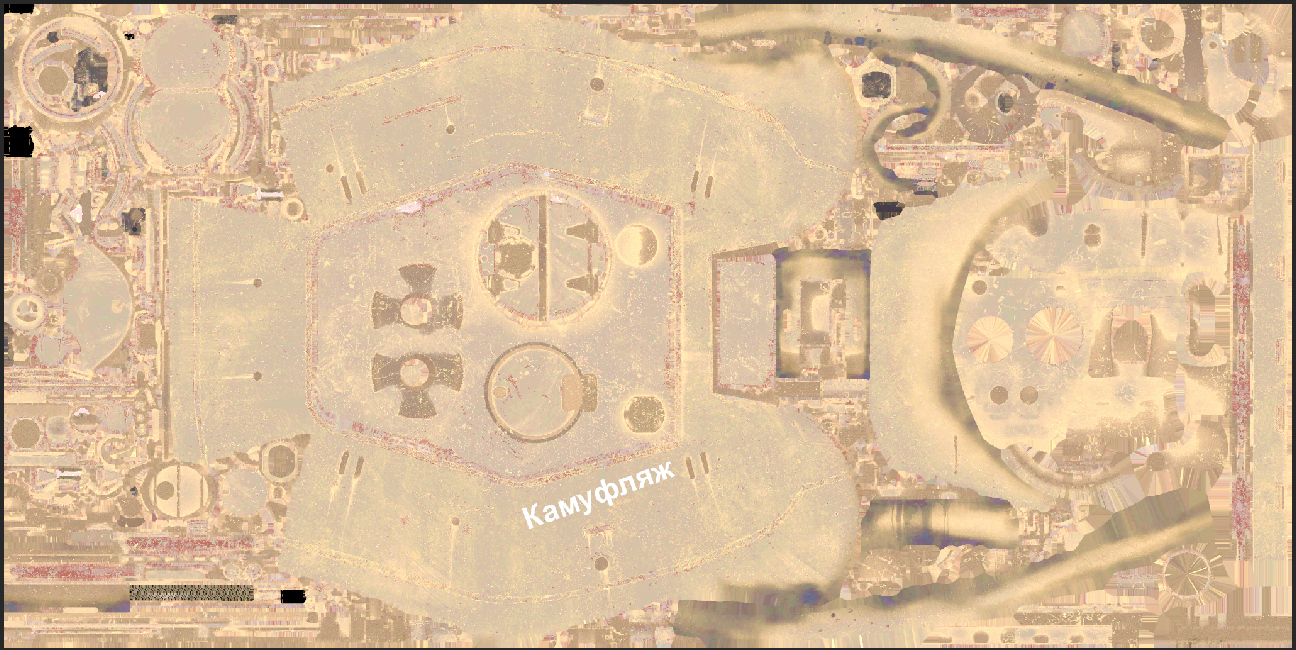
Let's take it up a notch! Let's say we have an inscription that we want to put on the tank. Let it be... "Camouflage". But if we will use the previous method, so the inscription will appear in an unclear place and, most likely, will be stretched...
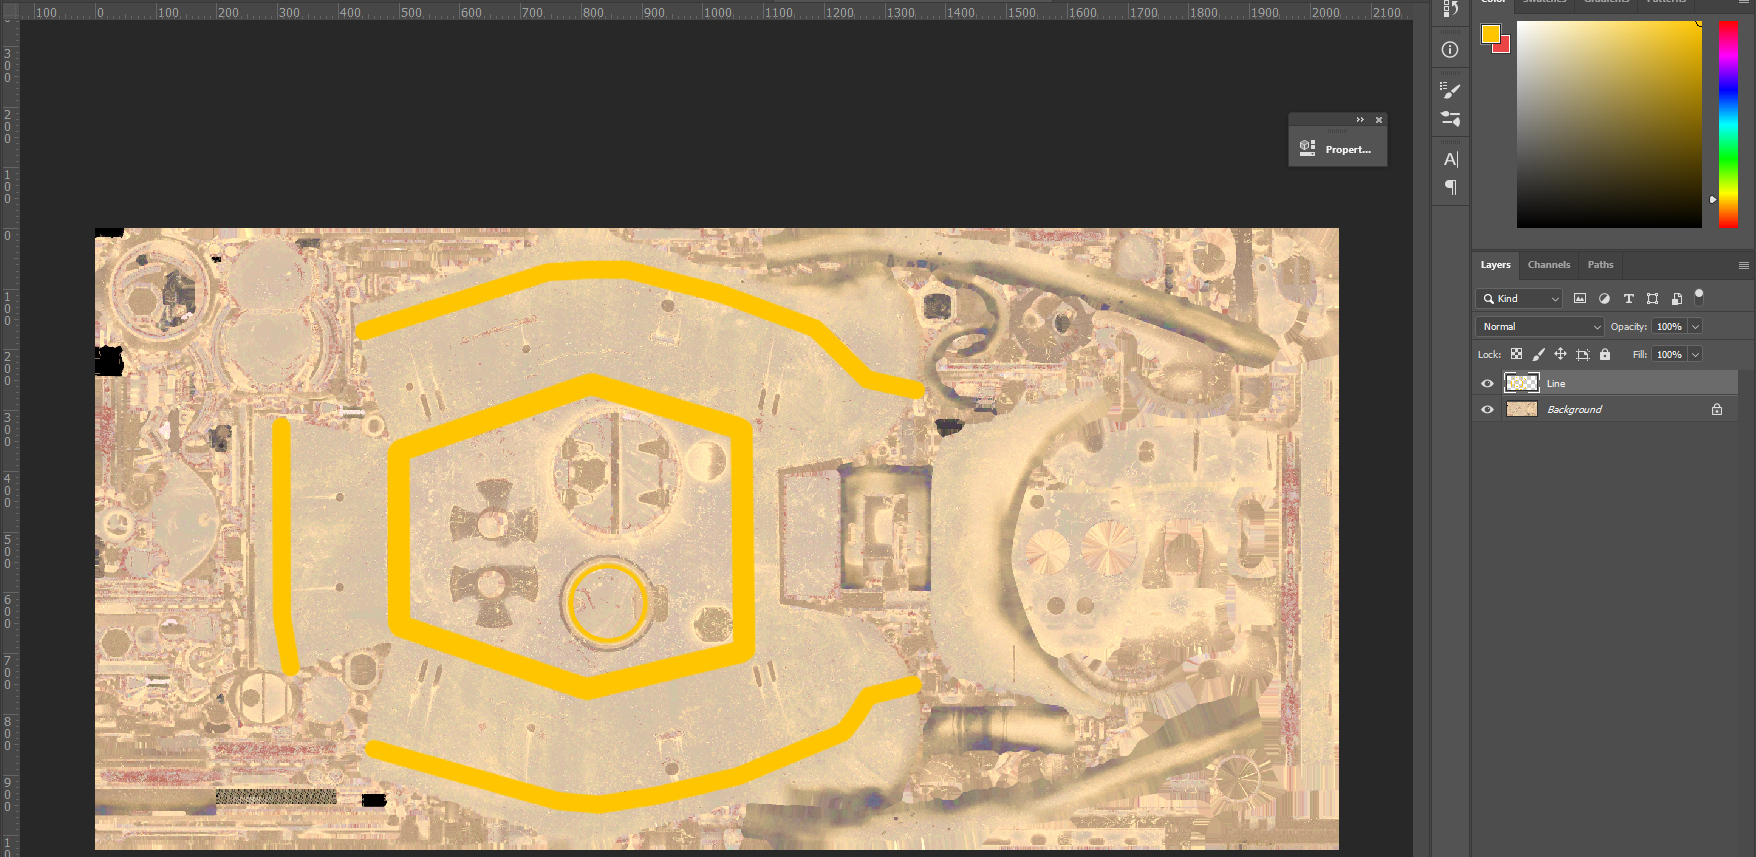
Let's go back to our T-34-85 and try to make it look nice. Let's place this inscription on the turret.
- Open the texture of the turret t_34_85_d5t_turret.tga.
- We see a rendering of the texture of the turret. With a little skill we can guess which part of the texture is responsible for what.
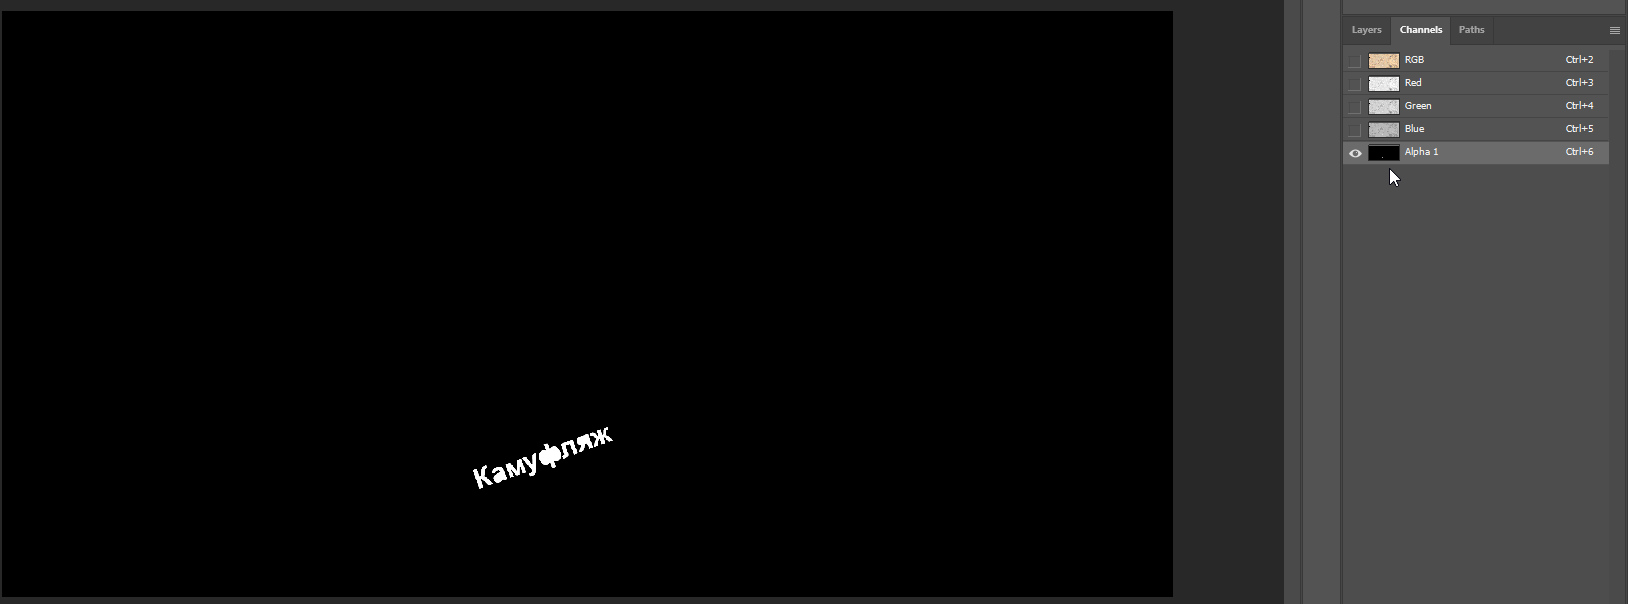
- Place the inscription on the turret where we want it:
Now we need to make it visible.
By default the alpha channel of the texture is black, which means that this texture is completely transparent and does not affect the camouflage. If we make the alpha channel white (i.e. completely opaque), this texture will completely cover our scalable camouflage.
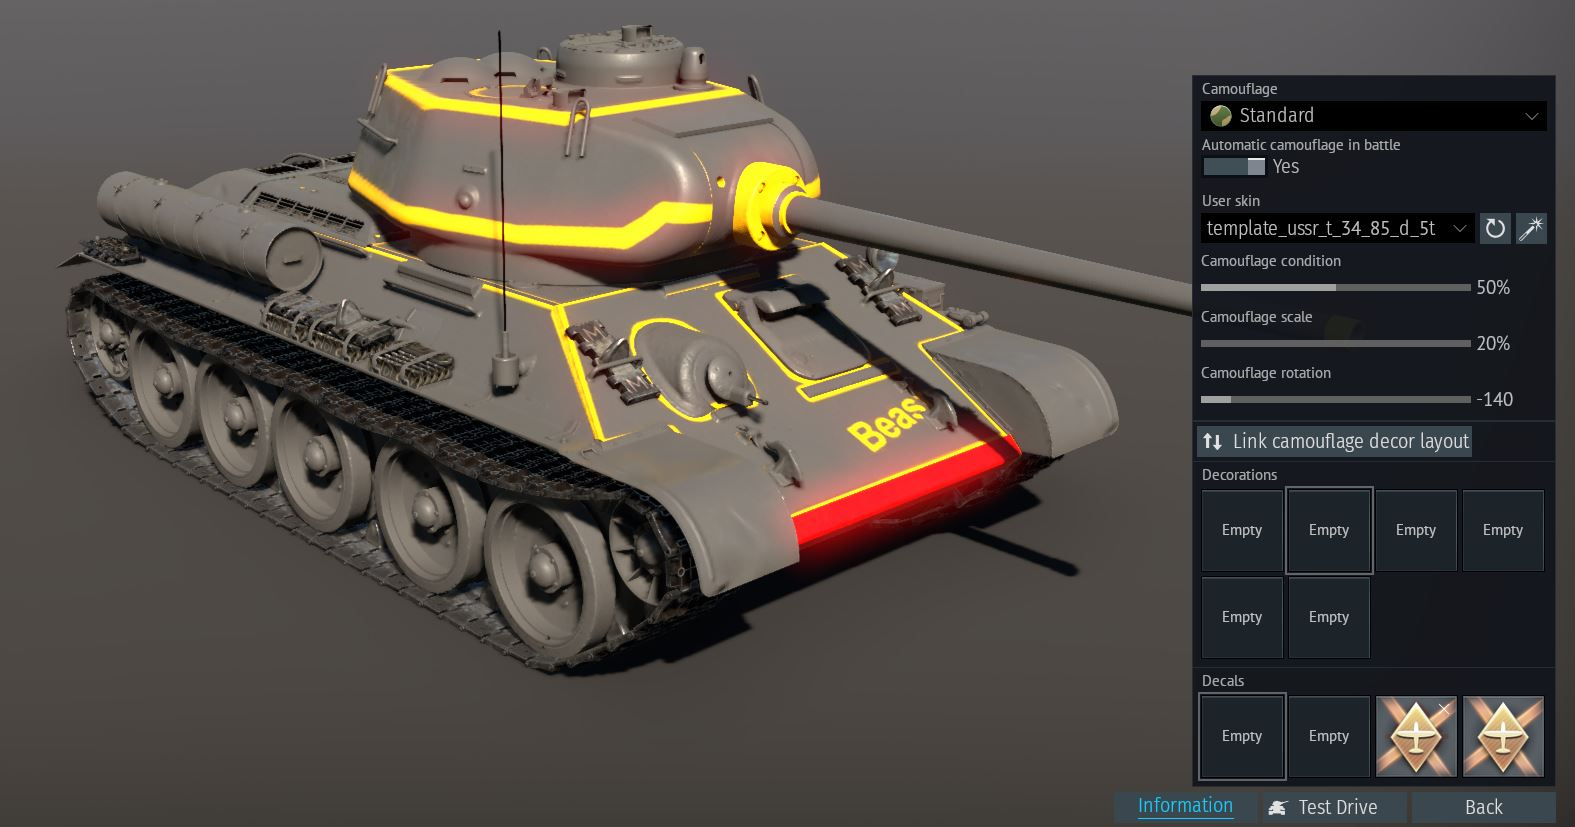
This is what it would look like if we fill the "alpha" of the tower texture with white:
Therefore, in order to make only our inscription appear, it is necessary to paint only the area where our inscription is on the texture in "alpha" white.

Save, check the result in the game. Don't forget to press "Update custom camouflage list"!
The inscription has appeared and is not affected by rotation, scaling and our scalable camouflage! It will always be in the same place on the tower!

The alpha channel doesn't have to be white or black. You can use different greyscales to get a semi-transparent or uneven overlay. For example, if you make the lettering grey rather than white in the "alpha", our scalable camouflage will partially shine through from underneath it.
— Q: Why do we need this apart from proper inscriptions and decals?
A: For example, we don't need camouflage to be applied to the rollers... or the turret roof... Find these parts of the tank in the textures, create them the desired color and paint these parts white in the alpha channel.
There is plenty to experiment with, try it out and find interesting solutions! In the meantime, we will go one step further and move on to fully fixed camouflages.
Fixed camouflage
This is going to be a little more difficult. It takes a lot of care and probably a lot of time. But camouflages of this type get into Camouflage Trophies, and their creators get a royalty on each sold key to such trophies. You can also apply in-game decals to these camouflages!
We have already familiarized ourselves with the textures of individual parts of the tank, now let's talk about them in more detail and create a simple camouflage for the same T-34-85. For example, we will make it in a grey fill with orange stripes at the joints of the armour plates.
But a bit of theory. Fixed camouflage cannot be rotated and scaled. All the necessary texture elements have to be applied manually to the corresponding parts of the albedo texture of the machine element.
We will create everything from scratch.
- Create an example of camouflage.
- Find our textures in the root folder of the game.
- We will start with editing the tower: open the t_34_85_d5t_turret.tga texture and immediately completely white out all the alpha-channel.
After updating in the game we will see the following picture:
Let’s to the RGB layers and will now work with them.

Focusing on the texture elements, create orange stripes at the joints of the armour.
Fill the rest with gray ¯\_(ツ)_/¯

Save under the same name and format with a replacement, update the camouflage in the game and get the result:
All other parts of the tank can be made by analogy:
- t_34_85_d5t_gun.tga
- t_34_85_d5t_body.tga
We have got a great* camouflage!
You can download other players' camouflages from Live WT and see how they are made, there are many interesting things to discover.
Players also join camouflage authoring communities such as LNC and Slayer's Workshop. There experienced authors can help you if you can't figure something out, or teach you new tricks and techniques when working with camouflages.
The fixed camouflage method is used to make most camouflages on the Live WT. The quality of a camouflage is often directly related to the time it takes to create it. Some authors spend months gathering materials for historical camouflages and rendering them! Or very detailed and meticulous work on semi historical and fictional camouflages.
Working with Camouflage Nets
Starting from the Dance of Dragons update, tanks with camouflage nets are being switched to a new shader for texturing camouflage nets. In the Dance of Dragons update, the Vextra 105 and T-80U-E1 switched to the new system, and starting from the Firebirds update, all new vehicles with camouflage nets will be added with the new texturing system.
Read more about creating camouflage for tanks with camouflage nets in the article at the link.
Classification of camouflage by historicity
Semi-historical, historical, fictional camouflages? Why classify them and how do they differ?
The camouflage classification is for the convenience of Live WT players. Some people for example only want to see historical camouflages on their vehicles, and such labels make it easier to find suitable work.
Such a label helps in the selection of camouflage for the market. And for the camouflage that got on the market it determines the visibility of the camouflage for other players in battle.
You can change this in the menu Settings - Customization of Vehicles
- Historical camouflage — camouflage, which has a real-life prototype that served in the army. It is important that the prototype must have the same modification as the vehicle for which the camouflage was made in the game.
For example if a camouflage was made for the F-4C, and the QF-4B was chosen as the reference, then it would be a semi historical camouflage. - Semi Historical camouflage — if the camouflage was taken from another vehicle model of the same or a close time period, and also if the camouflage was applied to a vehicle that was not listed as active in the army (museum exhibits and racing camouflages).
- Fictional camouflage — everything else.
Work with blk
Let's talk a little more about the camouflage .blk file. It determines which textures to replace with new ones.
For example let's take something more impressive than the T-34-85, let it be the Abrams M1A1 HC. We will be working in Visual Studio Code for this example, but almost any other text editor can be used.
Having created an example of camouflage, we will see:

- leopard_2a4_blade.tga — dump albedo texture
- m1a1_abrams_ammo_box.tga — albedo texture of a box with a machine gun belt
- m1a1_abrams_body.tga — hull albedo texture
- m1a1_abrams_body_add.tga — albedo texture of mounted armor
- m1a1_abrams_gun.tga — cannon albedo texture
- m1a1_abrams_turret.tga — turret albedo texture
- m1a1_hc_abrams_turret.tga — albedo texture for additional turret elements
- mg_m240.tga — albedo texture of the anti-aircraft machine gun
- us_camo_modern_green.tga— scalable camouflage texture
- us_m1a1_hc_abrams.blk — camouflage config file, which will be discussed now
- us_m1a1_hc_abrams_phys_track.tga — track albedo texture
Let's talk about us_m1a1_hc_abrams.blk. In it we see:

First, let's note that us_camo_modern_green.tga is in the set_tex block, and all other textures are in the replace_tex block.
name:t="user"		// It just has to be here

replace_tex {		// Scalable camouflage
  from:t="us_camo_olive*"		// Replacement texture
  to:t="us_camo_modern_green.tga"	// New texture
}

set_tex {		// Fixed camouflage
  from:t="m1a1_abrams_body_c*"		// Replacement texture
  to:t="m1a1_abrams_body.tga"		// New texture
  param:t="camo_skin_tex"		// Required parameter for set_tex, it won't work without it
}
The texture of a separate part of the tank (turret, hull...) can also be made using replace_tex without the param:t="camo_skin_tex" parameter. But then the alpha channel of the texture should be made black, and game decals will not be applied to the camouflage. But it still won't scale or rotate.
Normal textures will be written via replace_tex.
Working with Normal Maps
As mentioned above, normal maps allow you to adjust the smoothness, metallicity and relief of the texture. Normal maps usually have an "_n" in their texture name.
Tank normal maps will not be automatically uploaded when creating a camouflage example and can be accessed via assetviewer. For aircraft they will be unloaded along with albedo textures.
Let’s continue to work with our T-34-85. We can get the normal maps we need from the assetviewer and upgrade them or make them from scratch based on the albedo texture.
Let's say we got the normal maps through the assetviewer. For each albedo texture there is a corresponding normal map.
- For t_34_85_d5t_body.tga — t_34_85_d5t_body_n.tga
- For t_34_85_d5t_turret.tga — t_34_85_d5t_turret_n.tga
- And so on.
In the received example, normal maps for ground vehicles and ships will not be specified in the camouflage config. But you can write them yourself. For example, to add a turret normal map for the T-34-85, you need to add the normal texture to the folder with the rest of the textures and add it to the camouflage config (.blk).
It is important that the file name and extension exactly match the specified file in the config!
replace_tex{
  from:t="t_34_85_d5t_turret_n*"
  to:t="t_34_85_d5t_turret_n.dds"
}
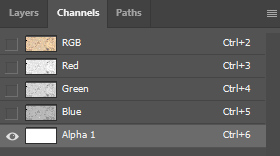
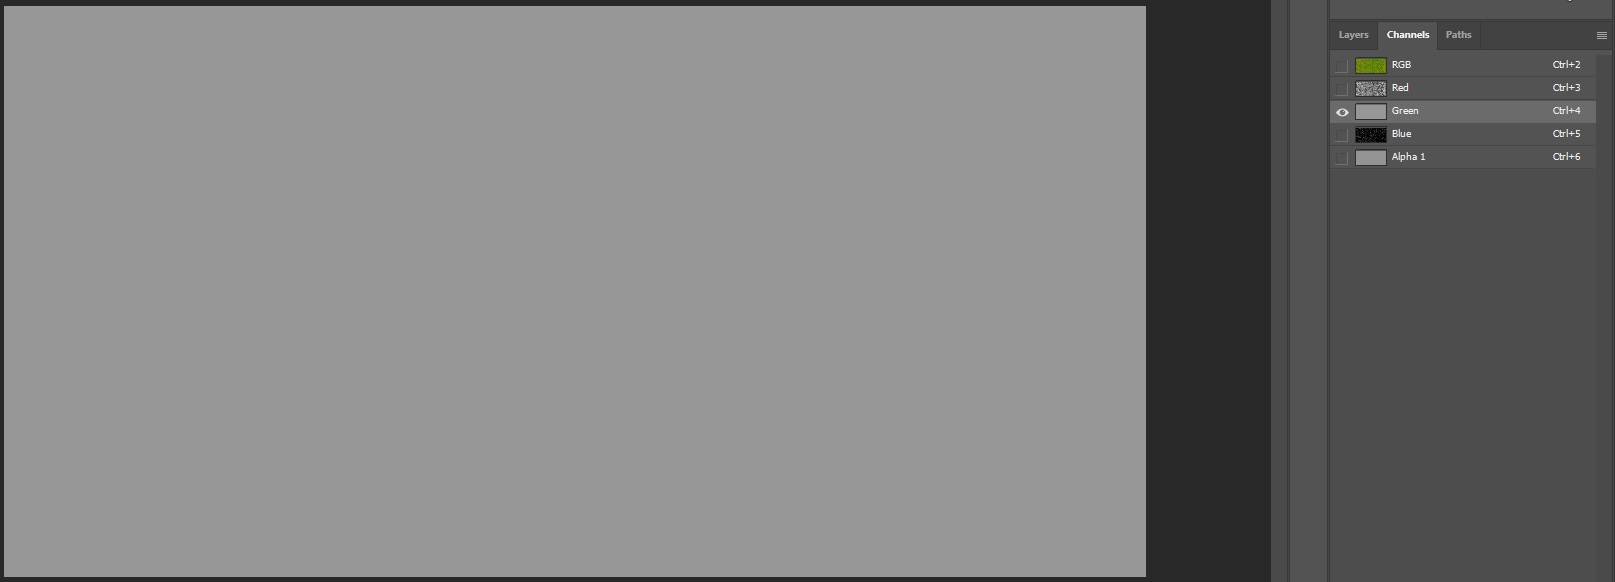
For example consider t_34_85_d5t_turret_n.tga — the normal map of the tower. We see the following:
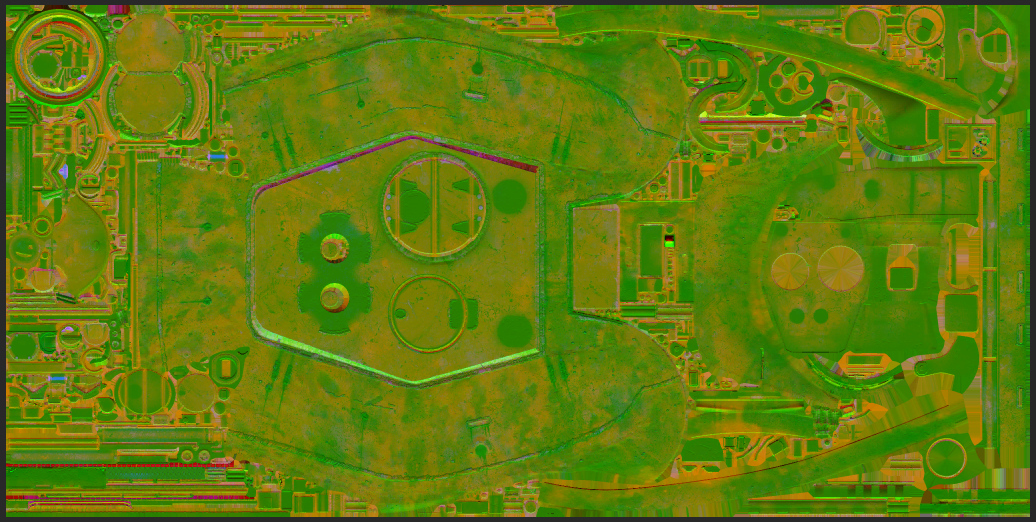
Here all the work takes place in separate channels, each of which is responsible for its own parameter:
- Red — smoothness
- Green — x normal
- Blue — metallicity
- Alpha 1 — y normal

The closer to black, the weaker the effect. For example a completely black Red channel on a texture will make the car matte. And completely white - glossy. Normals (Green and Alpha 1 channels) allow you to make bumps. Their base color is grey.
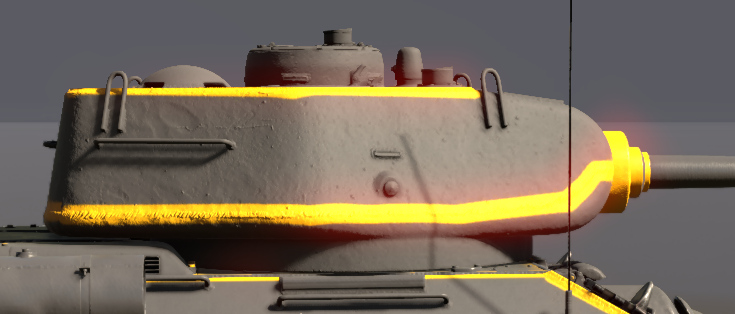
Let's go back to our gray-orange skin on the T-34-85 and try each layer individually. Let's start with Red - smoothness. By default, the red channel looks like this:

And this is what the turret looks like:

But if we paint it white (that is, turn the smoothness to the maximum), we will get:


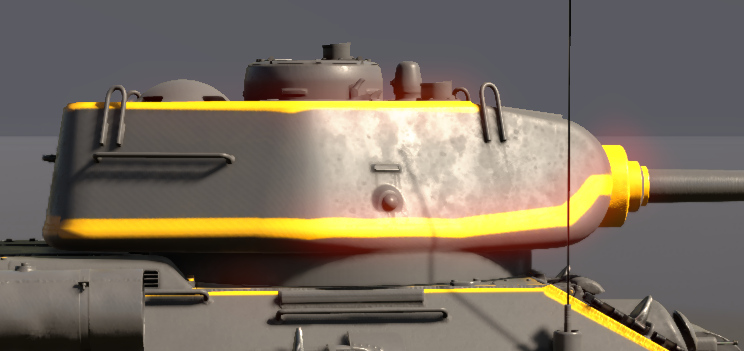
And vice versa, if we paint it black:

Everything is exactly the same with the metallicity map (Blue).
With the “Wind of Change” update the game has incorporated a new rendering system. The advantage of this being an extended range in the “smoothness” textures, allowing for a more natural reproduction of smooth and rough materials. This will especially affect the use of heavy roughness.
In connection with this, there have been changes in the technology for camouflage creation. In the normal texture (_n, _n_dmg) the red channel that previously was responsible for smoothness of the texture, is now stored inverted roughness.
The old smoothness channel has been converted to the new inverted roughness by the formula:
inverted roughness = 1 - (1-0.7*smoothness)^3
Note how the normal layers (Green and Alpha 1) work. The base color is grey, which simply means the surface is flat. The lighter, the surface will be more convex, the darker, on the contrary, more hollow.
For example let's flatten completely the turret of our T-34-85 by making both layers of normals evenly grey.

We equalized the normals of the tower and we get a perfectly smooth tower without seams or chipping:
Camouflages for aircraft
Creating an aircraft skin is almost the same thing as creating a tank skin. The main difference is, it is impossible to create a scalable skin, only a fixed one. Everything else is the same as for ground vehicles and ships.
Each aircraft has two main textures:
- Albedo texture of an aircraft (e.g., su_25.tga)
- Normal map of an aircraft (e.g., su_25_n.tga)
In most cases, these two textures alone will be sufficient.
The main texture does not include the textures for the pylons, the interior of the cockpit and the afterburner flame texture for the jet engines. These can be obtained through Assetviewer.
In the “Apex Predators” update for PCs, the _dmg textures of aircraft and helicopters have been replaced by damage decals. But _dmg textures are still required for consoles, where damage is displayed the old way.
Naval camouflages
This will be done in the same way as tank camouflages.
Helicopter camouflages
This will be done in the same way as aircraft camouflages.
Requirements for Market
Camouflage published on the WT Live page may qualify for selection for Camouflage Trophies. Camouflages need to meet several technical and formal requirements.
Technical:
- Camouflage must be published on the WT Live in the camouflage section.
- The archive should contain only one
.blkfile. - The contents of the
.blkfile must only refer to the textures found in the archive. - Archive may only contain textures mentioned in the
.blkfile. - All names in the
.blkfile must match to the texture files in the archive, including letter case. - Filenames in the archive can only contain numbers and letters of the English alphabet.
- The resolution of the camouflage texture must be in multiples of 8. Permitted texture sizes on the largest side: 128; 256; 512; 1024; 2048; 4096 and 8192 px (8192 px only for the texture of high rank (VI+ rank) aircraft and bombers).
- Textures for ground vehicles should be made with the obligatory possibility of applying decals (see fixed camouflage). Diffuse texture should be done via
set_tex, not viareplace_tex. It is allowed to combine fixed and scalable camouflage. Usingreplace_texfor_bodyand_turrettextures greatly reduces chances of being accepted in a trophy. - Camouflage textures should be in
.ddsor.tgaformat. The dds format is recommended, as it is more compact. - It is recommended to not exceed 70 MB archive size for aircraft and 40 MB for ground vehicles. For the most efficient compression, it is recommended to use "DDS rgba 8 bpp interpolated alpha" storage format.
- It is not allowed to change cockpit and engine flame textures.
- If the camouflage was created after 2022, tick the "inverted roughness" checkbox.

Formal:
- Picture for the market must be in 16:9 format. For the market, the default title image is taken from the camouflage post. If the design of your posts suggests a resolution other than 16:9 for the title image, you can add an appropriate image to the post below. If the camouflage post does not have a suitable format and/or representative image, it will be made by the developer team when the camouflage is added to the market.
- For the historical camouflage it is very important to add a reference picture to the post. If it is semi-historical — that is strongly recommended. History text on the reference as well as its pictures add score to the trophy camouflage selection. If the camouflage is fictional, briefly describe the idea behind it and, if possible, add references that were used during the creation process.
- Camouflages may not contain trade marks and elements protected by the copyright. Check for copyrights on decals, logos, drawings, and patterns. Often festival camouflages and pilot group camouflages have active copyrights! (Camouflages where such elements were changed or removed do not lose the historical status).
- Aircraft identification marks of the countries of the fascist/Nazi bloc must not contain prohibited symbols. The use of harmonized identification marks is recommended (link).
- If your camouflage uses
replace_tex, mention that it is impossible to use decals with it.
Procedure for updating camouflage that is already added to the Market
When updating the camouflage, do not make any changes that drastically alter its appearance!
- Upload the updated camouflage to the same post as the original camouflage.
- Notify the developers of the change in one of the following ways:
| Write a message on the forum in private messages to the developer KCCC_g, in which you add: — A link to the post with the camouflage — A short description of the changes (preferably with pictures) | In the comments under the camo post that needs updating, mention the developer @KCCC_g and summarize the changes. | You can also request a camouflage update through the moderators by sending them a summary description of the changes. |