IS-7

From War Thunder Wiki
Jump to: navigation, search
IS-7
ussr_is_7.png
GarageImage IS-7.jpg
ArtImage IS-7.png
IS-7
AB RB SB
8.3 8.3 8.3
Class:
Show in game
MARKET

Description

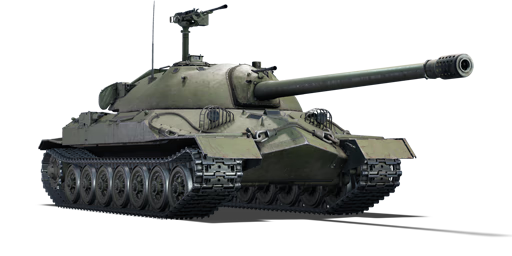
The IS-7 is the sixth variant of the IS heavy tank family. It is a Soviet heavy tank that began development in 1945 under the project designation Object 260. The vehicle only existed as a prototype before being cancelled in favour of the T-10 (IS-8) variant. Nikolai Fedorovich Shashmurin designed the IS-7 in Leningrad in 1945. It was the largest and heaviest member of the IS heavy tank family, weighing 68 tonnes and armed with a long-barreled 130 mm S-70 tank gun. It was also one of the most sophisticated heavy tank designs. The armour was designed in the same way as the IS-3, with a pike nose on the upper glacis wearing 150 mm of armour inclined at a 65° angle. The lower glacis was supposed to be 100 mm thick, however, measurements revealed that it may be as thick as 110-120 mm depending on welding variances. When shot from the front, the sharp angle of the pike nose increases the possibility of a ricochet. The 130 mm S-70 tank gun was a naval gun adaptation that fired a 33 kilogram armour-piercing round with a muzzle velocity of 900 metres per second. The gun's loading mechanism used an assisted loading mechanism with a conveyor belt system. It could hold six ready rounds before needing to be replenished. The rounds were divided into two parts: the shell and the propellant. According to Nicholas Moran, the prototype IS-7 had eight machine guns and might have had to remove five of them if it had gone into production. The IS-7 was an outstanding breakthrough vehicle, but it was far too heavy and expensive to build; the T-10 was better suited for warfare as it was much easier and cheaper to transport. Work on the IS-7 was terminated on February 18, 1949.

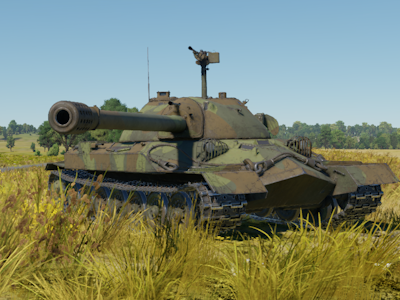
Introduced in Update 1.79 "Project X" as the main reward of the 2018 Operation S.U.M.M.E.R. event, the IS-7 is one of the greatest heavy tanks available to the Soviet Army ground forces. It's best to play it in the medium range. The IS-7 has substantially fewer concerns with flankers than prior IS heavy tank variants since its side armour is significantly thicker. Almost no conventional round can penetrate the frontal armour, and there are few weak spots. The IS-7 has an assisted loading mechanism with a conveyor belt system that allows for the loading of 130 mm rounds in as little as 10 seconds. In addition to its impressive armour, the IS-7 is armed with no less than eight machine guns, which serve as an effective deterrence to any light vehicles that may wander into its path. Furthermore, the IS-7 is equipped with a substantially more powerful engine than previous IS heavy tank variants, improving acceleration and manoeuvrability without sacrificing any maximum forward or reverse speed. IS-7 players should not be discouraged by challenging terrain, as the broad tracks and powerful engine will make swift work of any surface. The IS-7 should be used as a breakthrough tank, pushing forward to allow friendlies to use lighter vehicles to secure objectives. However, be aware that it is not completely invincible, as experienced opponents may exploit the vehicle's few minor flaws. Furthermore, some high-calibre rounds (such as the FV4005 and Conway) will easily disable your vehicle regardless of where they hit.

General info

Survivability and armour

Smoke grenades
Creation of a smoke screen in front of the vehicle
Armourfront / side / back
Hull150 / 150 / 60
Turret250 / 203 / 99
Crew5 people
Visibility94 %

The IS-7's armour is some of the best conventional armour on any vehicle available in War Thunder. However, due to its BR it often faces vehicles that possess weaponry that the thick, conventional steel armour has no hope of stopping: HEAT-FS, ATGMs and APFSDS. While some sections of the vehicle might be resistant to even these, for the most part, these rounds won't struggle to penetrate.

As such, the IS-7's true chances of survivability come from its excellent mobility and the spread-out crew. The ideal use of the IS-7, particularly when facing more modern vehicles, is to use its good mobility to get into an early advantageous position, and from there using its reverse speed to duck in and out of cover.

Unfortunately, however, the vehicle's limited ammunition load and the sheer size of the rounds result in ammunition being vulnerable, strewn throughout. In fact, penetrating rounds are often more likely to hit one of many ammo racks than they are crew members.

To put it simply: Despite the IS-7's status as a 'heavy tank', it shouldn't be played like earlier heavy tanks, but instead should be played like an early MBT, utilising mobility and reload over armour.

Armour type:

  • Cast homogeneous armour (Turret)
  • Rolled homogeneous armour (Hull)
Armour Front (Slope angle) Sides Rear Roof
Hull 150 mm 150 mm Top
100 mm Bottom
60 mm 5 - 40 mm
Turret 101 - 235 mm Turret front
250 mm Gun mantlet
139 - 202 mm 63 - 179 mm 30 - 99 mm
Cupola 30 mm 30 mm 30 mm 30 mm

Notes:

  • Suspension wheels are 20 mm thick, tracks are 30 mm thick, and torsion bars are 60 mm thick.

Mobility

Speedforward / back
AB64 / 25 km/h
RB and SB60 / 23 km/h
Number of gears8 forward
2 back
Weight68.0 t
Engine power
AB2 003 hp
RB and SB1 050 hp
Power-to-weight ratio
AB29.5 hp/t
RB and SB15.4 hp/t
Game Mode Max Speed (km/h) Weight (tons) Engine power (horsepower) Power-to-weight ratio (hp/ton)
Forward Reverse Stock Upgraded Stock Upgraded
Arcade 64 25 68 1356 2,003 19.94 29.46
Realistic 60 23 929 1,050 13.66 15.44

The IS-7 sports excellent mobility characteristics, despite its weight; its 1050 horsepower diesel engine comfortably pushes the vehicle to its top speed of 63 km/h (AB) or 60 km/h (RB/SB) with what seems like absolute ease. As such, it drives similarly to early MBTs. Despite a lack of neutral turning, the IS-7 is more than capable of hull traversing at a competitive speed to best utilise its armour when necessary; this is notably improved by the Tracks upgrade. It possesses two reverse gears, and when combined with the powerful engine the vehicle can reverse surprisingly fast for such a large and heavy tank.

Modifications and economy

Repair costBasic → Reference
AB6 319 → 8 202 Sl icon.png
RB6 590 → 8 553 Sl icon.png
SB12 477 → 16 195 Sl icon.png
Total cost of modifications129 000 Rp icon.png
226 000 Sl icon.png
Talisman cost2 400 Ge icon.png
Crew training130 000 Sl icon.png
Experts450 000 Sl icon.png
Aces2 000 Ge icon.png
Research Aces890 000 Rp icon.png
Reward for battleAB / RB / SB
150 / 210 / 250 % Sl icon.png
214 / 214 / 214 % Rp icon.png
Modifications
Mobility Protection Firepower
Mods new tank traks.png
Tracks
Research:
9 400 Rp icon.png
Cost:
15 000 Sl icon.png
320 Ge icon.png
Mods new tank suspension.png
Suspension
Research:
8 000 Rp icon.png
Cost:
13 000 Sl icon.png
270 Ge icon.png
Mods new tank break.png
Brake System
Research:
8 000 Rp icon.png
Cost:
13 000 Sl icon.png
270 Ge icon.png
Mods new tank filter.png
Filters
Research:
12 000 Rp icon.png
Cost:
19 000 Sl icon.png
410 Ge icon.png
Mods new tank transmission.png
Transmission
Research:
15 000 Rp icon.png
Cost:
24 000 Sl icon.png
510 Ge icon.png
Mods new tank engine.png
Engine
Research:
15 000 Rp icon.png
Cost:
24 000 Sl icon.png
510 Ge icon.png
Mods tank tool kit.png
Improved Parts
Research:
2 800 Rp icon.png
Cost:
15 000 Sl icon.png
320 Ge icon.png
Mods extinguisher.png
Improved FPE
Research:
2 400 Rp icon.png
Cost:
13 000 Sl icon.png
270 Ge icon.png
Mods tank reinforcement ussr.png
Crew Replenishment
Research:
12 000 Rp icon.png
Cost:
19 000 Sl icon.png
410 Ge icon.png
Mods new tank horizontal aiming.png
Horizontal Drive
Research:
9 400 Rp icon.png
Cost:
15 000 Sl icon.png
320 Ge icon.png
Mods tank cannon.png
Adjustment of Fire
Research:
8 000 Rp icon.png
Cost:
13 000 Sl icon.png
270 Ge icon.png
Mods new tank vertical aiming.png
Elevation Mechanism
Research:
12 000 Rp icon.png
Cost:
19 000 Sl icon.png
410 Ge icon.png
Mods smoke screen.png
Smoke grenade
Research:
15 000 Rp icon.png
Cost:
24 000 Sl icon.png
510 Ge icon.png

Armaments

Main armament

Autoloader
Automatically feeds projectiles into the breech. The speed does not depend on the skills of the loader
Ammunition30 rounds
First-order6 rounds
Reload10.0 s
Vertical guidance-3° / 15°
Main article: S-70 (130 mm)
130 mm S-70 Turret rotation speed (°/s) Reloading rate (seconds)
Mode Capacity Vertical Horizontal Stabilizer Stock Upgraded Full Expert Aced Stock Full Expert Aced
Arcade 30 -3°/+15° ±180° N/A 16.2 22.4 27.2 30.1 32.0 10.00 10.00 10.00 10.00
Realistic 11.9 14.0 17.0 18.8 20.0

The 130 mm S-70 gun stays reliably accurate until 1,500 m distance. Beyond 2,000 m the loss of accuracy becomes a real handicap. The high muzzle velocity of your shells grants you pretty flat firing trajectories and thus helps fire at moving targets from a distance. In that regard, using the "sight distance control" feature can increase your chances of successfully hitting enemy tanks.

The turret rotation speed is average compared to other tanks at the same rank or battle rating. This makes tracking a target from a distance an easy task to perform. Lacking a stabilizer, the tank absolutely can't fire on the move.

The gun uses two-piece ammunition with projectiles and propellant bags. Thanks to the autoloader, your 6-shots first order ammo rack allows your tank to have a reload time similar to vehicles at the same BR. The reload time however becomes 2 to 3 times longer once the ready rack is empty.

Your recoil is important but not powerful enough to throw your gun off target after firing.

Ammunition

The ammunition choice is limited but effective:

  • BR-482B: APCBC; a capped armour-piercing shell with a ballistic cap that has a high penetration power and an explosive filler. It will destroy any armoured target it penetrates.
  • OF-482M: HE; useful for destroying open and lightly armoured vehicles.

Penetration statistics
Ammunition Type of
warhead
Penetration @ 0° Angle of Attack (mm)
10 m 100 m 500 m 1,000 m 1,500 m 2,000 m
BR-482B APCBC 313 309 294 276 260 244
OF-482M HE 37 37 37 37 37 37
Shell details
Ammunition Type of
warhead
Velocity
(m/s)
Projectile
mass (kg)
Fuse delay
(m)
Fuse sensitivity
(mm)
Explosive mass
(TNT equivalent) (g)
Ricochet
0% 50% 100%
BR-482B APCBC 900 33.4 1.2 19 177.1 48° 63° 71°
OF-482M HE 900 33.4 0.3 0.1 3,640 79° 80° 81°

Ammo racks

Full
ammo
Ammo
type
1st
rack empty
2nd
rack empty
3rd
rack empty
4th
rack empty
5th
rack empty
6th
rack empty
7th
rack empty
8th
rack empty
9th
rack empty
10th
rack empty
Visual
discrepancy
30 Projectiles
Propellants
26 (+4)
28 (+2)
20 (+10)
25 (+5)
14 (+16)
22 (+8)
(+23)
19 (+11)
(+29)
16 (+14)
N/A
14 (+16)
N/A
11 (+19)
N/A
(+21)
N/A
(+23)
N/A
(+29)
No
Ammo racks of the IS-7

Notes:

  • The IS-7 uses two-piece ammunition, composed of projectiles (yellow) and propellant bags (orange). Both have separate racks.
  • Racks 5 (projectiles) and 10 (propellants) are ready racks and take priority in being filled as well as depleted. They amount to 6 shots.
  • Full reload speed will be realized as long as ammo exists in the ready rack. If a ready racks is empty, a penalty to reload speed will occur.
  • Simply not firing when the main gun is loaded will load ammo from other racks into the ready rack. Firing the main gun will interrupt the loading of the ready rack.
  • To go into battle with the flanks depleted of propellant bags (racks 1 to 5), pack 16 (+14) shells.

Machine guns

Ammunition200 rounds
Belt capacity50 rounds
Reload8.0 s
Fire rate600 shots/min
Ammunition200 rounds
Belt capacity50 rounds
Reload8.0 s
Fire rate600 shots/min
Vertical guidance-5° / 85°
Ammunition800 rounds
Belt capacity400 rounds
Reload8.0 s
Fire rate600 shots/min
Ammunition1 600 rounds
Belt capacity400 rounds
Reload8.0 s
Fire rate600 shots/min
14.5 mm KPVT
Mount Capacity (Belt) Fire rate Vertical Horizontal
Coaxial 200 (50) 600 N/A N/A
Pintle 200 (50) 600 -5°/+85° ±180°

The pintle-mounted 14.5 mm KPVT heavy machine gun can act as both an offensive and anti-aircraft machine gun on the IS-7, giving it protection against aircraft and lightly armoured vehicles. Best use is within 500 m against lightly armoured vehicles. The 360° movement allows you to point quickly your MG in any given direction. Moreover, the high position of the MG on the turret allows you to shoot from behind cover without exposing your armour.

7.62 mm RP-46
Mount Capacity (Belt) Fire rate Vertical Horizontal
Coaxial - Left side 400 (400) 600 N/A N/A
Coaxial - Right side 400 (400) 600 N/A N/A
Hull - Left side (front facing) 400 (400) 600 N/A N/A
Hull - Right side (front facing) 400 (400) 600 N/A N/A
Turret - Left side (rear facing) 400 (400) 600 N/A N/A
Turret - Right side (rear facing) 400 (400) 600 N/A N/A

The small calibre of the RP-46 machine guns makes them largely ineffective against all armoured vehicles but the ones with an open compartment. It still can be used to ping targets as a rangefinding help. While you have 6 of them, they're not very helpful in battle against enemy vehicles.

Usage in battles

The IS-7, similarly to the rest of the IS line, should be played as a breakthrough tank, taking advantage of its extreme durability, and avoiding long-range engagements where its shells simply lose effectiveness. With upwards of 450 mm of effective armour in places, there's no need to shy away from taking on almost any opponent.

The IS-7 is capable of destroying almost any machine on the battlefield and should have no qualms about combatting anything on the right terms. However, it's best to be wary of tanks with ATGMs, high-penetration HEAT, large-calibre HESH and anything with APFSDS, as they are able to disable you, often through your frontal plate. Also be wary of any tanks with two plane stabilisers, as the IS-7s main armament is not stabilised in any way and must be stopped before it can fire accurately.

Fighting the IS-7

If you don't have any powerful chemical warhead, or just got suddenly attacked by IS-7 point-blank, the highlighted weak spot on the bottom of the turret is your only real hope, since you won't have time to look for any others. APDS or other strong shells with the power of ~280 mm should be able to breach the 250 mm thick mantlet bottom even if it's a bit angled, potentially destroying horizontal and vertical turret drives as well as cannon breech. After that you should rush IS-7 down and destroy it ASAP, as it shouldn't be able to use its gun and turret anymore.

General tactic:

It's best to avoid taking the IS-7 on if it stands any chance of firing back - it's very likely that if it gets a shot off, it will be able to destroy your vehicle. Try to disable the gun, or if behind or to the sides, attempt to take out the ammo - the primary store is in the back of the turret, with excess ammunition stored in the upper sides of the hull and beside the driver, as well as a small stash right below the gun breech. If forced to engage the IS-7 from the front, attempt to fire through the turret optic (just above and to the right of the gun when looking at the front), as this is your best opportunity to disable the gunner and the breech. Shooting from an angle significantly reduces the amount of effective armour your shells have to penetrate. The IS-7 can be vulnerable to trap shots or high-calibre HE rounds above the driver's port, although it does have significantly more armour there than the IS-3. Powerful ATGMs can easily breach hull armour and potentially take out 3 crew members, or explode excessive ammo near to tank's front.

In an downtier:

IS-7 can easily destroy your entire team with little to no effort, so if you see one, you should immediately start planning your attack or escape route. Firstly, if you can't just attack it with your entire squad, you want it to be alone. Secondly, start predicting where it's going to go, so you can get the advantage of the first attack. Some urban environment with enough cover to sneak up on it and enough space to drive around it is perfect. After that, use your tools of choice:

Smoke and cannon: To make this tactic easier, it's best to ask your scout ally (usually light tank) to "Scout" it constantly if they can. Use smoke shells to completely blind IS-7 and get as close to it as possible. Avoid being hit by numerous machine guns, as it will try to use it to detect you or destroy your scout buddy. Do not drive in a straight line after shooting smoke shells. After getting close, it's advisable to drop even more smokes (the hull-mounted ones or the engine exhaust system works perfect, as you don't really have a lot of time), just to make sure that his teammates won't be able to stop you, then try to find out its rear and set its engine on fire. After that, keep circling around it, setting it on fire and keeping the smoke screen up, or find its turret's back and destroy the tank with a single well placed shot.

Firstly, IS-7 got antagonized by another IS-7 and M60A1 (AOS) which counts as overkill and heavy numbers. SPAA used this opening to flank it and break its tracks. Since it's lightly-armoured, APHE didn't detonate. IS-7 didn't expect such trickery and didn't even bother to fire its HMG. Being outnumbered 3 to 1, it drops smokes, which was a mistake, since it only helps IS-7s enemies to get even closer, while SPAA returns to distract it and damage every MG it has, now in range, where it can circle around it safely. By the time that smoke disappeared, IS-7 got damaged by SPAA's teammates, and it finishes the tank off by unloading APDS magazine into the back of the turret point-blank.

Overkill: If you are a proud owner of FV4005, Type 60 ATM, Sturmpanzer 2, M50 Ontos, FV 4004 Conway, BMP-1 (AB), and some other vehicles with weapons that have extreme overkill potential (usually at the cost of all the mobility and/or all armour), this is your time to shine. Aim for the weak spots, or simply fire at the left side of the hull (for you it's on the right if the tank is in front of you), depending on your weapon type. If IS-7 has full ammo loadout, it will most definitely explode. In type 60 ATM's case, you can even drop ATGM right on top of its roof or swing it into the side of the turret. Since it's not completely round, unlike most Soviet designs, it has lesser bounce chance.

Strength in numbers: Send someone to bait and stall IS-7, while rest are going to flank or simply rush it down. Despite being nearly invulnerable from the front, it may easily explode, when multiple tanks fire at its sides at less than 30° angle. Ideally, you want to send something like T95 or another extremely armoured tank as bait (or even another IS-7 in AB), so foe can't simply destroy it without putting an effort, but if there is none such tanks, sacrifices must be made. Unless...

Combat SPAA: This may sound absurd, but IS-7 can easily be doomed by SPAA. SPAA can easily use some cover to attack its exposed track with cannons, making moving IS-7 topple over, then destroy second track, to immobilize it. Even if IS-7 fires back at it, APHE is going to over-penetrate, if its armour is less than 15 mm. After that, someone can be called in to make a clean side shot (about 170 mm penetration required for sides). In case if SPAA is combat-capable and has APDS shells with 110 mm of penetration, it can try to get behind the turret, while breaking every MG with autocannons, to execute it personally. If IS-7 is aware of your intentions and keeps tracking SPAA with the turret, just set the vehicle on fire by damaging the engine, the foe will have to extinguish the fire eventually or face consequences.

Pros and cons

Pros:

  • 130 mm BR-482B APCBC round capable of dealing a lot of internal damage - very few tanks will survive a successful penetration
  • One of the few Soviet heavy tanks to have a 5-man crew, increasing its survivability
  • Has an assisted loader (which loads a shell every 10 seconds)
  • Decent turret rotation (16.47° per second with a stock crew, 23.53° per second with a fully upgraded aced crew)
  • A lot of machine guns; total of two 14.5 mm KPVTs and six 7.62 mm RP-46's that are deadly against open-top vehicles/ lightly armoured vehicles
  • Anti-aircraft 14.5 mm HMG that can rip apart any thin-skinned vehicles (45 mm of penetration at 10 m)
  • Impressive armour display with a heavily sloped turret, piked front hull, thick gun mantlet, spaced and sloped side armour
  • Can be very difficult to destroy for players who are inexperienced in fighting it
  • Good reverse speed and can accelerate backwards rather quickly
  • Good acceleration and decent top speed for its weight
  • 14.5mm KPVs can heavily damage or destroy gun barrels at close range

Cons:

  • Limited maximum ammunition load of 30 rounds
  • Terrible gun depression and elevation (only -3° depression and 15° elevation)
  • Shots to the back of the turret will set off the ammo rack located there, this is the first rack of shells which are loaded into the cannon
  • Often faces 8.7 tanks with stabilisers and APFSDS that can easily penetrate it
  • The front turret optic is a reasonably easy spot to penetrate from the front, needing ~170 mm penetration
  • Vulnerable, as with all late heavy tanks, to chemical rounds, ATGMs and late kinetic rounds
  • 20 mm of armour over the engine deck and only 5 mm of armour plating over the engine ventilation, meaning planes can often cause engine damage and fires
  • It takes a rather long time to replenish shells in the assisted loader, and having an assisted loader means it must reload a shell into the mechanism first before reloading the gun
  • Not a lot of ammo for the machine guns, some of the machine guns cannot even reload once they've expended their first ammo belt
  • The assisted loader will not complete reloads if the loader is knocked out or replaced by another crew member partway through a reload
  • High repair cost

History

The development of this advanced Soviet heavy tank began in early 1945. Several outstanding scientific groups got involved with the work at once, and the new vehicle was supposed to combine all the latest developments and a great deal of military experience in the design of heavy tanks. After creating several prototypes and experimenting with the engine, armament, and suspension, a steel giant was born and christened Object 260, with the letter designation IS-7 (Iosif Stalin - 7). Weighing 68 tons, the heavy tank was equipped with a naval diesel engine that took the monster up to a fantastic 60 km/h. The tank was armed with a powerful 130 mm (first with a S-26 and after with a S-70 L54 naval cannon) rifled cannon with mechanized first-order ammo racks and an amazing eight machine guns: two high-calibre 14.5 mm KPVs (one twinned with the cannon and the other an anti-air gun) and six 7.62 mm RP-46 machine guns. The armour of the IS-7 is its main feature with high protection value, along with a range of advanced technological solutions, some of which were successfully used on more modern tanks.

Unfortunately, the tank turned out to be very expensive for a country that was recovering after World War II. Mass production would involve a range of technological problems. In addition, transporting the giant IS-7 was very complex, it required special railroad platforms and the tank's weight exceeded the maximum load for the majority of Soviet bridges of that time. After the construction of several prototypes and a limited experimental series, the project was closed.

- From Devblog

Media

Skins
Videos

See also

Other vehicles of similar configuration and role

External links


Leningrad Kirov Plant (Ленинградский Кировский Завод)
Medium Tanks 
T-28  T-28 (1938) · T-28 · T-28E
T-80  T-80B · T-80U · T-80UK · T-80BVM
Heavy Tanks 
KV-1  KV-1 (L-11) · KV-1 (ZiS-5) · KV-1E · KV-1S
KV-2  KV-2 (1939) · KV-2 (1940) · KV-2 (ZiS-6) · KV-220
Other  SMK · IS-7 · Object 279
Captured 
KV  ▀KV-IB · ▀KW I C 756 (r) · ▀KW II 754 (r)
Other  T-28 (Sweden)
Export  T-80U (Sweden)
See Also  Chelyabinsk Tractor Plant

USSR heavy tanks
KV-1  KV-1 (L-11) · KV-1 (ZiS-5) · KV-1E · KV-1S
KV-2  KV-2 (1939) · KV-2 (1940) · KV-2 (ZiS-6) · KV-220
Other KVs  KV-85 · KV-122
IS-1/2  IS-1 · IS-2 · IS-2 (1944) · IS-2 No.321 · IS-2 "Revenge" · Object 248
Other IS tanks  IS-3 · IS-4M · IS-6 · IS-7
T-10  T-10A · T-10M
Multi-turreted  T-35 · SMK
Other  Object 279
Lend-Lease  ▂MK-II "Matilda"