Difference between revisions of "Advance to the Rhine"
Inceptor57 (talk | contribs) m (→Overview) |
Inceptor57 (talk | contribs) m (→North Side) |
||
| (20 intermediate revisions by 8 users not shown) | |||
| Line 1: | Line 1: | ||
{{DISPLAYTITLE:Advance to the Rhine}} | {{DISPLAYTITLE:Advance to the Rhine}} | ||
| − | |||
| − | |||
| − | |||
| − | + | <div class="ttx"> | |
| − | + | <div class="ttx-image">[[File:MapIcon Ground AdvancetotheRhine.jpg]]</div> | |
| − | + | <div class="ttx-table"> | |
| − | + | <div class="ttx-table-line ttx-table-head">Possible Layouts</div> | |
| − | + | <div class="ttx-table-line"><span class="ttx-value">[[File:Icon GreenCheckmark.png|link=]]</span><span class="ttx-name">Domination</span></div> | |
| − | + | <div class="ttx-table-line"><span class="ttx-value">[[File:Icon GreenCheckmark.png|link=]]</span><span class="ttx-name">Conquest</span></div> | |
| − | + | <div class="ttx-table-line"><span class="ttx-value">[[File:Icon GreenCheckmark.png|link=]]</span><span class="ttx-name">Battle</span></div> | |
| − | + | <div class="ttx-table-line"><span class="ttx-value">[[File:Icon RedXCross.png|link=]]</span><span class="ttx-name">Break</span></div> | |
| − | + | <div class="ttx-table-line"><span class="ttx-value">[[File:Icon RedXCross.png|link=]]</span><span class="ttx-name">Skirmish</span></div> | |
| − | + | <div class="ttx-table-line ttx-table-head">Other Information</div> | |
| − | + | <div class="ttx-table-line"><span class="ttx-value">1.05 km x 1.05 km</span><span class="ttx-name">Full tank area size</span></div> | |
| − | + | <div class="ttx-table-line"><span class="ttx-value">Cologne, Germany [[File:CountryIcon NDE.png]]</span><span class="ttx-name">Real World Location</span></div> | |
| − | + | <div class="ttx-table-line ttx-table-head">Full Map</div> | |
| − | + | <div class="ttx-image">[[File:MapLayout Ground AdvancetotheRhine.jpg]]</div> | |
| + | </div> | ||
| + | </div> | ||
__TOC__ | __TOC__ | ||
==Overview== | ==Overview== | ||
| − | + | <!--''Write an introduction to the article in 2-3 small paragraphs. Briefly tell about the location and also about its features.''--> | |
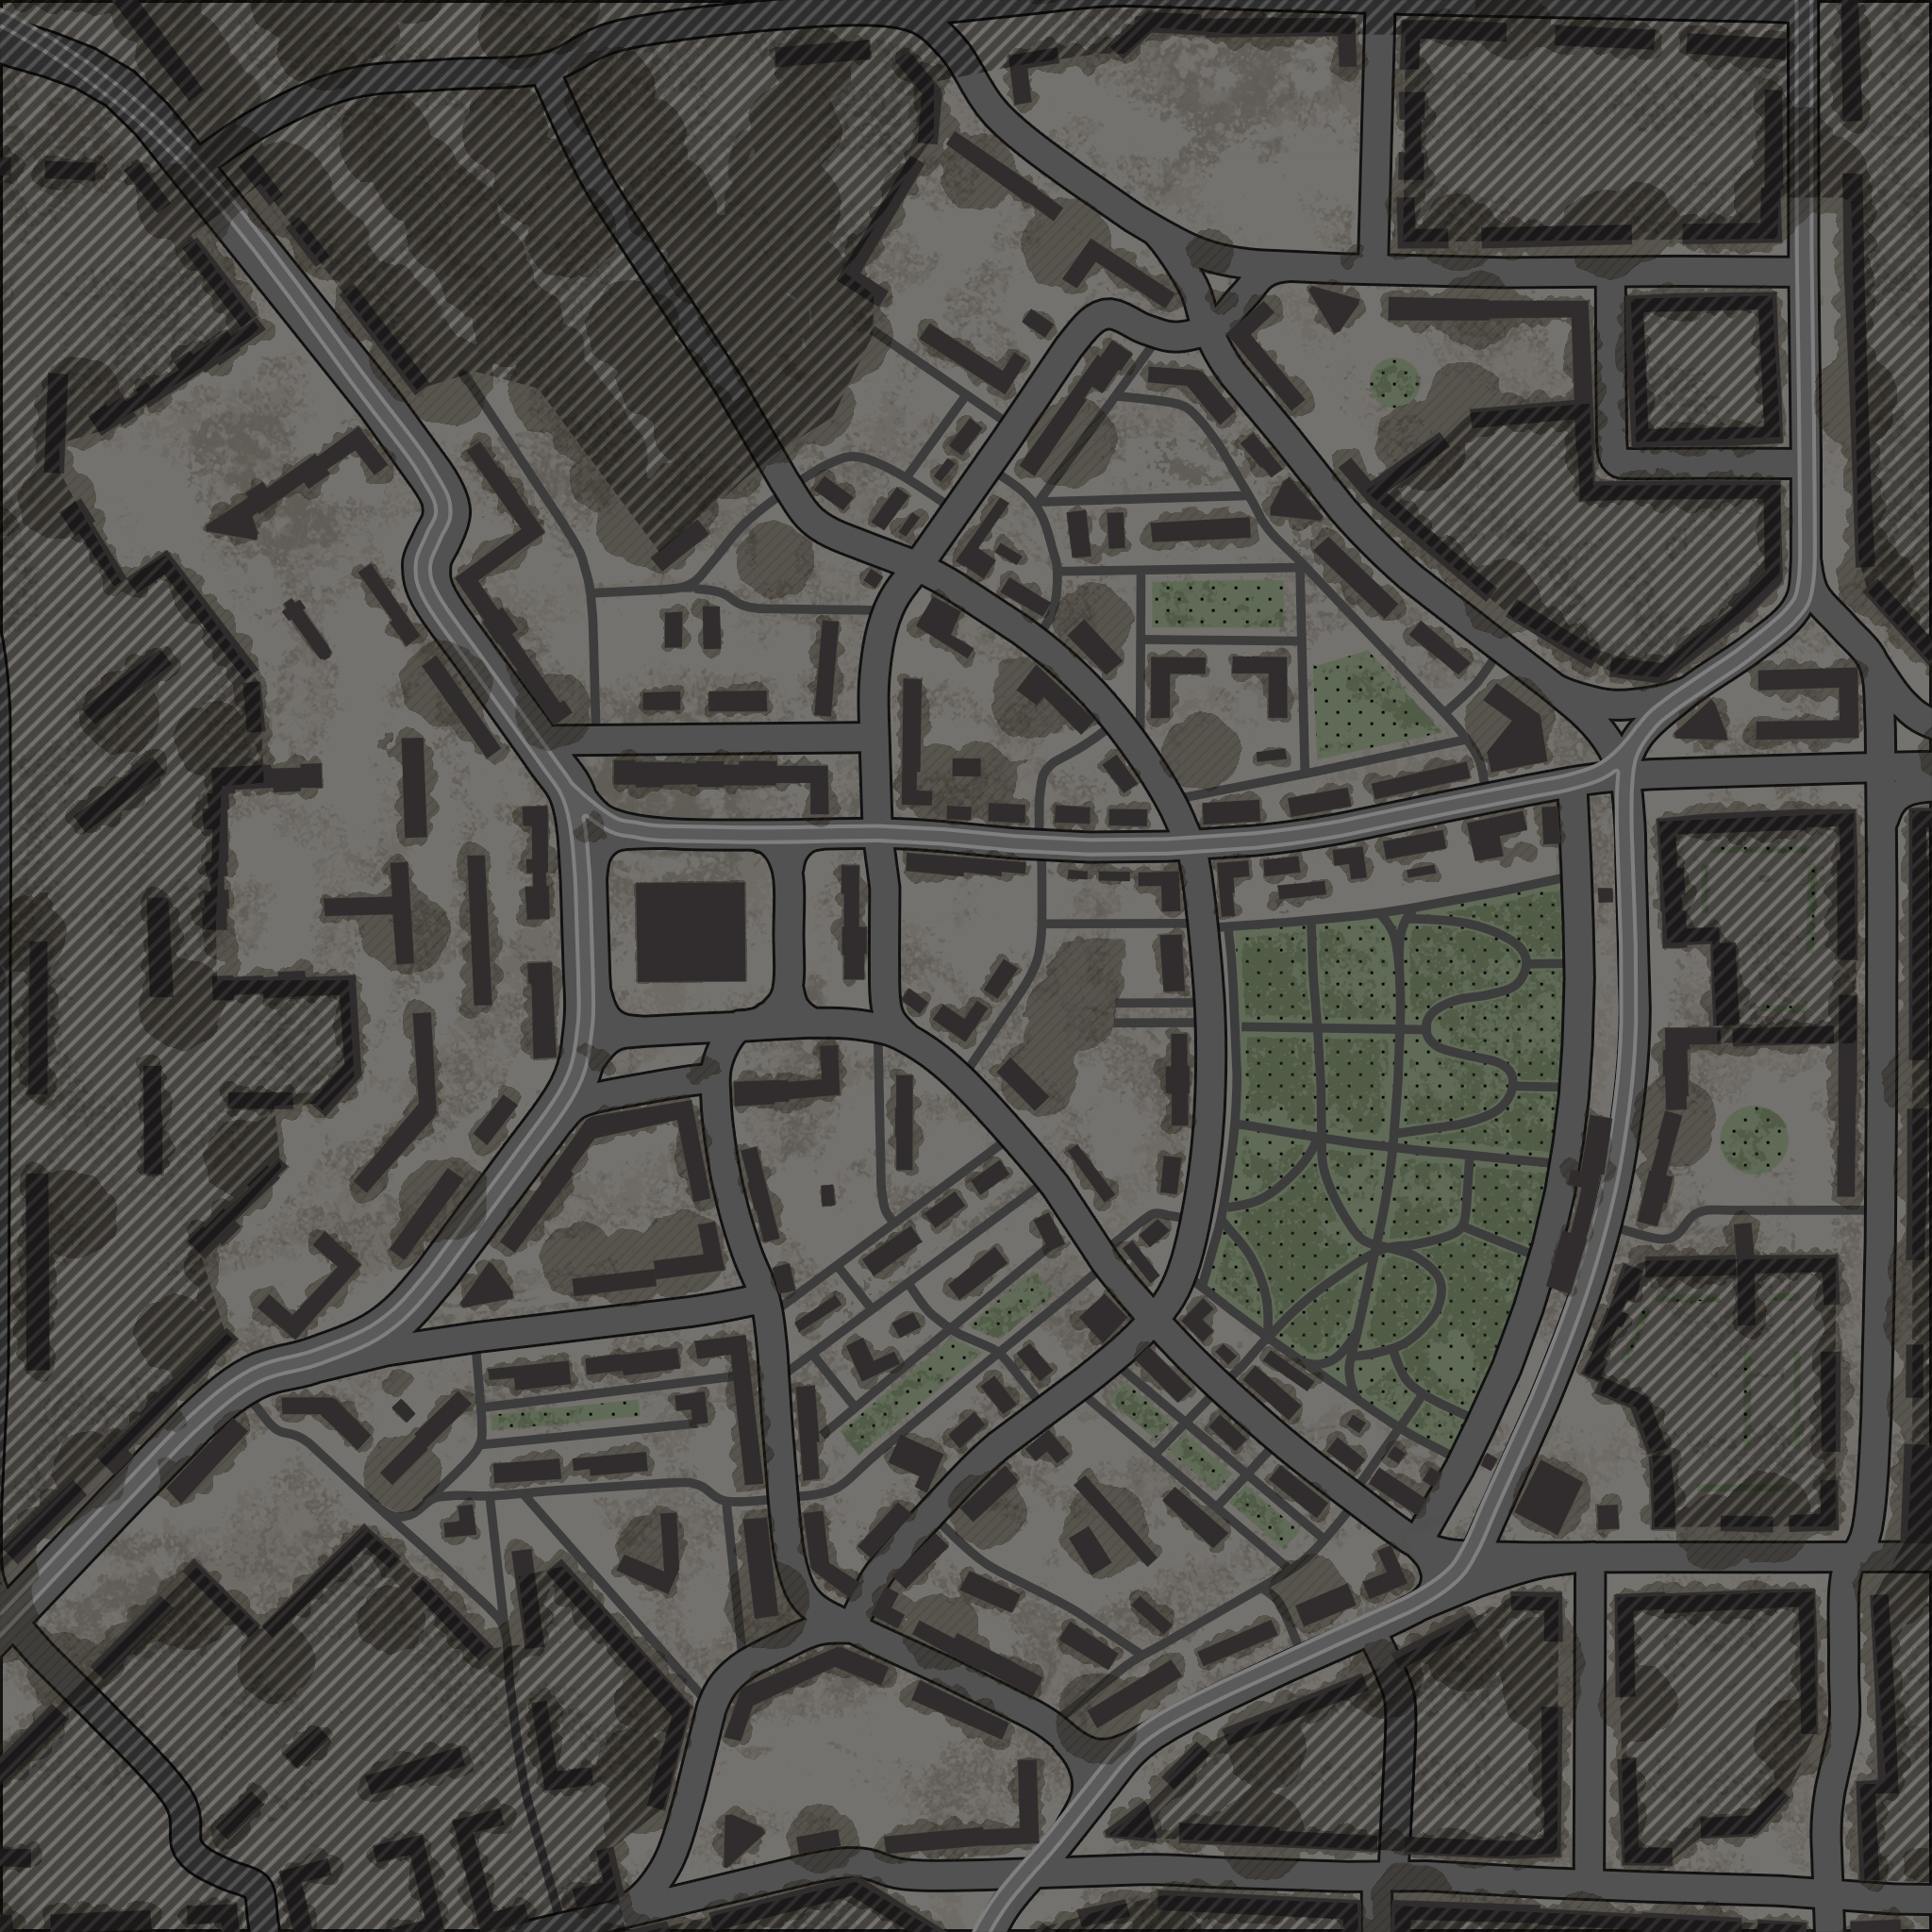
| − | '''Advance to the Rhine''' is a ground forces map available in all modes. | + | '''Advance to the Rhine''' is a ground forces map available in all modes. It is a "generalized recreation" of the city of Cologne, Germany and was added in [[Update 1.53 "Fire Storm"]]. The fighting takes place on the city streets of Cologne and is almost entirely close-quarters. Most of the map is made up of bombed out buildings, with a large tower statue in the west, and an open park area in the east. |
| + | |||
| + | The full tank map is 1.05 km x 1.05 km, making it the smallest tank map in the game. The air battle area is 65km x 65km. | ||
| − | + | {| class="wikitable" | |
| + | |+ Battle area Size | ||
| + | ! Game Mode | ||
| + | ! AB | ||
| + | ! RB | ||
| + | ! SB | ||
| + | |- | ||
| + | | Domination | ||
| + | | 1.05 km x 1.05 km | ||
| + | | 1.05 km x 1.05 km | ||
| + | | 1.05 km x 1.05 km | ||
| + | |- | ||
| + | | Conquest #1 | ||
| + | | 1.05 km x 1.05 km | ||
| + | | 1.05 km x 1.05 km | ||
| + | | 1.05 km x 1.05 km | ||
| + | |- | ||
| + | | Conquest #2 | ||
| + | | 1.05 km x 1.05 km | ||
| + | | 1.05 km x 1.05 km | ||
| + | | 1.05 km x 1.05 km | ||
| + | |- | ||
| + | | Conquest #3 | ||
| + | | 1.05 km x 1.05 km | ||
| + | | 1.05 km x 1.05 km | ||
| + | | 1.05 km x 1.05 km | ||
| + | |- | ||
| + | | Conquest #4 | ||
| + | | 1.05 km x 1.05 km | ||
| + | | 1.05 km x 1.05 km | ||
| + | | 1.05 km x 1.05 km | ||
| + | |- | ||
| + | | Battle | ||
| + | | 1.05 km x 1.05 km | ||
| + | | 1.05 km x 1.05 km | ||
| + | | 1.05 km x 1.05 km | ||
| + | |} | ||
===Game Description=== | ===Game Description=== | ||
| + | <!--Description in the map loading screen prior to joining the battle. Remove if non-existent.--> | ||
Teams fight for control over the bridges leading to the other side of the Rhine. | Teams fight for control over the bridges leading to the other side of the Rhine. | ||
===Historical Background=== | ===Historical Background=== | ||
| + | <!--''Describe historical context of the location.''--> | ||
The devastated urban environment of "Advance to the Rhine" is based off the conditions of the city Cologne in Germany. | The devastated urban environment of "Advance to the Rhine" is based off the conditions of the city Cologne in Germany. | ||
| − | During World War II, Cologne was the Military Area Command Headquarters for the Military District of Münster. The city was subjected to multiple air raids by Western Allies bombers throughout the war. In March 1945, the city was the target of the U.S. First Army in their path towards the Rhine River. It was here that a famous tank encounter occurred that was captured by Signal Corps member Jim Bates. A [[ | + | During World War II, Cologne was the Military Area Command Headquarters for the Military District of Münster. The city was subjected to multiple air raids by Western Allies bombers throughout the war. In March 1945, the city was the target of the U.S. First Army in their path towards the Rhine River. It was here that a famous tank encounter occurred that was captured by Signal Corps member Jim Bates. A [[Panther A|Panther]] tank taking position near the Cologne Cathedral gave the Americans heavy resistance, knocking out a [[M4A1 (76) W|M4A1 (76)]] lead in a tank platoon. Noting the heavy fire from a high-velocity gun, the crew of a [[M26|M26 Pershing]], commandeered by Sergeant Early, maneuvered around the Panther and in a meet-up with both of their guns pointing at each other, the Pershing fired off the first shot, hitting the Panther straight in the hull side. The Pershing fired two more shots as the Panther crew bailed out of their burning tank, ending with a catastrophic explosion of the Panther's ammunition. |
The German garrison in Cologne soon surrendered to the Allies around March 7th. This freed up many American soldiers to exploit a new breakthrough discovered at the German city of Remagen, the still-standing Lundendorff Bridge over the Rhine. | The German garrison in Cologne soon surrendered to the Allies around March 7th. This freed up many American soldiers to exploit a new breakthrough discovered at the German city of Remagen, the still-standing Lundendorff Bridge over the Rhine. | ||
| − | ==Notable Landmarks== | + | ===Notable Landmarks=== |
| + | |||
# The large tower statue as seen in the map's thumbnail is the landmark in most game modes for a flag point. | # The large tower statue as seen in the map's thumbnail is the landmark in most game modes for a flag point. | ||
==Map configuration== | ==Map configuration== | ||
| − | ===Game Modes=== | + | <!--Under this heading is the box to change game mode--> |
| − | + | {| class="wikitable" style="width:314; margin-left: auto; margin-right: auto; border: none;" | |
| − | + | ! colspan="3" | Change Maps by Game Modes | |
| + | |- | ||
| + | ! <div class="ttx-switch-mode"><div class="ttx-switch-mode-button" id="ttx-ab-button">AB</div><div class="ttx-switch-mode-button" id="ttx-rb-button">RB</div><div class="ttx-switch-mode-button" id="ttx-sb-button">SB</div></div> | ||
| + | |} | ||
| − | + | At present, this map has the same layouts in AB, RB and SB. | |
| − | |||
| − | |||
| − | |||
| − | |||
| − | |||
| − | + | ===Domination=== | |
| − | + | <!--Put map screenshot, layout sizes and basic description (where each cap point is) in table using ttx-ab, ttx-rb &ttx-sb spans appropriately. If a more detailed description is desired then insert it as a paragraph of text above the table--> | |
| − | [[File:MapLayout | + | |
| + | {| class="wikitable" style="width: 300px;" | ||
| + | ! Domination Mode - Map Layouts | ||
| + | |- align="center" | ||
| + | | | ||
| + | <div style="float: none;" class="ttx-ab">[[File:MapLayout Domination AdvancetotheRhine ABRBSB.jpg|300px]]</div> | ||
| + | <div style="float: none;" class="ttx-rb">[[File:MapLayout Domination AdvancetotheRhine ABRBSB.jpg|300px]]</div> | ||
| + | <div style="float: none;" class="ttx-sb">[[File:MapLayout Domination AdvancetotheRhine ABRBSB.jpg|300px]]</div> | ||
| + | |- align="center" | ||
| + | | | ||
| + | <span class="ttx-ab">1.05 km x 1.05 km</span> | ||
| + | <span class="ttx-rb">1.05 km x 1.05 km</span> | ||
| + | <span class="ttx-sb">1.05 km x 1.05 km</span> | ||
| + | |- | ||
| + | | | ||
| + | <span class="ttx-ab">In AB point A is around the statue / column in the west, point B is at the southeast intersection, and C is at the northeast intersection.</span> | ||
| + | <span class="ttx-rb">In RB point A is around the statue / column in the west, point B is at the southeast intersection, and C is at the northeast intersection.</span> | ||
| + | <span class="ttx-sb">In SB point A is around the statue / column in the west, point B is at the southeast intersection, and C is at the northeast intersection.</span> | ||
| + | |} | ||
| + | |||
| + | ===Conquest=== | ||
| + | <!--Put map screenshot, layout sizes and basic description (where each cap point is) in table using ttx-ab, ttx-rb &ttx-sb spans appropriately. If a more detailed description is desired then insert it as a paragraph of text above the table--> | ||
| + | |||
| + | {| class="wikitable" style="width: 900px;" | ||
| + | ! colspan="4" | Conquest Mode - Map Layouts | ||
| + | |- | ||
| + | ! Conquest #1 | ||
| + | ! Conquest #2 | ||
| + | ! Conquest #3 | ||
| + | ! Conquest #4 | ||
| + | |- align="center" | ||
| + | | | ||
| + | <div style="float: none;" class="ttx-ab">[[File:MapLayout Conquest1 AdvancetotheRhine ABRBSB.jpg|250px]]</div> | ||
| + | <div style="float: none;" class="ttx-rb">[[File:MapLayout Conquest1 AdvancetotheRhine ABRBSB.jpg|250px]]</div> | ||
| + | <div style="float: none;" class="ttx-sb">[[File:MapLayout Conquest1 AdvancetotheRhine ABRBSB.jpg|250px]]</div> | ||
| + | | | ||
| + | <div style="float: none;" class="ttx-ab">[[File:MapLayout Conquest2 AdvancetotheRhine ABRBSB.jpg|250px]]</div> | ||
| + | <div style="float: none;" class="ttx-rb">[[File:MapLayout Conquest2 AdvancetotheRhine ABRBSB.jpg|250px]]</div> | ||
| + | <div style="float: none;" class="ttx-sb">[[File:MapLayout Conquest2 AdvancetotheRhine ABRBSB.jpg|250px]]</div> | ||
| + | | | ||
| + | <div style="float: none;" class="ttx-ab">[[File:MapLayout Conquest3 AdvancetotheRhine ABRBSB.jpg|250px]]</div> | ||
| + | <div style="float: none;" class="ttx-rb">[[File:MapLayout Conquest3 AdvancetotheRhine ABRBSB.jpg|250px]]</div> | ||
| + | <div style="float: none;" class="ttx-sb">[[File:MapLayout Conquest3 AdvancetotheRhine ABRBSB.jpg|250px]]</div> | ||
| + | | | ||
| + | <div style="float: none;" class="ttx-ab">[[File:MapLayout Conquest4 AdvancetotheRhine ABRBSB.jpg|250px]]</div> | ||
| + | <div style="float: none;" class="ttx-rb">[[File:MapLayout Conquest4 AdvancetotheRhine ABRBSB.jpg|250px]]</div> | ||
| + | <div style="float: none;" class="ttx-sb">[[File:MapLayout Conquest4 AdvancetotheRhine ABRBSB.jpg|250px]]</div> | ||
| + | |- align="center" | ||
| + | | | ||
| + | <span class="ttx-ab">1.05 km x 1.05 km</span> | ||
| + | <span class="ttx-rb">1.05 km x 1.05 km</span> | ||
| + | <span class="ttx-sb">1.05 km x 1.05 km</span> | ||
| + | | | ||
| + | <span class="ttx-ab">1.05 km x 1.05 km</span> | ||
| + | <span class="ttx-rb">1.05 km x 1.05 km</span> | ||
| + | <span class="ttx-sb">1.05 km x 1.05 km</span> | ||
| + | | | ||
| + | <span class="ttx-ab">1.05 km x 1.05 km</span> | ||
| + | <span class="ttx-rb">1.05 km x 1.05 km</span> | ||
| + | <span class="ttx-sb">1.05 km x 1.05 km</span> | ||
| + | | | ||
| + | <span class="ttx-ab">1.05 km x 1.05 km</span> | ||
| + | <span class="ttx-rb">1.05 km x 1.05 km</span> | ||
| + | <span class="ttx-sb">1.05 km x 1.05 km</span> | ||
| + | |- | ||
| + | | | ||
| + | <span class="ttx-ab">In AB the capture point is around the statue / column in the west.</span> | ||
| + | <span class="ttx-rb">In RB the capture point is around the statue / column in the west.</span> | ||
| + | <span class="ttx-sb">In SB the capture point is around the statue / column in the west.</span> | ||
| + | | | ||
| + | <span class="ttx-ab">In AB the capture point is at the southeast intersection.</span> | ||
| + | <span class="ttx-rb">In RB the capture point is at the southeast intersection.</span> | ||
| + | <span class="ttx-sb">In SB the capture point is at the southeast intersection.</span> | ||
| + | | | ||
| + | <span class="ttx-ab">In AB the capture point is at the northeast intersection.</span> | ||
| + | <span class="ttx-rb">In RB the capture point is at the northeast intersection.</span> | ||
| + | <span class="ttx-sb">In SB the capture point is at the northeast intersection.</span> | ||
| + | | | ||
| + | <span class="ttx-ab">In AB the capture point is in the middle of the park in the east of the map.</span> | ||
| + | <span class="ttx-rb">In RB the capture point is in the middle of the park in the east of the map.</span> | ||
| + | <span class="ttx-sb">In SB the capture point is in the middle of the park in the east of the map.</span> | ||
| + | |} | ||
| + | |||
| + | ===Battle=== | ||
| + | <!--Put map screenshots, layout sizes and basic descriptions (where each cap point is) in table using ttx-ab, ttx-rb &ttx-sb spans appropriately. If a more detailed description is desired then insert it as a paragraph of text above the table--> | ||
| + | |||
| + | {| class="wikitable" style="width: 300px;" | ||
| + | ! Battle Mode - Map Layouts | ||
| + | |- align="center" | ||
| + | | | ||
| + | <div style="float: none;" class="ttx-ab">[[File:MapLayout Battle AdvancetotheRhine ABRBSB.jpg|300px]]</div> | ||
| + | <div style="float: none;" class="ttx-rb">[[File:MapLayout Battle AdvancetotheRhine ABRBSB.jpg|300px]]</div> | ||
| + | <div style="float: none;" class="ttx-sb">[[File:MapLayout Battle AdvancetotheRhine ABRBSB.jpg|300px]]</div> | ||
| + | |- align="center" | ||
| + | | | ||
| + | <span class="ttx-ab">1.05 km x 1.05 km</span> | ||
| + | <span class="ttx-rb">1.05 km x 1.05 km</span> | ||
| + | <span class="ttx-sb">1.05 km x 1.05 km</span> | ||
| + | |- | ||
| + | | | ||
| + | <span class="ttx-ab">In AB the capture points are located at the northeast and southeast intersections.</span> | ||
| + | <span class="ttx-rb">In RB the capture points are located at the northeast and southeast intersections.</span> | ||
| + | <span class="ttx-sb">In SB the capture points are located at the northeast and southeast intersections.</span> | ||
| + | |} | ||
==Strategy== | ==Strategy== | ||
| + | <!-- ''Describe what focus a team should have when spawning into the map'' --> | ||
| + | === Ground Gameplay === | ||
| + | This map favours lighter vehicles that can move around and change positions, however heavy vehicles will excel at flanking. The monument is a key location, where heavy vehicles can create a breach and light vehicles can exploit it. It is possible to drive on top of the monument, although this exposes you to enemy fire. | ||
| + | |||
| + | There are many potential angles of attack on the middle of the map, so the plentiful hard and soft cover should be used to protect against ambushes. High-profile vehicles can shoot over the low hills and rubble piles, and vehicles with good gun depression can take strong hull-down positions. The park area contains a lot of bushes which can obscure enemies, so extra care should be taken to be ambushed. | ||
| + | |||
| + | ==== <u>South Side</u> ==== | ||
| + | [[File:Advance to the Rhine, South Side, Key Positions.jpg|left|thumb|''Key sight lines and positions for the south team''.]] | ||
| + | ''[Left: Key sight lines and positions for the south team]'' | ||
| + | |||
| + | ''This is not an exhaustive list of positions. Always stay vigilant.'' | ||
| + | |||
| + | '''A: Behind the''' '''house''' '''that looks''' '''past the monument.''' | ||
| + | |||
| + | There are broken windows that you can easily shoot through. This location is best for lighter vehicles which can occupy it early. It can also be taken during to contest the A-Point during the middle of the game, which provides an angles opponents peeking the angle from behind the monument. | ||
| + | |||
| + | '''B: Behind the house on the corner of the road crossing the map.''' | ||
| + | |||
| + | Peeking around the building, or shooting through the rubble, will catch enemies crossing the northern major street and can be used throughout the game. | ||
| + | |||
| + | '''C: At the far corner of the middle section of the map.''' | ||
| + | |||
| + | Any vehicle can take this location, however care must be taken while travelling to it, as enemies often push to A using the major road and you can be flanked from the right. This position overlooks an entrance to A, as well as much of the major Northern road and the major road going from north home point to south home point (on the right). | ||
| + | |||
| + | '''D: Western side-streets''' | ||
| + | |||
| + | This position is very safe because it's so close to the spawn. It overlooks the entrances to A from the left side, although some sightlines are blocked which can allow enemies to flank the position. This position is ideal for light vehicles with fast reloads to take near the start of the game. | ||
| + | |||
| + | '''E: West side of the park''' | ||
| + | |||
| + | This position is very common because it's a point where two teams meet. It is possible to peek around the buildings or to destroy the the building with large-calibre or high-explosive rounds, which allows shooting through the rubble. Stabilised guns are key for players who want to peek around the corners as enemies will quickly return fire. If point A is lost, consider retreating to avoid being overrun. | ||
| + | |||
| + | '''F: East-side, north-south road''' | ||
| + | |||
| + | These positions are key to stop enemies flanking but can be tedious to hold, as enemies might be unwilling to peek. Well-armoured vehicles (e.g. The ''Ferdinand'', ''Jagdtiger'', and ''Ho-Ri Production/Prototype'') will be able to fully-exploit these positions, as their strong frontal armour will protect against enemy retaliation when peeking around the corner. These vehicles must still be wary of cannon-barrel and track damage. | ||
| + | |||
| + | '''G: Centre of the park''' | ||
| + | |||
| + | Vehicles with over 10 degrees of depression will excel in this position, as they can take a hull-down position and ambush enemies over the low-hills. Care must be taken, as enemies may attack from any direction, so players in this area should be prepared to retreat if team-support collapses. | ||
| + | ==== <u>North Side</u> ==== | ||
| + | [[File:Advance to the Rhine, North Side, Key Locations.jpg|thumb|Strategic locations to occupy for the North side. ''Not all possible locations shown.'']] | ||
| + | The image on the right showcases key positions that provide many sight lines and can help the South team win the game. Below I will discuss each position: | ||
| + | |||
| + | ''These are not by any means all available positions. There are dozens others that haven't been included, however most of them are either not applicable to early-mid game or they are too situational.'' | ||
| + | |||
| + | '''A: North-east corner of the A-Point''' | ||
| + | |||
| + | This location is great for any decently fast tank that wants to catch enemies entering into A from the right side. This position can be unsafe during mid-game when enemies have advanced, but before that the only threat comes from the front. | ||
| + | |||
| + | '''B: Western side-streets''' | ||
| + | |||
| + | Fast tanks can catch enemies coming from spawn here, though slower vehicles can take pass west of this position to counter the enemy approach. Small vehicles, or vehicles with strong turret armour, will be best in this position because enemy fire will be intense. | ||
| + | |||
| + | '''C: Centre of the map''' | ||
| + | |||
| + | This position is a counter to position C of the south side and overlooks the major southern road and the end of the park. It's possible to push across to the line of buildings on the right and shoot into the park or the vertical road. Players taking this positions should take cover or retreat if team-support collapses, as this position is quite exposed. | ||
| + | |||
| + | '''D: East of the park''' | ||
| + | |||
| + | Players taking this position put pressure on the enemy, but are exposed to many angles of attack. It provides views into the park and the enemy spawn. It is easy to relocate and defend the eastern north-road. | ||
| + | |||
| + | '''E: Eastern north-road''' | ||
| + | |||
| + | Heavy armour or good manoeuvrability is essential in this position. There will be heavy enemy fire, and flanking on the western side of this road is essential to avoid heavy casualties. | ||
| + | |||
| + | === Air Gameplay === | ||
| + | This map can be difficult for Close Air Support (CAS), because there are tall buildings around the map, and small buildings blocking the tanks below. Rockets are likely to be more effective than bombs, because bombs can get stuck in buildings and bounce off of weird rubble. | ||
| + | |||
| + | Enemies will often be grouped on the capture points; on the north and south ends of the ''eastern north-road''; in the middle of the map around the large rubble and park; anywhere around the monument and the left side of the map. | ||
| + | |||
| + | Self-Propelled Anti-Air (SPAA) vehicles will struggle to shoot around buildings, so CAS players should to spot your target at altitude, out of range of SPAAs, and stay low and fast for your strikes. | ||
== Media == | == Media == | ||
| − | <!--'' | + | <!-- ''Excellent additions to the article would be video guides, screenshots from the game, and photos.'' --> |
| − | {{ | + | |
| − | + | ;Videos | |
| + | {{Youtube-gallery|QvZ8h1CuM7s|'''The Shooting Range #314''' - ''Squadmates'' section at 08:15 discusses the map {{PAGENAME}}.|ZnopLjce42E|'''The Shooting Range #225''' - ''Map Guide'' section at 07:53 discusses the map {{PAGENAME}}.|_axMvzS97Sw|'''Map Review: Advance to the Rhine''' - ''War Thunder Official Channel''}} | ||
| − | == | + | == See also == |
| − | < | + | <!-- ''Links to the articles on the War Thunder Wiki that you think will be useful for the reader, for example:'' |
| + | * ''reference to related locations'' --> | ||
| − | + | * [[Berlin (Ground Forces)]] | |
| − | + | ||
| − | + | == External links == | |
| − | * | + | <!--''Paste links to sources and external resources, such as:'' |
| − | |||
| − | [ | ||
| − | == | ||
| − | ''Paste links to sources and external resources, such as:'' | ||
* ''topic on the official game forum;'' | * ''topic on the official game forum;'' | ||
| − | * ''other literature.'' | + | * ''encyclopedia page on location/battle;'' |
| + | * ''other literature.''--> | ||
| + | |||
| + | [[wt:en/devblog/current/805|[Devblog] Advance to the Rhine]] | ||
[[Category:Maps_and_missions]] | [[Category:Maps_and_missions]] | ||
[[Category:Ground forces maps]] | [[Category:Ground forces maps]] | ||
Latest revision as of 13:40, 22 September 2022
Contents
Overview
Advance to the Rhine is a ground forces map available in all modes. It is a "generalized recreation" of the city of Cologne, Germany and was added in Update 1.53 "Fire Storm". The fighting takes place on the city streets of Cologne and is almost entirely close-quarters. Most of the map is made up of bombed out buildings, with a large tower statue in the west, and an open park area in the east.
The full tank map is 1.05 km x 1.05 km, making it the smallest tank map in the game. The air battle area is 65km x 65km.
| Game Mode | AB | RB | SB |
|---|---|---|---|
| Domination | 1.05 km x 1.05 km | 1.05 km x 1.05 km | 1.05 km x 1.05 km |
| Conquest #1 | 1.05 km x 1.05 km | 1.05 km x 1.05 km | 1.05 km x 1.05 km |
| Conquest #2 | 1.05 km x 1.05 km | 1.05 km x 1.05 km | 1.05 km x 1.05 km |
| Conquest #3 | 1.05 km x 1.05 km | 1.05 km x 1.05 km | 1.05 km x 1.05 km |
| Conquest #4 | 1.05 km x 1.05 km | 1.05 km x 1.05 km | 1.05 km x 1.05 km |
| Battle | 1.05 km x 1.05 km | 1.05 km x 1.05 km | 1.05 km x 1.05 km |
Game Description
Teams fight for control over the bridges leading to the other side of the Rhine.
Historical Background
The devastated urban environment of "Advance to the Rhine" is based off the conditions of the city Cologne in Germany.
During World War II, Cologne was the Military Area Command Headquarters for the Military District of Münster. The city was subjected to multiple air raids by Western Allies bombers throughout the war. In March 1945, the city was the target of the U.S. First Army in their path towards the Rhine River. It was here that a famous tank encounter occurred that was captured by Signal Corps member Jim Bates. A Panther tank taking position near the Cologne Cathedral gave the Americans heavy resistance, knocking out a M4A1 (76) lead in a tank platoon. Noting the heavy fire from a high-velocity gun, the crew of a M26 Pershing, commandeered by Sergeant Early, maneuvered around the Panther and in a meet-up with both of their guns pointing at each other, the Pershing fired off the first shot, hitting the Panther straight in the hull side. The Pershing fired two more shots as the Panther crew bailed out of their burning tank, ending with a catastrophic explosion of the Panther's ammunition.
The German garrison in Cologne soon surrendered to the Allies around March 7th. This freed up many American soldiers to exploit a new breakthrough discovered at the German city of Remagen, the still-standing Lundendorff Bridge over the Rhine.
Notable Landmarks
- The large tower statue as seen in the map's thumbnail is the landmark in most game modes for a flag point.
Map configuration
| Change Maps by Game Modes | ||
|---|---|---|
| | ||
At present, this map has the same layouts in AB, RB and SB.
Domination
| Domination Mode - Map Layouts |
|---|
|
1.05 km x 1.05 km 1.05 km x 1.05 km 1.05 km x 1.05 km |
|
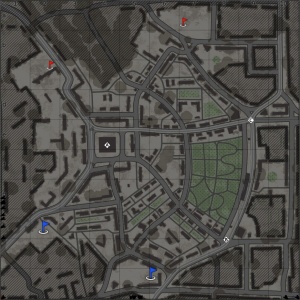
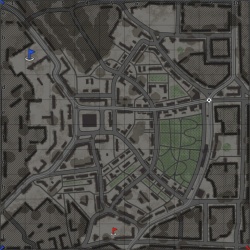
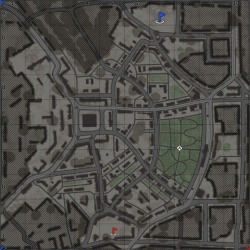
In AB point A is around the statue / column in the west, point B is at the southeast intersection, and C is at the northeast intersection. In RB point A is around the statue / column in the west, point B is at the southeast intersection, and C is at the northeast intersection. In SB point A is around the statue / column in the west, point B is at the southeast intersection, and C is at the northeast intersection. |
Conquest
| Conquest Mode - Map Layouts | |||
|---|---|---|---|
| Conquest #1 | Conquest #2 | Conquest #3 | Conquest #4 |
|
1.05 km x 1.05 km 1.05 km x 1.05 km 1.05 km x 1.05 km |
1.05 km x 1.05 km 1.05 km x 1.05 km 1.05 km x 1.05 km |
1.05 km x 1.05 km 1.05 km x 1.05 km 1.05 km x 1.05 km |
1.05 km x 1.05 km 1.05 km x 1.05 km 1.05 km x 1.05 km |
|
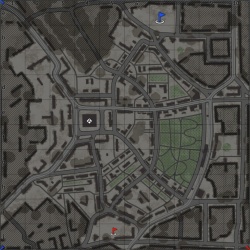
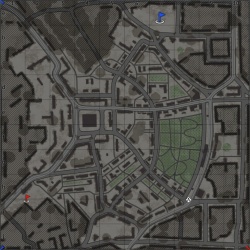
In AB the capture point is around the statue / column in the west. In RB the capture point is around the statue / column in the west. In SB the capture point is around the statue / column in the west. |
In AB the capture point is at the southeast intersection. In RB the capture point is at the southeast intersection. In SB the capture point is at the southeast intersection. |
In AB the capture point is at the northeast intersection. In RB the capture point is at the northeast intersection. In SB the capture point is at the northeast intersection. |
In AB the capture point is in the middle of the park in the east of the map. In RB the capture point is in the middle of the park in the east of the map. In SB the capture point is in the middle of the park in the east of the map. |
Battle
| Battle Mode - Map Layouts |
|---|
|
1.05 km x 1.05 km 1.05 km x 1.05 km 1.05 km x 1.05 km |
|
In AB the capture points are located at the northeast and southeast intersections. In RB the capture points are located at the northeast and southeast intersections. In SB the capture points are located at the northeast and southeast intersections. |
Strategy
Ground Gameplay
This map favours lighter vehicles that can move around and change positions, however heavy vehicles will excel at flanking. The monument is a key location, where heavy vehicles can create a breach and light vehicles can exploit it. It is possible to drive on top of the monument, although this exposes you to enemy fire.
There are many potential angles of attack on the middle of the map, so the plentiful hard and soft cover should be used to protect against ambushes. High-profile vehicles can shoot over the low hills and rubble piles, and vehicles with good gun depression can take strong hull-down positions. The park area contains a lot of bushes which can obscure enemies, so extra care should be taken to be ambushed.
South Side
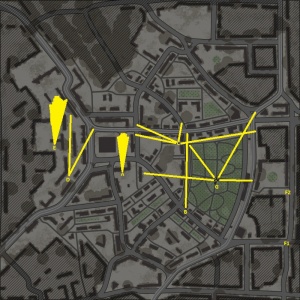
[Left: Key sight lines and positions for the south team]
This is not an exhaustive list of positions. Always stay vigilant.
A: Behind the house that looks past the monument.
There are broken windows that you can easily shoot through. This location is best for lighter vehicles which can occupy it early. It can also be taken during to contest the A-Point during the middle of the game, which provides an angles opponents peeking the angle from behind the monument.
B: Behind the house on the corner of the road crossing the map.
Peeking around the building, or shooting through the rubble, will catch enemies crossing the northern major street and can be used throughout the game.
C: At the far corner of the middle section of the map.
Any vehicle can take this location, however care must be taken while travelling to it, as enemies often push to A using the major road and you can be flanked from the right. This position overlooks an entrance to A, as well as much of the major Northern road and the major road going from north home point to south home point (on the right).
D: Western side-streets
This position is very safe because it's so close to the spawn. It overlooks the entrances to A from the left side, although some sightlines are blocked which can allow enemies to flank the position. This position is ideal for light vehicles with fast reloads to take near the start of the game.
E: West side of the park
This position is very common because it's a point where two teams meet. It is possible to peek around the buildings or to destroy the the building with large-calibre or high-explosive rounds, which allows shooting through the rubble. Stabilised guns are key for players who want to peek around the corners as enemies will quickly return fire. If point A is lost, consider retreating to avoid being overrun.
F: East-side, north-south road
These positions are key to stop enemies flanking but can be tedious to hold, as enemies might be unwilling to peek. Well-armoured vehicles (e.g. The Ferdinand, Jagdtiger, and Ho-Ri Production/Prototype) will be able to fully-exploit these positions, as their strong frontal armour will protect against enemy retaliation when peeking around the corner. These vehicles must still be wary of cannon-barrel and track damage.
G: Centre of the park
Vehicles with over 10 degrees of depression will excel in this position, as they can take a hull-down position and ambush enemies over the low-hills. Care must be taken, as enemies may attack from any direction, so players in this area should be prepared to retreat if team-support collapses.
North Side
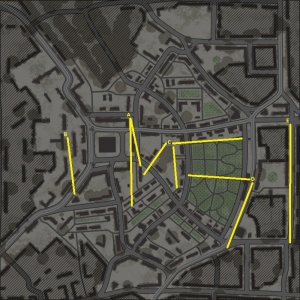
The image on the right showcases key positions that provide many sight lines and can help the South team win the game. Below I will discuss each position:
These are not by any means all available positions. There are dozens others that haven't been included, however most of them are either not applicable to early-mid game or they are too situational.
A: North-east corner of the A-Point
This location is great for any decently fast tank that wants to catch enemies entering into A from the right side. This position can be unsafe during mid-game when enemies have advanced, but before that the only threat comes from the front.
B: Western side-streets
Fast tanks can catch enemies coming from spawn here, though slower vehicles can take pass west of this position to counter the enemy approach. Small vehicles, or vehicles with strong turret armour, will be best in this position because enemy fire will be intense.
C: Centre of the map
This position is a counter to position C of the south side and overlooks the major southern road and the end of the park. It's possible to push across to the line of buildings on the right and shoot into the park or the vertical road. Players taking this positions should take cover or retreat if team-support collapses, as this position is quite exposed.
D: East of the park
Players taking this position put pressure on the enemy, but are exposed to many angles of attack. It provides views into the park and the enemy spawn. It is easy to relocate and defend the eastern north-road.
E: Eastern north-road
Heavy armour or good manoeuvrability is essential in this position. There will be heavy enemy fire, and flanking on the western side of this road is essential to avoid heavy casualties.
Air Gameplay
This map can be difficult for Close Air Support (CAS), because there are tall buildings around the map, and small buildings blocking the tanks below. Rockets are likely to be more effective than bombs, because bombs can get stuck in buildings and bounce off of weird rubble.
Enemies will often be grouped on the capture points; on the north and south ends of the eastern north-road; in the middle of the map around the large rubble and park; anywhere around the monument and the left side of the map.
Self-Propelled Anti-Air (SPAA) vehicles will struggle to shoot around buildings, so CAS players should to spot your target at altitude, out of range of SPAAs, and stay low and fast for your strikes.
Media
- Videos


