Modifying existing units in the game is an intermediate step between creating your own missions in MissionEditor and creating your own models on the way to mastering the creation of complex modifications of the game…
This method (tutorial) can be used for many purposes, but as practice shows, the area is often reduced to either just getting new unusual emotions/creating memes/content, or for testing in-game mechanics.
For example, to give an MBT better APDS and APS, to test the dynamics of a tank destroyer with additional 4 hp/t, or using only existing models to test the theoretical effectiveness of HEAT PTABs!
Perhaps, it is necessary to specify the limitations at once:
- The game allows players to use custom units only with those models that are in the category
gameData\units, there are tanks and ship models. Since aviation models are located ingamedata\flightmodels, if you try to use them by the player, the game will simply refuse to start the mission. However, this limitation does not apply to AI units, but the expediency of modifying them without direct control over the unit is very questionable. Just remember, it is possible, but almost useless. - You also won’t be able to add a second turret to a single turret tank. The game is extremely demanding to respect the hierarchy of the model, as well as the presence of DM modules for engines, turrets, guns… In the best case scenario, the game will simply crash. So you need to know the measure.
- And no, you can’t deform, change or delete a part of the model. For this, there is another method called
objectgroupsandinclude, which we will talk about another time. - And lastly, any modifications except custom camouflages, sights and sounds do not work in multiplayer. But even if you have somehow miraculously succeeded — it’s called cheating!
You will need
- Notepad++ (or any other text editor) — universal text editor, the main advantage compared to the usual notepad longer memory of previous actions. It is very desirable to install a simple plugin BracketsCheck, which will help you quickly detect the missing bracket, and prevent the game from crashing.
- Weapons, units and sensors to be used.
So, let’s get started. Let’s say I want to give the R3 T20 an APDS shell, an extra 70hp, and a two-plane stabilizer.
Step One: Getting the original unit .blk
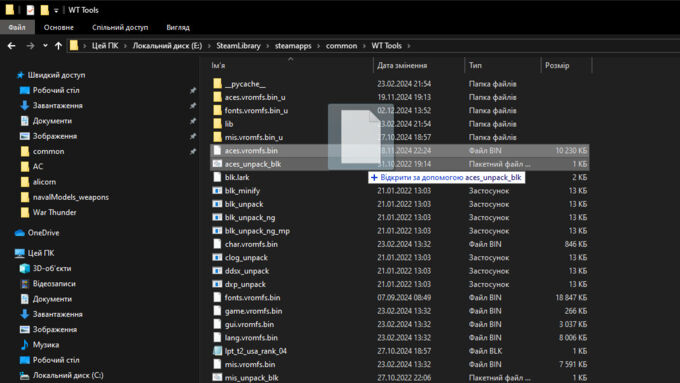
First, you need to copy the aces.vromfs.bin file from your game folder, and paste it into your WT Tools folder.
After, decompile this file using the aces_unpack_blk program.
The process takes some time, but at the end will be created folder aces.vromfs.bin_u, which can already be used.
Use the search bar to find the file r3_t20_fa.blkx and open it in Notepad++. That’s all for now.
Step two: creating a unit .blk
Since we can’t change the contents of the game files, we need a new unit file. So we need to create a new .blk in the WarThunder\content\pkg_local\gameData\units\tankModels\userVehicles folder using any other available file, be it a mission, config or a file created by WT Tools. If any of the folders are missing on the path, create them yourself. The name of the file must be the in-game name of one of the reserve tanks of any country. For example, ussr_bt_7.blk or sw_strv_m31.blk
Open the new file in the editor, and delete all the contents. Now we need to copy all the contents of r3_t20_fa.blkx into the new file. In my case, it is sw_strv_m31.blk
Step three: modify the unit.
The structure of the block files used in the game is characterized by clearness and logic. Even without studying special manuals or hints, any user with a basic knowledge of English can easily understand which variable is responsible for this or that function.
For example, it is easy to understand that the variable model:t="" is responsible for the 3D model used, the VehiclePhys{} block is responsible for the physical parameters of the unit, and the cockpit{} block is responsible for the position and characteristics of the player’s camera controlling the unit. That’s why I don’t see the point of writing a detailed guide about hundreds of variables and functions inside the file — I’m sure that the user will be able to figure it all out on his own.
So, open the unit file and look for the commonWeapons block. Since the original unit has only one autocannon, the section looks like this:
commonWeapons{

  Weapon{
    trigger:t="gunner0" /* Trigger. In other words, the fire button. */
    blk:t="gameData/Weapons/groundModels_weapons/20mm_Oerlikon_KAD_B17_user_cannon.blk" /* Path to the file of the used autocannon. */
    emitter:t="bone_gun_barrel"
    flash:t="emtr_gun_flame"
    recoilMultiplier:r=0.5 /* Barrel recoil multiplier. */
    useEmitter:b=yes
    shellCasingEmitter:t="emtr_shell"
    shellCasingMesh:t="auto_cannon_cartridge_case"
    openHatchTime:r=0.0 /* Time for opening the shell ejection hatch; Absent in this example. */
    shellCasingLifeTime:r=5.0
    shellCasingImpulse:p3=1.0, 0.0, 0.0
    linkShellCasingToGun:b=yes
    recoilOffset:r=0.1 /* Barrel recoil distance in meters. */
    jammedReloadTime:r=15.0 /* Reload time in case of cannon jamming. */
    barrelDP:t="gun_barrel_dm" /* DM model for barrel damage. */
    breechDP:t="cannon_breech_dm" /* DM model for breech damage. */
    defaultYaw:r=0.0 /* Default horizontal position of the cannon. */
    defaultPitch:r=0.0 /* Default vertical position of the cannon. */
    speedYaw:r=45.0 /* Horizontal aiming speed of the cannon. */
    speedPitch:r=30.0 /* Vertical aiming speed of the cannon. */
    bullets:i=600 /* Number of ammunition rounds. */
    fireConeAngle:r=5.0
    ChainfireTime:r=0.5
    DelayAfterShoot:r=2.0
    accuracyAir:r=1.5
    accuracyGnd:r=0.0
    errMeasureVel:r=0.0
    errMeasureVelFast:r=0.0
    errMeasureVelFwdShift:r=1.5
    errMeasureVelDir:r=0.0
    errTargettingOn100kmph:r=0.0
    errTargetting:r=3.0
    errExplTime:r=0.0
    forestallTime:r=0.1

    turret{
      head:t="bone_turret"
      gun:t="bone_gun"
      barrel:t="bone_gun_barrel"
      gunnerDm:t="gunner_dm"
      loaderDm:t="loader_01_dm"
    }

    limits{
      yaw:p2=-180.0, 180.0 /* Horizontal aiming restriction of the cannon. In this example, the cannon can rotate a full 360 degrees. */
      pitch:p2=-10.0, 60.0 /* Vertical aiming restriction of the cannon. */
    }

    gunStabilizer{
      hasVerticalGunFreeMode:b=no
      hasHorizontal:b=yes /* Presence of a horizontal gun stabilizer. */
      horizontalOmegaMult:r=1.0
      horizontalSpeedLimitKPH:r=25.0 /* Maximum operating speed of the horizontal gun stabilizer in km/h. */
      hasVertical:b=yes /* Presence of a vertical gun stabilizer. */
      verticalOmegaMult:r=1.0
      verticalSpeedLimitKPH:r=25.0 /* Maximum operating speed of the vertical gun stabilizer in km/h. */
      speedFromVehicleVerticalMult:r=-1.0

      errorKPHToDegrees{
        row:p2=5.0, 0.0
        row:p2=10.0, 0.015
        row:p2=15.0, 0.02
        row:p2=20.0, 0.1
        row:p2=25.0, 0.3
      }
    }
  }

  hideNodes{
    node:t="ex_decor_l_01"
    node:t="ex_decor_r_01"
  }
}

weapon_presets{

  preset{
    name:t="it_oto_r3_t20_fa_default"
    blk:t="gameData/units/tankModels/weaponPresets/it_oto_r3_t20_fa_default.blk" /* Path to the weapon preset. Honestly, the file is empty and useless, but without it, the weapon won't work at all. */
  }
}
Let’s get started.
First, I will increase the maximum speed of the gun stabilizer by changing the parameters horizontalSpeedLimitKPH:r and verticalSpeedLimitKPH:r from 25km/h to 125km/h.
Now for the APDS. I could just copy the path to the .blk of the Dardo autocannon, but since I promised in the title to talk about custom weapons, we’ll just add an APDS shell with twice the armor penetration of the standard armor-piercing projectile…
To do this, I search in the decompiled files 20mm_Oerlikon_KAD_B17_user_cannon.blkx, copy the contents to a new file in the directory WarThunder\content\pkg_local\gameData\weapons\groundmodels_weapons, call it better_20mm.blk, and save.
Now I open the file and immediately see several variables:
cannon:b=no /* Is it a cannon? */
weaponType:i=3 /* Weapon type and its usage priority. */
bUseHookAsRel:b=yes
emitColor:p3=1.0, 1.0, 0.0
emitI:r=10.0
emitR:r=3.0
emitTime:r=0.03
aimMinDist:r=0.1
aimMaxDist:r=2000.0
maxDeltaAngle:r=0.08 /* Horizontal spread. */
maxDeltaAngleVertical:r=0.08 /* Vertical spread. */
shotFreq:r=16.6 /* Rate of fire in rounds per minute. */
shotFreqRndK:r=0.15
traceFreq:i=3 /* Frequency of tracer rounds in a burst. In this example, every third shot is a tracer. */
bEnablePause:b=no
bullets:i=600 /* Number of rounds. */
bulletsCluster:i=1 /* Number of rounds per shot. */
reloadTime:r=7.0 /* Reload time. */
bulletsCartridge:i=120 /* Number of rounds in a burst. */
fxType:t="muzzle_ground_20mm"
fxMultipleSpawn:b=yes
shouldCollideWithRendinsts:b=yes
sound_path:t="tanks/weapon_tanks/cannons"
sound_pathStudio:t="ground/weapon/cannons"
sound:t="20mm_oerlikon_kad_b17"
sound_inside:t="20mm_oerlikon_kad_b17_interior"
soundLoop:b=yes
sfxReloadBullet:t="grd_cannon_belt_reload"
isBulletBelt:b=no

overheat{ /* Overheat settings. 9 seconds of firing will result in 50% jamming. */
  overheat:p2=4.0, 0.0
  overheat:p2=6.0, 0.1
  overheat:p2=9.0, 0.5
}

visualOverheat{ /* Visual representation settings for the overheated barrel. */
  shotsToMax:i=120
  cooldownTime:r=8.0
  cooldownDelay:r=1.8
  fxType:t="smoke_overheat_med"
  decalOffset:p3=0.0, 0.0, 0.0
  decalSize:p3=1.8, 2.2, 2.2
}
But I don’t want to change anything here. While I’m scrolling down, I find a bullet with settings similar to armor-piercing:
  bullet{
    bulletCount:i=10 /* Number of rounds in the belt. Apparently a placeholder. */
    mass:r=0.111 /* Mass of the projectile. */
    caliber:r=0.02 /* Caliber in meters. In this case, 20mm. */
    speed:r=1100.0 /* Initial velocity in m/s. */
    maxDistance:r=5000.0 /* Maximum firing range. */
    damageMass:r=0.077
    damageCaliber:r=0.012
    normalizationPreset:t="apcr"
    ricochetPreset:t="apcr"
    groundRicochetPreset:t="apcr_ground"
    secondaryShattersPreset:t="ap_small_arms"
    stabilityThreshold:r=0.05 /* Stability multiplier, affecting accuracy in flight. */
    stabilityCaliberToArmorThreshold:r=5.0
    stabilityReductionAfterRicochet:r=0.5
    stabilityReductionAfterPenetration:r=0.15
    bulletType:t="apcr_t" /* Type of projectile. */
    slopeEffectPreset:t="apcr"
    fresnel:p3=0.23, 0.1, 2.0
    shellAnimation:t="video/shells_animations/apcr_t_shell.ivf"
    breakingArmorThicknessEffective:b=yes
    breakingArmorThickness:p2=2.0, 40.0
    breakingCriticalSpeed:r=700.0
    breakingDistance:r=0.02
    relativeVelHitShift:p2=300.0, 1000.0
    relativeVelArmorShift:p2=200.0, 1000.0
    selfDestructionFx:t="explosion_air_selfexplosion_small"
    explosionEffect:t="hit_19_27mm_metal_ap"
    groundCollisionEffect:t="hit_19_27mm_dirt_ap"
    ricochetEffect:t="hit_19_27mm_metal_ap"
    waterCollisionEffect:t="hit_19_27mm_water"
    waterRicochetEffect:t="hit_19_27mm_water"
    groundRicochetEffect:t="hit_19_27mm_metal_ap"

    stabilityRicochetModifier{ /* Ricochet chance multipliers at different angles. */
      mod1:p2=0.0, 0.05
      mod2:p2=20.0, 0.1
      mod3:p2=30.0, 0.2
      mod3:p2=45.0, 0.3
    }

    hitpower{ /* Impulse multiplier transmitted to the target at different ranges. */
      HitPower0m:p2=1.0, 300.0
      HitPower1000m:p2=0.7, 1000.0
      HitPower1500m:p2=0.6, 1500.0
      HitPower2500m:p2=0.6, 2500.0
      HitPower10000m:p2=0.5, 10000.0
    }

    damage{

      kinetic{
        damageType:t="generic"
        demarrePenetrationK:r=0.65 /* Ideal penetration of the projectile in mm. Adjusted by various parameters and distance. */
        demarreSpeedPow:r=1.43
        demarreMassPow:r=0.71
        demarreCaliberPow:r=1.07
      }

      breakingScaleByArmor{
        mod0:p2=5.0, 1.0
        mod1:p2=10.0, 0.8
        mod2:p2=40.0, 0.5
      }

      breakingScaleByAir{
        mod0:p2=0.05, 1.0
        mod1:p2=0.2, 0.7
        mod2:p2=0.5, 0.5
      }
    }
  }
I decided to change the following parameters:
- Increased the initial velocity
speed:r=to 1300 m/s; - Changed
bulletType:t="apcr_t"tobulletType:t="apds_fs_long_tank", changing the 3d model of the projectile; - And doubled the value of projectile penetration
demarrePenetrationK:r=from 65 mm to 130 mm; gettingdemarrePenetrationK:r=1.3; - Now go back to the unit file, and replace
20mm_Oerlikon_KAD_B17_user_cannon.blkwith custombetter_20mm.blk; - One last thing. Find the
engine{}block and the linehorsePowers:r=95.0, and add 70 horsepower to the engine. It should behorsePowers:r=165.0
Save all the files and move on to testing
For this purpose, you can create a new mission or use an existing one. You can learn more about creating them here.
It is probably worth mentioning that the mission editor does not even know about the existence of any units other than the official ones, so you will still have to edit the mission file manually. Here is an example of unit settings:
  tankModels{
    name:t="ultra_R3_T20"
    tm:m=[[1, 0, 0] [0, 1, 0] [0, 0, 1] [308.818, 156.33, 549.329]]
    unit_class:t="userVehicles/sw_strv_m31" /* Path to the custom unit. */
    objLayer:i=1
    closed_waypoints:b=no
    isShipSpline:b=no
    shipTurnRadius:r=100
    weapons:t="it_oto_r3_t20_fa_default" /* Weapon preset file. */
    bullets0:t=""
    bullets1:t=""
    bullets2:t=""
    bullets3:t=""
    bulletsCount0:i=200 /* Ammunition count. */
    bulletsCount1:i=0
    bulletsCount2:i=0
    bulletsCount3:i=0
    crewSkillK:r=0
    applyAllMods:b=yes

    props{
      army:i=1
      count:i=1
      formation_type:t="rows"
      formation_div:i=3
      formation_step:p2=2.5, 2
      formation_noise:p2=0.1, 0.1
    }

    way{}
  }
You can test, enjoy!


