Wirbelwind

From War Thunder Wiki
Jump to: navigation, search
Rank VI USA | Premium | Golden Eagles
A-10A Thunderbolt (Early)
Wirbelwind
germ_flakpanzer_iv_wirbelwind.png
GarageImage Wirbelwind.jpg
ArtImage Wirbelwind.png
Wirbelwind
AB RB SB
4.7 3.7 3.7
Class:
Research:26 000 Specs-Card-Exp.png
Purchase:76 000 Specs-Card-Lion.png
Show in game

Description

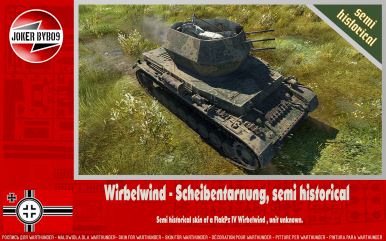
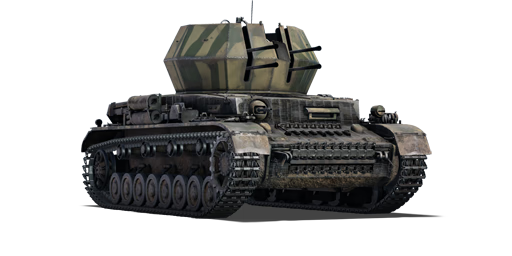
The Flakpanzer IV "Wirbelwind" (Sd.Kfz. Index: Sd.Kfz. 161/4) is the first variant of the Flakpanzer IV self-propelled anti-aircraft gun family. The German military forces were less interested in developing self-propelled anti-aircraft guns in the early years of World War II, but as the Allies gained air superiority, the need for more mobile and better-armed self-propelled anti-aircraft guns grew. SS-Hauptsturmführer Karl Wilhelm Krause of the 12th SS Panzer Division Hitlerjugend came up with the Flakpanzer IV Wirbelwind concept in the early summer of 1944. He presented the idea to SS-Obersturmbannführer Max Wünsche, commanding officer of the 12th SS Panzer Regiment, and Adolf Hitler approved it. The Panzer IV medium tank chassis was used to mount an open-top, nine-sided turret housing a quadruple mount of 20 mm Flugzeugabwehrkanone 38 autocannon (Flakvierling 38). A closed-top design would have been preferable, but due to the heavy smoke generated by the main armament, this was not possible. The turret's shape earned it the nickname Keksdose ("biscuit tin"). Ostbau Werke in Sagan, Silesia, was primarily responsible for its construction.

Introduced in Update 1.43, the Flakpanzer IV "Wirbelwind" is one of the best self-propelled anti-air vehicles in its class. Given its high fire rate, this machine effectively spews out a stream of fragmentation rounds, and any plane unfortunate enough to be hit by the waves of shells will burst into flames if not being completely destroyed. However, crews inside the turret are only marginally protected by thin armour, so it is critical to keep an eye out for enemy aircraft strafing. Lastly, armour-piercing ammunition belts are also available to destroy lightly armoured targets.

General info

Survivability and armour

Armourfront / side / back
Hull30 / 30 / 20
Turret16 / 16 / 16
Crew5 people
Visibility104 %

The armour surrounding the turret can provide a small amount of protection against plane machine guns, but the amount of armour on its turret is still low and it has an open top so it's best to destroy the attacking plane quickly or move out of the way.

Armour type:

  • Rolled homogeneous armour
Armour Front Sides Rear Roof
Hull 80 mm (11°) Front plate
20 mm (72°) Front glacis
80 mm (11-12°) Lower glacis
30 mm 30 mm (4-15°) 10 mm
Turret 16 mm (19-24°) 16 mm (21-27°) 16 mm (17-22°) N/A

Notes:

  • Suspension wheels are 15 mm thick and tracks are 20 mm thick.
  • Some track links are placed on the front glacis, adding 15 mm armour at their area.
  • Belly armour is 10 mm thick.

Mobility

Speedforward / back
AB43 / 8 km/h
RB and SB39 / 8 km/h
Number of gears6 forward
1 back
Weight25.0 t
Engine power
AB572 hp
RB and SB300 hp
Power-to-weight ratio
AB22.9 hp/t
RB and SB12.0 hp/t
Game Mode Max Speed (km/h) Weight (tons) Engine power (horsepower) Power-to-weight ratio (hp/ton)
Forward Reverse Stock Upgraded Stock Upgraded
Arcade 43 8 25 426 572 17.04 22.88
Realistic 39 8 265 300 10.6 12

Modifications and economy

Repair costBasic → Reference
AB1 475 → 1 898 Sl icon.png
RB1 118 → 1 438 Sl icon.png
SB1 689 → 2 173 Sl icon.png
Total cost of modifications24 600 Rp icon.png
44 600 Sl icon.png
Talisman cost1 100 Ge icon.png
Crew training22 000 Sl icon.png
Experts76 000 Sl icon.png
Aces400 Ge icon.png
Research Aces320 000 Rp icon.png
Reward for battleAB / RB / SB
90 / 100 / 150 % Sl icon.png
142 / 142 / 142 % Rp icon.png
Modifications
Mobility Protection Firepower
Mods new tank traks.png
Tracks
Research:
1 200 Rp icon.png
Cost:
2 200 Sl icon.png
105 Ge icon.png
Mods new tank suspension.png
Suspension
Research:
1 100 Rp icon.png
Cost:
2 000 Sl icon.png
95 Ge icon.png
Mods new tank break.png
Brake System
Research:
1 100 Rp icon.png
Cost:
2 000 Sl icon.png
95 Ge icon.png
Mods new tank filter.png
Filters
Research:
2 100 Rp icon.png
Cost:
3 800 Sl icon.png
180 Ge icon.png
Mods new tank transmission.png
Transmission
Research:
2 000 Rp icon.png
Cost:
3 600 Sl icon.png
175 Ge icon.png
Mods new tank engine.png
Engine
Research:
2 000 Rp icon.png
Cost:
3 600 Sl icon.png
175 Ge icon.png
Mods tank tool kit.png
Improved Parts
Research:
1 200 Rp icon.png
Cost:
2 200 Sl icon.png
105 Ge icon.png
Mods extinguisher.png
Improved FPE
Research:
1 100 Rp icon.png
Cost:
2 000 Sl icon.png
95 Ge icon.png
Mods tank reinforcement ger.png
Crew Replenishment
Research:
2 100 Rp icon.png
Cost:
3 800 Sl icon.png
180 Ge icon.png
Mods new tank horizontal aiming.png
Horizontal Drive
Research:
1 200 Rp icon.png
Cost:
2 200 Sl icon.png
105 Ge icon.png
Mods tank ammo.png
20mm_kwk_30_HE_ammo_pack
Research:
1 200 Rp icon.png
Cost:
2 200 Sl icon.png
105 Ge icon.png
Mods aa cannon.png
Adjustment of Fire
Research:
1 100 Rp icon.png
Cost:
2 000 Sl icon.png
95 Ge icon.png
Mods tank ammo.png
20mm_kwk_30_AP_ammo_pack
Research:
1 100 Rp icon.png
Cost:
2 000 Sl icon.png
95 Ge icon.png
Mods new tank vertical aiming.png
Elevation Mechanism
Research:
2 100 Rp icon.png
Cost:
3 800 Sl icon.png
180 Ge icon.png
Mods art support.png
Artillery Support
Research:
2 000 Rp icon.png
Cost:
3 600 Sl icon.png
175 Ge icon.png
Mods tank ammo.png
20mm_kwk_30_APCR_ammo_pack
Research:
2 000 Rp icon.png
Cost:
3 600 Sl icon.png
175 Ge icon.png

If the Wirbelwind is to be used in an anti-air role, mobility modules are not as important as the Sprgr. modification, which gives the vehicle access to a purely high-explosive ammo belt. The Horizontal Drive and Elevation Mechanism modules are also useful.

The PzGr 40 modification gives this vehicle a decent anti-tank capability, although this upgraded ammo belt will still not be able to penetrate heavily armoured targets.

Armaments

Main armament

4 x 20 mm FlaK38 cannon
Ammunition3 200 rounds
Belt capacity20 rounds
Reloadbasic crew → aces
3.9 → 3.0 s
Fire rate480 shots/min
Vertical guidance-10° / 90°
Main article: FlaK38 (20 mm)
20 mm FlaK38 (x4) Turret rotation speed (°/s) Reloading rate (seconds)
Mode Capacity (Belt) Fire rate Vertical Horizontal Stabilizer Stock Upgraded Full Expert Aced Stock Full Expert Aced
Arcade 3,200 (20) 1,920 -10°/+90° ±180° N/A 52.8 73.1 88.8 98.2 104.5 5.20 4.60 4.24 4.00
Realistic 35.7 42.0 51.0 56.4 60.0

Ammunition

  • Default: API-T · HEFI-T* · HEFI-T* · HEFI-T* - These are adapted for the anti-air role with much less performance against enemy tanks. Focus on the AA role with this belt until others are researched. You can still damage and take out lightly armoured vehicles in self-defence as last resort.
  • Sprgr.: HEFI-T* - These are absolutely devastating in the anti-air role.
  • PzGr: API-T - They do decent damage against lightly armoured vehicles as well as planes. When targeting enemy vehicles, focus on weak spots like the rear or the sides.
  • PzGr 40: HVAP-T · API-T - Best penetrating belt of this vehicle: devastating for enemy vehicles. However, the post-penetration damages are very poor and the penetration power drops quickly over distance. Go for close combat and target modules and crew members for increased efficiency. Like any ACPR shell, it is not very effective against angled armour.

Since every bullet is a tracer, it helps aiming at aircraft but detectability is also greatly increased.

Penetration statistics
Ammunition Penetration @ 0° Angle of Attack (mm)
10 m 100 m 500 m 1,000 m 1,500 m 2,000 m
HEFI-T* 5 4 3 2 2 2
API-T 37 34 23 14 9 6
HVAP-T 48 45 31 20 13 8
Shell details
Ammunition Velocity
(m/s)
Projectile
mass (kg)
Fuse delay
(m)
Fuse sensitivity
(mm)
Explosive mass
(TNT equivalent) (g)
Ricochet
0% 50% 100%
HEFI-T* 900 0.12 0.1 0.1 10.2 79° 80° 81°
API-T 800 0.15 - - - 47° 60° 65°
HVAP-T 1,050 0.1 - - - 66° 70° 72°

Ammo racks

Ammo racks of the Wirbelwind
Full
ammo
1st
rack empty
2nd
rack empty
3rd
rack empty
4th
rack empty
5th
rack empty
6th
rack empty
7th
rack empty
8th
rack empty
Visual
discrepancy
160 36 (+128) 32 (+128) 24 (+136) 20 (+140) 16 (+144) 12 (+148) (+152) (+160) Yes

Notes:

  • Clips with 20 rounds each (3,200 rounds max)
  • Visual discrepancy: ammunition clips in turret do not empty.

Usage in battles

Being the first anti-aircraft of a modified Panzer IV, it is superior to the previous vehicle, the 3.7-cm Flak 36 auf Selbstfahrlafette Sd.Kfz. 6/2 in many areas and has little to none disadvantages. One notable disadvantage would be the lack of penetration of API-T rounds compared to the prior 3,7 cm cannon. It is recommended to stay away from areas of combat as your quad 20's will do practically nothing against the front plates of heavier armoured enemies at its rank, against which its only defence is to blind enemy vehicles with a barrage of fire and hope allies will neutralize the threat. However, firing a stream of HVAP-T rounds into an enemy's side plates can lead to a very fast elimination.

In terms of advantages with the 20 mm autocannons, the quad-mount gives the Wirbelwind the ability to fire a lethal stream of bullets at any pilot who wanders into your sights.

Anti-Aircraft

While in tank guns, dispersion (the MOA cone that is used to determine accuracy) is something that is ideally kept to a minimum, this vehicle benefits from it by having shots spread out in a sort of "shotgun" effect, rather than having four separate beams of projectiles. This means that if you can get your lead point right, your odds of shredding aircraft with even a momentary burst is exceptional compared to other types of AA present at the ranks that you will be operating this vehicle. Unfortunately, this rapid-fire ability is hindered by the 20 round magazine capacity for each cannon (for a total of 80 rounds), meaning that it is best to fire 3-5 round bursts to make effective use of what ammunition you have and your magazine size. This is one of the few areas the Wirbelwind is caught lacking, the others being an open crew compartment roof and the fact that your SPAA houses most of its crew in a thinly armoured turret.

Some of these disadvantages with the Wirbelwind can be mitigated by working with another SPAA. Two Wirbelwinds about 30m apart prove a daunting combination to enemy aircraft as their crossed streams maximize their ability to hit and it is very hard to neutralise both in one go. Besides doubling their spotting ability — when one sees the other firing, he or she will be quick to acquire the same target and proceed to severely worsen the aeroplane's day. For this reason, as a matter of etiquette, do not fire into the air if you do not see anyone, so as not to mislead your teammates.

Attack

It is highly discouraged to use the Wirbelwind aggressively since it can be hard to always get such a favourable engagement (and also it is not the SPAA's job to do so). However, should a player choose such an attack plan, they should consider either being supported by friendly tanks as an additional gun or cover, or flanking wide and make effective use of cover and concealment against thin-skinned vehicles. Use roads less-traveled to remain hidden. No matter which manoeuvre that is used, stay vigilant for enemy aircraft to avoid them spotting and pouncing on the Wirbelwind. Even if equipped with the PzGr 40 belt for anti-tank purposes, eighty 20 mm shells from the Wirbelwind can still mess up an aircraft's flight time.

Once the question of manoeuvring to an advantageous position is answered, the next concern is seeing if the 20 mm have enough firepower to be of any threat to the enemy downrange. While the PzGr 40 APCR belt can be a threat to enemy light tank, lightly armoured tank destroyers like the M18 Hellcat, and also enemy anti-air vehicle, the shell's penetration decreases drastically at range and it's not enough to deal with more heavily armoured vehicles, with the side armour of some medium tanks even being a questionable option. The Wirbelwind's armour is only enough to reduce the damage done by aeroplanes, which makes engaging any sort of tank very dangerous. As such, pick targets wisely and make sure to either take them out within one belt's worth of shells or hold fire to avoid drawing any attention at all.

Against the Wirbelwind

  • Aircraft: the Wirbelwind is an extremely popular SPAA in Ground Realistic battles and pose a huge threat to any plane, thus every pilot should know how to counter it. Aircraft with access to rockets (e.g. P-47D, IL-2) can practice firing off a salvo of rockets at long distances, this way the pilot can score hits/critical hits if not a kill without even entering the effective range of the 20 mm autocannons. Bomb-carrying planes, for example BTD-1, P-47D, will be more dangerous, as they usually need to get closer to drop the bombs accurately. The conventional method of shallow dive bombing will not work if the Wirbelwind knows your presence and starts spraying bursts towards you as you dive, 1-2 hits from it and your wing will snap off. Pilots can try flying low to the ground - at tree-top level if they can, to avoid getting spotted by the SPAA. On occasion, the opposing team, being usually the Allies, will have aircraft with huge cannons, like the XA-38 and Yak-9K. In this case, practising long-range shooting with these plane cannons can definitely help, since you want to finish your pass as quick as possible so you do not get too close to the Wirbelwind. Its armour can overall be easily penetrated by most aircraft armaments, except the frontal hull.
  • Light tank/SPAA: light tanks generally see the Wirbelwind as a nice target if their cannon is effective, for example the M24. Other countries' SPAAs usually cannot quickly kill a Wirbelwind from the front, because its hull can reach 100 mm thick which no SPAA at this tier can pierce through. It is best to focus fire on its thin turret, clean out every crew inside, wait for ~12 seconds so it finishes replenishing new crew, and wipe out the new crew again, destroying the Wirbelwind. Perform this task carefully, though, as the Wirbelwind has access to a HVAP belt with ~48 mm penetration, allowing it to penetrate almost all light vehicles without a problem.
  • Medium tank/heavy tank/tank destroyer: these vehicles will have no issue destroying a Wirbelwind, it is an SPAA after all. Note, do not shoot the frontal hull armour if it is angling, your shell might fail to penetrate if its penetration is not high enough. Also certain tank destroyers (e.g. M10, M18, SU-85) should be careful as their armour have weak spots that can be penetrated by Wirbelwind's PzGr.40 HVAP belt.

Pros and cons

Pros:

  • Excellent hull armour for an AA vehicle, can resist low-penetrating tanks like M24, T-34 (1942) and 75 mm M4
  • Turret armour is thick enough to protect the crew inside from light machine gun fire from enemy tanks
  • High driving speed able to move from cover to cover with little to no problem
  • High rate of fire allows it to spray shells in an aircraft's path and quickly take them down
  • Impressive ammo capacity (~2 minutes of continuous fire)
  • Excellent gun elevation and depression allows it to deal with targets regardless of their location
  • Powerful guns with various belts: HE belt will devastate planes at close range, while HVAP can go through side armour and quickly knock out the crew of common enemies like M4, T-34 (1942) and Cromwell
  • Excellent turret traverse makes it possible to stay on aircraft

Cons:

  • Weak turret protection: open top design makes vehicle vulnerable to strafing runs by enemy aircraft, especially those with .50 cals like the P-40, and the thin armour can get penetrated by other SPAA like M16, ZSD63 and GAZ trucks
  • Weak side armour, where an ammo rack is located
  • Especially vulnerable to HE and HEAT shells: even glancing shots could be lethal
  • Less effective at firing at distant aircraft, 20 mm shells have difficulty dealing with bombers due to both durability and the typical altitude of targets
  • Long reload time compared to other SPAAs at this BR
  • With continuous firing, a magazine is emptied very fast so strict trigger control is important

History

Development

Development of self-propelled anti-aircraft guns that could keep up with the Panzer formations were not taken into consideration in the early years of World War II due to the Luftwaffe's superiority over the air, but gradual losses in the Luftwaffe and inability to support their flights gave the Allies the upper hand in the air, granting them air superiority. The growing air power of the Allies forced the Germans to develop methods to protect their tank formations from strafing from Allied aircraft, one early design to protect the front line tanks was the Flakpanzer IV Mobelwagen, an interim design as Flakpanzer designs underwent development. SS-Hauptsturmführer Karl Wilhelm Krause of the 12th SS Panzer Division came up with the concept of the Flakpanzer IV Wirbelwind in the summer of 1944. The commander of the 12th SS Panzer Regiment, SS-Obersturmbannführer Max Wünsche, received this and presented it to Hitler, to which he approved for its development.
A camouflaged Wirbelwind.

The design called for use of the proven Panzer IV design. The Wirbelwind uses the Panzer IV hull, but the original Panzer IV turret was removed and replaced with an open-topped nine-sided turret that mounted the anti-aircraft armament. The anti-aircraft armament chosen for the vehicle was a quadruple mounted 2 cm FlaK 38. Though a closed-top turret design was desired, the number of gasses given out by the gun made this impossible for the crew. The production of the Wirbelwind commenced at the Ostbau Werke at Sagan, Silesia. Between 87 to 105 Wirbelwinds were manufactured from May to November 1944, with the discrepancies due to differences in the Wehrmacht service records and Ostbau Werke's production records.

Combat usage

A surviving Wirbelwind.

The troops nicknamed the Wirbelwind the "Keksdose" (Biscuit Tin) due to its unique turret shape. The Wirbelwind was equipped with Panzer formations to protect them against low-flying aircraft. During the Battle of Normandy in 1944, flak units in the 12th SS Panzer Division were credited with shooting down 45 allied planes. However, there weren't enough to go around in the front-lines so many Panzer formations were left vulnerable to enemy aircraft due to lack of availability of the Flakpanzers. Not only did their small numbers made their effect on the front minimal, but the 20 mm cannon was also determined to insufficient against the more armoured aircraft that the Allies are fielding. Thus, the design was changed to not use the quadruple 2 cm Flak 38, but instead the 3.7 cm FlaK 43 in the new designation Flakpanzer IV Ostwind. Aside from that the Wirbelwind also served as a ground support role, which it proved very well at with its rapid firing 20 mm cannons.

It was determined that the Flakpanzer IV in the Wirbelwind and Ostwind configurations were to be replaced by the Kugelblitz by early 1945, in an attempt to yet again increase the firepower of the anti-aircraft guns. But this never happened due to the war ending before the Kugelblitz could be deployed.


Archive of the in-game description

After losing air superiority, the Wehrmacht needed to improve the AA weapons of its armoured tank divisions. The Wirbelwind AA vehicle was built on the chassis of the Pz.IV tank. It was the first specialized, self-sufficient means of defending armoured tank divisions against enemy aircraft. The Flakvierling 38 installation was placed in an open turret protected by 16 mm of armour plating. Unlike various other self-propelled AA systems, this AA weapon struck a balance between protection, deployment time, and firepower. Between July, 1944 and March, 1945 105 of these mounts were built. They were used on the Western and Eastern Fronts. The first prototype was built on the basis of a remodeled Pz.IV by Krupp-Druckenmuller GmbH Berlin-Mariendorf in May, 1944.


Media

Skins
Images
Videos

See also

Vehicles equipped with the same chassis
Other vehicles of similar configuration and role

External links


Germany anti-aircraft vehicles
Wheeled  Sd.Kfz.222
Half-track  Sd.Kfz.251/21 · Sd.Kfz. 6/2
Flakpanzer IV  Wirbelwind · Ostwind · Ostwind II · Kugelblitz · Zerstörer 45
Other Flakpanzers  Flakpanzer I · Flakpanzer 38 · Flakpanzer 341
Wiesel AWC  Wiesel 1A4 · Ozelot
Radar SPAAG  Gepard · Gepard 1A2
Missile SPAA  FlaRakPz 1 · FlaRakRad