
Variables in mission editor are used to store information like text, numbers or booleans used for creating true or false statements, they can be used to optimize code of your mission and also to create things that are normally impossible without using them.
If you create a string variable named t1_unit_01 you will be able to see it in Target or Object tab which you can find in actions similar to unitSetProperties where you can select AI or player units, its name will be displayed as @t1_unit_01, it will be displayed similarly in other actions too.
As mentioned before, they can also be used to optimize missions, but only when you need a really high amount of triggers that do perform similar functions, in case of small mission you won’t even notice a difference and usually you will need more triggers than when just using simple actions without variables, so this article will explain how to use them and show a good use of them.
Important notes:
- You cannot store more than one information in the same variable
- All of these instructions from this article are valid for both singleplayer and multiplayer missions
Basics
Note: Before reading this make sure that you know basics about creating triggers and other things related to them (events, actions, conditions)
How to create a variable
Note: You will need a working singleplayer mission before you start
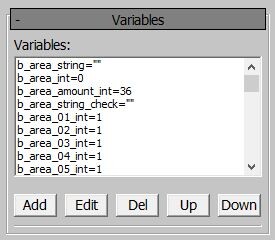
- Choose on the side toolbar Variables, you can find it under Triggers tab.
Now you should be able to see a window with multiple tabs that can be pressed, Add for adding new variables, Edit for editing, Del for deleting and Up and Down to move them. - Press Add to add a new variable.
After pressing it a new window should appear, you can select a name for it under Variable name: and select its type under Variable type:, there are 10 of them, but for now I’ll only explain how to use string (text), integer (number without a fractional component), real (number with a fractional component) and bool (used for creating true or false statements) - Set the variable name to
t1_unit_string_01and it’s type tostring.
Now you should have created a new string variable, the next thing to do is set its value and assign it to something - Select created variable.
After selecting there should appear a new field where you can set its value - Set the variable value to
t1_unit_01.
Now you need a new action where you can assign this variable - Go to the Triggers / Missions Obj. Navigat tab, find an
unitSetPropertiesaction and create it. - Press object and select
@t1_unit_string_01, then scroll down and enable cannotShoot option.
It should assign a variable to this action and give it a simple property, now we need a unit which will use it - Create a new
armada unitand call itt1_unit_01and make it a player unit.
If everything went without any issues then your unit shouldn’t be able to fire and that will mean that you properly assigned a variable tounitSetPropertiesaction
Ways of storing information in variables
Editing variable value manually
Go to the window with Variables, simply select one of them and just set it’s value.
Sometimes it’s a good idea to assign some important actions and conditions to variables and then just edit them by changing variable value in the .blk file.
Using varSet (Int/Real/Bool/String) actions
Create a varSet action, in the Var tab select that variable which you want to edit, then set it’s value, you can also import this value from other variable using input_var option.
| Action | Description | Fields |
|---|---|---|
varSetBool | Sets a bool value Notes: Using this action will remove (overwrite) everything from selected var variable | — var: Select a bool variable to which you want to input a value — value: Select the type of value (checked — True, unchecked — False) — input_var: Select if you want to input the value from other variables — fromDescriptor: Makes the action load values from the server, can not be used by players |
varSetInt | Sets an integer value Notes: Using this action will remove (overwrite) everything from selected var variable | — var: Select an integer variable to which you want to input a value — value: Set the numbersource_var: Select if you want to input values from ongoing battle (overwrites current value) — input_var: Select if you want to input the value from other variables — fromDescriptor: Makes the action load values from the server, can not be used by players |
varSetReal | Sets a real value Notes: Using this action will remove (overwrite) everything from selected var variable | — var: Select a real variable to which you want to input a value — value: Set the number — input_var: Select if you want to input the value from other variables — fromDescriptor: Makes the action load values from the server, can not be used by players |
varSetString | Sets a string value Notes: Using this action will remove (overwrite) everything from selected var variable | — var: Select a string variable to which you want to input a value — value: Set the text — input_var: Select if you want to input the value from other variables — fromDescriptor: Makes the action load values from the server, can not be used by players |
Using varAddString action
This way you can add a text to existing string variable by adding a value in the field with same name or a number and set selected amount of shown digits (for example if you add a 3 number and set digits to 2 then it will be shown as 03), you can also input all these values from other variables
| Action | Description | Fields |
|---|---|---|
varSetString | Sets a string value Notes: Using this action will remove (overwrite) everything from selected var variable | — var: Select a string variable to which you want to input a value — value: Set the text — input_var: Select if you want to input the value from other variables — fromDescriptor: Makes the action load values from the server, can not be used by players |
Using varModify action
To do operations on selected number
| Action | Description | Fields |
|---|---|---|
varModify | Modifies existing real or integer variable | — var: Select which variable you want to modifyoperator: Select what type of operation you want to do. — value: Select the value — use_variable: If checked, will use the value from other integer or real variable — var_value: Select a string or real variable Available vars: — inv: Inverse— mul: Multiplication— add: Addition— subAB: (var — value)— subBA: (value — var)— divAB: (var / value)— divBA: (value / var)— modAB, modBA: get the remainder from a division |
Using varSetRandomInt action
To just let the game choose a random number from selected range
| Action | Description | Fields |
|---|---|---|
varSetRandomInt | Sets a random integer value Notes: Using this action will remove (overwrite) everything from selected var variable | — var: Select an integer variable to which you want to input a value — from: Sets the first value — var_from: Sets the first value using an integer variable — to_not_including: Sets the second value (it won’t be included in getting the final number) — var_to_not_including: Sets the second value using an integer variable (it won’t be included in getting the final number) |
Using varGetIntFromString or varGetStringValue
| Action | Description | Fields |
|---|---|---|
varGetIntFromString | Imports an integer value from the selected string variable to a selected integer variable | — value: Select from which string variable you want to import an integer — valuevar: Select to which integer variable you want to export an integer value |
varGetStringValue | Imports all text from the selected string value | — var: Select to which string variable you want to import a string value — from_var_name: Select from which string variable you want to import a string value (remember to not put @ before string variable name) |
Example of how you can set it:
Current variables:
| var | type | value |
|---|---|---|
t1_unit_string | string | t1_unit_12 |
t1_unit_int | integer | 12 |
Now I want it to set the string to the name of a unit that has a higher number (by 1)
Actions:
unitSetVar(var = “t1_unit_string” value = “”) — to clear value of selected stringunitSetVar(var = “t1_unit_string” value = “t1_unit”) — sets the value to that with which starts name of AIvarModify(var = “t1_unit_int” operator = “add” value = “1”) — adds 1 to existing numberunitAddString(var = “t1_unit_string” input_var = “t1_unit_int” digits = “2”) — adds the number of the next unit
After that this variable should be shown as t1_unit_13.
Examples of use
Creating a set of triggers that checks multiple areas for units
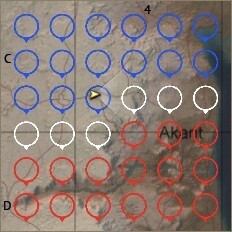
This set of triggers is meant to check if there are units in a selected area, then if there’s at least one unit from the A or B team in it the mission should mark this area on the minimap with a colour depending on which team is at this moment in that area. If there are both teams in the same area then it should give it white neutral marking on the minimap. The mission should have 36 of those areas and they should be placed next to each other.
To make everything behave as intended, you need 8 triggers, one that checks all areas at the start of mission, one that checks all areas later when the first one is disabled, three for checking if there are any units in them and from what team they are, another three triggers to mark all areas and obviously variables, in this case 42 of them.
Adding variables
The first step to get things done is to add variables that you will need for your mission
| Name | Descriprtion |
|---|---|
b_area_string | String variable, it will store area’s name and be used to check current area |
b_area_int | Integer variable, it will store the number of current area and that number will be added by using varAddString action to b_area_string and b_area_string_check variables |
b_area_amount_int | Integer variable, it will store current amount of areas, in this case 36, you need to set it manually there |
b_area_string_check | String variable, it will be used to store current state of the area: — 1 — there are units from the A team in the area — 2 — there are units from the B team in the area — 3 — neutral |
b_area_01_int - b_area_36_int | Integer variables, there will be 36 of them and they will store informations about all created areas |
switch_area_string | String variable, it will store the name of first_time_check_all_areas and then switch_area variables, set it to first_time_check_all_areas |
check_if_no_one_in_area | String variable, set it to check_if_no_one_in_area (to point it at the trigger with the same name) |
check_if_t1_in_area | String variable, set it to check_if_t1_in_area (to point it at the trigger with the same name) |
check_if_t2_in_area | String variable, set it to check_if_t2_in_area (to point it at the trigger with the same name) |
when_t1 | String variable, set it to when_t1 (to point it at the trigger with the same name) |
when_t2 | String variable, set it to when_t2 (to point it at the trigger with the same name) |
when_both | String variable, set it to when_both (to point it at the trigger with the same name) |
Adding areas
The second step is to add areas
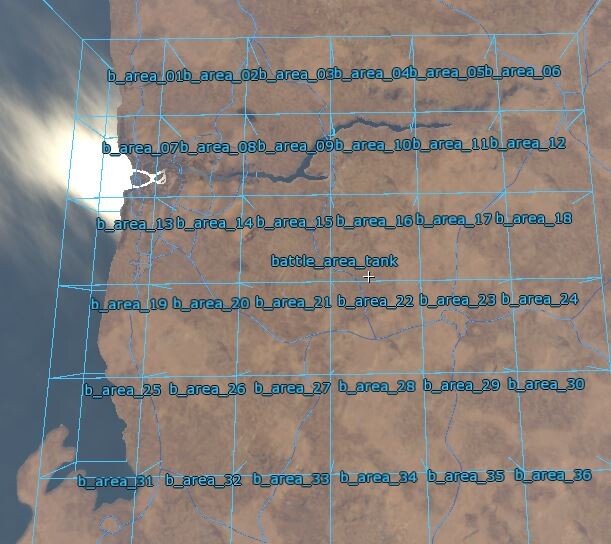
- Create 36 box areas that are placed next to each other
It should create one big 6×6 box, so it should have 6 columns and 6 rows. Don’t forget to set their size to 2000×2000 meters.
They can’t overlap with each other because if that happens it can break the mission, there should be at least 5 meters of free space between areas
- Rename all areas to
b_area_01,b_area_02,b_area_03etc.
Remember that they can’t be named in random order, it is the best to name them from the left to the right or in reverse order
Creating triggers that checks all areas at the start of mission
First trigger will responsible for creating a name of areas which will be later checked in other triggers for the number assigned to every area (1, 2 or 3)
Basically it works like that, first_time_check_all_areas sets the value of b_area_string (for example b_area_01 — name of the area that is going to be checked, it will be needed for showing icons) and b_area_string_check (for example b_area_01_int — name of the variable (it’s stored value, 1, 2 or 3) that is going to be checked) that is going to be checked, then activates when_t1, when_t2 and when_both triggers that will shown an icon on the minimap with corresponding color
Important note: Order of creating triggers matters, if you set them wrongly then the mission will not work
Trigger name: first_time_check_all_areas
Events:
| Name | Value | Desc |
|---|---|---|
| Periodic Event | 0.01 | Set it to 0.01 so it will be able switch between areas as fast as it is possible |
Conditions:
| Name | Value | Desc |
|---|---|---|
varCompareInt | var_value = b_area_int value = 0 var_value_other = b_area_amount_int comparison_func = equal | This condition will keep changing the number of b_area_int variable (at the start of mission it is set to 0) until it reaches 36 |
Actions:
This part will start working once the trigger will reach the 36 number
| Name | Value | Desc |
|---|---|---|
unitSetInt | value = 0 var="b_area_int” | Resets the value of b_area_int integer variable, so the switch_area (which will be activated next) will be able to start changing areas from the start (b_area_01) |
unitSetString | value = “switch_area” var = “switch_area_string” | Changes the value of |
triggerEnable | target = “@switch_area_string” | Enables switch_area trigger which will work for the rest of time until the mission ends |
triggerDisable | target = “first_time_check_all_areas” | Disables this trigger |
Else:
| Name | Value | Desc |
|---|---|---|
varModify | operator = “add” value = 1 var = “b_area_int” | It will add 1 every time this trigger is activated (as long as it meets the condition, so the b_area_int variable has lower number than 37) |
varSetString | value = “b_area_” var = “b_area_string” var ="b_area_string_check” | It will set b_area_string and b_area_string_check variable values to b_area_ |
varAddString | value = “” input_var = “b_area_int” digits = 2 var = “b_area_string” var = “b_area_string_check” | It will add a number after b_area_ which was set in previous action so b_area_string value and area name will be the same (in this case b_area_01) |
varAddString | value = “_int” digits = 0 var = “b_area_string_check” | It will add a text after the full name of area (b_area_01) so it will allow other triggers set or check the number (0 — doesn’t change the icon, 1 — change the icon color to A team, 2 change the icon colo r to B team, 3 — change the icon color to neutral white) assigned to b_area_01_int ,b_area_02_int ,b_area_03_int etc. variables |
triggerEnable | target = “@when_t1” target = “@when_t2” target = “when_both” | It will enable all triggers that are needed to add an icon on the minimap |
Three similar triggers which the main function will be to add an icon on the minimap
- Trigger name =
"when_t1"— it will check the number assigned to b_area_xx_int (xx = number) variables, 1 — set the icon color to A team - Trigger name =
"when_t2"— it will check the number assigned to b_area_xx_int (xx = number) variables, 2 — set the icon color to B team - Trigger name =
"when_both"— it will check the number assigned tob_area_xx_int(xx = number) variables, 3 — set the icon color to neutral team (white)
This one is for when_t1 Every time only one of these triggers will be used and the rest of them will abort should they not meet the condition
Events
- Periodic Event = 0.01
Just like before, to make it work as fast as it is possible
Conditions
varCompareInt(var_value = “@b_area_string_check”, value = 1 comparison func = “equal”)
It will compare the number of value stored in b_area_xx_int variable with
Actions
missionShowMapIcon(show = true, team = “both”, iconName = “ui/gameuiskin#capturezone_big_ring”, areaName = “@b_area_string” colorCode = “team A”, scale = 0.20)triggerEnable(target = “@switch_area_string”)
If the number of b_area_xx_int variable is set to 1 then it will show an icon with A team color, then enable switch_area trigger (it’s name is stored in switch_area_string string) which will switch the area name to check to the next one (b_area_01 -> b_area_02, b_area_02 -> b_area_03 etc.)
Else
missionShowMapIcon(show = false, team = “both”)triggerDisable(target = “@when_t1”)
If the number of b_area_xx_int variable is NOT set to 1 then it won’t show the icon and just disable this trigger
Now you will need to copy this trigger to make it work for every colour (blue, red and white)
- Copy this trigger two times and set the name of copies to
when_t2andwhen_both, then change their values invarCompareIntto 2 forwhen_t2and 3 forwhen_both. - Change the color of icon in
missionShowMapIcon(under actions) to Team B forwhen_t2and White forwhen_both. - Change the target in
triggerDisableaction, switch it to @when_t2 forwhen_t2and @when_both forwhen_both.
Now go back to the window with Variables and set values of all b_area_xx_int (xx = number) variables to 1, 2 or 3. If you did everything properly then the mission should show blue, red or white icons on the minimap.
Creating triggers that give a number to b_area_xx_int variables and keep checking them until the mission ends
This trigger works like first_time_check_all_areas, the only big difference is the part under Actions, this time it is used to reset trigger state when b_area_int it reaches 36, other difference is a trigger that is enabled at the end of Actions and Else, it is set to check_if_no_one_in_area now.
Trigger name= "switch_area"
Events
- Periodic Event = 0.01
Set it to 0.01 so it will be able switch between areas as fast as it is possible
Conditions
- varCompareInt (var_value = b_area_int, value = 0, var_value_other = b_area_amount_int, comparison_func = equal)
This condition will keep changing the number ofb_area_intvariable (at the start of mission it is set to 0) until it reaches 36
Actions
varSetInt(value = 0, var = “b_area_int”)
Resets the b_area_int variable value to 0
varSetString(value = “b_area_”, var = “b_area_string”, var ="b_area_string_check”)varAddString(value = “”, input_var = “b_area_int”, digits = 2, var = “b_area_string”, var = “b_area_string_check”)varAddString(value = “_int”, digits = 0, var = “b_area_string_check”)triggerEnable(target = “@check_if_no_one_in_area”)
Activates a trigger which changes the value of b_area_xx_int variable
Else
varModify(operator = “add”, value = 1, var = “b_area_int”)varSetString(value = “b_area_”, var = “b_area_string”, var ="b_area_string_check”)varAddString(value = “”, input_var = “b_area_int”, digits = 2, var = “b_area_string”, var = “b_area_string_check”)varAddString(value = “_int”, digits = 0, var = “b_area_string_check”)triggerEnable(target = “@check_if_no_one_in_area”)
Activates a trigger which changes the value of b_area_xx_int variable
The next set of triggers will change the number of b_area_xx_int variables, for that you need to create three similar triggers, which will check if there are any units in areas.
Trigger name= "check_if_no_one_in_area"
Events
Periodic Event= 0.01
Conditions
unitWhenInArea(math = “3D”, object = “all_players_squad”, target = “@b_area_string”, object_type = “isAlive”, check_objects = “any”)
Checks if there are any players in currently checked area
Actions
triggerEnable(target = “@check_if_t1_in_area”
If there are any players then it will enable check_if_t1_in_area to check if there are any players from the A team
Else
triggerEnable(target = “@switch_area_string”
If there are NOT any players present in the area then it will just enable switch_area trigger to switch b_area_xx_int to the next area
Trigger name= "check_if_t1_in_area"
Events
- Periodic Event = 0.01
Conditions
unitWhenInArea(math = “3D”, object = “all_players_squad”, target = “@b_area_string”, object_type = “isTeamA”, check_objects = “any”)
Checks if there are any players from the A team in currently checked area
Actions
varSetInt(value = 0, var = “@b_area_string_check”)varModify(operator = “add”, value = 1, var = “@b_area_string_check”)
If there are any units from the A team then it will reset the value of b_area_xx_int variable and add 1 to it (1 = A team color)
triggerEnable(target = “@switch_area_string”
It will enable switch_area to switch b_area_xx_int to the next area
Else
triggerEnable(target = “@check_if_t2_in_area”
If there are players in the area but they are not from the A team then it will enable another trigger which checks if for the B team
Note: If you wonder why there’s the var set to @b_area_string_check and not b_area_string_check in varSetInt action. If you just set it to b_area_string_check then it would look for this value:
b_area_string_check:t = b_area_01_int
If you set it to @b_area_string_check then it will look for this value: b_area_01_int:t = 0 so it can check and set the number stored in currently checked area
Trigger name= “check_if_t2_in_area”
Events
- Periodic Event = 0.01
Conditions
unitWhenInArea(math = “3D”, object = “all_players_squad”, target = “@b_area_string”,object_type= “isTeamB”, check_objects = “any”)
Checks if there are any players from the B team in currently checked area
Actions
varModify(operator = “add”, value = 2, var = “@b_area_string_check”)
If there are any units from the B team it will add 2 to it (2 = B team color) and if it already added 1 in the previous action then it will set it’s color to white (3 — neutral color)
triggerEnable(target = “@when_t1” target = “@when_t2” target = “@when_both”)
When it is done with checking players it will enable triggers which will show an icon with proper color on the minimap
Else
triggerEnable(target = “@when_t1” target = “@when_t2” target = “@when_both”)
When it is done with checking players it will enable triggers which will show an icon with proper color on the minimap
After that, it will work exactly like in the previous part (3.).
If you did everything properly, then now this entire set of triggers should work like it was explained in the description of this section.You can increase the number of areas but you also need to increase the value of b_area_amount_int variable if you want to do that.
Sample mission
- Link to the multiplayer mission that contains this set of triggers (Remember that you need to remove https:// part of this link to make it work in War Thunder)