
So, you want to make a localization mod, but you don’t know where or how to start. Well this is the all-in-one guide for them. This guide is here because, though the standard localization instructions and localization guidelines on the wiki have some great information, they are missing some key information too. Information about file structures, what texts are in which files, how to add files, and how to rename vehicles and weapons are all missing from it. So, to remedy that issue, here is a better guide.

Note: The following guide is going to consistently use examples from my lang mod. This is not intended in any way to promote this mod specifically. Examples from my mod are being used because they are the easiest and most effective way to demonstrate the points being made and explanations being given for maximum clarity and understanding.
Table of contents
- What are localization mods?
- Problems with the existing guides
- Activating localization mods
- Properties of localization mods
- Knowing your way around the files
- Step 1: What do you want your mod to do?
- Step 2: Information organization
- Step 3: Choosing your editing software
- Step 4: Choosing your file organization and workflow
- Step 5: Editing the files
- Step 6: Testing, testing, testing
- Step 7: Publishing
- Tips, advice, and extra information
- Conclusion
What are localization mods?
Localiztion mods (a.k.a. language mods or lang mods) are mods for War Thunder that modify the game’s text elements. You can use them to edit vehicle names, kill messages, weapons, menu texts, and pretty much any piece of text in the entire game. These are not the same as sound mods because these mods cannot edit things like crew voices or gunshot sound effects. Lang mods are 100% allowed in War Thunder. They exist on War Thunder Live, official guides exist on this wiki (though those guides are lacking), and a button even exists in-game to enable them. Do not fear being punished for using a lang mod because they are fully acceptable.
Problems with the existing guides
The two official guides (localization instructions and localization guidelines) that already exist on this wiki are heavily lacking. They explain some thing about lang mods such as plurals, adding new languages, and enabling them, but miss several other key details. The existing guides do not explain exactly what a lang mod even is and neglect to mention all of the other things that they can do, instead treating them as only for adding localizations for new languages. This misses one of the most important points about these mods which is that you can rename vehicles and edit menu texts, allowing you to personalize your game to your liking such as turning kill messages into memes, or to rework vehicles and weapons to be more accurate to real life.
They also ignore issues you can run into with these mods. These include common issues related to game updates, lesser known issues such as the problems with color tags and the weapon selector, and extremely niche issues like plural formatting with paucals. All of these issues are easy to deal with if you know how, but are not addressed in the official guides. That is why this guide exists. This guide explains how to do everything and how to deal with every possible issue you could run into when working with these mods.
Activating localization mods
The first thing you need to do is activate lang mods because lang mods are not enabled by default. The simplest way to do this is to do it ingame. Go into the game and go to Options. In Options, you should see the following setting:

Make sure to turn this setting on. It will say a restart of your game is required. Go restart your game. Once you do, a new folder called lang should appear in your War Thunder folder. If this still does not happen, go to your war thunder folder and open up the file config.blk. In config.blk, scroll down until you the debug section and add, if the line is not already there, add the line testLocalization:b=yes to the debug section. If the line says testLocalization:b=no, change it to testLocalization:b=yes. Your debug section should look something like this, though the order of lines may vary:
debug{
  screenshotAsJpeg:b=yes
  512mboughttobeenoughforanybody:b=no
  enableNvHighlights:t="auto"
  netLogerr:b=yes
  screenshotHiRes:b=no
  testLocalization:b=yes
}
Once this new lang folder has appeared, open the folder to check its contents. At the time of writing this guide, there should be 55 files in it: 55 .csv files and the file localization.blk. Keep track of this because localization.blk is extremely important.
Properties of localization mods
Before you begin making a lang mod, you need to understand how lang mods work. Lang mods have a lot of different syntaxes and formatting tags, and understanding them is critical. So, for this guide, we are going to start with the basics and work up to the more difficult parts.
Basic syntax
Lang mod files are .csv files. .csv files are made up of columns and rows. They work like a spreadsheet where the columns are the categories and the rows contain the data. In War Thunder’s .csv files, the first column is the name of the file entry, columns 2 through 21 are different languages for each text entry, column 22 is comments, and column 23 is max characters. You do not need to worry about columns 22 and 23 because they are unused and never touched. Each column is separated by a semicolon. Here is an example of what this looks like for the IS-2 (1944):
"<ID|readonly|noverify>";"<English>";"<French>";"<Italian>";"<German>";"<Spanish>";"<Russian>";"<Polish>";"<Czech>";"<Turkish>";"<Chinese>";"<Japanese>";"<Portuguese>";"<Ukrainian>";"<Serbian>";"<Hungarian>";"<Korean>";"<Belarusian>";"<Romanian>";"<TChinese>";"<HChinese>";"<Vietnamese>";"<Comments>";"<max_chars>"
...
"ussr_is_2_1944_shop";"IS-2 (1944)";"IS-2 (1944)";"IS-2 mod.1944";"IS-2 Mod. 1944";"IS-2 (1944)";"ИС-2 (1944)";"IS-2 (1944)";"IS-2 obr. 1944";"IS-2 (1944)";"IS-2 1944 型";"IS-2 1944年型";"IS-2 mod. 1944";"ІС-2 (1944)";"IS-2 (1944)";"IS-2 (1944)";"IS-2 (1944)";"ІС-2 узору 1944 г.";"IS-2 (1944)";"IS-2 (1944)";"IS-2 1944 型";"IS-2 (1944)";;
"ussr_is_2_1944_0";"IS-2 (1944)";"IS-2 mod. 1944";"IS-2 mod.1944";"IS-2 Mod. 1944";"IS-2 (1944)";"ИС-2 (1944)";"IS-2 (1944)";"IS-2 obrazec 1944";"IS-2 (1944)";"IS-2 1944 型";"IS-2 1944年型";"IS-2 mod. 1944";"ІС-2 зраз. 1944 р.";"IS-2 (1944)";"IS-2 (1944)";"IS-2 1944년형";"ІС-2 узору 1944 г.";"IS-2 (1944)";"IS-2 (1944)";"IS-2 1944 型";"IS-2 (1944)";;
"ussr_is_2_1944_1";"IS-2";"IS-2";"IS-2";"IS-2";"IS-2";"ИС-2";"IS-2";"IS-2";"IS-2";"IS-2 1944 型";"IS-2 1944年型";"IS-2";"ІС-2";"IS-2";"IS-2";"IS-2";"ІС-2";"IS-2";"IS-2";"IS-2 1944 型";"IS-2";;
"ussr_is_2_1944_2";"Heavy tank";"Char lourd";"Carro armato pesante";"Schwerer Panzer";"Tanque pesado";"Тяжёлый танк";"Czołg ciężki";"IS-2";"Ağır Tank";"重\t型\t坦\t克";"重戦車";"Tanque Pesado";"Важкий танк";"Teški tenk";"nehéz harckocsi";"중전차";"Цяжкі танк";"Tanc greu";"重\t型\t坦\t克";"重\t型\t坦\t克";"Xe tăng hạng nặng";;
Pay attention to how this is formatted. The first line is called the header, and lists what each column actually is. The first entry in every line is ussr_is_2_1944_[something]. That is the file name and we will come back to what that “something” is in a bit. Then, columns 2-21 are different entries of the IS-2 (1944) in each language. Then, at the end of each line, there are 2 semicolons. These are the 2 semicolons in between <Vietnamese> and <Comments>, and between <Comments> and <max_chars>. The fact that there is nothing in between the 2 semicolons indicates that the <Comments> column is empty for this text line, and the lack of anything after the final semicolon indicates that the <max_chars> column is empty for this line.
Every entry, in addition to being separated from other entries by a semicolon, is surrounded by quotation marks. These are not actually necessary, but there is an exception to that. Take a look at this example:
"uk_sherman_ic_firefly_shop";"Sherman IC ""Trzyniec""";"Sherman IC ""Trzyniec""";"Sherman IC ""Trzyniec""";"Sherman IC ""Trzyniec""";"Sherman IC ''Trzyniec''";"Sherman IC ""Trzyniec""";"Firefly „Scorpion”";"Sherman Mk.IC Firefly [2. AD]";"Sherman IC ""Trzyniec""";"萤\t火\t虫 IC (“特\t日\t内\t茨”\t号)";"シャーマン IC ""トジネツ""";"Sherman IC ""Trzyniec""";"Sherman IC «Trzyniec»";"Sherman IC ""Trzyniec""";"Sherman IC Firefly „Trzyniec”";"셔먼 IC ""트르지네츠""";"Firefly «Scorpion»";"Firefly „Scorpion”";"螢\t火\t蟲\t(特\t日\t内\t茨\t號)";"“萤\t火\t虫”\t(波\t兰\t第 4 装\t甲\t团)";"Sherman IC ""Trzyniec""";;
"uk_sherman_ic_firefly_0";"Sherman IC ""Trzyniec"" of 2nd (Warsaw) Armoured Division";"Sherman IC ""Trzyniec"" 2e Brigade blindée (Varsovie)";"Sherman IC ""Trzyniec"" of 2nd (Warsaw) Armoured Division";"Sherman IC ""Trzyniec"" of 2nd (Warsaw) Armoured Division";"Sherman IC ''Trzyniec'' de la 2° División Blindada de Varsovia";"Sherman IC ""Trzyniec"" of 2nd (Warsaw) Armoured Division";"Sherman IC Firefly 2. Warszawska Dywizja Pancerna";"Medium Tank Sherman Mk.IC Firefly [2nd (Warsaw) Armoured Division]";"Sherman IC ""Trzyniec"" of 2nd (Warsaw) Armoured Division";"谢\t尔\t曼 IC (波\t兰\t第 2 华\t沙\t装\t甲\t师\t“特\t日\t内\t茨”\t号)";"第\t2(ワルシャワ)\t機甲師団 シャーマン IC ""トジネツ""";"Sherman IC ""Trzyniec"" of 2nd (Warsaw) Armoured Division";"Sherman IC «Trzyniec» (2-ї Варшавської бронетанкової дивізії)";"Sherman IC ""Trzyniec"" of 2nd (Warsaw) Armoured Division";"Sherman IC Firefly „Trzyniec” (2. varsói páncélosdandár)";"제2 (바르샤바) 기갑사단 소속 셔먼 IC ""트르지네츠""";"Sherman IC 2nd «Warsaw» Armoured Division";"Sherman IC divizia 2 blindate „Varșovia”";"螢\t火\t蟲\t(波\t蘭\t第 2 華\t沙\t装\t甲\t师\t“特\t日\t内\t茨”\t號)";"“谢\t尔\t曼”\tMk IC\t“萤\t火\t虫”\t(波\t兰\t第 4 装\t甲\t团)";"Sherman IC ""Trzyniec"" Của sư đoàn thiết giáp 2 (Warsaw)";;
"uk_sherman_ic_firefly_1";"Sherman IC ""Trzyniec""";"Sherman IC";"Sherman IC ""Trzyniec""";"Sherman IC ""Trzyniec""";"Sherman IC ''Trzyniec''";"Sherman IC ""Trzyniec""";"„Scorpion”";"Sherman Mk.IC";"Sherman IC ""Trzyniec""";"萤\t火\t虫 IC (“特\t日\t内\t茨”)";"シャーマン IC ""トジネツ""";"Sherman IC ""Trzyniec""";"Sherman IC «Trzyniec»";"Sherman IC ""Trzyniec""";"Sherman IC";"셔먼 IC ""트르지네츠""";"«Scorpion»";"„Scorpion”";"螢\t火\t蟲";"“萤\t火\t虫”";"Sherman IC ""Trzyniec""";;
"uk_sherman_ic_firefly_2";"Medium tank";"Char moyen";"Carro armato medio";"Mittelschwerer Panzer";"Tanque mediano";"Средний танк";"Czołg średni";"Sherman";"Orta Tank";"中\t型\t坦\t克";"中戦車";"Tanque Médio";"Середній танк";"Srednji tenk";"közepes harckocsi";"중형전차";"Сярэдні танк";"Tanc mediu";"中\t型\t坦\t克";"中\t型\t坦\t克";"Xe tăng hạng trung";;
See how “Trzyniec” is surrounded by double set of quotation marks on each side? That is because to display quotation marks ingame, you need to double the quotation marks in the files. One quotation mark will be read by the game as separating entries in different columns, but two quotation marks will be read by the game as telling it to display the quotation mark character. When quotation marks are used, the entire entry needs to be surrounded by a single set of quotation marks. Not every entry in the line needs to be, only the entry with the double set of quotation marks.
Take a look at the following example from my lang mod:
uk_sherman_ic_firefly_shop;⋠ Sherman, Mk. Ic (2. Dy.Pan.)
uk_sherman_ic_firefly_0;"⋠ Tank, Medium, Sherman, Mk. Ic ""Firefly"" (2. Dywizja Pancerna) ""Trzyniec"""
uk_sherman_ic_firefly_1;⋠ Sherman, Mk. I
uk_sherman_ic_firefly_2;Medium tank
Notice that the second line, the line which contains ""Firefly"" and ""Trzniec"", has quotations around the entire line, but the other three lines do not have any quotations and uk_sherman_ic_firefly_0, a different entry in the same line, does not have quotation marks. This is because there are no double quotations in those entries and so quotations around the entire entry are not needed. We’ll get to why all the other languages are missing in that example, but the use of quotations is what matters here.
Printf format specifiers
Printf format specifiers are a way of specifying values such as numbers and strings to be inserted into text. The specifiers always begin with a % symbol, followed by some character. Usually you will see %d and %s, but they can sometimes be more complicated, such as %.3f. All the specifiers come from C++ and the full list can be found in the “Type field” section of the C++ printf function manual. If it ends with %%, that indicates that it is a percentage and it will display as a % symbol ingame.
For the following example, assume that the contact limit is 100 and the ammunition belt has a caliber of 20 mm:
Input:
You cannot add more than %d contacts.
Omni-purpose %s mm ammunition belt
Output:
You cannot input more than 100 contacts.
Omni-purpose 20 mm ammunition belt
As can be seen, the specifiers get converted to actual values based on whatever the value ingame is. It is important when you see a piece of text with the specifiers to not remove or change them. This is because the game must read them in a certain order that it recognizes based on the file name entry in the first column. You can change the standard text around them, but not the specifiers themselves or their order.
Named variable placeholders
Named variable placeholders are a way of inserting variables into text. You cannot define these variables yourself, they are variables that exist in the game. A variable is a named container that has a value assigned to it and by inserting a variable into your text, it will display as a value. Variables are always inserted in between { and }, and you should not translate the names of variables because that will prevent the game from reading the variable’s name.
For the following example, assume the time bonus is 3 seconds:
Input:
Bonus time {timeSec} sec.Output:
Bonus time 3 sec.
Unlike with specifiers, you can change their order around as you like.
Keyboard/gamepad shortcut icon placeholders
These work exactly the same as named variable placeholders, but are instead surrounded by {{ and }}, and the variables inside are usually in all caps. These are used to specify keyboard shortcuts (e.g. the text that tells you to press a key selection to repair or extinguish a fire).
Plurals
Plurals are the one case in which you can mess with variables. In War Thunder, plurals have completely unique formatting. They rely on already existing named variable placeholders, but allow you to procedurally create plural forms.
War Thunder’s plurals are kind of confusing, so let’s take this slowly. We are going to use the examples listed in the Wiki’s localization guidelines because they are good examples of how plurals work, as well as some examples of issues with using them, but first, let’s explain the basic format.
The basic format of plurals is {n} {n=X/Y}. In this example, n is some named variable placeholder and X and Y are its singular and plural forms. For a language with a singular, dual, and plural form, you could have {n} {n=A/B/C} where A is the singular, B is the dual, and C is the plural. Here are some basic examples taken from the localization guidelines:
Input:
English:     {monthCount} {monthCount=month/months}
German:      {monthCount} {monthCount=Monat/Monate}
Polish:      {monthCount} {monthCount=miesiąc/miesiące/miesięcy}
Serbian:     {monthCount} {monthCount=mesec/meseca/meseci}
Czech:       {monthCount} {monthCount=měsíc/měsíce/měsíců}
Mandarin:    {monthCount} {monthCount=个月}
Output:
English:     1 month or 2 months or 5 months
German:      1 Monat or 2 Monate or 5 Monate
Polish:      1 miesiąc or 2 miesiące or 5 miesięcy
Serbian:     1 mesec or 2 meseca or 5 meseci
Czech:       1 měsíc or 2 měsíce or 5 měsíců
Mandarin:    1个月 or 2个月 or 5个月
Which plural you use will depend on which column the entry is in. One thing to note is that for languages like Mandarin which only have 1 grammatical number, you can also define it without the = symbol by writing it as {n}个月, which will yield the same results.
However, plurals have an issue: paucals. A paucal is an indefinite grammatical number that sits between the definite grammatical numbers, such as noun endings for 1 and 2, and the plural. It basically means “a few” and usually has a rough number range. This means that you cannot define it as an exact number. As an example, let’s take the language Motuna. Motuna, also known as Siwai, is one of the languages of the soon-to-be-independent island of Bougainville, currently part of Papua New Guinea. Motuna does not have a singular noun ending, instead just using the base form of the noun, similarly to English. Its dual noun ending is “-karo,” its paucal noun ending is “-naa,” and its plural noun ending is “-ngung.” Motuna’s paucal noun ending generally ranges from 3 to 7 or 8, but the boundary between the paucal and plural is fuzzy and often relative, and there are contexts in which numbers as low as 4 count as plural rather than paucal. This poses problems, and the following example is going to show why.
For this example, let’s assume that the paucal form is in the range 3-7. The example word “sikuuna” is the Motuna word for boat.
Input:
{boat} {boat=sikuuna/sikuuna-karo/sikuuna-naa/sikuuna-naa/sikuuna-naa/sikuuna-naa/sikuuna-naa/sikuuna-ngung}Output:
1 sikuuna or 2 sikuuna-karo or 3 sikuuna-naa or 6 sikuuna-naa or 8 sikuuna-ngung
The issue is you cannot specify ranges for plurals, so to get the paucal “sikuuna-naa” to apply in the range of 3-7, it has to be written 5 times, one for each number in the range of 3-7. A further issue comes in when we remember that the boundary between the paucal and plural in Motuna is very fluid. That means that contextually, sikuuna-ngung may apply starting with the 4th number, but plurals cannot account for context unless they are put into sentences explicitly constructed to keep that context in mind.
Of course, Motuna isn’t the only language like this. Motuna is just the example being used to demonstrate an issue that can arise when using plurals. This issue can also become even bigger when dealing with languages such as Sursurunga which has a greater paucal, the Rālik dialect of Marshallese which has a paucal, multiple, and plural, all of which can overlap with each other depending on the context, Mokilese which has a greater plural, or Warekena which has a greater and a greatest plural. None of these are issues you will normally run into when making a translation, but if you are making a translation for one of these more obscure languages, it does need to be remembered.
Did you know? Yes, I did read pieces of a 595 page PhD thesis on Motuna from 2015 to write this (Onishi, 2015).
Color tags
Moving onto something much more simple than plurals, let’s talk about color tags. Color tags work like HTML tags where you have an opening and closing color tag, and inside the color tag you specify the color. The color can be specified either using the game’s predefined color tags or with a hex code. The game’s predefined colors can be used by writing them after color=@, while hex codes are preceded by color=#. For example:
<color=@userlogColoredText>Sample text</color>
<color=#f9db78>Sample text</color
Both of these color tags will yield the words “Sample text” in the exact same color because userlogColoredText's color is #f9db78.

You can combine color tags in the same line to indicate different things. Here is an example from my lang mod:

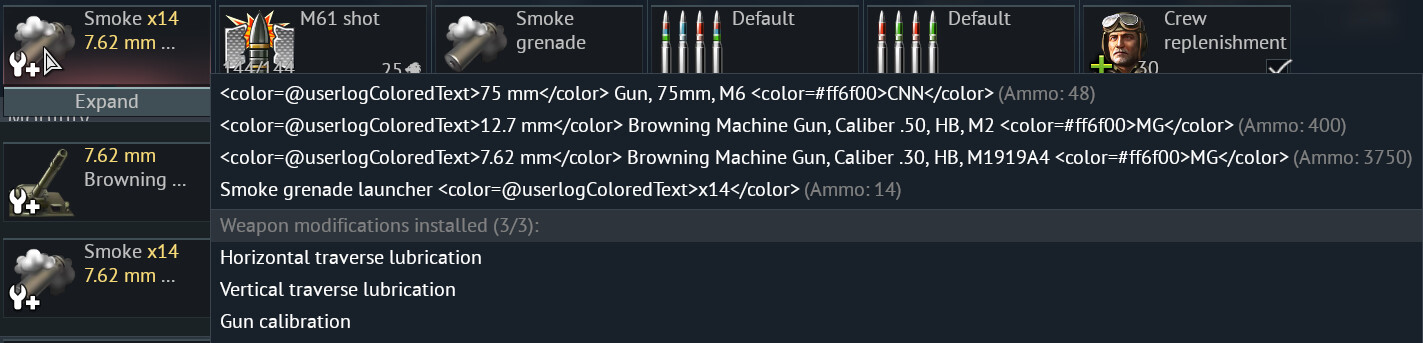
In this text, Schnellnebelkerze 39 is the name of the smoke grenade, 91 mm is the caliber and is colored with userlogColoredText, and GRN-SMK gives the type (GRN-SMK stands for “Grenade — Smoke”) and is colored with the hex code #ff6f00. Of course, you don’t need to edit it in that specific way, but this is an example of what you can do with coloring tags.
Coloring tags does have three issues, though: the custom loadout selector, custom sights that show ammunition names, and the offensive armament selector for ships and tanks. The custom loadout selector does not render color tags, and so the tags themselves display. For example, this:

Becomes this in the custom loadout selector:

This doesn’t apply when selecting loadouts, only when creating new custom loadouts, but it is important to remember. Color tags also do not render properly in custom sights if the sight shows the name of the round. For example, this:

Becomes this in the sight if you have showing ammunition enabled:

The final issue is the offensive armament selector for tanks and ships. This is in the top row next to the shell selector in the modifications window. When color tags are used, it looks like this:
Multiline statcards
Before reading this section, you must read the above section on color tags.
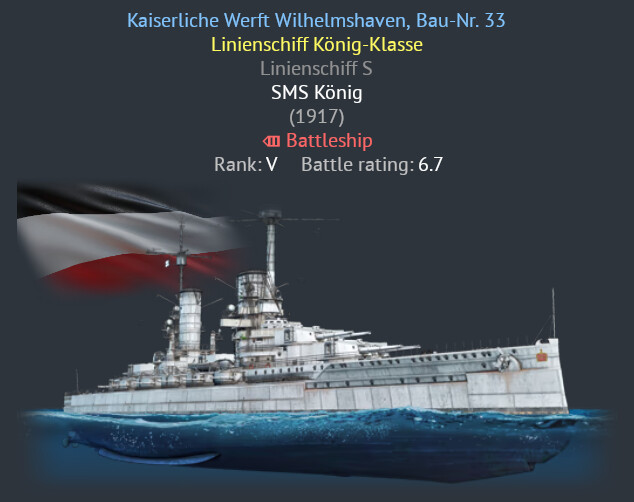
As of major update 2.55 "Ninth Wave", Gaijin added the ability to make vehicle names on statcards multiple lines. Here is an example:
Why would you ever want to do this? Well, one of the reasons is because it allows you to fit much more information on a single statcard, with color-coding for ease of readability. Another is that it gets rid of the issue of name scrolling. In the update where statcards were reworked to allow for multiline statcards, the ability to stretch a statcard's width via the text being too long was removed. In its place was the text scrolling if it gets too long, like this:
Making your statcards multiple lines gets around this issue. Doing this is much simpler than it seems. This is the full entry for that vessel:
germ_battleship_konig_shop;SMS König
germ_battleship_konig_0;"<color=#81c3fc>Kaiserliche Werft Wilhelmshaven, Bau-Nr. 33</color>
<color=#fffa62>Linienschiff König-Klasse</color>
<color=#919191>Linienschiff S</color>
SMS König
<color=#adadad>(1917)</color>"
germ_battleship_konig_1;SMS König
germ_battleship_konig_2;Battleship
The part we care about is this:
germ_battleship_konig_0;"<color=#81c3fc>Kaiserliche Werft Wilhelmshaven, Bau-Nr. 33</color>
<color=#fffa62>Linienschiff König-Klasse</color>
<color=#919191>Linienschiff S</color>
SMS König
<color=#adadad>(1917)</color>"
_0 entries are statcard lines, so that is what we are focusing on. Let's break this down piece by piece:
<color=#81c3fc>Kaiserliche Werft Wilhelmshaven, Bau-Nr. 33</color>: This line denotes the manufacturer. It is surrounded in a color tag with a hex code, has the text, and then a close color tag. That that, there is a new line. Just press Enter.<color=#fffa62>Linienschiff König-Klasse</color>: This denotes the class of the ship.<color=#919191>Linienschiff S</color>: This denotes a development name for the ship. SMS König, before being named, was ordered as Linienschiff S.SMS König: This is the actual white part, the vessel's name. Since white is the default, no color tag is needed as long as the above line's color tag is closed out.<color=#adadad>(1917)</color>: This denotes the refit of the ship. We have the 1917 refit of SMS König (Gaijin claims it is in its 1916 fit ingame, but it is not.).
Importantly, the entire entry after the ; is surrounded in quotes. This is needed because this is what allows you to make it multiple lines and have the game still recognize it as a single entry. You can do a lot of things with multiline statcards, they are very powerful as a tool. I would advise establishing a complete set of the colors you are using for different things. This is the color set I use, but you can use anything you want or take this as inspiration for a place to start:
<color=#81c3fc>Manufacturer & manufacturer name</color>
<color=#ff8c80>Military project</color>
<color=#5cae63>Index (G-, Sd.Kfz., Ps., etc.)</color>
<color=#fffa62>Ship class</color>
<color=#ff831c>Previous name</color>
<color=#7ce68f>Alternate applicable name</color>
Vehicle name
<color=#adadad>Modifications</color>
<color=#ba77ba>Service years package</color>
<color=@currencyGoldColor>Unit/Ace</color>
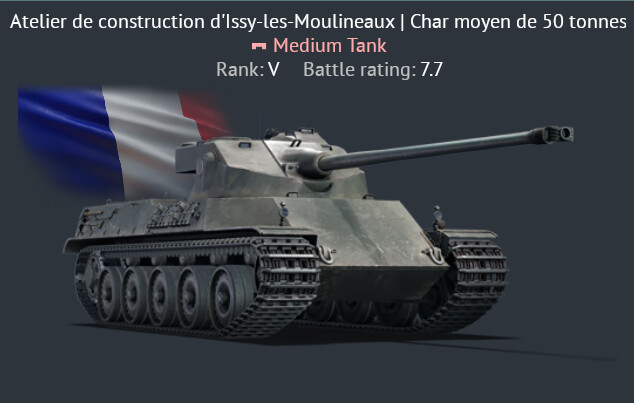
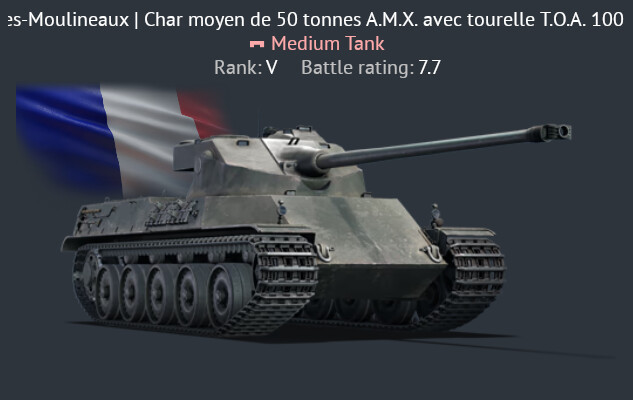
With this ability, you can create a lot. Here are some examples:

You do not have to follow this specific format either. Here is an entirely different format that is being done by Wiggly_Armed_Man, but using the exact same techniques:
I would personally say that the below image is just mildly... completely disgusting, but you do you.
As you can see above, one of the benefits of the way that the system is designed ingame is that, if your multiline name goes too long, it simply shrinks the image on the statcard, rather than overflowing.
Color tags can also span multiple lines and you can nest color tags inside other color tags. Take a look at this:
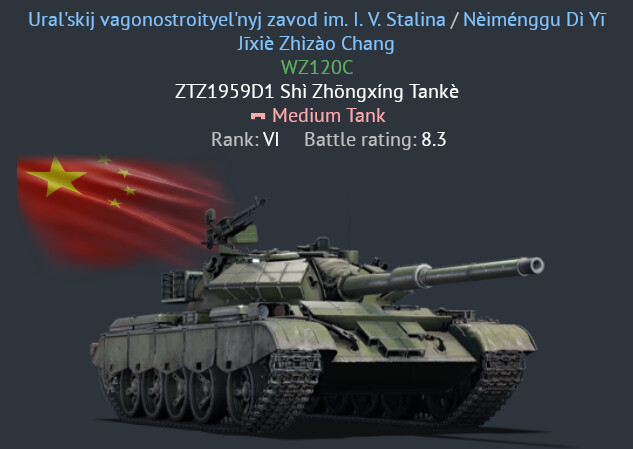
cn_type_59d_0;"<color=#81c3fc>Ural'skij vagonostroityel'nyj zavod im. I. V. Stalina <color=@commonTextColor>/</color> Nèiménggu Dì Yī
Jīxiè Zhìzào Chang</color>
<color=#5cae63>WZ120C</color>
ZTZ1959D1 Shì Zhōngxíng Tankè"
In the first piece:
<color=#81c3fc>Ural'skij vagonostroityel'nyj zavod im. I. V. Stalina <color=@commonTextColor>/</color> Nèiménggu Dì Yī
Jīxiè Zhìzào Chang</color>
The piece <color=@commonTextColor>/</color> is a color tag making a / gray, nested inside the <color=#81c3fc> color tag for a manufacturer making the text around it blue. That manufacturer also has a newline after "Yī", with "Jīxiè Zhìzào Chang" going to the next line. No new color tag is needed on that next line, the previous line's color tag simply keeps applying until it is closed out. All of that results in this statcard:
Adding new languages
Adding languages is generally simple, but it comes with a catch. First, let’s talk about actually adding the language. The steps are:
- Open the
langfolder and findlocalization.blk. - In
localization.blk, find thetext_translation{block. - In the
text_translation{block, add the linelang:t="NewLanguage". - Go to the
War Thunderfolder and openconfig.blk. - Change the line
language:t="English"(or whatever language you have the game set to) tolanguage:t="NewLanguage". - Go to whichever
.csvfiles you want to change for the translation and for each file, add a new<NewLanguage>column right before the<Comments>column. - Launch the game from
aces.exein yourWar Thunderfolder. You must launch it fromaces.exeor the language modification will be overriden.
To give an example, let’s say that you wanted to add a new translation for the Naga City dialect of the Central Bikol language (the Naga City dialect is the most widely spoken dialect of Central Bikol). To do that, you’re first going to go to your lang folder, find localization.blk, and find the text_translation{ block. Then, in the text_translation{ block, you are going to add the line language:t="NagaBikol". Your localization.blk file should now look something like this:
text_translation{
  lang:t="English"
  lang:t="Russian"
  lang:t="French"
  lang:t="Italian"
  lang:t="German"
  lang:t="Spanish"
  lang:t="Polish"
  lang:t="Czech"
  lang:t="Turkish"
  lang:t="Chinese"
  lang:t="TChinese"
  lang:t="HChinese"
  lang:t="Japanese"
  lang:t="Portuguese"
  lang:t="Belarusian"
  lang:t="Ukrainian"
  lang:t="Serbian"
  lang:t="Hungarian"
  lang:t="Korean"
  lang:t="Romanian"
  lang:t="Vietnamese"
  lang:t="NagaBikol"
  ...
}
You’re now going to go to your War Thunder folder and open config.blk, find language:t="English", and replace it with language:t="NagaBikol". Then, for every file you want to edit, you’re going to add a <NagaBikol> column to the header. The header should now look something like this:
"<ID|readonly|noverify>";"<English>";"<French>";"<Italian>";"<German>";"<Spanish>";"<Russian>";"<Polish>";"<Czech>";"<Turkish>";"<Chinese>";"<Japanese>";"<Portuguese>";"<Ukrainian>";"<Serbian>";"<Hungarian>";"<Korean>";"<Belarusian>";"<Romanian>";"<TChinese>";"<HChinese>";"<Vietnamese>";"<NagaBikol>";"<Comments>";"<max_chars>"
Make sure you add an extra semicolon to every line and fill in the additional entries for Naga Bikol. For example, the text entry for the warning text that says “CRITICAL SPEED, PUSH NOSE DOWN” would now look like this:
"HUD_CRIT_SPEED";"CRITICAL SPEED, PUSH NOSE DOWN!";"DÉCROCHAGE, POUSSEZ LE MANCHE!";"VELOCITÀ CRITICA! SPINGI IL MUSO GIÙ!";"GESCHWINDIGKEIT KRITISCH, NASE RUNTER!";"¡VELOCIDAD CRÍTICA, EMPUJA EL MORRO HACIA ABAJO!";"ОПАСНО МАЛАЯ СКОРОСТЬ!";"PRĘDKOŚĆ KRYTYCZNA, POPCHNIJ NOS W DÓŁ!";"Pádová rychlost";"KRİTİK HIZ, BURNUNU AŞAĞI VER!";"已\t达\t临\t界\t速\t度,\t快\t压\t下\t机\t头!";"限界速度だ!\t機首を\t下げろ!\t!";"VELOCIDADE CRÍTICA, PUXE O NARIZ PARA BAIXO!";"КРИТИЧНО НИЗЬКА ШВИДКІСТЬ, ОПУСТІТЬ НІС!";"KRITIČNA BRZINA, UPERITE NOS PREMA DOLE!";"KRITIKUS SEBESSÉG, NYOMD LE A GÉP ORRÁT!";"속도가 너무 낮습니다. 기수를 내리십시오!";"НЕБЯСПЕЧНА МАЛАЯ ХУТКАСЦЬ!";"VITEZĂ CRITICĂ, COBOARĂ BOTUL!";"已\t達\t臨\t界\t速\t度,\t快\t壓\t下\t機\t頭!";"已\t达\t临\t界\t速\t度,\t快\t压\t下\t机\t头!";"TỐC ĐỘ NGUY HIỂM, HƯỚNG MŨI MÁY BAY XUỐNG!";"KRITIKAL NA KALIKSAN, TULOK PAIBABA PAIBABA";;
Notice the extra entry for Naga Bikol at the end. Now, just launch the game from aces.exe and you’re good to go.
Removing columns
Another property of lang mods that you should know about is removing columns. In lang mods, you can actually remove some of those extra columns. To be abundantly clear, if you remove a column from a .csv file, this removes the translation for that language entirely. That being said, this is nonetheless going to be included in this guide just for the purposes of the guide being a truly complete list of everything that you can do.
By removing a column, the translation for the language that column is in is removed. You can also remove the <Comments> and <max_chars> columns. When you remove a column, selecting that language ingame will result in the game defaulting to the translation of the first column in the file. Let’s go back to that earlier example with the Polish Sherman from my lang mod, but this time with the header too:
<ID|readonly|noverify>;<English>
uk_sherman_ic_firefly_shop;⋠ Sherman, Mk. Ic (2. Dy.Pan.)
uk_sherman_ic_firefly_0;"⋠ Tank, Medium, Sherman, Mk. Ic ""Firefly"" (2. Dywizja Pancerna) ""Trzyniec"""
uk_sherman_ic_firefly_1;⋠ Sherman, Mk. I
uk_sherman_ic_firefly_2;Medium tank
Here, every language you select will default to English because no other columns exist.
There are a couple reasons why you might want to remove columns. The first is file size. For example, for my mod, cutting out all the extra columns reduced the mod’s file size from roughly 1.3 megabytes to under 250 kilobytes. That’s a reduction of over 5 times. The second is ease of editing. If you have no use for the other columns, than just getting rid of them can make them easier to edit by reducing clutter.
Whether or not you should do this is highly dependant on the purpose of your mod. If your mod has translations for multiple languages, you absolutely do not want to do this. However, if your mod is exclusively in one language, you may want to cut out the extra columns because there isn’t a use for them in the mod.
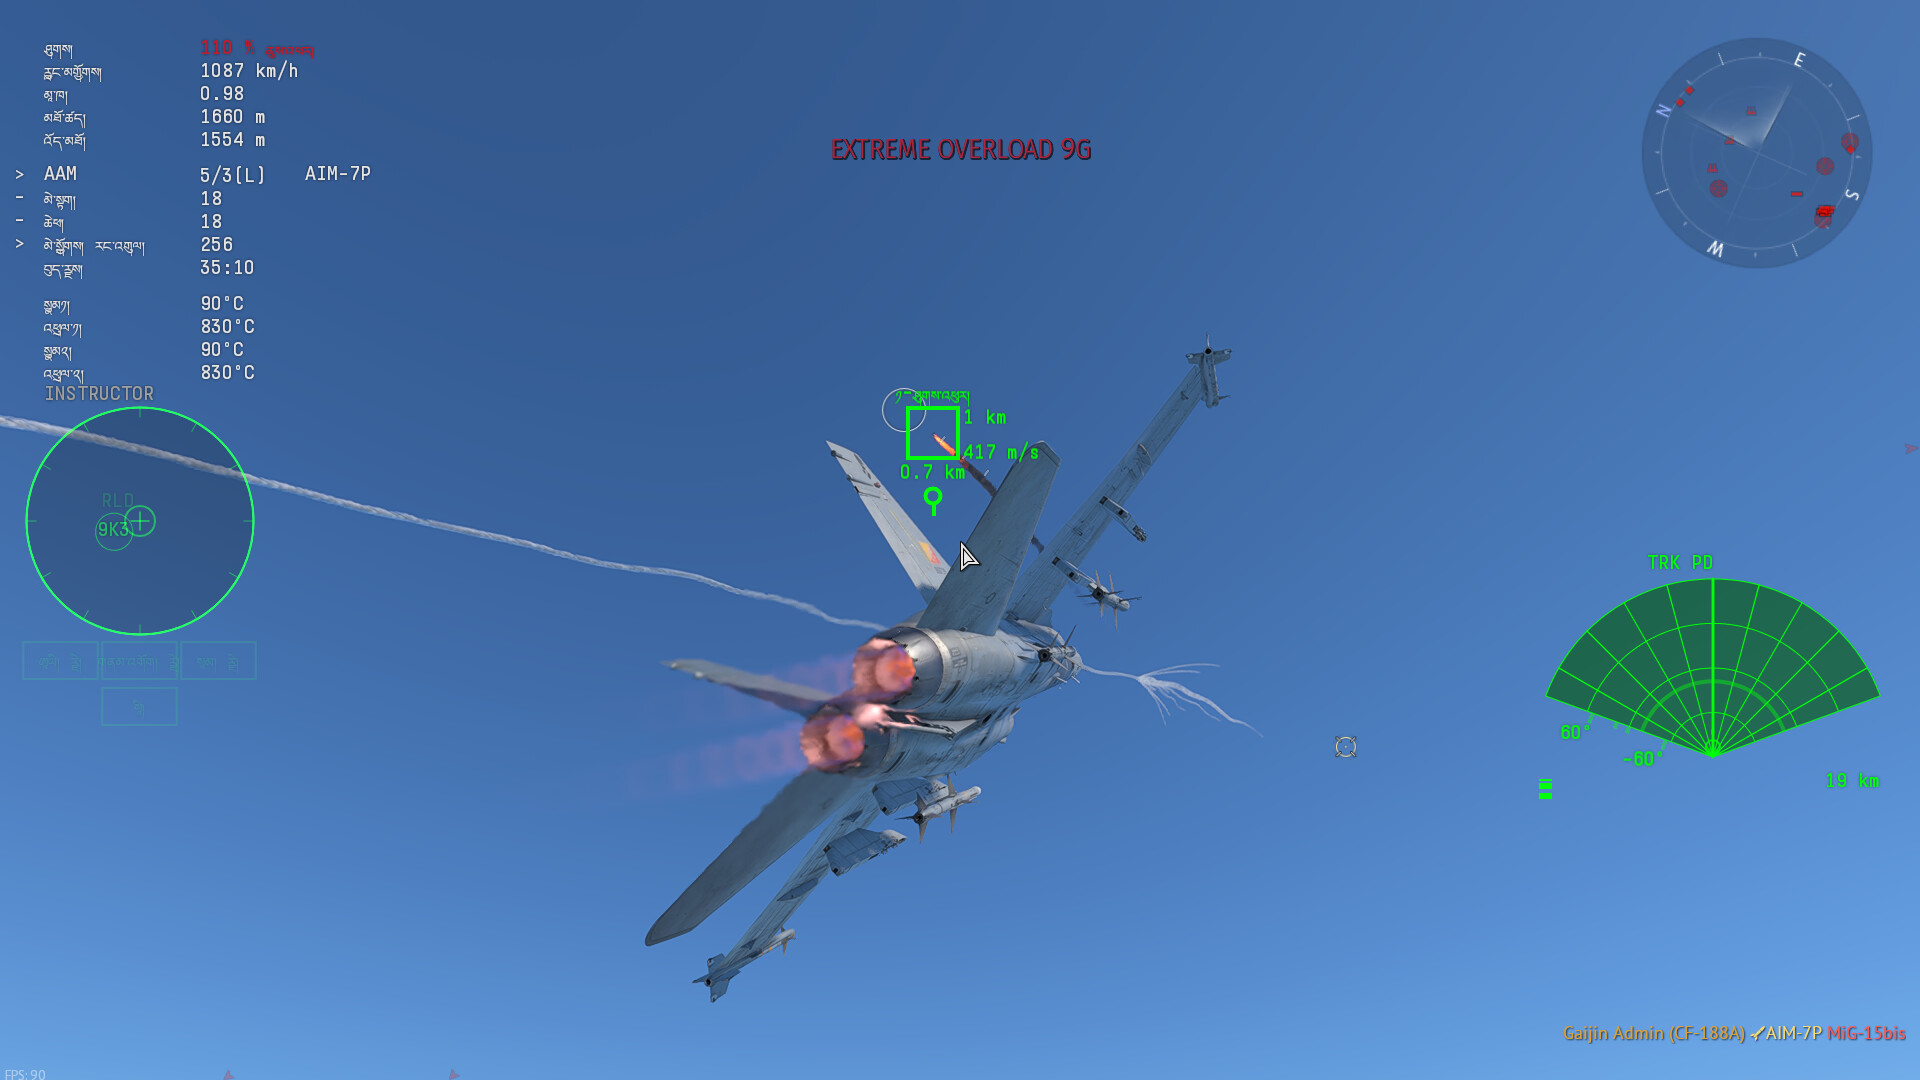
Non-Latin scripts
Many languages use non-Latin scripts. For example, Russian, Ukrainian, Mandarin, and Japanese are all languages that use non-Latin scripts and have localizations in the game already. You absolutely can do localizations for more non-Latin scripts. However, some issues exist, specifically with languages written from right to left. Given the vehicles ingame, this mainly becomes an issue when working with the Semetic language family. War Thunder has issues with properly rendering text written right-to-left and will often just render it left-to-right instead. It also does not render niqqud properly in Hebrew and does not connect the letters for Arabic scripts. This issue can be seen in the cover image for this article. In the cover image, the Iranian F14's Farsi is actually written backwards because, while the text is written in the correct direction in the files, War Thunder is rendering it as left-to-right even though Farsi and all other Semetic languages are written right-to-left. That same Farsi text is also not rendered with the letters connected. There are also some scripts, such as Hindi, which the game simply does not render at all. For example, Hindi text is just rendered as a blank space where the text would go. This issue is not limited to Hindi and also encompasses scripts such as Cuneiform. Why would you want to make a localization for a language and writing system that has been dead for 2000 years? Beats me, but if you want to, I'm sorry but you're out of luck.
Non-latin scripts that the game does not normally support
Sometimes, War Thunder does not support certain scripts. For example, if you normally try to write anything in Hindi, it looks like this:
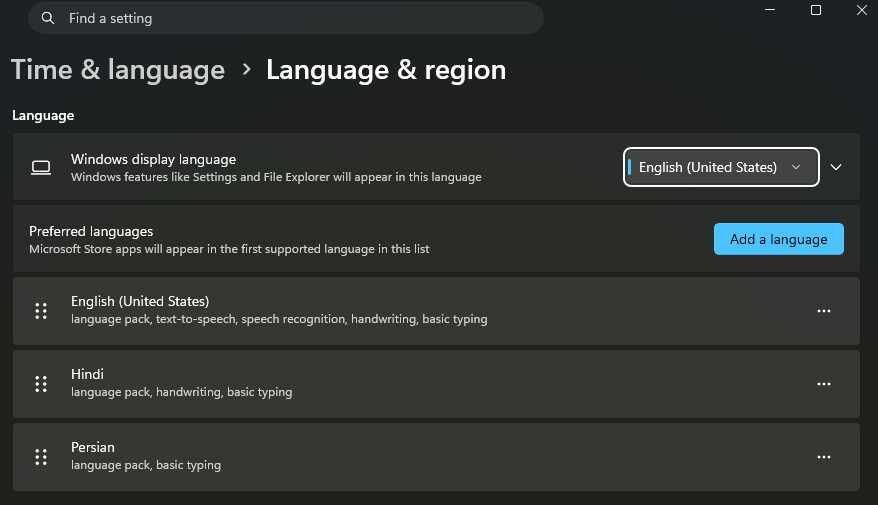
But there is a way to fix this. To do it, you have to actually install the language package on your actual computer. The way to do it varies by computer, but in essence, you have to install the language package onto your actual computer. On Windows, going into Time & Language > Language & region, and then adding another preferred language as a language pack. This allows the game to render it.
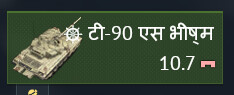
Now, if you load into the game with Hindi installed on your computer, it will actually render the text.
But, there are some problems. It is a little visible in the above image, but for a clearer look, take a look at a lang modded statcard for the Indian Osa-AK:
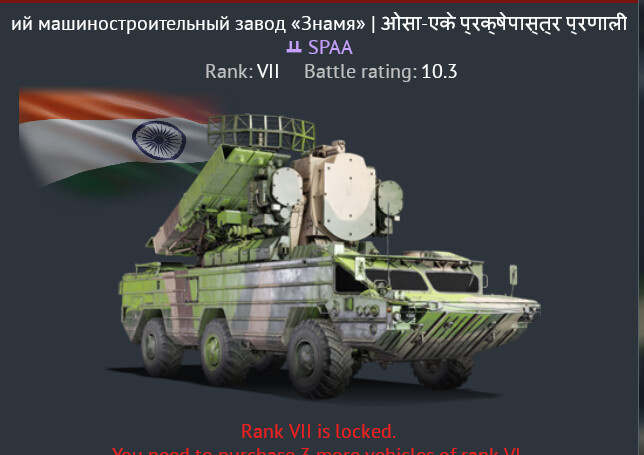
If you read Hindi, This reads as something approaching nonsense. The actual Hindi text written in the file is ओसा-एके प्रक्षेपास्त्र प्रणाली. Why does it appear written completely incorrectly? It is because, while the game can render individual characters, it is not fully equipped to handle Hindi. Hindi has something called conjucts. A conjuct is a combination of 2 letters that form a unique character. Let's look at the character प्र, the first character in the word प्रक्षेपास्त्र. It is pronounced "pra" and is a conjuct of प् (p) and र (ra). That diagonal line under प् is called a virama and denotes inherent schwa deletion (the removal of the inherent schwa vowel sound at the end of a consonant), removing the A sound from the end of प (pa), making it pronounced as just "p". That, combined with र (ra) makes "pra". However, though प् and र are conjucted in Hindi to form प्र, the game is incapable of recognizing that. So, it instead renders them as प् र (this was done with a zero width space, if you actually type it they conjuct automatically). This, though technically making the sound "pra", is not how you actually write Hindi, and as seen in the statcard image, it happens all over the place, compounding as an issue until the text becomes mildly gibberish.
Another issue is fonts. This happens only sometimes. As an example, War Thunder can actually render Hebrew. The text is backwards because of WT's lacking right-to-left support, but the characters themselves render correctly:
However, if you install the Hebrew language package on your computer, the font changes:
The text is still correct, but the font has changed.
Of course, you do not have to do this with just Hindi. You can do it with a lot of scripts. Here is an example of changing menu texts into Dzongkha, the national language of Bhutan:
Special characters
War Thunder has a lot of special characters in it that are rendered ingame as different symbols using the game’s custom font. These special characters will appear as blocks or random other symbols in your editors, but war thunder will render them like this:


A full list of all the unicode characters can be found here.
The official localization guide tells you to not change or remove these characters. This is bad advice. It is true that changing these around without knowing which character is which is a bad idea. You need to cross reference ingame and with the unicode sheet. But if you are properly cross referencing and have a good grasp on what you want to do with them, you absolutely can modify these and even replace them with new ones. Here’s examples of that:


And here is an example of them being removed for Thai planes:

Of course, you still need to be careful. But, you absolutely can remove, edit, replace, and add them as you desire.
Adding new files
This is something very rarely done in lang mods, but it can be extremely useful and is highly important to discuss. We’ll go deeper into how exactly to fit this versus file replacement into your workflow later, but for now, let’s just discuss how it works.
Basically, the normal way lang mods work is that you copy a game file, edit that file, and then replace the original file with that new edited file. But there is another way to do it: you can add new files without replacing anything. This does require 2 extra seconds to set up, but it’s much easier in the long term.
To add files, you need the game ro read them. But the game won’t read them automatically just because they’re in the lang folder, you need to make the game read them.
For the following example, we are going to use the file modded_units.csv and say that it renamed the F-16C to the F-16C-50 (we’ll talk about how to do that later).
First, go into localization.blk and find the locTable{ block. At the bottom, add the line file:t="%modded_units.csv". Your locTable{ block should now look something like this:
locTable{
  file:t="%lang/matching.csv"
  file:t="%lang/controls.csv"
  file:t="%lang/encyclopedia.csv"
  file:t="%lang/encyclopedia_tips.csv"
  file:t="%lang/menu.csv"
  file:t="%lang/menu_chat.csv"
  file:t="%lang/menu_clan.csv"
  file:t="%lang/menu_events.csv"
  file:t="%lang/menu_debriefing.csv"
  file:t="%lang/menu_multiplayer.csv"
  file:t="%lang/menu_options.csv"
  file:t="%lang/menu_discount_description.csv"
  file:t="%lang/missions_briefing.csv"
  file:t="%lang/missions_campaign.csv"
  file:t="%lang/missions_chapters.csv"
  file:t="%lang/missions_debriefings.csv"
  file:t="%lang/missions_dynamic.csv"
  file:t="%lang/missions_fails.csv"
  file:t="%lang/missions_hints.csv"
  file:t="%lang/missions_locations.csv"
  file:t="%lang/missions_objectives.csv"
  file:t="%lang/missions_pilots.csv"
  file:t="%lang/missions_single.csv"
  file:t="%lang/missions_training.csv"
  file:t="%lang/missions_tutorial.csv"
  file:t="%lang/missions_versus.csv"
  file:t="%lang/speech_coral_sea.csv"
  file:t="%lang/speech_guadalcanal.csv"
  file:t="%lang/speech_honolulu.csv"
  file:t="%lang/speech_midway.csv"
  file:t="%lang/speech_tutorial.csv"
  file:t="%lang/speech_video.csv"
  file:t="%lang/speech_wake_island.csv"
  file:t="%lang/shop.csv"
  file:t="%lang/ui.csv"
  file:t="%lang/units.csv"
  file:t="%lang/units_weaponry.csv"
  file:t="%lang/unlocks_achievements.csv"
  file:t="%lang/unlocks_challenges.csv"
  file:t="%lang/unlocks_conditions.csv"
  file:t="%lang/unlocks_attachables.csv"
  file:t="%lang/unlocks_decals.csv"
  file:t="%lang/unlocks_medals.csv"
  file:t="%lang/unlocks_skins.csv"
  file:t="%lang/unlocks_streaks.csv"
  file:t="%lang/benchmark.csv"
  file:t="%lang/units_modifications.csv"
  file:t="%lang/worldwar.csv"
  file:t="%lang/_common_languages.csv"
  file:t="%lang/_keyboard.csv"
  file:t="%lang/_missing.csv"
  file:t="%lang/_online.csv"
  file:t="%lang/_legal.csv"
  file:t="%lang/pc_UiMessages.csv"
  file:t="%lang/modded_units.csv"
}
To explain why this works, let’s talk about load order. The order files are put in localization.blk defines the load order; in other words, the order in which the game will read the files. units.csv is the file that contains all vehicles and thus contains the base F-16C text entries. Because modded_units.csv is after units.csv in the load order, the game will read modded_units.csv after units.csv and so it is possible to override content in units.csv with content in modded_units.csv. So, if the F-16C is renamed to the F-16C-50 in modded_units.csv, the name F-16C-50 will show up ingame even though nothing in the base units.csv file has been edited.
You can do this for every text entry in the game. You can also do it with folders. For example, if you put modded_units.csv in a folder called modded and dropped the folder modded into your lang folder, the game will still read modded_units.csv as long as you change the file’s entry in localization.blk to read file:t="lang/modded/modded_units.csv" to specify that it is in the modded folder. Here is an example of what this looks like for a full set of modded files:
locTable{
  file:t="%lang/matching.csv"
  file:t="%lang/controls.csv"
  file:t="%lang/encyclopedia.csv"
  file:t="%lang/encyclopedia_tips.csv"
  file:t="%lang/menu.csv"
  file:t="%lang/menu_chat.csv"
  file:t="%lang/menu_clan.csv"
  file:t="%lang/menu_events.csv"
  file:t="%lang/menu_debriefing.csv"
  file:t="%lang/menu_multiplayer.csv"
  file:t="%lang/menu_options.csv"
  file:t="%lang/menu_discount_description.csv"
  file:t="%lang/missions_briefing.csv"
  file:t="%lang/missions_campaign.csv"
  file:t="%lang/missions_chapters.csv"
  file:t="%lang/missions_debriefings.csv"
  file:t="%lang/missions_dynamic.csv"
  file:t="%lang/missions_fails.csv"
  file:t="%lang/missions_hints.csv"
  file:t="%lang/missions_locations.csv"
  file:t="%lang/missions_objectives.csv"
  file:t="%lang/missions_pilots.csv"
  file:t="%lang/missions_single.csv"
  file:t="%lang/missions_training.csv"
  file:t="%lang/missions_tutorial.csv"
  file:t="%lang/missions_versus.csv"
  file:t="%lang/speech_coral_sea.csv"
  file:t="%lang/speech_guadalcanal.csv"
  file:t="%lang/speech_honolulu.csv"
  file:t="%lang/speech_midway.csv"
  file:t="%lang/speech_tutorial.csv"
  file:t="%lang/speech_video.csv"
  file:t="%lang/speech_wake_island.csv"
  file:t="%lang/shop.csv"
  file:t="%lang/ui.csv"
  file:t="%lang/units.csv"
  file:t="%lang/units_weaponry.csv"
  file:t="%lang/unlocks_achievements.csv"
  file:t="%lang/unlocks_challenges.csv"
  file:t="%lang/unlocks_conditions.csv"
  file:t="%lang/unlocks_attachables.csv"
  file:t="%lang/unlocks_decals.csv"
  file:t="%lang/unlocks_medals.csv"
  file:t="%lang/unlocks_skins.csv"
  file:t="%lang/unlocks_streaks.csv"
  file:t="%lang/benchmark.csv"
  file:t="%lang/units_modifications.csv"
  file:t="%lang/worldwar.csv"
  file:t="%lang/_common_languages.csv"
  file:t="%lang/_keyboard.csv"
  file:t="%lang/_missing.csv"
  file:t="%lang/_online.csv"
  file:t="%lang/_legal.csv"
  file:t="%lang/pc_UiMessages.csv"
  file:t="%lang/WTHLM_menu.csv"
  file:t="%lang/WTHLM_units.csv"
  file:t="%lang/WTHLM_units_modifications.csv"
  file:t="%lang/WTHLM_units_weaponry.csv"
  file:t="%lang/WTHLM_engines.csv"
  file:t="%lang/WTHLM_sensors.csv"
  file:t="%lang/WTHLM_materials.csv"
  file:t="%lang/WTHLM_maps.csv"
  file:t="%lang/WTHLM_encyclopedia_tips.csv"
  file:t="%lang/WTHLM_loading_screens.csv"
  file:t="%lang/WTHLM_nations.csv"
  file:t="%lang/WTHLM_version.csv"
  file:t="%lang/Package_Farsi/WTHLM_units_farsi.csv"
  file:t="%lang/Package_Farsi/WTHLM_units_weaponry_farsi.csv"
  file:t="%lang/Package_Farsi/WTHLM_units_modifications_farsi.csv"
  file:t="%lang/Package_Thai/WTHLM_units_thai.csv"
  file:t="%lang/WTHLM_userlang.csv"
}
Another thing to note is that if you are adding files, you can make as many new files as you want. In the previous example, the base units_modifications.csv file has been broken up into WTHLM_units_modifictions.csv, WTHLM_engines.csv, and WTHLM_sensors.csv for the purpose of clearer and easier file arrangement.
Packages
This adding files system also allows you to make addons/modules/packages/whatever you want to call them for your mod. In the above example of localization.blk, there are the lines file:t="%lang/Package_Farsi/WTHLM_units_farsi.csv", file:t="%lang/Package_Farsi/WTHLM_units_weaponry_farsi.csv", and file:t="%lang/Package_Farsi/WTHLM_units_modifications_farsi.csv". Because load order reads files further down in localization.csv later, you can add these extra lines into your localization.csv and then have extra folders that you can add into your lang folder with the contents referred to by these lines. As long as these lines are at the end of localization.blk, they will take effect.
The example shown above is from my lang mod for a package for the language Farsi (a.k.a. Persian)—the most commonly spoken language in Iran. By dropping the Package_Farsi folder into your lang folder, Iranian vehicles and weapons in the game get displayed ingame in Farsi instead of in English because the Farsi package I made puts it in the original Farsi. If you have a localization.blk file with the lines referring to packages and you do not have the packages installed, the game will just ignore those extra lines and nothing will break. This means that you can create optional packages that people can download.
Knowing your way around the files
Now that we’ve discussed at hellish length all of the different things you can do with lang mods (and have recounted section 4.2 of a PhD thesis on the language Motuna), let’s discuss knowing your way around the files.
Knowing your way around the files and the formatting of specific types of entries is one of the most critical things in developing lang mods. First we’re going to discuss what is where in the files and then we’ll look at specific formatting for specific types of file entries.
What is where?
Here is just a quick list of what types of texts you find in different parts of the game:
units.csv: vehicles and AI targetsunits_weaponry.csv: armamentsunits_modifications.csv: modifications, engines, radars, LWSs, MAWs, countermeasures, and other sensor systemsmenu.csv: general menu texts and popupsencyclopedia_tips.csv: loading tips when loading the game and loading into battle and missionsui.csv: weapon texts for the in-cockpit HUD on more modern aircraft (specifically, these texts have their file name entry asils/[something])
This is absolutely not an exhaustive list, but it is a useful guide as to where the overwhelming majority of the texts you will likely be editing are.
Vehicles and vehicle formatting
Vehicle formatting is important to understand if you want to edit their names, which is one of the most common applications of lang mods. Each vehicle has 4 file name entries. They always are the vehicle’s file name followed by _shop, _0, _1, and _2. For the rest of this guide, they are going to be called _shop names, _0 names, _1 names, and _2 names. Here is an example:
"ussr_is_2_1944_shop";"IS-2 (1944)";"IS-2 (1944)";"IS-2 mod.1944";"IS-2 Mod. 1944";"IS-2 (1944)";"ИС-2 (1944)";"IS-2 (1944)";"IS-2 obr. 1944";"IS-2 (1944)";"IS-2 1944 型";"IS-2 1944年型";"IS-2 mod. 1944";"ІС-2 (1944)";"IS-2 (1944)";"IS-2 (1944)";"IS-2 (1944)";"ІС-2 узору 1944 г.";"IS-2 (1944)";"IS-2 (1944)";"IS-2 1944 型";"IS-2 (1944)";;
"ussr_is_2_1944_0";"IS-2 (1944)";"IS-2 mod. 1944";"IS-2 mod.1944";"IS-2 Mod. 1944";"IS-2 (1944)";"ИС-2 (1944)";"IS-2 (1944)";"IS-2 obrazec 1944";"IS-2 (1944)";"IS-2 1944 型";"IS-2 1944年型";"IS-2 mod. 1944";"ІС-2 зраз. 1944 р.";"IS-2 (1944)";"IS-2 (1944)";"IS-2 1944년형";"ІС-2 узору 1944 г.";"IS-2 (1944)";"IS-2 (1944)";"IS-2 1944 型";"IS-2 (1944)";;
"ussr_is_2_1944_1";"IS-2";"IS-2";"IS-2";"IS-2";"IS-2";"ИС-2";"IS-2";"IS-2";"IS-2";"IS-2 1944 型";"IS-2 1944年型";"IS-2";"ІС-2";"IS-2";"IS-2";"IS-2";"ІС-2";"IS-2";"IS-2";"IS-2 1944 型";"IS-2";;
"ussr_is_2_1944_2";"Heavy tank";"Char lourd";"Carro armato pesante";"Schwerer Panzer";"Tanque pesado";"Тяжёлый танк";"Czołg ciężki";"IS-2";"Ağır Tank";"重\t型\t坦\t克";"重戦車";"Tanque Pesado";"Важкий танк";"Teški tenk";"nehéz harckocsi";"중전차";"Цяжкі танк";"Tanc greu";"重\t型\t坦\t克";"重\t型\t坦\t克";"Xe tăng hạng nặng";;
These different entries corrospond to different ways the vehicle can appear.
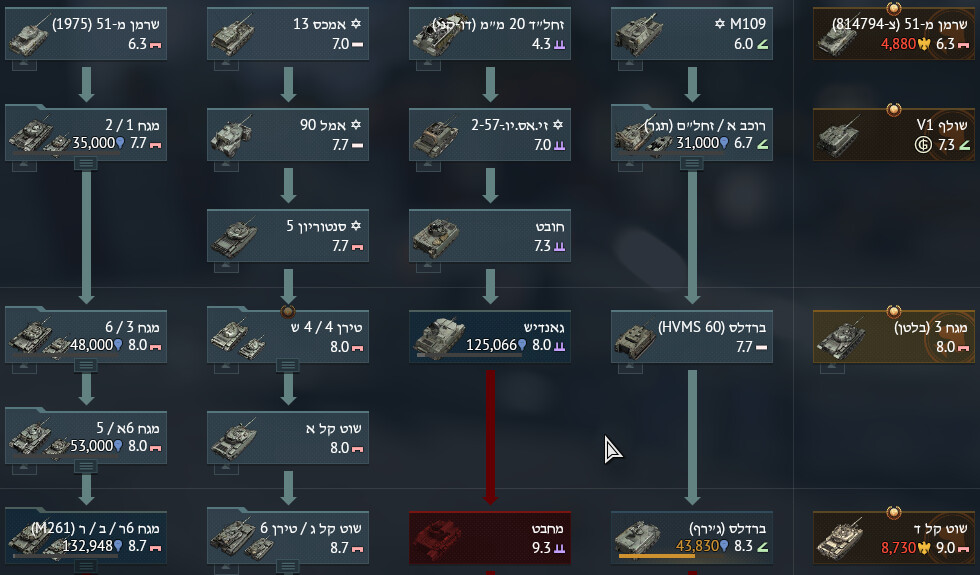
- _shop names are the names seen in the tech tree and at close range in battle. These are sometimes also called “short names.”
- _0 names are the names you see in the statcards of vehicles and the name that appears if you hover over a player’s vehicle in the list of players on each team during a battle. These are sometimes also called “long names” (different from long distance names).
- _1 names are mid distance names. They’re the names you see when you’re somewhat far away from a player, but not too far away from them.
- _2 names are the names you see when you’re very far away from someone and is the most shortened form of the name. An interesting quirk of these names is that for aircraft, _2 names show the most shortened form of the name while for ground and naval vehicles, it shows the vehicle’s type (e.g. medium tank, light cruiser, etc.). It does not necessarily have to do this, you can turn the vehicle type into a shortened form of the name or vice versa, but that is how it is formatted by default. These are also sometimes called “long distance names” (different from “long names”).
Here is an example of how you can utilize these different names for vehicles:
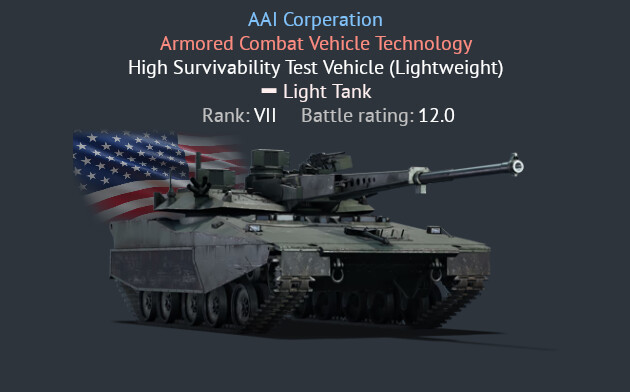
us_m1a1_aim_abrams_shop;M1A1AIM SA
us_m1a1_aim_abrams_0;General Dynamics Land Systems | Tank, Combat, Full Tracked: 120mm Gun, M1A1 Abrams, Abrams Integrated Management, Situational Awareness
us_m1a1_aim_abrams_1;M1A1
us_m1a1_aim_abrams_2;MBT
In this example, the _0 name is incredibly long, and so it’s left for the statcard. Meanwhile, the name that’ll show up in the tech tree is left as M1A1AIM SA, a much more readable name. At longer distances, it is just M1A1, and at the longest distances it is just MBT. This works as a good example of how you can use these different namings for a vehicle to include both its full name as well as still having it be easily accessible at a quick glance.
Weapons and /short
Weapons have 2 types of entries: standard entries and entries with /short added on their ends. This is an example of what this looks like:
"weapons/us_aim9m_sidewinder";"AIM-9M Sidewinder air-to-air missiles";"Missiles air-air AIM-9M Sidewinder";"Missili aria-aria Sidewinder AIM-9M";"AIM-9M Sidewinder Luft-Luft-Raketen";"Misiles aire-aire AIM-9M Sidewinder";"УРВВ AIM-9M Sidewinder";"Pociski powietrze-powietrze AIM-9M Sidewinder";"AIM-9M Sidewinder střely vzduch-vzduch";"AIM-9M Sidewinder havadan havaya füzeler";"AIM-9M 响\t尾\t蛇 空\t对\t空\t导\t弹";"AIM-9M\tサイドワインダー\t空対空\tミサイル";"Mísseis ar-ar AIM-9M Sidewinder";"КРПП AIM-9M Sidewinder";"AIM-9M Sidewinder air-to-air missiles";"AIM-9M Sidewinder air-to-air missiles";"AIM-9M 사이드와인더 공대공 미사일";"УРВВ AIM-9M Sidewinder";"AIM-9M Sidewinder air-to-air missiles";"AIM-9M 響\t尾\t蛇 空\t對\t空\t導\t彈";"AIM-9M Sidewinder air-to-air missiles";"Tên lửa không đối không AIM-9M Sidewinder";;
"weapons/us_aim9m_sidewinder/short";"AIM-9M";"AIM-9M";"AIM-9M";"AIM-9M";"AIM-9M";"AIM-9M";"AIM-9M";"AIM-9M";"AIM-9M";"AIM-9M";"AIM-9M";"AIM-9M";"AIM-9M";"AIM-9M";"AIM-9M";"AIM-9M";"AIM-9M";"AIM-9M";"AIM-9M";"AIM-9M";"AIM-9M";;
You can think of the standard names as being equivalent to the _0 names of vehicles and /short names as being equivalent to _shop names in vehicles. These dictate what the full name will appear as and what the abbreviated name will appear as. The full name appears in things like the list of weapons in a loadout once you click on the loadout and see the full list on the right. /short names appear in situations like the indicator in the top left corner of what weapon is selected during a battle.
Not every weapon has a /short name though. /short names are generally reserved for aircraft weapons. Weapons for ground vehicles generally only have a single entry. For example:
"weapons/114mm_Psv_H_18_user_cannon";"114 mm Psv.H/18 howitzer";"Obusier de 114 mm Psv.H/18";"Obice da 114mm Psv.H/18";"114 mm Psv.H/18 Haubitze";"Obús Psv.H/18 de 114 mm";"114-мм гаубица Psv.H/18";"Haubica Psv.H/18 kal. 114 mm";"114mm houfnice Psv.H/18";"114 mm Psv.H/18 obüs";"114 毫\t米 Psv.H/18 榴\t弹\t炮";"114 mm Psv.H/18榴弾砲";"Morteiro de 114 mm Psv.H/18";"114-мм гаубиця Psv.H/18";"114 mm Psv.H/18 howitzer";"114 mm-es Psv.H/18 tarack";"114 mm Psv.H/18 곡사포";"114-мм гаубица Psv.H/18";"114 mm Psv.H/18 howitzer";"114 毫\t米 Psv.H/18 榴\t彈\t炮";"114 mm Psv.H/18 howitzer";"Lựu pháo 114 mm Psv.H/18";;
One thing to note about weapons is their statcards. The new weapon statcard format for ammunition means that if you make a name too long, it will overflow. This is what that looks like:

However, you can get around this. Though you can get rid of the quotes in lines, you can actually use quotes to be able to stretch one text entry across multiple lines. For example, by putting the previous example's entry in quotes and stretching it across two lines, as shown here:
57mm_qf_ap;"Cartridge, Q.F., 6-pr., Cordite M.D., Steel Shell, Mk. XIV (Shell, Q.F.,
A.P., 6-pr. 6-cwt., Mk. V)"
The overflow issue can be fixed by moving the overflowing text onto the next line, as seen here:

This overflow issue only occurrs for tank ammunition and gun shells more generally. Aircraft ammunition such as missiles, bombs, and aerial rockets automatically move to the next line without the need to split the lines in the files. Torpedoes and depth charages for ships also automatically move to the next line.
Modifications, tooltips, and /desc
Modifications have 2 types of names: the normal name, and the /desc name. /desc is for the tooltip with a description that comes up when you hover over something. For example:
"modification/f2a3_2x100lb";"Mk.41";"Mk.41";"MK.41";"Mk. 41";"Mk.41";"Mk.41";"Mk 41";"Mk.41";"Mk.41";"Mk 41 挂\t架";"Mk.41";"MK.41";"Mk.41";"Mk.41";"Mk. 41";"Mk.41";"Mk.41";"Mk 41";"Mark 41 掛\t架";"Mark 41 挂\t架";"Mk.41";;
"modification/f2a3_2x100lb/desc";"Allows the installation of 2 x 100 lb bombs.";"Permet l'installation de 2 bombes de 53 kg.";"Permette l'installazione di 2 bombe da 100lb.";"Ermöglicht die Anbringung von 2 x 100-lbs-Bomben.";"Permite la instalación de 2 bombas de 100 lb.";"Возможность установки на самолёт двух 100-фунтовых бомб.";"Pozwala na podwieszenie zestawu bomb 2 x 100 lb (2 x 45kg).";"Umožňuje nést 2× 100 lb pumu";"100 kg'lık bombaların yüklenmesine izin verir.";"可\t携\t带 2 枚 100 磅\t炸\t弹。";"追加武装に\t100lb\t爆弾(53kg)\t2発が\t選択可能になります。";"Permite a instalação de 2 bombas de 100 lb.";"Можливість установки на літак двох 100-фунтових бомб.";"Omogućava instalaciju 2 bombe od 100 lb.";"Lehetővé teszi 2 darab 100 fontos bomba felszerelését.";"100 lb 폭탄 2발을 장착할 수 있게 된다.";"Дазваляе самалёту несці дзве бомбы па 100 фунтаў.";"Permite instalarea a 2 bombe de 45 kg.";"可\t攜\t帶 2 枚 100 磅\t炸\t彈。";"可\t携\t带 2 枚 100 磅\t炸\t弹。";"Trang bị bom 2 x 100 lb.";;
Here, the standard modification name gives the name that appears in the modification window, and the /desc name gives the tooltip that appears when you hover over it.
There are also dedicated /tooltip text entries. These exist for a lot of menu texts. For example, the red text that appears in the top left corner when you enable lang mods has a /tooltip line. This is that text in the files:
"mainmenu/custom_lang_info";"Custom localization enabled";"Localisation personnalisée activée";"Traduzione personalizzata abilitata";"Benutzerdefinierte Lokalisation aktiv";"Localización personalizada activada";"Включена пользовательская локализация";"Włączone niestandardowe tłumaczenie";"Vlastní lokalizace povolena";"Özel yerelleştirme etkinleştirildi";"已\t启\t用\t自\t定\t义\t文\t本";"ローカライゼーションの\tカスタマイズを\t有効にする";"Localização personalizada ativada";"Користувацька локалізація ввімкнена";"Custom localization enabled";"Custom localization enabled";"사용자 설정 번역 사용 중";"Включена пользовательская локализация";"Custom localization enabled";"已\t啟\t用\t自\t定\t義\t文\t本";"Custom localization enabled";"Bản dịch tự chọn được kích hoạt";;
"mainmenu/custom_lang_info/tooltip";"You have custom localization enabled. If some texts in the game are displayed incorrectly, contact the author of the installed custom localization (mod) or disable it.";"Vous avez une localisation personnalisée activée. Si certains textes du jeu ne s'affichent pas correctement, contactez l'auteur de la localisation personnalisée (mod) ou désactivez-la.";"Hai una traduzione personalizzata abilitata. Se alcuni testi in gioco vengono visualizzati non correttamente, contatta l'autore della mod o disabilitala.";"Du hast eine benutzerdefinierte Lokalisation aktiviert. Falls einige Texte in dem Spiel inkorrekt dargestellt werden, kontaktiere den Autor der installierten benutzerdefinierten Lokalisation (Mod), oder deaktiviere sie.";"Tienes activada la localización personalizada. Si algunos textos del juego se muestran incorrectamente, ponte en contacto con el autor de la localización personalizada instalada (mod) o desactívala.";"У вас включена пользовательская локализация. Если некоторые тексты в игре отображаются некорректно, обратитесь к автору установленной пользовательской локализации (мода) или отключите её.";"Masz aktywowane niestandardowe tłumaczenia. Jeśli niektóre teksty gry są przedstawiane nieprawidłowo, skontaktuj się z twórcą niestandardowego tłumaczenie (modyfikacja) lub ją wyłącz.";"Máte povolenou vlastní lokalizaci. Pokud se některé texty ve hře zobrazují nesprávně, kontaktujte autora nainstalované vlastní lokalizace (mod) nebo ji vypněte.";"Özel yerelleştirmeyi etkinleştirdiniz. Eğer oyundaki bazı metinler düzgün görüntülenmiyorsa, yüklü özel yerelleştirmenin (mod) yapımcısıyla iletişime geçin ya da özel yerelleştirmeyi devre dışı bırakın.";"已\t启\t用\t客\t户\t端\t文\t本\t自\t定\t义\t功\t能。\t如\t游\t戏\t内\t部\t分\t文\t本\t未\t正\t常\t显\t示,\t请\t与\t文\t本\t原\t作\t者\t联\t系\t或\t禁\t用\t自\t定\t义\t文\t本。";"ローカライゼーションの\tカスタマイズを\t有効にしました。\tゲーム\t内\tテキストの\t表示に\t誤りがあった\t場合は、\tカスタムローカライゼーション(mod)\tを\tインストールした\t作成者に\t問い\t合わせるか、\t無効に\t設定してください。";"Você ativou a localização personalizada. Se alguns textos do jogo forem exibidos incorretamente, entre em contacto com o autor da localização personalizada instalada (mod) ou desative-a.";"У вас увімкнено користувацьку локалізацію. Якщо деякі тексти в грі відображаються некоректно, зверніться до автора користувацької локалізації (моду), що встановлено, або вимкніть її.";"You have custom localization enabled. If some texts in the game are displayed incorrectly, contact the author of the installed custom localization (mod) or disable it.";"You have custom localization enabled. If some texts in the game are displayed incorrectly, contact the author of the installed custom localization (mod) or disable it.";"사용자 설정 번역이 적용된 상태입니다. 일부 텍스트가 제대로 표시되지 않을 경우, 제작자에게 연락하거나 비활성화하시기 바랍니다.";"У вас включена пользовательская локализация. Если некоторые тексты в игре отображаются некорректно, обратитесь к автору установленной пользовательской локализации (мода) или отключите её.";"You have custom localization enabled. If some texts in the game are displayed incorrectly, contact the author of the installed custom localization (mod) or disable it.";"已\t啟\t用\t客\t戶\t端\t文\t本\t自\t定\t義\t功\t能。 如\t遊\t戲\t內\t部\t分\t文\t字\t未\t正\t常\t顯\t示,\t請\t與\t文\t本\t原\t作\t者\t聯\t絡\t或\t停\t用\t自\t定\t義\t文\t本。";"You have custom localization enabled. If some texts in the game are displayed incorrectly, contact the author of the installed custom localization (mod) or disable it.";"Bạn đã bật tính bản dịch tùy chọn. Nếu một số văn bản trong trò chơi hiển thị không chính xác, hãy liên hệ với tác giả của bản dịch tự chọn (mod) đã cài đặt hoặc tắt nó đi.";;
You can edit these tooltips as you wish and even make them multiple lines long. For example, here is what I did to that text for my mod:
mainmenu/custom_lang_info;<color=@commonTextColor>War Tinder's Historical Localization Mod</color> <color=@goodTextColor>v1.17.03d1</color>
mainmenu/custom_lang_info/tooltip;"You have installed War Tinder's Historical Localization Mod <color=@goodTextColor>v1.17.03d1</color>. Vehicle, weapon, and modification names may appear different.

If you find an error in the mod or a missing piece of text, please create a report in the issues section for the mod's GitHub repository. The GitHub repository can be found here:

https://github.com/Addysaurus/lang_modding

Mod team:
• WarTinder
• Odican
• Theren5534
• czartraktheprotogen
• ph41te
• Violet
• KittyCatAjax

P.S. It's never too late to start HRT!"
Here, the text is colored to be the standard game text color instead of red, redid the tooltip, and made it multiple lines. This example is here to show something important: if you make a tooltip multiple lines, you need to surround it in quotes. If you do not, the game will only read the first line. This example is also an example of adding files because it has been moved into a new file called WTHLM_version.csv.
Note: This is not an advertisement, it is just an example. Use or make whatever mod you want. That is why this guide exists.
Encycopedia tips
encyclopedia_tips.csv is a unique case because it is the only file where you can add new file entries (sort of).
"loading/aircraft/tip74";"The tropical variant, the Bf.109F-4, protected the pilot from overheating on the ground with a mounted umbrella covering the cockpit.";"La variante tropicale du Bf.109F-4 (trop) intégrait un parasol qui couvrait l'habitacle et protégeait le pilote du soleil au sol.";"La variante tropicale del Bf.109F-4 aveva un ombrello montato sopra alla cabina per proteggere il pilota dal sole quando a terra.";"Die Tropenausführung der Bf 109 F-4 schützte den Piloten vor Überhitzung am Boden durch einen am Flugzeug montierten Schirm, der das Cockpit gegen die Sonneneinwirkung abschirmte.";"La variante tropical del Bf 109 F-4, protejía al piloto del calor en tierra con un parasol montado en la cabina.";"В тропической версии Bf.109F-4 для защиты пилота от перегрева на земле было предусмотрено крепление для зонтика, прикрывающего кабину.";"Tropikalna wersja niemieckiego myśliwca Messerschmitt Bf 109 F-4, w czasie postoju na ziemi, chroniła pilota przed przegraniem dzięki parasolowi zamontowanemu w kokpicie.";"Letci i tankisté ve WT bojují do posledního dechu.";"Bf.109F-4'ün tropik versiyonu, pilotu kokpit üzerine takılan bir şemsiye aracılığıyla aşırı sıcaktan korumuştur.";"Bf 109 F-4 的\t热\t带\t改\t型\t安\t装\t了\t一\t把\t遮\t蔽\t座\t舱\t罩\t的\t阳\t伞,\t以\t免\t倒\t霉\t的\t飞\t行\t员\t被\t热\t气\t给\t烤\t熟\t了。";"Bf.109F-4\tの\t熱帯地域派生型は\t地上において、\tシェードを\t搭載し\tコックピットを\t覆うことで\tパイロットを\t熱から\t保護しました。";"A variante tropical, o Bf. 109 F-4, protegeu o piloto de superaquecimento no chão com um guarda chuva montado cobrindo o cockpit.";"У тропічній версії Bf.109F-4 для захисту пілота від перегріву на землі було передбачене кріплення для парасольки, що прикриває кабіну.";"Tropska varijanta Bf.109F-4 je imala suncobran koji je prekrivao kabinu i tako štitio pilota od vrućine.";"A Bf 109 F-4 trópusi változatára fel lehetett erősíteni egy esernyőt, mely védte a pilótát a túlhevüléstől.";"사막 작전형인 Bf 109F-4에는 지상에서 조종사의 더위를 막기 위해 조종석을 덮는 양산도 장착되어 있었습니다.";"У трапічным варыянце Bf.109F-4 для абароны пілота ад перагрэву на зямлі было прадугледжана мацаванне для парасоніка, які прыкрывае кабіну.";"Varianta tropicală, Bf.109F-4, proteja piloții de supraîncălzire la sol cu un parasolar montat deasupra carlingii.";"Bf.109F-4 是\t熱\t帶\t改\t良\t型,\t它\t通\t過\t安\t裝\t覆\t蓋\t座\t艙\t的\t陽\t傘\t保\t護\t飛\t行\t員\t免\t受\t地\t面\t過\t熱\t的\t影\t響。";"车\t长\t断\t裂,\t发\t动\t机\t昏\t迷,\t机\t枪\t阵\t亡,\t驾\t驶\t员\t殉\t爆\t都\t是\t安\t东\t星\t特\t色\t0v0";"Biến thể nhiệt đới, Bf.109F-4, đã bảo vệ phi công khỏi sức nóng trên mặt đất với một chiếc dù được gắn trong buồng lái.";;
"loading/aircraft/tip75";"The absence of armor on the H6K4 was due to the plane’s long range (up to 6000 km).";"L'absence de blindage du H6K4 augmentait fortement son rayon d'action (jusqu'à 6000 km).";"L'assenza di corazzatura sugli H6K4 era dovuto a lungo raggio dell'aereo (fino a 6000 km).";"Das Fehlen von Panzerung auf der H6K4 war ein Grund für die große Reichweite des Flugzeugs, die bei bis zu 6000 km lag.";"La ausencia de blindaje en el H6K4 era para maximizar el alcance del avión (hasta 6000 km).";"Отсутствие бронирования H6K4 было обусловлено высокой дальностью полёта самолёта — до 6000 км.";"Samolot H6K4 był prawie pozbawiony pancerza, dzięki temu mógł pokonywać długie dystanse (nawet 6000 km).";"Názor na překlad a chyby můžeš napsat do československé sekce WT fóra.";"H6K4'ün zırh yoksunluğunun sebebi uzun menzilli olmasıdır (600km civarı).";"H6K4 九\t七\t式\t飞\t行\t艇\t二\t二\t型\t虽\t然\t牺\t牲\t了\t装\t甲\t防\t护,\t但\t航\t程\t却\t高\t达 6,000 千\t米。";"長い\t航続距離 (最大\t6, 000km) を\t実現するため、\t九七式飛行艇の\t防護性能は\t貧弱なものになってしまいました。";"A ausência de armadura no H6K4 foi devida ao longo alcance do avião (até 6000 km).";"Відсутність бронювання H6K4 була зумовлена високою дальністю польоту літака - до 6000 км.";"Za nedostatak oklopa na H6K4 je kriv njegov veliki dolet (čak do 6000km).";"A H6K4 páncélzatának hiánya a nagy, akár 6000 kilométeres hatótávolság elérésének tudható be.";"H6K4는 장거리 비행(최대 6,000km)을 위해 장갑판이 달려 있지 않았습니다.";"Самалёт H6K4 не меў браніравання, дзякуючы чаму мог выконваць палёты на далёкія, да 6000 км, дыстанцыі.";"Lipsa blindajului de pe H6K4 s-a datorat razei sale lungi de acțiune (până la 6000 km).";"H6K4 九\t七\t式\t飛\t行\t艇\t二\t二\t型\t雖\t然\t犧\t牲\t了\t裝\t甲\t防\t護,\t但\t航\t程\t卻\t高\t達 6,000 公\t里。";"装\t饰\t挂\t件\t里\t伪\t装\t栏\t目\t内\t的\t草\t堆\t可\t以\t遮\t挡\t发\t动\t机\t产\t生\t的\t热\t源\t以\t增\t强\t坦\t克\t对\t热\t成\t像\t的\t伪\t装\t能\t力";"Không có vỏ kim loại khiến cho H6K4 có tầm bay xa cực lớn (lên đến 6,000 km).";;
"loading/aircraft/tip76";"The PBY Catalina was the most popular seaplane; some are still in civilian use.";"Le PBY Catalina fut l'hydravion le plus populaire ; certains sont encore en usage civil.";"Il Consolidated PBY Catalina era l'idrovolante più famoso; alcuni sono ancora in uso civile.";"Die PBY Catalina war das beliebteste Seeflugzeug des Krieges. Einige sind heute noch im zivilen Gebrauch.";"El PBY Catalina fue el hidroavión más popular; Algunos están todavía en uso civil hoy en día.";"PBY Catalina была самым массовым из гидросамолётов, и некоторые самолёты этой модели действуют до сих пор, переоборудованные для гражданских целей.";"Latająca łódź PBY Catalina była najbardziej popularnym wodnosamolotem w historii, niektóre z nich wciąż są w użytku cywilnym.";"Spojenec tvou pomoc jistě ocení, naopak záměrné vytlačování a blokování ti může přinést potrestání";"PBY Catalina en ünlü deniz uçağıydı, bazıları hava sivil amaçlarla kullanılmaktadır.";"PBY 可\t谓\t使\t用\t最\t广\t泛\t的\t水\t上\t飞\t机\t—\t—\t直\t到\t今\t天\t仍\t有\t不\t少\t改\t造\t后\t的\t民\t用\t“卡\t特\t琳\t娜”\t在\t正\t常\t飞\t行。";"PBY\tカタリナは\t最も\t人気のある\t飛行艇です。\t民間ではいまだに\t現役で\t使われているものもあります。";"O PBY Catalina era o hidroavião mais popular; alguns ainda estão no uso civil.";"PBY Catalina був наймасовішим гідролітаком; деякі моделі якого досі використовуються для цивільного призначення.";"PBY Catalina je bio najpopularniji hidroavion, neki su i dalje u civilnoj upotrebi.";"A PBY Catalina volt a legnépszerűbb hidroplán. Néhány darab még mindig polgári használatban van.";"PBY 카탈리나는 가장 인기있는 비행정이었고 일부는 지금도 민간에서 운용 중입니다.";"Лятучая лодка PBY Catalina была наймасавым гідрасамалётам у гісторыі. Некаторыя з іх дагэтуль ужываюцца ў грамадзянскай авіяцыі.";"PBY Catalina a fost cel mai popular hidroavion; câteva sunt încă folosite în scopuri civile.";"PBY 卡\t特\t琳\t娜\t水\t上\t飛\t機\t可\t以\t說\t是\t使\t用\t最\t廣\t泛\t的\t水\t上\t飛\t機,\t直\t到\t今\t天\t仍\t有\t不\t少\t在\t民\t間\t使\t用";"请\t按\t交\t通\t法\t规\t驾\t驶\t车\t辆,\t以\t防\t止\t出\t现\t追\t尾\t擦\t碰\t等\t交\t通\t事\t故,\t当\t然\t作\t战\t时\t请\t无\t视\t该\t规\t定。";"Chiếc PBY Catalina là chiếc tàu bay phổ biến nhất; một số vẫn đang phục vụ trong các hoạt động dân sự.";;
"loading/aircraft/tip77";"The A5M was the world's first monoplane carrier-based fighter.";"L'A5M fut le premier chasseur monoplan embarqué du monde.";"Il A5M fu il primo caccia monoplano imbarcato al mondo.";"Die A5M war das erste trägergestützte Eindecker-Jagdflugzeug der Welt.";"El A5M era primer monoplano de combate para portaaviones del mundo.";"A5M стал первым в мире палубным истребителем-монопланом.";"Japoński myśliwiec A5M był pierwszym jednopłatowcem na świecie, który mógł startować i lądować na lotniskowcach.";"Pořadí a typ munice ve vozidle si můžeš nastavit v testovací jízdě.";"A5M dünyanın ilk tek-kanat, uçak gemisi konuşlu avcısıdır.";"A5M 九\t六\t舰\t战\t乃\t全\t世\t界\t首\t款\t单\t翼\t舰\t载\t战\t斗\t机。";"九六式艦上戦闘機は\t世界初の\t単葉艦上戦闘機です。";"O A5M foi o primeiro monoplano do mundo embarcado.";"A5M став першим у світі палубним винищувачем-монопланом.";"A5M je bio prvi jednokrilac za nosače aviona.";"Az A5M volt a világon az első repülőgép-hordozó bázisú egyfedelű vadászrepülő.";"A5M은 세계 최초의 함재 단엽전투기였습니다.";"Японскі знішчальнік A5M быў першым у свеце палубным знішчальнікам-манапланам.";"Avionul japonez A5M a fost primul avion de vânătoare monoplan din lume purtat de portavioane.";"A5M 九\t六\t式\t艦\t載\t戰\t鬥\t機\t是\t世\t界\t上\t第\t一\t架\t單\t翼\t艦\t載\t戰\t鬥\t機";"一\t些\t薄\t甲\t的\t地\t面\t载\t具\t具\t有\t“结\t构\t断\t裂”\t机\t制,\t驾\t驶\t这\t一\t类\t载\t具\t时\t要\t小\t心\t隐\t蔽\t车\t体";"Chiếc A5M là máy bay tiêm kích cánh đơn trên tàu sân bay đầu tiên trên thế giới.";;
The above text is the last 4 aircraft loading tips. But, you do not need to stop there. You are not limited to 77 aircraft loading tips. The base game may only have 77 of them, but you can add loading/aircraft/tip78 and the game will read it and display it. This isn’t truly adding new file entries. Rather, it is like this because the game does not use tip75, tip76, tip77, etc. as a way of referring to specific files. Instead, it just uses them to index tips that it accesses directly from encyclopedia_tips.csv, meaning that you can add as many as you want.
Regional files
NOTE: Before you read this, read the section on adding files.
So, you will almost never see a lang mod edit the regional files. The regional files are a special set of files that have decals, skins, events, tournaments, etc. Ever wondered where the entries for a decal you like is, or where the text for the Eye in the Sky event is actually located? It is in the regional files. You aren't exactly "supposed" to edit them. When I say that, I do not mean that it is not allowed. Lang mods are allowed and the regional files are lang files. Editing them is allowed. However, they are designed to not be edited in the same way that other lang files are and are very much an utter pain to set up the editing of for a couple of reasons. The first is that when you generate the lang folder, the regional files are not generated with it. Those exist in a seperate folder. You can see the references to them in localization.blk, they look like this (more on these in a moment):
regional:t="%langRegional/special_events.csv"
regional:t="%langRegional/tournaments.csv"
regional:t="%langRegional/unlocks_extra.csv"
regional:t="%langRegional/ugc.csv"
regional:t="%langRegional/regional_trophies.csv"
regional:t="%langRegional/regional_skins.csv"
regional:t="%langRegional/regional_decals.csv"
regional:t="%langRegional/regional_titles.csv"
The second reason is that, normally, there is only one way to edit the regional files, and it is a variant on the adding files method. However, it comes with a big problem. Basically, what you would do is you would set the reference to the regional file equal to a fake file and then add in a new file. For example, regional:t="%langRegional/regional_decals.csv" becomes regional:t="%langRegional/FAKE_regional_decals.csv", and then you can add your own file:t="%lang/modded_decals.csv" file in locTable as normal. However, the issue is that it would not just grab from the base regional file and then apply any edits you made on top like normal. Instead, you would need to copy the entirety of the regional file into your file and then any time they add anything to it, which is like every other day, you would need to update your file. This is a gargantuan pain and also could mean you need to release a mod update like every 2 days, which is not tenable.
I am going to show you a new method for editing them that, to my knowledge (please correct me if I am wrong), I am the first to figure out. But first, I mentioned the regional files do not generate when you generate the lang folder. So here is how you get them. First, go to Gszabi99's War Thunder datamine GitHub repository. Gszabi99, along with Oshida, are the community's resident dataminers and are major helps to the community. Once you are there, go to regional.vromfs.bin_u/lang. Here is where you will find the regional files. You can download them from there. You will not actually be using these files in the mod itself, but these files are the references so you can find the file entries for anything you want to edit. Store them somewhere near the rest of your development files (see step 4 to learn good file organization).
Okay. Now comes the messy part. Go to localization.blk. The first thing you are going to do is, as mentioned in the earlier, old method, set the reference for the regional file you want to edit to a file that doesn't exist. Let's use decals as an example. Here, regional:t="%langRegional/regional_decals.csv" could become regional:t="%langRegional/FAKE_regional_decals.csv" or really any other file that isn't real. Next, go to locTable where most of the other lang file references are. In locTable, add the line file:t="%langRegional/regional_decals.csv". What you are doing here is re-referencing that existing regional_decals.csv file, but with file:t instead of regional:t. I am not entirely sure what is going on here behind the scenes, but what I think is happening is that the regional:t tag makes the file non-overridable. Now that you have re-added the reference for regional_decals.csv but done it with file:t, it is now overridable. This means that it will work like all other file where it will grab from the base game file and then apply your changes on top. From there, you can just add your own file as normal, such as file:t="%lang/modded_decals.csv". Your localization.blk file should look something like this:
...
regional:t="%langRegional/FAKE_regional_decals.csv"
...

locTable{
  ...
  file:t="%langRegional/regional_decals.csv"
  file:t="%lang/modded_decals.csv"
  ...
}
With this whole song and dance done, you can now edit regional files! Just go back to your copy of regional_decals.csv that you downloaded earlier from Gszabi99's GitHub, find any entry you want in it, copy that entry into your new modded_decals.csv file (or whatever else you called it), and you can now edit it as you please.
Step 1: What do you want your mod to do?
You just read through 7,500+ words about lang mods, or maybe you just skipped to this part. Regardless, now that this guide has listed literally every single thing that you can do with lang mods, let’s actually get into the steps of making them.
The first step of making a lang mod is determining what you want your mod to actually do. Of course, every mod is unique and has its own purpose, but they can broadly be broken down into three types, though overlap can exist between them: localizations for new languages, UI mods, and renamings of vehicles, weapons, and modifications. Renamings of ingame units can be further broken down into 2 subcategories: renamings for convenience and renamings for historical accuracy. Once again, overlap exists between those 2 subcategories and both will be delved into.
Localizations for new languages
This is exactly what it sounds like. It’s a translation of the game’s texts to a new language. We are not going to spend much time on this because it was discussed in great detail earlier in this guide.
UI mods
UI mods are interesting. They are both extremely common, and yet easily the least talked about form of mod, mostly because they are the least published. UI mods are not modifying UI elements per se, but they are making use of text changes to edit the UI. The most simple and easily most common form of this is editing damage, critical hit, severe damage, and kill messages. However, some go further. Some use unique unicode characters to identify specific elements (e.g. using different unicode characters to denote differences between hits, kills, etc.).
Renamings of vehicles, weapons, and modifications
These are the “big mods.” In other words, they’re the ones that most frequently get published. These can be broken down into two types: renamings for readability and renamings for accuracy.
Renamings for readability are the less common of the two. They involve smaller changes (e.g. changing the distance at which an aircraft’s variant is shown from the _1 name to the _2 name). Another example would be minor changes like renaming the Israeli P-51D-20-NA to the P-51D-20-IL (this is an actual example that happened). This is not historically accurate, but it can aid in readability for some. Another example of this would be Laiti’s Chinese Unicode Localization Mod. This mod doesn’t modify vehicle names themselves, but modifies their text to use unicode characters as roundels for every vehicle in the Chinese tech tree.
Renamings for accuracy are the big mods, both in the sense of being the ones that are most commonly published, and in the sense of requiring by far the largest investment of time and energy to do the research required to make it accurate. These mods range from changing certain vehicles to be mildly more accurate, to mass reworks of nearly everything in the game. Mass reworks are not for the faint of heart. They are absolutely doable and are fantastic, but performing them does require very large investments of time. The largest mods—the ones that rework most of the game—generally involve multiple people (more on this in step 2).
Renamings for accuracy also often include a lot of formatting changes. For example:

In this example, the name is just JF-17 Blāk I Thaṇḍar, but formatting has been changed to also include the manufacturers.
Step 2: Information organization
If you are doing a UI mod or a renaming for readability, this is an important step. If you are doing a language translation, this is a very important step. If you are doing a renaming for accuracy, this is the single most important step!
Did you know? If you do not do this, it will come back to bite you. I speak from experience.
In all seriousness, you really should organize your information properly. If you do not, it will very likely come back to bite you.
Organizing your information properly means having a good handle on:
- What you have worked on
- What you have left to work on
- Whether or not something is in the files yet
- Sources
- Any additional notes you want to add
This seems complicated, and to not bury the lead, it is. It gets complicated fast. But, it is not as complicated as it sounds and if you establish a good system from the start, you will be rewarded for it in saved time and energy down the road.
There are a couple good ways to do information organization, but easily the best is spreadsheet because it allows you to keep track of lots of information. Specifically, Google Sheets is the best for this. Google Sheets is the best because while Microsoft Excel is very powerful, so is Google Sheets and Sheets has the benefit of being online so even if something happens to your computer, your work is saved. Here is an example of my organization system:

This is a very extensive organization system. In all likelihood, you will not need something anywhere even close to this. But this sheet is designed this way to be maximally useful. It has every possible piece of information one could need, color-coded tags for the status of something as being ingame and for what stage of completion in the mod it is in, is broken down by nation, and is designed for use by multiple people. Notice that not all the columns are filled in. That is because the nature of the sheet is to be useful and sometimes not all of the columns can be filled or it is not useful to fill them, and so they don’t get filled. Remember, the most important part of an information organization system is that it is understandable to you. You are the one making the mod, and so your ability to understand the way information is organized is the most paramount thing.
Translation vs. transliteration
Deciding whether you are translating or transliterating and to what extent you do each is important. This dictates how you deal with other languages. The fundamental difference is that translation will yield the equivalent words in your language of choice, while transliteration uses characters from your language of choice to transcribe the sounds of the original language. This is important because, for example, transliterating מֶרְכָּבָה סִימָן 1 will result in Merkavah Siman 1, while translating it will result in Chariot Mark 1.
Transliteration also can be broken up into 2 further categories: transliterations with diacritics and translitertations without diacritics. Diacritics are the marking and symbols you sometimes see above and below letters that denote additional sounds or sound changes. To give an example, the proper, full name for what the game calls the Namer Tsrikhon is the נגמ"ש מֶרְכָּבָה צְרִיחַ. That can be transliterated as Nagmash Merkavah Tsariach or as Nagmaš Merkavah Ṣariaḥ. Both are pronounced exactly the same, but the former is diacriticless, while the latter uses diacritics. You could also translate some languages and transliterate others (e.g. transliterating alphabets, abjads, and abugidas, but translating logographic languages like Mandarin and Japanese).
One issue is that the game cannot render certain diacritics. That may create the appearance of an extra space in between letters or a missing letter. This especially becomes an issue with Thai and Mandarin. Furthermore, certain diacritics may be rendered bizarrely, such as ones that are meant to be on top of a letter appearing after it. This especially becomes an issue when working with Mandarin.
If you are transliterating, you need to decide on a transliteration system. Nearly every language has multiple different transliteration systems for it that will transcribe characters in the original language as different characters in your chosen language. For example, just for Thai, there are 7 different major transliteration systems:
- International Phonetic Alphabet (every language has this one)
- Royal Thai General System of Transcription
- Paiboon
- American Library Association and Library of Congress
- United Nations Group of Experts on Geographical Names
- ISO 11940-1
- ISO 11940-2
Each of these systems can also have different purposes. For example, UNGEGN is only used for geographic place names, hence its name. Transliteration systems can also overlap. For example, GOST 7.79-2000A is the form of GOST 7.79-2000 that uses diacritics and is identical to ISO 9:1995, but GOST 7.79-2000B, which is the diacriticless variant of the system, is unique.
You can also modify transcription systems. For example, ISO 11940-1:1998 transliterates the Thai character จ as C, but จ is not pronounced that way and can more accurately be transliterated as J or Ch. You could even develop your own transliteration system entirely from scratch, though doing so is nightmarishly difficult and you should only ever be done if you have an extremely good knowledge of the language.
If you are transliterating, the easiest way to do so is with code. You can write the transliteration system yourself with code, or you can use a library in your chosen programming language that does the work for you. If you are going to do this with code, Python is the best language to do it with because it is very simple and has an extremely large number of transliteration libraries.
Divvying up work
Most people are not going to ever run into this problem because this only applies to when a mod has a consistent team of multiple people. However, it still should be talked about. If you are working with multiple people, do not have people just work on whatever they feel like. This might work if you’re just making a bunch of miscellaneous changes, but if you are doing anything more focused than that, this will hurt you.
Instead, people should be assigned specific tasks. Each person should have their own projects to work on (e.g. one person could be working on the Italian Navy while another is focusing on Soviet guns). Divvying up tasks like this will greatly aid in organization and make the final work be completed more quickly, as well as being higher quality.
Step 3: Choosing your editing software
Once you have figured out how you are going to organize your information, you will need to choose the editing software you will use to edit your files. For localization.blk, you can use Notepad++, Visual Studio Code, or really any text editor. For the .csv files, you have more options.
Personally, I use Visual Studio Code to edit the .csv files as well. However, editing .csv files in VS Code can be deeply inefficient, especially if you do not have an established workflow or experience that allows you to work quickly in it. I mainly use it because it is what I am used to. For a more visual system system to edit .csv files, use a spreadsheet editor like Microsoft Excel, Google Sheets, or LibreOffice. They can all load and export .csv files, and give you a much better visual representation of the data you are working with. Do keep in mind though that sheet editors can both cause problems with quotation marks and the semicolons used to separate entries, though LibreOffice is better at handling this, so you need to keep that in mind and account for that.
VS Code also has an extension called Edit CSV that can be quite useful for this purpose. It works a sheet editor in VS Code, allowing you to switch back and forth between the text and spreadsheet versions of .csv files within the program. That, along with the Rainbow CSV extension, brings VS Code nearly to parity with the fully-fledged sheet editors and makes it a viable complete alternative to them. Though, with Edit CSV, do remember to set the delimeter to a ;.
This guide’s ultimate recommendation is to use LibreOffice for editing your .csv files and any text editor of your choice, though VS Code is the most useful for reasons that will be explained in step 4, for editing localization.blk, your changelog file, and establishing your organization and workflow.
Step 4: Choosing your file organization and workflow
Once you have chosen your editing software, you need to choose how you are going to organize your files. Just having the files you are editing is usually not good enough. The first thing you want to do is to make sure you have a folder in an easy-to-access location. This is going to serve as your folder for organizing your files. For the sake of this guide, let’s call this folder lang_modding. You’re going to want copies of 4 things (you want copies, do not remove anything from your WT folder):
localization.blk- The base game lang files that you are editing
- Dev server lang files
- Your modified files
- A changelog file
Here is what a fully organized file structure can look like:

This is where VS Code comes in handy. Google sheets is great for editing .csv files, but it cannot do file organization. This is why VS Code comes in useful. VS Code allows for easy management of files and allows you to run code for things like transliteration, as well as editing localization.blk and your changelog file.
And while we’re at it, speak of the devil and it shall appear, this is a good time to make a changelog file. This changelog file will help you keep track of the changes you have made to the mod by version, not just the overall state of the mod which is what the spreadsheets do. Organizing this file first by version and then by the type of change, but you can organize this any way you want, as long as it is easily comprehensible. You can also write your changelog on Google Docs or, if you want to publish it on Nexus Mods, directly in Nexus' changelog editor. Really, you can write wherever you want. You can also add a readme file in your workflow, though this is more useful if you are hosting this on a public GitHub repository.
The dev server files are important. You can get them by enabling lang mods on the dev server whenever it is open or you can download them from this datamine GitHub courtesy of gszabi99 when the dev server is open. The reason to have these is that every update, new texts are added and the official changelogs do not list them all. However, VS Code has a compare feature. You can select the base game file and its dev server equivalent, right click and then click “Compare selected,” and it will show you the differences. This means you can see every difference in the files you care about and add all the new texts to the files you are actually modifying.
Alternatively, if you want to actually print out just the differences, that requires code. To save you time, here is the Python code I wrote to do this:
import csv

def check_diff(old_file, new_file, output_file):
    old_entries = []
    new_entries = []
    with open(old_file, 'r', newline='', encoding='utf-8') as file:
        reader = csv.reader(file, delimiter=';')
        header = next(reader)
        [old_entries.append(row[0:2]) for row in reader]
    with open(new_file, 'r', newline='', encoding='utf-8') as file:
        reader = csv.reader(file, delimiter=';')
        header = next(reader)
        [new_entries.append(row[0:2]) for row in reader]
    with open(output_file, 'w', newline='', encoding='utf-8') as file:
        header = ['<ID|readonly|noverify>','<English>']
        writer = csv.writer(file, delimiter=';')
        writer.writerow(header)
        for i in new_entries:
            if i[0] not in [j[0] for j in old_entries]:
                writer.writerow(i)

check_diff('DEV/DEV_units.csv', 'DEV2/DEV2_units.csv', 'DIFF/DIFF_units.csv')
check_diff('DEV/DEV_units_weaponry.csv', 'DEV2/DEV2_units_weaponry.csv', 'DIFF/DIFF_units_weaponry.csv')
check_diff('DEV/DEV_units_modifications.csv', 'DEV2/DEV2_units_modifications.csv', 'DIFF/DIFF_units_modifications.csv')
check_diff('DEV/DEV_unlocks_attachables.csv', 'DEV2/DEV2_unlocks_attachables.csv', 'DIFF/DIFF_unlocks_attachables.csv')
check_diff('DEV/DEV_menu.csv', 'DEV2/DEV2_menu.csv', 'DIFF/DIFF_menu.csv')
check_diff('DEV/DEV_regional_decals.csv', 'DEV2/DEV2_regional_decals.csv', 'DIFF/DIFF_regional_decals.csv')
check_diff('DEV/DEV_regional_skins.csv', 'DEV2/DEV2_regional_skins.csv', 'DIFF/DIFF_regional_skins.csv')
check_diff('DEV/DEV_unlocks_skins.csv', 'DEV2/DEV2_unlocks_skins.csv', 'DIFF/DIFF_unlocks_skins.csv')
Copy that into a .py file and call it whatever you want, I call it diff_checker.py, and change the check_diff() function calls to match your files. In my file structure, I have these folders:
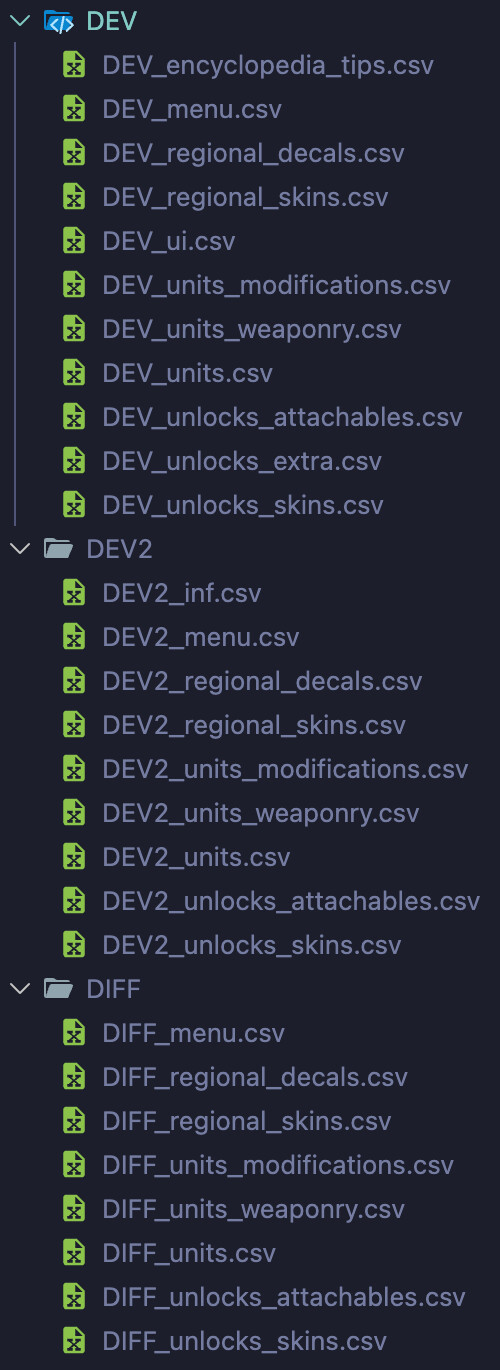
DEV is the folder with the old base game files. DEV2 is the folder with the new base game files. DIFF is the folder where the outputs are printed to. DEV and DEV2 do need to be populated manually with files and you will have to rename them. Every time you want to check new differences, move the DEV2 files over to DEV, rename them, and put in new DEV2 files. You do not need to make any files in DIFF, the code does that automatically. The way these are named is up to you, you can name them anything you want through the file paths in the check_diff(old_file, new_file, output_file) function call. In fact, you probably should not name them the way I did. Name them whatever works for you. This code also automatically removes the excess columns.
Step 5: Editing the files
Editing the files is quite simple. Open the .csv file you are modifying in Google Sheets (or you can edit it directly in VS Code), make the changes you want, and then export the .csv file. If there is new text to add to the files because of a dev server, just add new rows in Google Sheets and put the new entries in those cells, or just copy the text directly into VS Code.
Save the files. Then, drop them into your lang folder. If you are using the replacing lang files method, it will replace files of the same name. If you are using the adding files method (the far superior method), it will copy the files in. Just remember if you are adding files to copy the modified localization.blk in too and make sure it has the same name as the original file so it actually replaces it.
Step 6: Testing, testing, testing
Test your work. Here is what happens when you test do not your work before publishing:


Whenever you make a set of changes, don’t just assume they will work. It’s always possible that you forgot a semicolon or made a typo and added a quotation mark. Always test. Use your changelog file as a guide of what you should test. It will save you from pushing a major update and then realizing every single weapon in the entire game after the BLU-10/B is broken.
When testing, there are two ways you can do it. The first way is to close the game, drop the new files in, and then open the game again. I did this for well over a year. The second, easier method, is to go into the game options. Switch the language of the game from the language you are modding to any other language and then switch it back. That will reload the game's lang files and display any new changes you have made. This means that you can drop newly edited files into the game and then just switch the language to something else and then back to load the new files.
Step 7: Publishing
Publishing a lang mod has a deceptively large amount of steps to it, but they are all easily navigable once you understand them.
The first thing you are going to do is you are going to make a mod releases folder. For this guide, let’s call it lang_modding_releases. Make sure this does not sit in your standard lang_modding folder. Rather, make a separate folder that contains both the lang_modding and the lang_modding_releases folders. Inside the lang_modding_releases folder, you are going to make another folder. This folder will have the name of the mod and the version number (technically, you can name it whatever you want, but this is the best way if you are publishing). Let’s call this folder ExampleMod_1.0. In this folder, you are going to make yet another folder. Let’s call this third folder ModFiles (this will be important in a moment). Into the ModFiles folder, you are going to copy the finalized, edited mod files. Make sure these files have the names needed to make them work. If you are replacing files, make sure their names match up with the names of the base game files. If you are adding new files, copy them in alongside the modified localization.blk and make sure their names match the names you have added to localization.blk. If you have made any addon packages, you can make an additional folder in ExampleMod_1.0 called packages or something like that and add them in there.
Now that this is done, you are going to exit the ModFiles folder so you are now back in the ExampleMod_1.0 folder. Make a new file called README.md (or readme.md, the capitalization does not matter). This file is going to contain the instructions on installing your mod. Even if you have instructions listed wherever you are publishing the mod, you should always include instructions in the mod itself too when it is downloaded. Here is a basic template for the instructions:
## Installation instructions

1. Go to your War Thunder folder and open the file called config.blk.

2. Find the section titled "debug" within config.blk.

3. Within the debug section, add the line "testLocalization:b=yes". This must be a new line. It can be anywhere in the section, but adding it at the end is preferable. For example, this is what the debug section in my config.blk file looks like (you shouldn't copy this, this is just an example):

debug{
  screenshotAsJpeg:b=yes
  512mboughttobeenoughforanybody:b=yes
  enableNvHighlights:t="auto"
  netLogerr:b=yes
  testLocalization:b=yes
}

4. Launch the game. Once you have launched the game, a folder called lang will appear in your War Thunder folder.

5. Drop every file ending in .csv and the file localization.blk from this mod's ModFiles folder that you dowloaded into that lang folder. It will tell you that this is replacing an existing file. THIS IS OKAY. This modified localization.blk file does not remove any of the things already in the base file. It simply adds this mod's files to the end of the load order so they will be read after the base game files, allowing the mod to work.

6. Launch the game. The mod should now be installed and working.
This template is written for the adding files method. You can adjust it as needed if you are using the replacing files method.
Once you are done with this, exit the ExampleMod_1.0 folder. You should now be in your lang_modding_releases folder and see the ExampleMod_1.0 folder in the folder list. Right click on the ExampleMod_1.0 folder and find the “Compress” option. Compress the folder to a .zip file. If you are doing this on MacOS, it may also add a MAC_OSX folder into your .zip file when it zips it. This is annoying, but it doesn’t actually change anything. Windows does not do this. Regardless, you’re done! You have a completed mod release. Well, almost. The release build of the mod itself is done. Congratulations! Unfortunately, you still have a few more steps to go.
If you are going to release your mod, you are going to need a cover image. The easiest way to do this is to download a War Thunder loading screen from one of the major update changelogs, events, or Battle Passes. You can find these on War Thunder’s official website. Then, just put some text over it. You can do this in almost any program, as long as it allows you to style text and put it over an image. Here’s an example:

You can also add images of the mod’s content such as screenshots taken ingame as additional images.
Okay, you now have everything you need to publish. Now, all you need to do is to figure out where to publish it. There are two main places, but one is much more common. The first and less common of the two is Nexus Mods. You can add the changelog to it through Nexus' changelog editor and add the files to be downloaded, as well as additional files such as extra packages you make for the mod. The second and by far more common option is War Thunder Live.
WT Live is the hub for publishing user skins, sound mods, maps, hangars, models, etc. It is big. WT Live does not have a specific section for lang mods (even though it does for sound mods). The most common classifications for lang mods on WT Live are either “All posts” or “Camouflages,” though some have also been posted under “Locations” and “Models.” If you want your mod to have maximum visibility, post it under “Camouflages.” Attach the download for the .zip file, attach the image(s), and write a description for your mod. You can add the changelog in the description, the comments, or as a link to a separate page for it. Then, just publish your mod and you are done!
If you have additional packages for your mod, though Nexus Mods is likely the way to go, you can also publish it on WT Live and include the packages in the mod download folder as well as instructions for them in the readme file.
Technically, there is a third option: GitHub. You can make a public repository and use the releases section to release the mod. GitHub is amazing for version control, but in terms of gaining visibility for your mod, it is the least effective of the 3 options. You can also post your mod to all 3 of these options.
Tips, advice, and extra information
This guide may be hellishly long already, but there are still some additional tips to note.
The biggest tip you should remember is to talk to people. If you are confused about how to do a specific thing with your mod, ask people how to do it. If you are trying to find information and either cannot find it or do not understand it, ask people who do. There are several incredible War Thunder communities, especially on Discord, that are abound with resources for you to use.
Additionally, set deadlines so you have motivation to get something done, but be flexible about them. Quality matters more than quantity with these mods and if you need extra time to find sources, are just lacking time at the moment, or just want a break to do stuff in real life, take that time. You are under no legal obligation to get a mod update out by a certain time (and if you are, what on Earth did you sign and WHY???). To give a personal example of this, as of the time of writing this, my mod’s update for the Enter the Serpent event was supposed to be out 3 days ago. However, I needed more time to finish up a rework of Swedish weapons and to make some more miscellaneous changes that I wanted to. So, I took that time, and the update will be better for it.
Another thing to remember is that sometimes you need to accept that you cannot have something be perfect. Especially if you are doing a renaming for accuracy mod, you are going to find that militaries are extremely inconsistent with themselves in their naming schemes and sometimes sources might just not be available and you’ll have to take your best guess. You are going to need to get comfortable with the fact that you will need to make inferences because of lack of sourcing and militaries being inconsistent. Here is an example of taking your best guess:


Conclusion
You just read over 17,000 words about lang mods (you probably didn’t and just skipped around and that is totally fine, and if you did read all of it, well done). You now have every piece of information on lang mods and how to do nearly everything possible with them. Will you be an expert at this immediately? No, of course you won’t, and that is entirely okay. It is a learning process. Making mistakes and correcting things over and over again is part of it.