Singleplayer mission creation basics
Contents
How to create a basic singleplayer mission
- 1. Run mission editor (missioned.cmd in WarThunderCDK folder)
- 2. Select a map in Select binary dump file window by pressing ... tab (all map files are stored here: <game folder>\levels)
- Note: You can edit a mission without loaded map, location in scene viewer is just a preview.
- 3. Go to tab Mission Editor
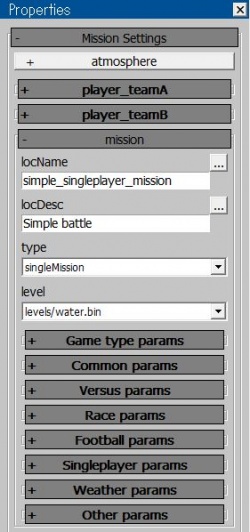
- Choose in the side toolbar Mission Settings → mission → level the same location you chose in scene view
- Choose a name for your mission in locName tab that will be displayed to the players (localization for mission name will be saved to a separate CSV file)
- Choose other settings - time of a day, weather, mission type in Weather params and campaign name in Singleplayer params.
- Note: Campaign name controls where the mission appears in User Missions window, you can add your own campaigns by creating a new CSV file
- 4. Create a new unit
- In the toolbar choose Create unit icon
- Select it's type, armada if you want it to be a plane, tankModels if you want it to be a ground vehicle, or ships if you want it be a boat or ship
- 5. Select your unit class (it is selected by default and is named armada_01) then open Object Properties panel (P button)
- Note: If it is a tank or ship it need to be placed on the ground or water, in order to do that you need to select the unit and press Drop object icon or Ctrl+Alt+D buttons
- 6. Adjust the settings - aircraft type (Class), weapons (weapons and bullets), modifications
- Note: By default your unit will have all performance modifications unlocked and activated
- To move or rotate your unit select the unit, then press W button if you want to move it, or E if you want to rotate it, then click on arrows or circles that should appear around the unit and while holding mouse button move or rotate it
- Note: By default your unit will have all performance modifications unlocked and activated
- 7. Set the created unit as player's unit
- Go to Mission Settings and player_teamA
- Assign created by you unit to wing
- Note: It needs to be only one unit
- 8. Save your mission (Ctrl+M or using the toolbar, Mission Editor → Save Mission) to the <game folder>\UserMissions\<mission name>.blk
E.g C:\Program Files (x86)\War Thunder\UserMissions\my_mission.blk
Attention: To test and play user missions you should have the unit that is used in mission bought.
Selecting different respawn types
- 1. Go to Mission Settings → mission → Singleplayer params
- 2. Select one of three available respawn types in restoreType
- attempts - gives the player 4 attempts, spawns the plane in almost the same position after last death
- tactical control - after death switches player's plane to the other plane controlled by the AI from your armada, in order to make it work you need to increase the number of units in armada by changing count in Object Properties window, all AI units will always follow the player
- manual - manual respawn by using spawnOnAirfield or unitRespawn actions and unitWhenStatus condition assigned to player's unit and set to isKilled, if they are not added then the player won't be able to respawn after death
Changing the fuel amount for player's plane
- 1. Go to Mission Settings → mission → Singleplayer params
- 2. Change the fuel amount in fuelAmount
- If the number is set to 1 all fuel tanks in the plane will be full, if it is set to 0.5 then it will have 50% of available fuel.
Making the mission work with CSV files
- 1. Open your mission file (BLK) in notepad or other software for editing text files
- 2. Find the mission{ block
- 3. Copy this line there (directly under it):
name:t="basic_singleplayer_mission"
- 4. Save the mission file
Localizations are saved in CSV format (separator - ;) in the same folder with necessary prefix “usr_”.
- For example:
usr_myMission.mission.blk
usr_myMission.csv
You can find more information about creating CSV files there: CSV files for missions
How to check missions in game
- 1. Launch the game
- 2. In the left top corner select Battles → User Missions
- Note 1: It is possible to edit or add missions while you are in game, there's a Refresh button in the right top corner of User Missions window
- Note 2: If you want to check updated mission you need to go back to main menu and load the mission again instead of using Restart tab
See also
- Instructions for Using the Mission Editor
- Multiplayer mission creation
- Triggers - explanation how to create triggers, description of all actions and conditions
- Variables - explanation how to create and use variables


