Instructions for Using the Mission Editor
Getting Started
Any mission consists of two parts: the location at which the mission takes place and the actual mission itself. This seemingly obvious fact can cause some confusion because when you start the editor you must first open the location and then open or create the mission. Actually, in the editor's language locations are called projects and upon opening the editor a dialogue window suggests opening an existing project or creating a new one. Since the creation of a new map is beyond the scope of this instruction, choose the option «open project» or use one from the list of recently opened locations.
The first mission will take place in the location «bulge» so for this lesson you should open the project with that name.
Toolbar and Functionality
So you have started up the editor and opened the project. After the project loads, you will see the toolbar:
Our main tool for the job is the «Mission Editor» tab. If it does not open on its own, then open it yourself. As you can see, this tab has a large number of button options.
Below you can see a table with descriptions of these buttons..
Moving the camera
Open the Bulge location in the editor and wait for it to finish loading. Most likely, you will find that the camera is looking at the terrain below and not with the most ideal viewing angle. In order to be able to «fly» the camera over the terrain, zoom in and out, turn the camera, and do other things it is necessary to activate free camera mode.To do this, click the mouse cursor within the main editor window and press «Space». Immediately after pressing the space bar, you will see that the mouse cursor has disappeared. Congratulations, you have activated free camera mode! Now, you can change the camera angle by moving the mouse, the «WASD» keys make the camera move in the desired direction, and holding the «Shift» key on the keyboard makes the camera respond to all these actions noticeably quicker.
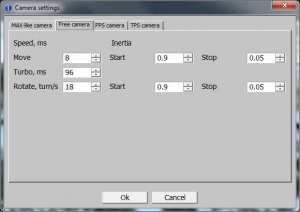
If the camera's movements still seem too slow, in the main menu of the editor select: «Settings->Cameras» to get into camera settings. In the window that appears, navigate to the tab «Free Camera» and change the «Move» and «Turbo, ms» settings which are responsible for the camera's movement when pressing «WASD» and «WASD» while holding the «Shift» key respectively. When you have finished changing the settings, close the window and check the movement speed. If you are still not satisfied with something – edit the camera settings again. .
Disable unnecessary information
By default the editor window displays the terrain model and height map. Under normal circumstances, information about the height map is not needed when creating a new mission and can be disabled. To do this, click the mouse within the main editor window and press the «F11» key. You will see a window appear with editor plug-ins. Find the row «(filter) HeightMap» and uncheck the box next to it. This will disable the display of the height map leaving the terrain itself with all its textures.
Reducing lighting brightness
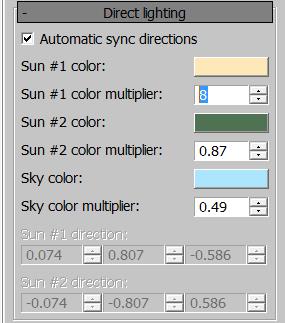
If the lighting brightness of a location seems too high or low, you can change its brightness. To do this, look closely at the toolbar. As you can see, it consists of several tabs. Right now, the «Mission Editor» tab is active. Switch to the «Environment» tab by clicking on it. The toolbar will change, but most importantly, a window will open with lighting settings. In the window, find the setting «Sun #1 color multiplier» and adjust its value. Note, as you are adjusting the values for this field, the changing lighting of the landscape. Select the value you are satisfied with and return to the «Mission Editor» tab..
Creating player's aircraft
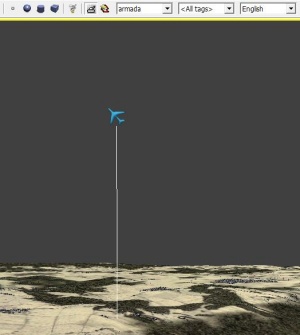
If you have carefully read the list of available commands, you have probably guessed what you are going to do. Select the option «armada» in the field «Choose type of unit created», use the «Create unit» button, and place the player's aircraft anywhere on the map. On the main screen the green icon for an aircraft should appear with the name «armada_01». We exit the mode for creating new units, select the aircraft, and click the button “Show object properties panel” in order to open the window in which we can edit the properties of our unit. In the window that appears, at the very top, we see the field «Name:» with the value «armada_01». Let's enter the name «player» instead so we can immediately tell that this is the player's aircraft. Under this field is the «Type» field in which you can change the type of unit if you want, but we won't do that. Further down are three fields titled «Position». In the first field is the object's coordinate along the X axis, in the second – the Y axis (height above the surface), and in the third – the Z axis. All coordinates are calculated from the origin coordinate of the loaded location. Set the height of the aircraft to 500 meters to be in close proximity to the surface. Make sure that the resulting change in the height of the aircraft does not place it below surface level if, for example, you originally placed it above a tall hill. Most likely, after you changed the height of the aircraft it disappeared from your screen. But that doesn't matter. We click on the button «Select object by name». In the window that appears we choose «player», click «Ok» to close this window, and press the «Z» key which moves the editor's camera to the currently selected object. Look, we have found the missing plane.
We select the aircraft again and open the window of its properties. Below the «Position» field is the field «Class» which itself consists of two fields: from «Class», we can specify the type of aircraft in which the player will fly the mission and its armaments. Select the «Yak-9t» aircraft and assign it «Yak9_default» armaments. Below some other fields is the section «Properties». The title of this section is in a gray box which means that the section can be expanded and collapsed. Try to collapse and expand this section. As you can see, in its expanded state this section does not fit within the screen and some of its fields are not visible. To access these fields simply roll the mouse wheel and note how the object properties window scrolls.
At the very top of the «Properties» section is the field «army». This field indicates to which side the object will belong. Hopefully, the player and allied troops were in the army with the index «1», and their opponents in the army with the index «2». Change the player's army index to «1» right now.
Below this field is another section that can collapse and expand under the name «plane». This section is responsible for the formation in which the units will move. Leave all the fields unchanged – you can play with them later on your own. Collapse the section and note the field below it. This field is called «count» and determines how many units will be in the squadron. Currently, the field has the value «1» which means that if we start a mission we will be in the air alone without another soul around us. But if we change the value to «2» then we will have a partner who will fly the same course as us. Let's change the value to «4», bringing the number of aircraft flying to four. As you probably know, pilots do not fly alone or in small clumps but fight in pairs or – rarely – groups of three. Even if a large group of aircraft are flying together, within the formation they are still broken down by leader and wingman or wingmen. The wingman's job is to protect his leader. To break down our 4 aircraft into 2 such pairs, it is necessary to click on the «+ numInWing» button directly under the field «count». Clicking this opens the «numInWing» setting whose value we can now change. Set this value to «2».
So we have put the aircraft on the map, set its height, assigned the aircraft's type, indicated the quantity of aircraft, and divided the aircraft into pairs.
Once again, select the player's aircraft or just look at it if it is already selected. You can see three lines – red, green, and blue – coming out of the plane. The red line shows the direction in which the player's aircraft and the planes following it are flying at the start of the mission. Using the «Rotate object» button, turn the aircraft so that the red line is facing the desired direction.
Try to save the mission. When you try to save, the editor displays an error.
Error message
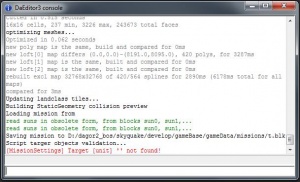
In the top row of buttons in the editor window is a button to open the console (Show/hide console). Clicking on it will open the console window in which our error message will be written in red:
«[MissionSettings] Target [unit] not found!».
The first point of the error «[MissionSettings]» indicates where the error occurred – in the mission settings.
Despite the fact that the error in this case is uninformative, usually there is an indication of the specific place at which the error occurred.
In the meantime, we have to believe that the error occurred because the game cannot understand where the player is. To correct this error we have to learn how to create a player.
We need to define which aircraft in the game is the player's
To do this, click the button «Mission properties». Then opens a window consisting of several fields and sections which you can collapse and expand. Expand the section «Mission settings» and inside it find another section «player_teamA». Expand it if it is collapsed. In the «wing» field of this section click the button «<none>» and in the window that appears select «player».
That's it. You just indicated to the game which aircraft should be considered the player's aircraft. Save the mission and run it for verification.
The First mission. Fly along a route
It is time to do our first mission. Let's make it a simple mission in which we will just have to fly over a certain route.
A training example of such a mission is «sample01_bulge_simple».
You should already have the «Bulge» location open with the player's aircraft displayed. Let's continue to develop this mission.
Initial mission setup
Before we start to arrange the aircraft, we need to specify the basic properties of the mission.Before we start to arrange the aircraft, we need to specify the basic properties of the mission. Open the mission properties window and open the section entitled Mission Settings. In it, find another section «mission» and open it. Here you should:
- In the «name» field enter the name of the mission in English. This name must be unique to the entire game and is the identifier of the mission. There should not be any other missions with the same name.
- In the «level» field choose the map that the game will load when the mission is selected. In our example, this should be the «Bulge» map.
- Select the type of mission (in your case it is singleMission).
- In the list restoreType, set attempts if you want the player to have several attempts to complete the mission (after the player crashes, he will respawn at some point not far from the crash site), or tacticalControl to allow the player, in case of a crash, to take the aircraft of one of his teammates provided of course that they are still alive.
- In the list «campaign» you should select «western» so that the mission takes place on the western front. This choice is dependent on which section of a single mission your mission will be played in.
- In the «environment» field select the type of sky for the mission.
- In the «weather» field select the type of weather you like best.
After fixing these settings, you can collapse the entire list of «Mission Settings».
Creating route waypoints
Let's outline the route by which the player will have to fly. To do this, use the button «Create point zone» to set two points – trying to make sure they are on roads. Change the name of the points to «waypoint01» and «waypoint02», and raise them to a height of 1000 above the surface of the terrain. Save the mission.
ЗEntering the route starting point
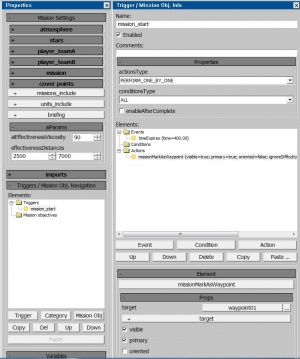
In order to show the player where to fly, you need to somehow indicate the point of the route he needs to reach. To do this, in the section «Triggers / Mission Ob. Navigation» click the button «Trigger» to create a trigger. The mission's entire logic will be precisely defined by the triggers. Select the newly created trigger in the window to the right and change its «Name:» to «start_mission». Under the name of the trigger you can see the field «Enabled» with a check-mark. This means that the trigger will be activated immediately after the start of the mission.Below in the same window you can see the field «Elements» in which there are three empty trees: «Events», responsible for when the execution of the trigger is attempted, «Conditions», responsible for which conditions exist to verify the trigger's execution; and «Actions», responsible for what happens in the trigger.
In the «Events» tree is the event «periodicEvent». Select it and click «Delete», located below the «Elements» field, to remove it. Now click «Event» to add a new event. In the resulting window, select «initMission» from the available events. Now the trigger will be ready for completion right after the start of the mission. We do not need any conditions to verify the trigger's completion, so just add a new command by pressing the «Action» button. In the window that appears, select «missionMarkAsWaypoint» and adjust its settings:
- In the «target» field select the first waypoint through which the player must pass «waypoint01».
- Check the box across from the «visible» field to display the point in the game space and on the map.
- Check the box across from the «primary» field to further mark the point as a primary waypoint for the player.
- Save the mission, run it, and verify that everything works as needed.
Tracking progress from the starting waypoint
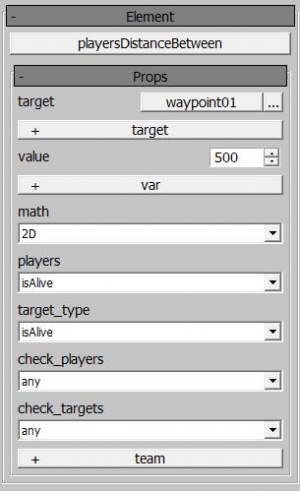
Now you need to keep track of the fact that the player reached the first waypoint in order to hide the first point, mark the second point as the primary one, and display the third point. To do this, we create a new trigger and call it «to_waypoint02» Leave the «Enabled» box checked to make sure that it will start as soon as the mission begins. In the «Events» list, leave the event «periodicEvent» as it is useful for us to launch the trigger once per second, to let us know every second whether the waypoint has been reached. Unlike the previous trigger, we will need to add additional conditions for completion so that the trigger will load only if the player approaches the waypoint. To do this, click the «Condition» button and in the window that appears select «playerDistanceBetween». Fill in the fields:- In the «target» field, specify the point for which you need to detect an approach. This will be «waypoint01»
- In the «target» field, specify the the distance to which the point must be approached, for example «500» meters.
- In the «match» field leave «2d» so that the verification will not take vertical distance into account.
Leave the other fields as they are. They will be addressed further in other examples.
Now that we have specified the conditions to execute the mission, let's create a set of commands that need to be performed. The first command will hide a waypoint that the player has already approached. To add this command, click the «Action» button and select «missionMarkAsWaypoint» from the list that appears with the following settings:
- In the «target» field select the waypoint that the player approached: «waypoint01»
- Uncheck the box across from the «visible» field to stop displaying the point in the game space and on the map
Now let's show the player the next waypoint. To do this, we add a «missionMarkAsWaypoint» command and adjust its settings:
- In the «target» field select the first waypoint through which the player needs to fly: «waypoint01»
- Check the box across from the «visible» field to display the point in the game space and on the map
- Check the box across from the «primary» field to further mark the point as a primary waypoint for the player.
Save the mission, run it, and verify that everything works as needed.
Completing the mission
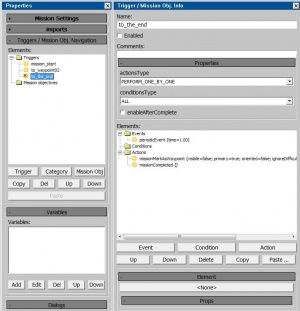
Create another trigger named «to_the_end» and uncheck the «Enabled» field located right below the name of the trigger. This will prevent the trigger from becoming active immediately when the mission starts. .
Now, let's turn on this trigger after the first waypoint is reached. To do this, add a new command to the trigger «to_waypoint02»: «triggerEnable» and for the «target» value select «to_the_end». This will make the triggers occur sequentially. In this example, it is not necessary to disable a trigger once it has finished because the triggers are in a strict sequence, and, after executing all their internal commands, they turn themselves off.
To the «to_the_end» trigger add the command «missionMarkAsWaypoint» in which you turned off the display for our last waypoint. Then add the command «missionCompleted». Save the mission and run it to make sure that everything works correctly.
Creating quests for players
All our missions will have one quest: «fly the route» To add this, you need to create a text document with the same name as the file in which you saved the mission but with the extension «.csv»
Open this file in a text editor and save it in «UTF-8» coding. Now add this line to the file:
«"follow_to_waypoints";"Follow to checkpoints";" Follow to checkpoints"»
and save it one more time. The line you added consists of three parts enclosed in quotation marks and separated by semicolons. The first part «“follow_to_waypoints”» is the unique quest identifier. A single file should not have another identifier with the same name. The second part «“Follow to checkpoints”» is the quest text in English.
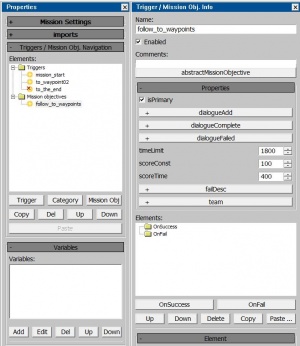
Now return to the game editor, open the mission properties window, and find the section «Triggers/Mission Ob. Navigation». At the bottom of this section you will see a row of buttons. Click on «Mission Obj» and select «abstractionMissionObjective» in the window that appears. You will create a new mission objective. Select the newly created mission objective, and in the window to the right change its name to the identifier from the text file without quotation marks: «follow_to_waypoints».
Save the mission and start it. Make sure that when the mission starts you receive the mission quest.
Completing the quest to fly a route
Now let's move on to the final trigger «to_the_end» and add the command to it which will mark the quest completed. To do this select «moSetObjectiveStatus» from the list of commands, specifying it as a quest «target » with the identifier «follow_to_waypoints», and set its «status» equal to «2» which corresponds to the completed quest. Click the «Up» button located under the «Elements» field to display a list of commands. Move the command «moSetObjectiveStatus» a few places up so that it is above «missionCompleted»
Also add the command «wait» changing the «time» value to «3» seconds. This is to ensure that some time passes between the quest completed message and the subsequent mission ending message so that they are not overlapping each other. Move this command so that it is between «moSetObjectiveStatus» and «missionCompleted»..
Congratulations, you have finished your first mission. Save and run it for verification.


