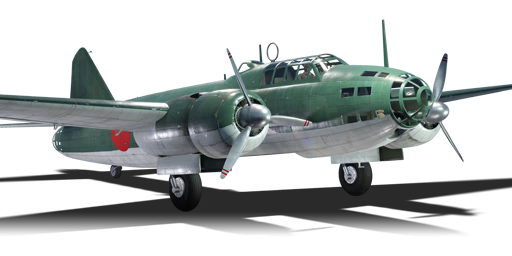
G4M1

From War Thunder Wiki
Jump to: navigation, search
RANK 4 FRANCE
Somua SM PACK
G4M1
g4m1.png
GarageImage G4M1.jpg
ArtImage G4M1.png
G4M1
Research:7 900 Specs-Card-Exp.png
Purchase:10 000 Specs-Card-Lion.png
Show in game

Description

The G4M, designated as the Type 1 Attack Bomber (一式陸上攻撃機), was a Japanese bomber that improved on the previous G3M model. It had high performance and long range, but it sacrificed armour and crew protection to reduce weight. This made it vulnerable to enemy fire and earned it the nickname "flying lighter". Despite its flaws, it was the most widely used and most famous bomber by Japan in World War II. It participated in many battles and missions, such as the sinking of the British battleships HMS Prince of Wales and HMS Repulse in 1941, and the bombing of Darwin in 1942.

The G4M1 has been around since the Open Beta Test before Update 1.27. It can perform well as an attacker, especially later in the battle, because it can carry a lot of bombs (4 x 250 kg or 12 x 60 kg) and destroy many targets. However, bombing bases is risky, because the plane will be exposed to enemy fighters who will climb to intercept it. It is better off attacking ground targets like Light Pillboxes, tanks and guns, or ships with the 250 kg bombs. Climbing is not advisable in the G4M1, because it will need friendly fighters to cover it, but they will have to deal with the Allied planes first. The pilot has to be skilled with the rear gunner, or the plane will be shot down easily by an enemy behind it. The 20 mm cannon is powerful, but hard to hit with. The other guns on the G4M1 are weak, but use them if possible.

Nicknames
  • IJN Pilot nickname: Hamaki (葉巻, Cigar)
  • Allied reporting name: Betty
  • Allied nickname: Flying Lighter

General info

Flight performance

Max speed
at 6 000 m452 km/h
Turn time32 s
Max altitude8 000 m
Engine2 х Mitsubishi Kasei 15
TypeRadial
Cooling systemAir
Take-off weight13 t
Characteristics Max Speed
(km/h at 6,000 m)
Max altitude
(metres)
Turn time
(seconds)
Rate of climb
(metres/second)
Take-off run
(metres)
AB RB AB RB AB RB
Stock 431 422 8000 33.2 33.6 5.1 5.1 314
Upgraded 471 452 31.2 32.0 10.2 7.2

Details

Features
Combat flaps Take-off flaps Landing flaps Air brakes Arrestor gear
X X
Limits
Wings (km/h) Gear (km/h) Flaps (km/h) Max Static G
Combat Take-off Landing + -
540 300 427 398 250 ~5 ~3
Optimal velocities (km/h)
Ailerons Rudder Elevators Radiator
< 360 < 360 < 360 > 324
Compressor (RB/SB)
Setting 1
Optimal altitude 100% Engine power WEP Engine power
2,600 m 2,800 hp 3,125 hp
Setting 2
Optimal altitude 100% Engine power WEP Engine power
5,600 m 2,560 hp 2,857 hp

Survivability and armour

Crew7 people
Speed of destruction
Structural540 km/h
Gear300 km/h

The bomber has no dedicated armour protection, however, it still features relatively good survivability for a Japanese bomber. All of its fuel tanks are self-sealing, making it likely to survive burning wings, and significantly increasing survival chances under low to medium-calibre gunfire. Furthermore, the 20 mm rear cannon provides an opportunity to quickly dispatch tailing fighters. This, in a combination with a narrow silhouette, makes rear aspect engagement the preferable way of dealing with incoming enemy fighters.

What should be avoided are enemies incoming from top and bottom, especially those equipped with 20 mm cannons, as the large and fragile wing area makes for an easy target.

Modifications and economy

Repair costBasic → Reference
AB500 → 633 Sl icon.png
RB829 → 1 049 Sl icon.png
SB1 296 → 1 640 Sl icon.png
Total cost of modifications6 920 Rp icon.png
6 760 Sl icon.png
Talisman cost530 Ge icon.png
Crew training3 000 Sl icon.png
Experts10 000 Sl icon.png
Aces125 Ge icon.png
Research Aces160 000 Rp icon.png
Reward for battleAB / RB / SB
30 / 70 / 120 % Sl icon.png
112 / 112 / 112 % Rp icon.png
Modifications
Flight performance Survivability Weaponry
Mods aerodinamic fuse.png
Fuselage repair
Research:
350 Rp icon.png
Cost:
340 Sl icon.png
75 Ge icon.png
Mods radiator.png
Radiator
Research:
350 Rp icon.png
Cost:
340 Sl icon.png
75 Ge icon.png
Mods compressor.png
Compressor
Research:
390 Rp icon.png
Cost:
380 Sl icon.png
85 Ge icon.png
Mods aerodinamic wing.png
Wings repair
Research:
430 Rp icon.png
Cost:
420 Sl icon.png
90 Ge icon.png
Mods new engine.png
Engine
Research:
430 Rp icon.png
Cost:
420 Sl icon.png
90 Ge icon.png
Mods metanol.png
Engine injection
Research:
560 Rp icon.png
Cost:
550 Sl icon.png
120 Ge icon.png
Mods armor frame.png
Airframe
Research:
390 Rp icon.png
Cost:
380 Sl icon.png
85 Ge icon.png
Mods armor cover.png
Cover
Research:
560 Rp icon.png
Cost:
550 Sl icon.png
120 Ge icon.png
Mods ammo.png
type92_turret_belt_pack
Research:
350 Rp icon.png
Cost:
340 Sl icon.png
75 Ge icon.png
Mod arrow 0.png
Mods pilon bomb.png
12 in (mod30)
Research:
350 Rp icon.png
Cost:
340 Sl icon.png
75 Ge icon.png
Mod arrow 0.png
Mods turret gun.png
type92_turret_new_gun
Research:
390 Rp icon.png
Cost:
380 Sl icon.png
85 Ge icon.png
Mods pilon torpedo.png
17 3/4 in (mod45)
Research:
390 Rp icon.png
Cost:
380 Sl icon.png
85 Ge icon.png
Mod arrow 0.png
Mods ammo.png
type99_turret_belt_pack
Research:
430 Rp icon.png
Cost:
420 Sl icon.png
90 Ge icon.png
Mod arrow 0.png
Mods pilon torpedo.png
Improved torpedo
Research:
430 Rp icon.png
Cost:
420 Sl icon.png
90 Ge icon.png
Mod arrow 0.png
Mods turret gun.png
type99_turret_new_gun
Research:
560 Rp icon.png
Cost:
550 Sl icon.png
120 Ge icon.png
Mods pilon bomb.png
14 in (mod35)
Research:
560 Rp icon.png
Cost:
550 Sl icon.png
120 Ge icon.png

This plane needs to be fast to avoid trouble and good at defending itself- stock, it can do both things, but not very well. It is suggested that you research Engine and flight performance modifications as quickly as possible so you can skirt around the edge of the map, away from fighters. Alternatively, if you believe you can handle fighters, research the defensive armament lines first. Bomb load-outs are the next most important thing- fortunately, since research at this rank costs very little time, you can research defensive armament and bomb load-outs alternately; this will make the G4M1 an effective weapon. Protection is non-existent for the G4M1, so you should research survivability upgrades last, as it will not help you survive fighter attacks.

Armaments

Suspended armament

List of setups (8)
Setup 112 x 60 kg Navy Type 97 Number 6 ground bomb
Setup 24 x 250 kg Navy Type Number 25 Model 2 bomb
Setup 34 x 250 kg Navy Type 98 Number 25 bomb
Setup 41 x 500 kg Navy Type Number 50 Model 2 bomb
Setup 51 x Type 91 Model 2 torpedo (835 kg)
Setup 61 x Type 91 Model 3 torpedo (850 kg)
Setup 71 x 800 kg Navy Type 99 Number 80 AP bomb
Setup 81 x 800 kg Number 80 Mod. 1 bomb

The G4M1 can be outfitted with the following ordnance:

  • 12 x 60 kg Navy Type 97 Number 6 bombs (720 kg total)
  • 4 x 250 kg Navy Type Number 25 Model 2 bombs (1,000 kg total)
  • 4 x 250 kg Navy Type 98 Number 25 bombs (1,000 kg total)
  • 1 x 500 kg Navy Type Number 50 Model 2 bomb (500 kg total)
  • 1 x 835 kg Type 91 Model 2 torpedo
  • 1 x 850 kg Type 91 Model 3 torpedo
  • 1 x 800 kg Navy Type 99 Number 80 AP bomb (800 kg total)
  • 1 x 800 kg Navy Type Number 80 Model 1 bomb (800 kg total)

Defensive armament

Turret20 mm Type 99 Model 1 cannon
Ammunition1000 rounds
Fire rate517 shots/min
4 х Turret7.7 mm Type 92 machine gun
Ammunition1000 rounds
Fire rate600 shots/min

The G4M1 is defended by:

  • 1 x 20 mm Type 99 Model 1 cannon, tail turret (1,000 rpg)
  • 1 x 7.7 mm Type 92 machine gun, nose turret (1,000 rpg)
  • 1 x 7.7 mm Type 92 machine gun, dorsal turret (1,000 rpg)
  • 1 x 7.7 mm Type 92 machine gun, 2 x beam turrets (1,000 rpg)

Usage in battles

Comparing to its contemporaries, the G4M1 has a somewhat above average climb rate and top speed. Where it has an advantage is in the defensive armament, which, however, cannot be completely relied upon, due to the unreliability of the AI gunners and the relative fragility of the medium bombers.

As a result, the best use of the G4M1 is in dropping general-purpose bombs on enemy bases and emplacements from a high altitude, in particular for the arcade battles. Here an extra care should be taken when selecting bomb load, in order to choose payloads with maximum TNT equivalent for its destructive potential, as opposite to armour-piercing bombs. Also, worth noting, that the 800 kg Number 80 Model 1 bomb does more damage to the enemy base than the four 250 kg Number 25 Model 2 bombs, despite them having a higher total TNT equivalent. 250 kg bombs, however, are perfect for engaging enemy pillboxes and vehicles, owning it to their 116 m destruction radius of a soft targets, and 5 m of the armoured targets.

For the anti-naval duty, the B6N family or D4Y family typically do a better job, in particular as a torpedo carrier, due to its smaller size and vastly superior maneuverability.

Low-altitude attacks against vehicles would be best left to the D4Y3 Ko, within the same BR it carried triple 250 kg bombs (1 less), but it's far more manoeuvrable and to a limited degree can double as a fighter with its twin 7.7 mm machine guns.

Manual Engine Control

MEC elements
Mixer Pitch Radiator Supercharger Turbocharger
Oil Water Type
Controllable Controllable
Not auto controlled
Controllable
Auto control available
Controllable
Auto control available
Separate Controllable
2 gears
Not controllable

Pros and cons

Pros:

  • Excellent mix of bombs and torpedoes, suitable against all kinds of targets
  • Good manoeuvrability and top speed for a medium bomber
  • Good defensive capability with the tail 20 mm cannon
  • Self-sealing fuel tanks (although still quite unreliable)

Cons:

  • No armour means it can't take very many hits without adverse effects
  • Large wings means larger targets for the enemy

History

Designed as a lightweight medium bomber, the G4M1 sacrificed protection in order to achieve high-speed and an operational range of 2,850 km. Unfortunately, this made the plane extremely vulnerable to Allied fighters and anti-aircraft fire who found the engines and fuel tanks particularly flammable. The plane's finest hour was the sinking of the HMS Repulse and HMS Prince Of Wales, the first two capital ships sunk in open waters by aircraft during wartime.

The plane also played a role in the final hours of Admiral Isoroku Yamamoto. Two G4M1 bombers of the Kōkūtai 705, escorted by 6 A6M2 fighters Kōkūtai 204, were to carry him from Rabaul to Balalae Airfield near Bougainville Island. Admiral Yamamoto's purpose in traveling to Balalae Airfield was to inspect Japanese aircraft participating in Operation I-Go, and to boost morale following the intense battles at Guadalcanal. However, U.S. naval intelligence decrypted orders sent to Japanese commanders regarding the itinerary, escorting forces, and which units were be toured. In Operation Vengeance, 18 P-38G Lightnings were sent to intercept Yamamoto, which ended in both G4M1 bombers shot down. The bomber with Yamamoto crashed in the jungle, killing him, and the other, holding his staff, crashed at the sea.


Archive of the in-game description

The long-range twin-engine Mitsubishi G4M torpedo bomber had a relatively small bomb load of 1,000 kg but a long flight range of about 6,000 km.

Because of the Washington Naval Agreement, Japan was far behind in fleet construction. Therefore, to guard against potential enemy warships, the 10-Shi specification was created, calling for a long-range, twin-engine torpedo bomber.

The power plant consisted of two engines with 1,530 horsepower. The plane was the first Japanese plane in history to use retractable landing gear.

Needing to make weight cutbacks to construct a high-speed and long-range bomber, the designers abandoned fuel tank protection, assuming that the G4M1 would be able to flee from enemy fighters. The designers' hopes did not materialize: the wings (where the fuel tanks were located) easily caught fire, and at the war's start, fighters which could catch up to the bombers without much difficulty were already in the air.

All in all, 1,170 G4M1s were constructed.


Media

Skins
Videos

See also

Links to the articles on the War Thunder Wiki that you think will be useful for the reader, for example:

  • reference to the series of the aircraft;
  • links to approximate analogues of other nations and research trees.

External links

Paste links to sources and external resources, such as:

  • topic on the official game forum;
  • other literature.


Mitsubishi Company (三菱商会)
Fighters  A5M4 · Hagiri's A5M4
  A6M2 mod. 11 · A6M2 · A6M3 · A6M3 mod. 22 · A6M3 mod. 22Ko · A6M5 · A6M5 Ko · A6M5 otsu · A6M5 Hei · A6M6c
  A7M1 (NK9H) · A7M2
  J2M2 · J2M3 · J2M4 Kai · J2M5 · J2M5 (30 mm)
Hydroplanes  F1M2
Interceptors  Ki-83 · Ki-109
Bombers  G4M1
  Ki-21-Ia · Ki-21-I hei · Ki-67-I Ko · Ki-67-I otsu
Jet Fighters  Ki-200
Captured  ▃A6M2 · ␗A6M2
See also  Mitsubishi Heavy Industries, Ltd. (Post-War)

Japan bombers
Navy 
Carrier-based attack bomber 
B5N  B5N2
B6N  B6N1 · B6N2 · B6N2a
B7A  B7A2 · B7A2 (Homare 23)
Carrier-based dive bomber 
D3A  D3A1
D4Y  D4Y1 · D4Y2 · D4Y3 Ko
Shipboard Observation seaplane 
F1M  F1M2
Land-based Attack bomber 
G4M  G4M1
G5N  G5N1
G8N  G8N1
Flying boat 
H6K  H6K4
H8K  H8K2 · H8K3
Land-based Bomber 
P1Y  P1Y1
Army 
Light  Ki-32
  Ki-48-II otsu
Heavy  Ki-21-Ia · Ki-21-I hei
  Ki-49-I · Ki-49-IIa · Ki-49-IIb · Ki-49-IIb/L
  Ki-67-I Ko · Ki-67-I otsu
Other countries  ▅B-17E