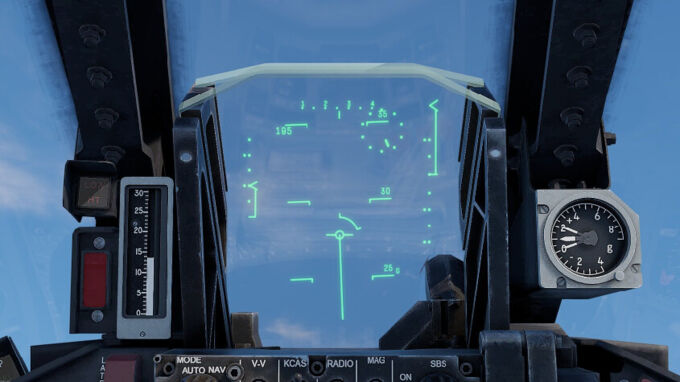
Being a Game Mode without markers, Air Simulator Enduring Confrontation (Sim EC) does not provide the pilot with easily visible overlay indicators for either available or selected Mission Targets / Bases. It is therefore crucial to be able to find and engage Mission Targets, and the CCRP (Continuously Calculated Release Point) method using Bombing Computers is a great tool for this.
In short, all CCRP methods have the feature to be able to mark or select a Mission Target, fly to it, and have the Bombing Computer decide when to drop the bomb to hit the intended target. The technological solutions to this problem — and methods to use those — are described in the following paragraphs.
Prerequisite: Weapon selection
There are several ways to drop bombs in WT, and the difference may be confusing to many, especially if they come from other game modes.
The easiest way to drop bomb is via the [Drop bomb] or [Drop bomb series] commands, which simply (depending on aircraft) drop the bombs single or in pairs ([Drop bombs]) when pressed, or in the case of [Drop bomb series] drops the amount of bombs set in the briefing screen under the [Bomb series] option.
The problem with this method is, that it doesn't allow to select the bomb you want to drop if you have several types, and you can not switch the number of bombs for bomb series during flight. Thus for Sim, this method is not recommended.
The recommended method for dropping bombs in Sim is with weapon selection: You can set up you controls that you can switch to your desired weapon (bombs, torpedoes, rockets, missiles,...) using the [Switch secondary weapon] command, and fire/drop using the [Fire secondary weapon] command (instead of having one command for bombs, one for rockets, one for torpedoes, one for missiles, etc. in the other method). So you can select specifically what bomb to use.
Furthermore, with the command [Secondary weapon ripple quantity] you can chose how many are dropped: When nothing is selected, the weapon is droppen single, then in increments you can chose to drop 2, 4, 8, 16,... and S, where [S] stands for series and drops a series of the selected bombs until the button is released or all bombs of the type are spent.
Note: The possible selection of 2, 4, 8, etc. is often suboptimal for efficient use of bombs. At high tier you need for example 6 Mk.83 1000-pounders for one base, the Tornado can carry 12 of those bombs, which would be nenough for two bases, but as there is no ripple quantity of 6 available, one has to use a trick, here e.g. to carry 6x low drag and 6x high drag bombs instead...
But now to the actual CCRP methods:
1. Early Bombing Computers
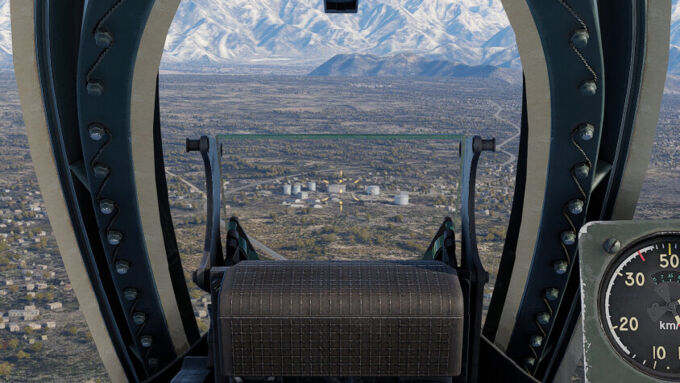
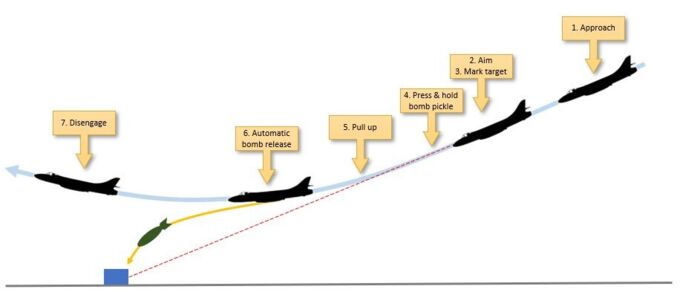
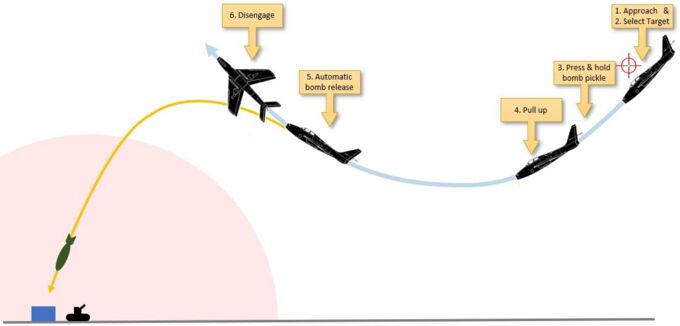
Early Bombing Computers use a simple method where the pilot uses his sight to aim for a desired target, activates the Bombing Computer, and pulls up. Based on parameters like altitude, speed, rate of descent, bomb ballistics, etc. (some of which need to be set up before the flight by the ground crew), the computer then determines the optimal release point and releases the bombs automatically once that point is reached.
A well known and widely used example for this is the Saab BT series of Bombing Computers (BT standing for “Bomb Tosser”), variants of which are for example implemented in WT in the Étendard IVM, P-16 or Hunter Mk.58.
Note: A big disadvantage of this method is that once marked, the pilot has no way to see / know what target was marked, as the gun sight has no indication for the target point.
Note: This method is also useful for engaging any point targets that are not Mission Targets / Bases, like ground vehicles, bunkers, etc., and thus is very helpful for Ground Battle events with aircraft that have no CCIP (Continuously Calculated Impact Point) capability. It can be used with all CCRP-equipped vehicles, not only the early models described in this paragraph.
How to use:
- Approach your target in a descent, wings level.
- Aim your sight at the intended impact point.
- Mark the target by using the [Activate target point] button.
- Press your pickle button [bomb button] and hold it.
- Gently and continuously pull back to level off / climb, while being careful to maintain heading and bank.
- The bombs are automatically released once the Bombing Computer has determined the proper release point.
- Disengage.
2. Intermediate Bombing Computer with preprogrammed targets
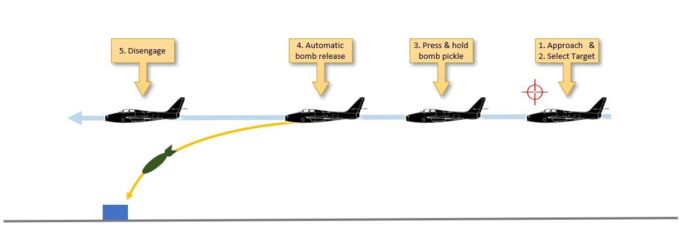
More modern bombing computers, like the ones used for example in aircraft like the Milan, are able to use pre-programmed Mission Targets / Bases. While still simple, the sights of those aircraft indicate the direction to a selected target, by placing the “ring” of the gyroscopic sight at the heading the aircraft needs to fly to overfly the selected target. However, there’s no indication of altitude of and distance to target, and there is no countdown indicating the calculated release point.
How to use:
- Approach your intended target and align to it as well as possible, to make sure the target lies within the display field of the sight. This can be done already very far away, and it’s recommended to use the map for this alignment.
- Toggle through the available Mission Targets until the one you desired is marked on the sight by the ring of the sight.
- Close in on the target, align yourself horizontally to ensure you will overfly it, and when close enough, press the pickle button (bomb button) and hold it.
- The bombs are automatically released once the Bombing Computer has determined the proper release point.
- Disengage
3. Modern Bombing Computer with detailed HUD
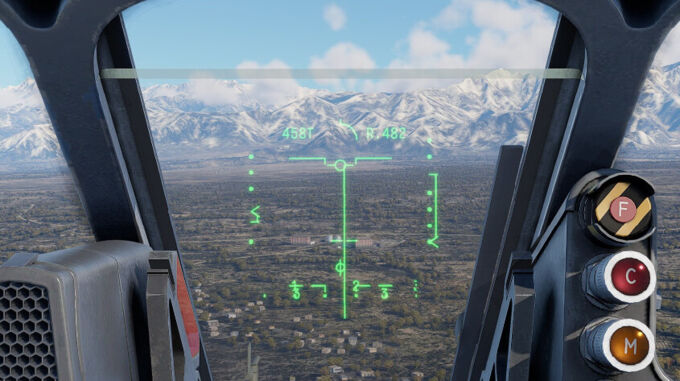
The next step in the evolution of Bombing Computers was a more detailed indication of the bombing targets, showing not only direction on the sight or HUD, but also altitude (e.g. by indicating the calculated impact point on the ground) as well as a countdown indicating how much time will pass until the bombs are released. This of course makes it easier to plan one’s attack, providing all information needed for a successful CCRP run.
The actual attack method is the same as described for the Intermediate bombing computer, but easier thanks to more detailed information provided to the pilot.
4. Bombing Computers in connection with Targeting Equipment
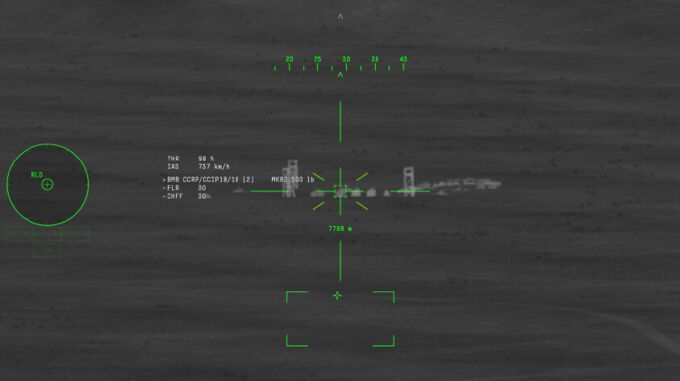
While in general the operation works like the method described previously, the Targeting Equipment allows to finetune one’s aiming point: When a Mission Target is selected, switching to the Targeting view one can precisely aim the desired impact point.
Also, using the Targeting Equipment allows the pilot to aim for and engage point targets other than Mission Targets / Bases, like ground vehicles, bunkers, etc., and thus is very helpful for Ground Battle events.
5. Toss Bombing / Lofting
A further advantage of CCRP Bombing Computers is the possibility to use Toss Bombing, also known as Lofting. Here the bombs are not delivered from level flight or a dive, but are actually released while climbing, thus tossing the bombs upwards in a parabolic arc. This means that the bombs can be dropped from a longer distance, allowing the aircraft to not have to get into the air defense bubble around a heavily defended target.
How to use:
- Mark or select your intended target as described in the paragraphs above.
- From level flight or a dive, press the pickle button [bomb button] and hold it.
- Gently and continuously pull back to climb, while being careful to maintain heading and bank.
- The bombs are automatically released once the Bombing Computer has determined the proper release point.
- Disengage.
Important: The tricky part with this delivery method is to decide when and to what attitude one has to pull up. This of course depends a lot on initial altitude, speed and distance to the target, and needs to be practiced a bit. Here, having a modern HUD with a countdown counter helps a lot, obviously. However, Toss bombing is possible with all the methods described above.
Note: It makes little or no sense to use the Lofting for High Drag bombs, as their braking equipment negates the advantages of tossing the bombs in an upward arc.
6. Special cases
There are two special cases that need to be considered when it comes to CCRP bombing in Sim EC:
6.1 Bugged aiming points for Mission Targets / Bases
On some maps, some Mission Targets are currently bugged in WT insofar as the preselected aiming point is not on the same elevation. This leads to the bombs not actually being released when the countdown is reached.
Maps where this can be observed are especially Afghanistan, Vietnam, and some bases on the Denmark map, but can occur on all maps potentially.
However, there are two workarounds to address this issue:
- Instead of selecting the Mission Target / Base by toggling through the preprogrammed Mission Targets (as described in section 2), mark the target in your sight and engage as described in section 1.
- If equipped with Targeting Equipment (see section 4), once you toggled to your desired target, switch to Targeting View, and adjust the offset aiming point to lie perfectly on the intended target.
6.2 Aircraft equipped with CCRP but lacking corresponding indications
In WT, quite a few aircraft types that in real life are equipped with bombing computers capable of CCRP bomb delivery methods, currently lack any indication for CCRP usage in their cockpit. While this may be no issue for AB and RB game modes (thanks to additional CCRP overlays in HUD-only and External views there) the lack of any indication of a selected Mission Target / Base in Sim makes using CCRP in those aircraft impossible in Sim.
Aircraft affected (list non conclusive):
- F-111 Aardvark
- F-105 Thunderchief
- F-4 Phantom II
- A-4 Skyhawk
- …
While it’s possible to select, approach and engage a Mission Target / Base using CCRP in those aircraft, the pilot has no way to actually know which target was selected. Obviously, he doesn’t know how to direct himself to and engage the desired target…
For those cases, only the method described in section 1 can be used for CCRP, or of course (if applicable) CCIP bombing methods.
6.3 Using the Tactical Map for CCRP
Patch "Storm Warning" introduced new functionalities to the Tactical Map that have turned out to be very useful for Sim pilots: It is now not only possible to pan the map — very useful when zoomed in (you can zoom in e.g. with your mouse wheel, if applicable) — but you can also place a marker on any place on the map (red square bracket).
The position marked by this bracket will then be the POI (Point of Interest, also called SPI for Single Point of Interest...) of your Ballistic Computer, meaning the aiming point for any of the CCRP bomb delivery methods described above! This means that — depending on what you have available on your aircraft, like seekers of weapons, but also Targeting Equipment and CCRP markings on sights and HUDs, will point at that marked POI. So now, instead of marking with the sight (section 1) or toggling through available Mission Targets (sections 2 to 5), you can directly select your target on the Tactical Map.
Note: For best accuracy and precision, it is of course best to zoom in on the map as well as possible. With the marker accurately placed, one doesn't even need to fine-aim for area targets like Mission Targets / Bases, especially with area weapons like incendiary bombs.
Attention: Selecting a target with another method (sight/HUD marking, toggling bases, aiming seekers or Targeting Equipment) will override the marked target POI on the Tactical Map, and you have to mark again on the map to use the Map POI as target.
How to use:
- Open the Tactical Map
- Locate your desired target. If necessary, zoom in [Mousewheel] and pan map[right click & drag] accordingly.
- Click the middle mouse button as accurately as possible on the desired target to place the POI marker there.
- Close the Tactical Map.
- Set up sight/HUD, weapons and delivery method as desired, necessary.
- Use the navigation / aiming cues to engage the targets.
- If necessary (e.g. if POI could not be placed accurately enough, or shifted), re-adjust aiming point using the methods described in the paragraphs above.
Attention: Be careful manipulating the Tactical Map when in flight! The Ground can come up and slap you in the face faster than you think... ;-)
Note: To select another Point on the Tactical Map, perform the steps described above again, while especially taking care of step 4! This is still a bit fiddly, but the worst that happens if you don't have the POI bracket selected is you designate the point for your teammates (which you want to do anyway so your team knows what target you intend to attack)...
