T-34-85E

From War Thunder Wiki
Jump to: navigation, search
RANK 6 BRITAIN
Rooikat 105 PACK
This page is about the Soviet medium tank T-34-85E. For other versions, see T-34 (Family).
T-34-85E
ussr_t_34_85e.png
GarageImage T-34-85E.jpg
T-34-85E
AB RB SB
5.7 5.7 5.7
Show in game

Description

The T-34-85E is a premium gift rank IV Soviet medium tank with a battle rating of 5.7 (AB/RB/SB). It was introduced as a premium pack in Update 1.49 "Weapons of Victory". It was discontinued after the 2018 Victory Day sales.

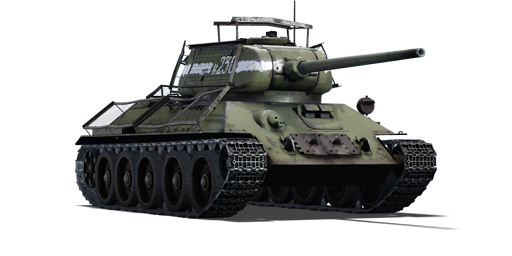
The T-34-85E is essentially a gift version of the T-34-85, it has nearly the same characteristics and the only difference would be the mesh screens added onto the turret and hull. It is an improvement over the original's predecessor, the T-34-85 (D-5T) with a better armament, ammo, and an additional crew member. Aside from that, both tanks' technical specifications are pretty much the same.

The front hull armour is only 45 mm thick, even when sloped this is a pitiful amount of armour to fight with against the other vehicles at its BR as every other tank gun can penetrate that armour. Thus if possible, do not prolong the exposure of the hull armour towards the enemy.

As the T-34-85E is statistically the same as the T-34-85, many of the latter's strategy work well in the former. The T-34-85E's best playstyle is that of a flanker. Due to its high mobility, fast turret traverse, and a capable cannon with excellent post-penetration damage, the T-34-85E fills this role perfectly. Since the turret is so tall, it makes combat behind low obstacles difficult, as the turret segment above the main gun is visible. The T-34-85E's other playstyle can be as a support tank, by keeping up with more protected vehicles like the IS-2 and supplement firepower while their heavy armament reloads.

The T-34-85E would not make a very suitable short-range brawler though even with the 85 mm gun as the gun has a rather tedious reload for the specific playstyle and the T-34's armour is very poor at its BR. With that, the T-34-85E would tend to be able to fire one shot at a close enemy before it gets taken out by other enemies nearby. However, it is understandable that the situation is unavoidable, so it is recommended to stay steady by firing one shot at an unsuspecting enemy at close range before retreating to reload, evading enemy shots.

General info

Survivability and armour

Armourfront / side / back
Hull45 / 45 / 45
Turret90 / 75 / 52
Crew5 people
Visibility100 %

Any enemy vehicle around the T-34-85E's BR can destroy it if it can get a solid shot on the hull armour. Beware when exposing hull when coming out to take a shot on an enemy, someone is bound to be watching for the T-34-85 and they won't be afraid to plant a shell into the 45 mm hull armour.

Armour type:

  • Rolled homogeneous armour (Hull, Turret roof)
  • Cast homogeneous armour (Turret, Cupola, Driver's hatch, Machine gun port)
Armour Front (Slope angle) Sides Rear Roof
Hull 45 mm (60°) Front glacis
45 mm (60°) Lower glacis
75 mm (60°) Driver's hatch
65 mm (30°) Machine gun port
45 mm (39-40°) Top
45 mm Bottom
45 mm (47-49°) Top
45 mm (46°) Bottom
20 mm
Turret 90 mm (1-69°) Turret front
90 mm (8-61°) Gun mantlet
75 mm (19-22°) Front 2/3rd
52 mm (13-19°) Rear 1/3rd
52 mm (9°) 20 mm
Cupola 90 mm 90 mm 90 mm 20 mm

Notes:

  • Unlike the original T-34-85 which has 40 mm armour plates behind the 90 mm thick gun mantlet, this vehicle doesn't have those additional 40 mm armour plates.
  • Suspensions wheels are 20 mm thick and tracks are 18 mm thick

Mobility

Speedforward / back
AB62 / 10 km/h
RB and SB55 / 9 km/h
Number of gears5 forward
1 back
Weight32.0 t
Engine power
AB954 hp
RB and SB500 hp
Power-to-weight ratio
AB29.8 hp/t
RB and SB15.6 hp/t
Game Mode Max Speed (km/h) Weight (tons) Engine power (horsepower) Power-to-weight ratio (hp/ton)
Forward Reverse Stock Upgraded Stock Upgraded
Arcade 62 10 32 775 954 24.22 29.81
Realistic 55 9 442 500 13.81 15.63

Modifications and economy

Repair cost
AB2 069 Sl icon.png
RB2 315 Sl icon.png
SB3 088 Sl icon.png
Crew training10 000 Sl icon.png
Experts320 000 Sl icon.png
Aces800 Ge icon.png
Research Aces1 050 000 Rp icon.png
Reward for battleAB / RB / SB
Talisman.png 2 × 110 / 180 / 210 % Sl icon.png
Talisman.png 2 × 172 / 172 / 172 % Rp icon.png
Modifications
Mobility Protection Firepower
Mods new tank traks.png
Tracks
Mods new tank suspension.png
Suspension
Mods new tank break.png
Brake System
Mods new tank filter.png
Filters
Mods new tank transmission.png
Transmission
Mods new tank engine.png
Engine
Mods tank tool kit.png
Improved Parts
Mods extinguisher.png
Improved FPE
Mods tank reinforcement ussr.png
Crew Replenishment
Mods new tank horizontal aiming.png
Horizontal Drive
Mods tank ammo.png
85mm_APHE_ammo_pack
Mods tank cannon.png
Adjustment of Fire
Mods new tank vertical aiming.png
Elevation Mechanism
Mods tank ammo.png
85mm_APCR_ammo_pack
Mods art support.png
Artillery Support

Armaments

Main armament

Ammunition60 rounds
First-order16 rounds
Reloadbasic crew → aces
9.6 → 7.4 s
Vertical guidance-5° / 22°
Main article: ZIS-S-53 (85 mm)
85 mm ZIS-S-53 Turret rotation speed (°/s) Reloading rate (seconds)
Mode Capacity Vertical Horizontal Stabilizer Stock Upgraded Full Expert Aced Stock Full Expert Aced
Arcade 60 -5°/+22° ±180° N/A 23.8 32.9 40.0 44.2 47.1 9.62 8.51 7.84 7.40
Realistic 14.9 17.5 21.3 23.5 25.0

Ammunition

Penetration statistics
Ammunition Type of
warhead
Penetration @ 0° Angle of Attack (mm)
10 m 100 m 500 m 1,000 m 1,500 m 2,000 m
BR-365K APHE 148 143 126 106 90 77
BR-365A APHEBC 135 133 124 114 104 95
BR-365P APCR 195 187 154 122 96 76
O-365K HE 19 18 17 16 15 14
Shell details
Ammunition Type of
warhead
Velocity
(m/s)
Projectile
mass (kg)
Fuse delay
(m)
Fuse sensitivity
(mm)
Explosive mass
(TNT equivalent) (g)
Ricochet
0% 50% 100%
BR-365K APHE 792 9.2 1.2 14 77 47° 60° 65°
BR-365A APHEBC 792 9.2 1.2 14 164 48° 63° 71°
BR-365P APCR 1,050 4.99 - - - 66° 70° 72°
O-365K HE 785 9.54 0.2 0.1 741 79° 80° 81°

Ammo racks

Ammo racks of the T-34-85
Full
ammo
1st
rack empty
2nd
rack empty
3rd
rack empty
4th
rack empty
5th
rack empty
6th
rack empty
60 57 (+3) 55 (+5) 54 (+6) 48 (+12) 43 (+17) 37 (+23)
7th
rack empty
8th
rack empty
9th
rack empty
10th
rack empty
11th
rack empty
Visual
discrepancy
31 (+29) 25 (+35) 19 (+41) 17 (+43) (+59) No

Notes:

  • Shells are modeled individually and disappear after having been shot or loaded.
  • Rack 11 is a first stage ammo rack. It totals 16 shells and gets filled first when loading up the tank.
  • This rack is also emptied early: the rack depletion order at full capacity is: 11 - 1 - 2 - etc. until 10.
  • If you pack 17 (+43) shells, it will keep the hull empty of ammo.
  • Simply not firing when the gun is loaded will move ammo from racks 1 to 10 into rack 11. Firing will interrupt the restocking of the ready racks.

Machine guns

Ammunition1 890 rounds
Belt capacity63 rounds
Reloadbasic crew → aces
10.4 → 8.0 s
Fire rate600 shots/min
Main article: DT (7.62 mm)
7.62 mm DT
Mount Capacity (Belt) Fire rate Vertical Horizontal
Coaxial 1,890 (63) 600 N/A N/A

Usage in battles

The T-34-85E can do well in many environments with its battle role, though it is recommended to stay away from large open areas as bigger guns like the Tiger's 88 mm can chew up the T-34-85E from a long-range. Thus, it is best to stay in cover, like fighting in the forests and urban areas. Using its mobility, attempt to flank enemy tanks to hit them before they realize where the T-34-85E is. Even if caught in a frontal engagement, the 85 mm gun can dish out enough penetration to get through weak points on most enemy tanks like the Tiger I's front hull plate and the Panther's gun mantlet. In these engagement, keep little hope in hull armour and hull angling, shoot first and evade, otherwise enemy tanks will be able to destroy the T-34-85E easily.

Any enemy vehicle around the T-34-85E's BR bracket can destroy it if it can get a solid shot on the hull armour. Beware when exposing hull when coming out to take a shot on an enemy, someone is bound to be watching for the T-34-85E and they won't be afraid to plant a shell into the 45 mm hull armour.

Even if upgunned with the 85 mm gun with a much more protective turret, the T-34-85E's hull armour is just as thick as it was on the 1942 variant. As such, the T-34-85E is very vulnerable to tanks BR 5.7 and higher since they have guns able to tear through the armour.

As such, it is best to keep T-34-85E away from the front arc of beasts like the Panther, Tiger I, and IS-2 and try aiming for their much more vulnerable side armour. It is best for the T-34-85E to do so as the post-penetration damage of the 85 mm gun can do much more damage hitting through the side right into the middle of the hull than it is from the front. Against medium tanks like M4A3 Shermans, Panzer IVs, and other T-34-85Es, it is safe to fight them frontally as long as the player T-34-85E gets the first, penetrating shot on the enemy tank, as the first tank to shoot and hit tends to be the winner.

Enemies worth noting:

Panther A, Panther D, Tiger II (P) - The Panthers are one of the most common tanks around BR 5.7, and they pose a great threat with their deadly long 75 mm cannon, thick frontal armour and adequate speed. You want to avoid engaging them at long range as the T-34 has only x3.5 scope magnification, making long range shooting super hard. Engage the Panthers within 500 m and avoid shooting their frontal hull. Their biggest weak spot is the gun mantlet, which is only 100 mm thick and has a flat part in the middle. That is where you want to aim at, the T-34's APHE has sufficient damage to instantly destroy the Panther even from its turret. The second weak spot is of course the sides, guaranteeing an instant kill. Generally APHE is enough to deal with the Panthers, and no APCR is needed. For the Tiger II P, aim at the vertical area of the frontal turret which is also 100 mm. The best tactic is still to flank it however.

Tiger H1/Tiger E - The Tiger's weak spots are the opposite with the Panthers. Their hull are unsloped and rather thin, while the gun mantlet is weirdly shaped and can absorb quite some shells. The best engaging range remains the same, within 500 m. If the Tiger is angling, aim at the turret ring to disable the gunner and destroy the turret traverse, or aim at the hull side below the side skirt, which is only 60 mm. If it is not angling, aim between the driver's vision port and the MG for an instant kill. Avoid shooting at these two parts as they tend to bounce/absorb shells. For the Tiger E, don't shoot at the lower glacis as there will be add-on tracks installed there, making it harder to penetrate.

Ho-Ri Production - In a frontal engagement, APCR is required as the APHE shells don't have enough penetration. With APCR loaded, aim at the further sides of the fighting compartment, away from the gun, because the further from the gun, the thinner the armour gets, with the thinnest part being around 160 mm unsloped. Penetrating there will knock out its loader, gunner or commander, or detonate the ammo. Of course, the best way is still side-shooting with APHE.

Panzer IV/70(V), Jagdpanzer 38(t) - These small tank destroyers with their well angled frontal armour can be quite a problem from a distance. With APHE, you can disable their transmission by shooting at their lower glacis. Now if you can, flank them. The 85 mm APHE does a great job at penetrating sloped, thin armour, so you don't have to get to their absolute sides. For the Pz IV/70, you can also aim at the downward part of the gun mantlet since the shell might ricochet downwards into the hull, knocking out every crew member. The Jagdpanzer 38(t) doesn't have this problem, so side-shooting is required to destroy it effectively.

M4A3E2 Jumbo - This is another common enemy. It is recommended to use the BR-365A, the one with less penetration but more explosive filler. The reason is that it is better at penetrating sloped armour, which the Jumbo has. With that shell you can easily destroy a M4A3E2 who's not angling. If it is, aim at the hull side just above the tracks, or load APCR and shoot straight at its gun mantlet. Against a 75 mm M4A3E2 you can relax a bit as it will struggle to penetrate your armour, but your cupola is a rather large weak spot and a shot through there can knock out the T-34. Be more careful with the M4A3E2 76 W, as they can easily pierce through your armour.

Pros and cons

Pros:

  • Excellent firepower: adequate penetration, destructive damage and good reload rate
  • Has two types of APHE for players to choose from: BR-365K with higher penetration but less TNT, and BR-365A with less penetration but plenty of TNT, either of which are enough to knock out most tanks with a single round
  • 56 km/h top speed and great manoeuvrability allows it to reposition or flank easily
  • 5-man crew increases survivability against solid shells
  • Similar playstyle with the previous T-34s which is beginner-friendly
  • Fast turret traverse to easily deal with targets from multiple directions
  • Sloped hull and round frontal turret might bounce low-penetrating guns like the 75 mm M3 on early M4 Shermans

Cons:

  • Armour is extremely thin, providing very limited protection against common guns (American 76 mm, British 17-pdr, German 75 mm & 88 mm, etc)
  • Crew members are closely packed, a well-aimed shot tends to knock them all out
  • -5 degrees gun depression is below average, limiting its capability in hilly maps
  • Poor reverse speed
  • Large turret profile makes it easier to get spotted and shot
  • Wire mesh screens do little against HEATFS, let alone any normal HEAT rounds which are commonly used by early cold war tanks (e.g. Type 60) in an uptier
  • Awkward to place bushes on upper front hull due to the obstruction of MG port and driver's optics

History

T-34-85E

In the final months of World War II, the T-34-85 was still very adequate as a medium tank, but the high casualties suffered by the fanatic defenders of Germany and their anti-tank weapons made the crew seek out a way to increase the tank's survivability against these infantry weapons. The crew improvised in the field modifications, and one of the method to shield the T-34s was to apply thin metal sheets or mesh screens onto the T-34 body in hopes that it would disrupt the warheads of Panzerfaust or Panzershreck before it detonates on the hull. These improvised T-34-85s were called T-34-85E with "E" for "ekranami" or "with screens".

However, it was found that these improvisation actually did not reliably stop an anti-tank warhead from penetrating the armour of the tank, or even disrupt the flight path to the target, the warhead would often just tear through the extra screens and hit the hull. Therefore, the practice of adding these screens was actually not widespread throughout the entire armoured forces, but enough were made that they were documented during the Battle of Berlin in many historical photographs as casualties from the tank crew man are so high that any chances of survival are taken in hopes of living to fight another day.

Overall, except with the addition of improvised screenings, the T-34-85E performed just like a regular T-34-85 in terms of mobility and firepower.


Archive of the in-game description

The T-34-85 medium tank was equipped in field conditions with screens to protect it against high-explosive antitank projectiles during the assault on Berlin. During the Berlin strategic offensive the Red Army's tank divisions encountered a problem with increased human casualties and lost combat vehicles due to the enemy's use of portable anti-tank grenade launchers with high-explosive antitank grenades. The greatest difficulty involved conducting military operations in urban areas, where the enemy had the opportunity to use portable anti-tank guns from a large amount of cover at close range. One of the attempts to reduce the effectiveness of these munitions involved using mesh screens installed on the body of the tank a certain distance from the armour plating. These mesh screens were presumably built in tank-repair workshops. However, the screens did not provide effective defence.


Media

Skins
Images

See also

Other T-34-85 variants

External links


Kharkov Design Bureau for Mechanical Engineering named after A. A. Morozov
Light Tanks 
BT-5  BT-5 · RBT-5
BT-7  BT-7 · BT-7M · BT-7A (F-32)
Medium Tanks 
T-34-76  T-34 (Prototype) · T-34 (1940) · T-34 (1941) · T-34 (1st Gv.T.Br.) · T-34 (1942) · T-34E STZ · T-34E
T-34-57  T-34-57 · T-34-57 (1943)
T-34-85  T-34-85 (D-5T) · T-34-85 · T-34-85E
T-34-100  T-34-100
T-44  T-44 · T-44-100 · T-44-122
Main Battle Tanks 
T-54  T-54 (1947) · T-54 (1949) · T-54 (1951)
T-64  T-64A (1971) · T-64B
Export/Captured 
T-34  ▀T 34 747 (r) · ␗T-34 (1943) · ␗Т-34-85 (S-53)
See Also  Uralmashzavod · Uralvagonzavod

USSR medium tanks
T-28  T-28 (1938) · T-28 · T-28E
T-34-76  T-34 (Prototype) · T-34 (1940) · T-34 (1941) · T-34 (1st Gv.T.Br.) · T-34 (1942) · T-34E STZ · T-34E
T-34-57  T-34-57 · T-34-57 (1943)
T-34-85  T-34-85 (D-5T) · T-34-85 · T-34-85E
T-34-100  T-34-100
T-44  T-44 · T-44-100 · T-44-122
T-54  T-54 (1947) · T-54 (1949) · T-54 (1951)
T-55  TO-55 · T-55A · T-55AM-1 · T-55AMD-1
T-62  T-62 · T-62M-1
T-64  Object 435 · T-64A (1971) · T-64B
T-72  T-72A · T-72AV (TURMS-T) · T-72B · T-72B (1989) · T-72B3 · T-72M2 Moderna
T-80  T-80B · T-80U · T-80UD · T-80UK · T-80UM2 · T-80BVM · Object 292
T-90  Т-90А · T-90M
Trophies/Lend-Lease 
Germany  ▂T-III · ▂T-V
Great Britain  ▂МК-IX "Valentine"
USA  ▂M3 Medium · ▂M4A2

USSR premium ground vehicles
Light tanks  BA-11 · RBT-5 · BT-7A (F-32) · T-26 (1st Gv.T.Br.) · T-26E · T-126 · PT-76-57 · 2S38
Medium tanks  T-34 (Prototype) · T-34 (1st Gv.T.Br.) · T-34E · T-34-57 (1943) · T-34-85E · T-34-100 · T-44-122 · TO-55 · T-55AM-1 · T-72AV (TURMS-T) · T-80UD
  ▂M3 Medium · ▂M4A2 · ▂T-III · ▂T-V · ▂МК-IX "Valentine"
Heavy tanks  SMK · T-35 · ▂MK-II "Matilda" · KV-1E · KV-2 (1940) · KV-2 (ZiS-6) · KV-122 · KV-220 · IS-2 "Revenge" · Object 248 · IS-6 · T-10A
Tank destroyers  BM-8-24 · BM-13N · BM-31-12
  SU-57 · SU-76D · SU-76M (5th Gv.Kav.Corps) · SU-85A · SU-100Y · SU-122P · Object 120
SPAA  ▂Phòng không T-34 · ZUT-37