Help:Inserting pictures
You can (and need) embed images into articles on the War Thunder Wiki. But before posting images in the text of the article, they must first be uploaded to the wiki. This can be done on the "Upload file" page , which you can also access via the link in the expandable Tools panel on the left side of the page.
During the file upload, you can change its name and add a short description. The file name can consist of several words (Cyrillic or Latin) separated by spaces or underscores (in wiki markup, the underscore is automatically converted to a space immediately after writing)
When uploading files, use meaningful friendly names for them!
Successful examples:
- BREN on Tiger (P).png
- Ju-87G Rudel.jpg
- Sla 16 installation on the tank.Jpg
Examples of unsuccessful names:
- 3eYIv63ADtM.jpg (meaningless character set)
- Image1.jpg (another meaningless name)
- CK.jpg (actually referring to Cobra King, but not immediately understand)
If you load a series of images, each of which is difficult to come up with a unique name, they can simply be numbered. For example: Cobra King - screenshot 1.jpg, Cobra King - screenshot 2.jpg, Cobra King - screenshot 3.jpg, etc.
A brief explanation is often used to indicate the source from which the image was taken. Example: "Taken from Walther Spielberger Panzerkampfwagen Tiger und seine Abarten." Try to indicate the source if you took an image from a book.
You can insert images into an article in two main ways: each image as a separate one or as an image gallery.
Contents
Insert separately
Visual editor
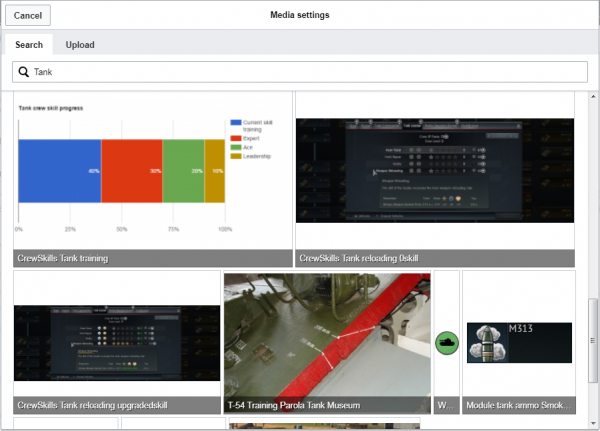
If you work in the visual editor, you can insert an image by clicking on the "Media" button in the "Insert" menu. Clicking on this button will open a dialog box in which you will first be prompted to find and select one of the files already downloaded, or to download a new one from your device:
In the "Search" section, you can find and select an image already uploaded to the wiki, and in the "Upload" section - upload a new one from your device.
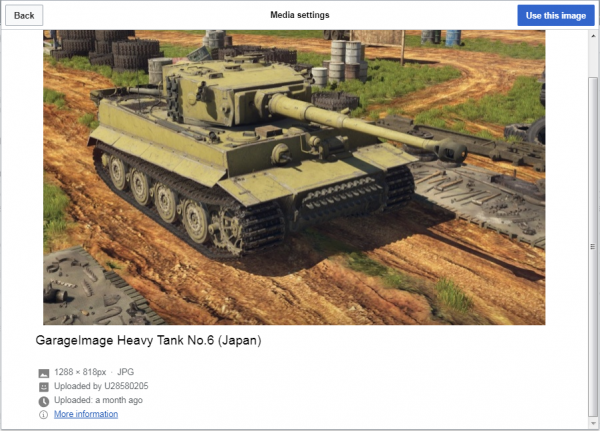
After you select the desired image, the editor will enlarge it, display the basic information about the image file and ask you to confirm the selection:
If the image is selected correctly, then you can safely click the blue button labeled "Use this image," otherwise click "Back."
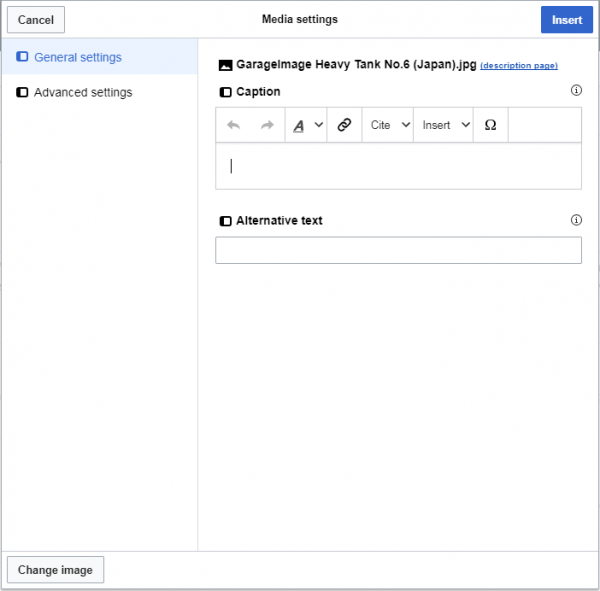
Next, the settings window for the pasted image will appear. By default, this is a thumbnail image, without description, with an alignment on the right and 300 pixels wide. Unless specifically required, these parameters, except for the description, do not need to be changed.
In the "General Settings" section, you can add a caption under the image, as well as add alternative text in case the image is not uploaded (optional).
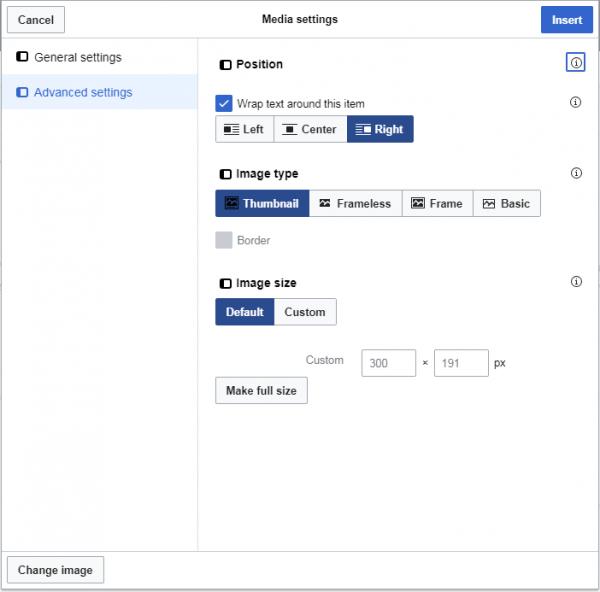
In the "Advanced Settings" section you can change the position of the image, adjust its type and size. Default values are not recommended.
After you finish setting the parameters, click the "Insert" button and the image will appear on the page.
Wiki text editor
In the wiki text editor to insert an image, you must use a special code, the syntax of which is presented below:
[[File:{Filename}|{parameters}|{caption}]]
The file name includes the full name of the image uploaded to the wiki, including the extension, for example: Example.jpg
Image parameters may include the following items, separated by a vertical bar, or not at all:
- border, frame, thumb, frameless: Set the following image formatting:
- thumb (mini) — a smaller version of the image with reference to the original, streamlined with the text on the right, is recommended by default ;
- border — gives a thin gray border (not recommended);
- frame — a frame with a caption;
- frameless — thumbnail with a link to the original, but without a frame and placed in the text itself.
- left, right, center, none: Set the horizontal alignment of the image on the page with text wrapping, the alignment is recommended on the right;
- baseline, sub, super, top, text-top, middle, bottom, text-bottom: Set the vertical alignment of the image on the page;
- {width} px: Resizes the image to the specified width, a value of 300px is recommended;
- x{height}px: Resizes the image to a given height;
- {width}x{height}px: Resizes the image to the specified width and height.
- The proportions of the image always remain the same!
- link={link}: The image can also serve as a link to something:
-
[[File:Example.jpg|20px|link=Help:Creating_articles]]→ .
. - The link parameter cannot be used together with the thumb, since the thumb implies a link to an enlarged version of the image. Also, the link cannot be used in conjunction with the frame;
- alt = {alternative text}: Change the alternative text of the image (in case the image is not uploaded);
- class = {class name}: specifies an additional element class
<img />.
If the parameter does not match any of the above, file would be formatted as a frame by default. The caption is displayed below the image if the thumb and frame parameters are used, and also shown as a tooltip when you hover the cursor with the border and frameless parameters. With the thumb and frame parameters, you can include wiki links and other formatting in the caption text, but in other cases the formatting will be ignored.
To insert illustrations into articles, it is recommended to use the following code (on the right - an example of the resulting image)
[[File:Example.jpg|thumb|300px|right|Caption]]
If you want to stop the flow of text (for example, for the title screenshot), you should add the code {{Break}} after the image.
To simplify the insertion of images in the wiki text editor, you can use the functionality of the extended toolbar by clicking the "Image" button icon.
![]() .
.
After clicking on this button, a dialog box opens in which you can enter the parameters described above.
Insert galleries
Visual editor
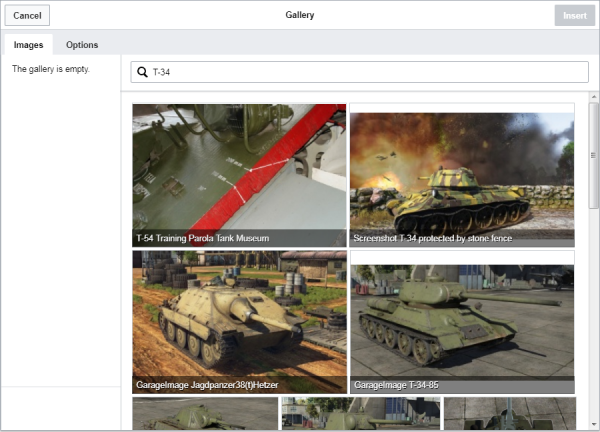
To insert an image gallery in the Visual Editor, select the "Gallery" item in the Insert menu. When you click on this button, a dialog box opens in which you can choose to upload already uploaded images to the gallery:
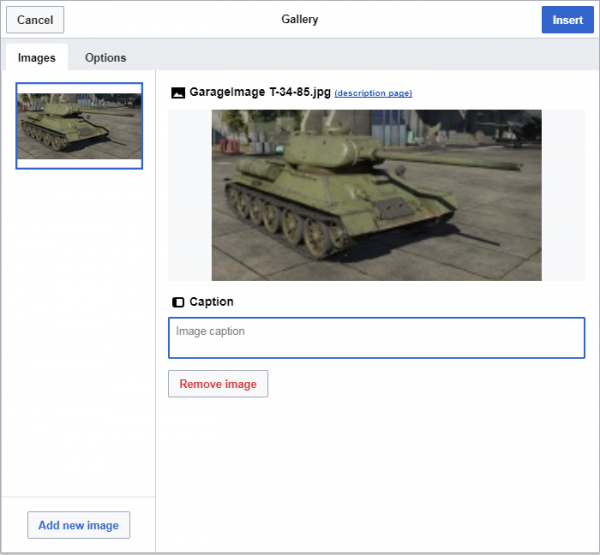
Gallery settings on the tab "Options" are not recommended to change. In order to find the images that you want to include in the gallery, you should use the search. To select an image, click on it with the left mouse button, and it will move to the block on the left and the image settings window will appear:
In this window, you can add a caption to the image in the "Images" field, as well as delete the image from the gallery using the "Remove image" button if you decided not to post it there.
In order to add the next image to the gallery, click the "Add new image" button at the bottom left corner, the window will return to the previous state. All images selected for placement in the gallery will be placed in the block on the left, which allows you to switch between them and rearrange their location in the gallery by dragging with the mouse. As soon as you select all the necessary images, click the "Insert" button and the finished gallery will appear on the page.
Wiki text editor
To insert an image gallery in the wiki text editing mode, you will need the following, rather simple code:
<gallery>
File:Example.jpg|Image 1
File:Example.jpg|Image 2
...
</gallery>
The code will result in the following gallery:
That is, to insert a gallery through the wiki text editor, it is enough to write the full name of the image on the wiki between <gallery> tags, and the image caption (not necessary) through a straight line. The number of images in the gallery is not limited, but you should not overdo it.
The order of the image names in the tags <gallery> determines the final order of the images in the finished gallery.
Additional info
Link to image page
If you put a colon (:) before the word File:, the picture will not be embedded in the text, instead the link will point to the picture page.
For example, the code:
[[:File:Example.jpg]]
[[:File:Example.jpg|Caption]]
It will be displayed like this:
File:Example.jpg
Caption
Direct file link
Code:
[[Media:Example.jpg]]
[[Media:Example.jpg|Caption]]
Displayed as:
Media:Example.jpg
Caption
More information about the insertion of images can be found at the link: Wikipedia: Help:Pictures.


