Difference between revisions of "Checking 3D model of the aircraft in game"
Inceptor57 (talk | contribs) m |
Inceptor57 (talk | contribs) m (Changed protection level for "Checking 3D model of the aircraft in game" ([Edit=Allow only autoconfirmed users] (indefinite) [Move=Allow only autoconfirmed users] (indefinite))) |
| (One intermediate revision by the same user not shown) | |
(No difference)
| |
Latest revision as of 16:52, 5 February 2019
Back to War Thunder CDK overview
Contents
Exporting aircraft model
To check in the game the aircraft model you created you should:
- Create a folder in <game directory>\WarThunderCDK\develop\assets\gameres\aircrafts\<your aircraft's name>
- Put all the textures required for your aircraft in the folder (see. model requirements)
- Export all the LOD's of undamaged and damaged plane's condition in DAG format to this folder.
Tip: by default you need 4 lods with names <aircraft name>.lod0X.dag, <aircraft name>_dmg2.lod0X.dag where X is LOD's number, from 0 to 3, but amount of levels of detalization as well as their filenames can be changed in .folder.blk or in special file <your aircraft name>.dynmodel.blk and <your aircraft name>_dmg2.dynmodel.blk - Export collision models and penetration models with the name <your aircraft name>_dm.dag. Similar you can change this names in .folder.blk or in <your aircraft name>_dm.aces.blk
- If aircraft has special animations, then you need to load animation in A2D format: <aircraft name>_anim.a2d
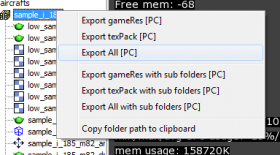
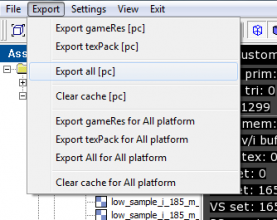
- Then you should start AssetViewer - program to view and export models to the game. If you see that model looks fine and after you make sure that console displays no error messages, in program menu (or context menu of your aircraft's folder ) select Export All
"Developers Diaries: Model Editor"
Early easy tutorial
Early easy tutorial
"War Thunder CDK: Location Editor part 2"
Exporting models from '3D Max' to 'Dagor engine'
Exporting models from '3D Max' to 'Dagor engine'
Preparing aircraft for the flight
- In folder <game directory>\content\pkg_user\gameData\flightModels\ create a file <aircraft name>.blk, add parameter model:t= name of your aircraft's model. SAmple of such file and its settings you can find in War Thunder CDK package.
- Now in folder <game directory>\UserMissions you should create or change one of the existing missions, adding your aircraft as player's aircraft.
- In Menu -> User Missions choose this mission and if everything was done right you will see your aircraft flying in game
If your aircraft has cockpit
- To create cockpit you should create a separate modelm which you should upload to <game directory>\WarThunderCDK\develop\assets\gameres\cockpits\<your aircraft name>.
- Undamaged condition, damage condition _dmg2, and animations are uploaded from 3ds Max' similar to the name <aircraft name>_cockpit.lod00.dag, <aircraft name>_cockpit_dmg2.lod00.dag and <aircraft name>_cockpit_anim.a2d.
Detalization levels and collision models are obviously not needed. - Config file of the aircraft should have block cockpit{} or near config file there should be a file <aircraft name>.cockpit.blk with this block (sa,ple is in WarThunderCDK package).
Adding cockpit to already existing aircraft
To add cockpit to already existing aircraft do the following:
- Create cockpit modelСоздать модель кабины (see. Technical Requirements for cockpit models) and export it to the game from assetviewer.
- Create a file <game directory>\content\pkg_user\gameData\flightModels\<internal aircraft name>.cockpit.blk
Sample of such a config file is in WarThunderCDK package
Notes:
You can get a list of internal aircraft names using mission editor which you can find in War Thunder CDK package.
You can create cockpits only for aircraft which do not have cockpit in the game yet.


