Difference between revisions of "StuG III G (Italy)"

From War Thunder Wiki
Jump to: navigation, search
(Description)
(Added armor profile)
(15 intermediate revisions by 5 users not shown)
Line 1: Line 1:
{{About
 
| about = tank destroyer '''{{PAGENAME}}'''
 
| usage = other versions
 
| link = StuG III (Family)
 
}}
 
 
{{Specs-Card
 
{{Specs-Card
 
|code=it_stug_III_ausf_G
 
|code=it_stug_III_ausf_G
Line 11: Line 6:
 
== Description ==
 
== Description ==
 
<!-- ''In the description, the first part should be about the history of the creation and combat usage of the vehicle, as well as its key features. In the second part, tell the reader about the ground vehicle in the game. Insert a screenshot of the vehicle, so that if the novice player does not remember the vehicle by name, he will immediately understand what kind of vehicle the article is talking about.'' -->
 
<!-- ''In the description, the first part should be about the history of the creation and combat usage of the vehicle, as well as its key features. In the second part, tell the reader about the ground vehicle in the game. Insert a screenshot of the vehicle, so that if the novice player does not remember the vehicle by name, he will immediately understand what kind of vehicle the article is talking about.'' -->
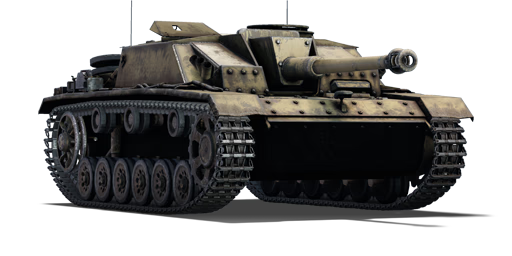
During the advance of the Allies on Italian territory in 1943, Germany began to send different types of vehicles to Italy (RSI) to increase their effectiveness and in turn improve the defence of the territory, including aircraft, light vehicles, transport vehicles, cannons, and eventually tanks. In particular, Pz.IV G, Pz.III N, and eventually StuG III G were sent. These were used in the 1st Armoured Division Black Shirts "M" formed in the same year and was divided into three companies, the third of which was equipped with 12 StuG III G, with 2 particular differences: the removal of the side skirts, and the addition of smoke launchers on both sides. The Italian StuG III Gs did not see combat because the division was still in training, and would eventually be recovered by the Germans only to be captured by the Allies during the advance into Germany.
+
The '''{{Specs|name}}''' is a rank {{Specs|rank}} Italian tank destroyer {{Battle-rating}}. It was introduced in [[Update "Ixwa Strike"]].
 
 
Introduced in [[Update "Ixwa Strike"]], the Italian StuG III G is almost the same as the German one however it has its particular differences such as the removal of the side skirts, and the addition of 2 triple smoke grenade launchers, which can be useful to escape from dangerous situations or to confuse the enemy. Thanks to the powerful cannon, you can destroy any target you meet at your level, always try to position yourself in well-protected places so you can destroy as many targets as possible.


== General info ==
 
== General info ==
Line 19: Line 12:
 
{{Specs-Tank-Armour}}
 
{{Specs-Tank-Armour}}
 
<!-- ''Describe armour protection. Note the most well protected and key weak areas. Appreciate the layout of modules as well as the number and location of crew members. Is the level of armour protection sufficient, is the placement of modules helpful for survival in combat? If necessary use a visual template to indicate the most secure and weak zones of the armour.'' -->
 
<!-- ''Describe armour protection. Note the most well protected and key weak areas. Appreciate the layout of modules as well as the number and location of crew members. Is the level of armour protection sufficient, is the placement of modules helpful for survival in combat? If necessary use a visual template to indicate the most secure and weak zones of the armour.'' -->
 +
''Describe armour protection. Note the most well protected and key weak areas. Appreciate the layout of modules as well as the number and location of crew members. Is the level of armour protection sufficient, is the placement of modules helpful for survival in combat? If necessary use a visual template to indicate the most secure and weak zones of the armour.''
  
'''Armour type:'''
+
'''Armour type:''' <!-- The types of armour present on the vehicle and their general locations -->
 
+
<!-- Example: * Rolled homogeneous armour (Front, Side, Rear, Hull roof)
* Rolled homogeneous armour (hull, superstructure)
+
* Cast homogeneous armour (Turret, Transmission area) -->
  
 
{| class="wikitable"
 
{| class="wikitable"
Line 28: Line 22:
 
! Armour !! Front (Slope angle) !! Sides !! Rear !! Roof
 
! Armour !! Front (Slope angle) !! Sides !! Rear !! Roof
 
|-
 
|-
| Hull || 80 mm (50°) ''Lower glacis'' <br> 80 mm (19°) ''Lower plate'' <br> 30 mm (76°) ''Bottom junction glacis''
+
| Hull || 80 mm (50°) ''Lower glacis'' 
| 30 + 5* mm (*Side skirts) || 50 mm (15°) ''Upper plate'' <br> 50 mm ''Lower plate'' <br> 30 mm (66°) ''Bottom junction glacis''
+
80 mm (19°) ''Lower plate'' 
| 30 mm (4°) ''Front part'' <br> 16 mm ''Engine compartment'' <br> 30 mm (13°) ''Rear part''
+
 
 +
30 mm (76°) ''Bottom junction glacis''
 +
| 30 + 5* mm (*Side skirts) || 50 mm (15°) ''Upper plate'' 
 +
50 mm ''Lower plate'' 
 +
 
 +
30 mm (66°) ''Bottom junction glacis''
 +
| 30 mm (4°) ''Front part'' 
 +
16 mm ''Engine compartment'' 
 +
 
 +
30 mm (13°) ''Rear part''
 
|-
 
|-
| Superstructure || 80 mm (0-11°) ''Upper plate'' <br> 80 mm (1-10°) ''Gun mantlet'' <br> 30 mm (69°) ''Upper glacis'' <br> 30 mm (50°) ''Side glacis overhanging the tracks'' || 30 + 5* mm (*Side skirts) || 30 mm || 11 mm
+
| Turret || 80 mm (0-11°) ''Upper plate'' 
 +
80 mm (1-10°) ''Gun mantlet'' 
 +
 
 +
30 mm (69°) ''Upper glacis'' 
 +
 
 +
30 mm (50°) ''Side glacis overhanging the tracks''
 +
| 30 + 5* mm (*Side skirts) || 30 mm || 11 mm
 
|-
 
|-
| Cupola || colspan="3" style="text-align:center" | 50 mm (cylindrical) || 11 mm
+
| Cupola || 50 mm (cylindrical) || 50 mm (cylindrical) || 50 mm (cylindrical) || 11 mm
 
|-
 
|-
 
|}
 
|}
  
'''Notes:'''
+
'''Notes:''' <!-- Any additional notes which the user needs to be aware of -->
 
+
<!-- Example: * Suspension wheels are 20 mm thick, tracks are 30 mm thick, and torsion bars are 60 mm thick. -->
* Suspension wheels and torsion bars are 15 mm thick while tracks are 20 mm thick.
 
* The belly of the {{PAGENAME}} is 30 mm thick.


=== Mobility ===
 
=== Mobility ===
 
{{Specs-Tank-Mobility}}
 
{{Specs-Tank-Mobility}}
 
<!-- ''Write about the mobility of the ground vehicle. Estimate the specific power and manoeuvrability, as well as the maximum speed forwards and backwards.'' -->
 
<!-- ''Write about the mobility of the ground vehicle. Estimate the specific power and manoeuvrability, as well as the maximum speed forwards and backwards.'' -->
 +
''Write about the mobility of the ground vehicle. Estimate the specific power and manoeuvrability, as well as the maximum speed forwards and backwards.''
  
{{tankMobility|abMinHp=426|rbMinHp=265|AoAweight=|abForwardSpeed=44|abReverseSpeed=8.2|rbForwardSpeed=40|rbReverseSpeed=7.5|abMaxHp=525|rbMaxHp=300|weight=24.4}}
+
{{tankMobility}}
  
 
=== Modifications and economy ===
 
=== Modifications and economy ===
Line 57: Line 65:
 
{{Specs-Tank-Weapon|1}}
 
{{Specs-Tank-Weapon|1}}
 
<!-- ''Give the reader information about the characteristics of the main gun. Assess its effectiveness in a battle based on the reloading speed, ballistics and the power of shells. Do not forget about the flexibility of the fire, that is how quickly the cannon can be aimed at the target, open fire on it and aim at another enemy. Add a link to the main article on the gun: <code><nowiki>{{main|Name of the weapon}}</nowiki></code>. Describe in general terms the ammunition available for the main gun. Give advice on how to use them and how to fill the ammunition storage.'' -->
 
<!-- ''Give the reader information about the characteristics of the main gun. Assess its effectiveness in a battle based on the reloading speed, ballistics and the power of shells. Do not forget about the flexibility of the fire, that is how quickly the cannon can be aimed at the target, open fire on it and aim at another enemy. Add a link to the main article on the gun: <code><nowiki>{{main|Name of the weapon}}</nowiki></code>. Describe in general terms the ammunition available for the main gun. Give advice on how to use them and how to fill the ammunition storage.'' -->
{{main|StuK40 L48 (75 mm)}}
+
{{main|StuK40 (75 mm)}}
 +
''Give the reader information about the characteristics of the main gun. Assess its effectiveness in a battle based on the reloading speed, ballistics and the power of shells. Do not forget about the flexibility of the fire, that is how quickly the cannon can be aimed at the target, open fire on it and aim at another enemy. Add a link to the main article on the gun: <code><nowiki>{{main|Name of the weapon}}</nowiki></code>. Describe in general terms the ammunition available for the main gun. Give advice on how to use them and how to fill the ammunition storage.''
  
 
{| class="wikitable" style="text-align:center" width="100%"
 
{| class="wikitable" style="text-align:center" width="100%"
 
|-
 
|-
! colspan="5" | [[StuK40 L48 (75 mm)|75 mm StuK40 L48]] || colspan="5" | Turret rotation speed (°/s) || colspan="4" | Reloading rate (seconds)
+
! colspan="5" | [[StuK40 (75 mm)|75 mm StuK40]] || colspan="5" | Turret rotation speed (°/s) || colspan="4" | Reloading rate (seconds)
 
|-
 
|-
 
! Mode !! Capacity !! Vertical !! Horizontal !! Stabilizer
 
! Mode !! Capacity !! Vertical !! Horizontal !! Stabilizer
Line 68: Line 77:
 
|-
 
|-
 
! ''Arcade''
 
! ''Arcade''
| rowspan="2" | 54 || rowspan="2" | -6°/+17° || rowspan="2" | ±10° || rowspan="2" | N/A || 13.2 || 18.3 || 22.2 || 24.6 || 26.1 || rowspan="2" | 7.67 || rowspan="2" | 6.78 || rowspan="2" | 6.25 || rowspan="2" | 5.90
+
| rowspan="2" | 54 || rowspan="2" | -6°/+17° || rowspan="2" | ±10° || rowspan="2" | N/A || __._ || __._ || __._ || __._ || __._ || rowspan="2" | _.__ || rowspan="2" | _.__ || rowspan="2" | _.__ || rowspan="2" | _.__
 
|-
 
|-
 
! ''Realistic''
 
! ''Realistic''
| 8.9 || 10.5 || 12.8 || 14.1 || 15.0
+
| __._ || __._ || __._ || __._ || __._
 
|-
 
|-
 
|}
 
|}
  
 
==== Ammunition ====
 
==== Ammunition ====
{{:StuK40 L48 (75 mm)/Ammunition|PzGr 39, Hl.Gr 38B, PzGr 40, Sprgr. 34, K.Gr.Rot Nb.}}
+
{| class="wikitable sortable" style="text-align:center" width="100%"
 +
! colspan="8" | Penetration statistics
 +
|-
 +
! rowspan="2" data-sort-type="text" | Ammunition
 +
! rowspan="2" | Type of<br>warhead
 +
! colspan="6" | '''Penetration @ 0° Angle of Attack (mm)'''
 +
|-
 +
! 10 m !! 100 m !! 500 m !! 1,000 m !! 1,500 m !! 2,000 m
 +
|-
 +
| PzGr 39 || APCBC || 140 || 137 || 125 || 112 || 100 || 89
 +
|-
 +
| Hl.Gr 38B || HEAT || 80 || 80 || 80 || 80 || 80 || 80
 +
|-
 +
| PzGr 40 || APCR || 166 || 162 || 146 || 128 || 112 || 98
 +
|-
 +
| Sprgr. 34 || HE || 10 || 10 || 10 || 10 || 10 || 10
 +
|-
 +
|}
 +
{| class="wikitable sortable" style="text-align:center" width="100%"
 +
! colspan="10" | Shell details
 +
|-
 +
! rowspan="2" data-sort-type="text" | Ammunition
 +
! rowspan="2" | Type of<br>warhead
 +
! rowspan="2" | Velocity<br>(m/s)
 +
! rowspan="2" | Projectile<br>Mass (kg)
 +
! rowspan="2" | Fuse delay<br>(m)
 +
! rowspan="2" | Fuse sensitivity<br>(mm)
 +
! rowspan="2" | Explosive Mass<br>(TNT equivalent) (g)
 +
! colspan="3" | Ricochet
 +
|-
 +
! 0% !! 50% !! 100%
 +
|-
 +
| PzGr 39 || APCBC || 750 || 6.8 || 1.2 || 14.0 || 28.9 || 48° || 63° || 71°
 +
|-
 +
| Hl.Gr 38B || HEAT || 450 || 4.4 || 0.0 || 0.1 || 872.1 || 62° || 69° || 73°
 +
|-
 +
| PzGr 40 || APCR || 930 || 4.1 || N/A || N/A || N/A || 66° || 70° || 72°
 +
|-
 +
| Sprgr. 34 || HE || 550 || 5.74 || 0.1 || 0.1 || 686 || 79° || 80° || 81°
 +
|-
 +
|}
 +
{| class="wikitable" style="text-align:center"
 +
! colspan="7" | Smoke shell characteristics
 +
|-
 +
! Ammunition
 +
! Velocity<br>(m/s)
 +
! Projectile<br>Mass (kg)
 +
! Screen radius<br>(m)
 +
! Screen deploy time<br>(s)
 +
! Screen hold time<br>(s)
 +
! Explosive Mass<br>(TNT equivalent) (g)
 +
|-
 +
| K.Gr.Rot Nb. || ___ || ____ || __ || __ || __ || ___
 +
|-
 +
|}
  
 
==== [[Ammo racks]] ====
 
==== [[Ammo racks]] ====
[[File:Ammoracks_StuG_III_G.png|right|thumb|x250px|[[Ammo racks]] of the StuG III G (identical).]]
+
<!-- [[File:Ammoracks_{{PAGENAME}}.png|right|thumb|x250px|[[Ammo racks]] of the {{PAGENAME}}]] -->
<!-- '''Last updated: 2.5.1.106''' -->
+
<!-- '''Last updated:''' -->
 
{| class="wikitable" style="text-align:center"
 
{| class="wikitable" style="text-align:center"
 
|-
 
|-
Line 87: Line 150:
 
! 2nd<br>rack empty
 
! 2nd<br>rack empty
 
! 3rd<br>rack empty
 
! 3rd<br>rack empty
 +
! 4th<br>rack empty
 +
! 5th<br>rack empty
 +
! 6th<br>rack empty
 
! Visual<br>discrepancy
 
! Visual<br>discrepancy
 
|-
 
|-
| '''54''' || 40&nbsp;''(+14)'' || 17&nbsp;''(+37)'' || 1&nbsp;''(+53)'' || No
+
| '''54''' || __&nbsp;''(+__)'' || __&nbsp;''(+__)'' || __&nbsp;''(+__)'' || __&nbsp;''(+__)'' || __&nbsp;''(+__)'' || __&nbsp;''(+__)'' || __
 
|-
 
|-
 
|}
 
|}
'''Notes:'''
 
 
* Racks disappear after you've used all shells in the rack.
 
* Pack 17&nbsp;''(+37)'' shells into battle to deplete your right flank of ammo (racks 1 & 2 emptied).


== Usage in battles ==
 
== Usage in battles ==
 
<!-- ''Describe the tactics of playing in the vehicle, the features of using vehicles in the team and advice on tactics. Refrain from creating a "guide" - do not impose a single point of view but instead give the reader food for thought. Describe the most dangerous enemies and give recommendations on fighting them. If necessary, note the specifics of the game in different modes (AB, RB, SB).'' -->
 
<!-- ''Describe the tactics of playing in the vehicle, the features of using vehicles in the team and advice on tactics. Refrain from creating a "guide" - do not impose a single point of view but instead give the reader food for thought. Describe the most dangerous enemies and give recommendations on fighting them. If necessary, note the specifics of the game in different modes (AB, RB, SB).'' -->
 
+
''Describe the tactics of playing in the vehicle, the features of using vehicles in the team and advice on tactics. Refrain from creating a "guide" - do not impose a single point of view but instead give the reader food for thought. Describe the most dangerous enemies and give recommendations on fighting them. If necessary, note the specifics of the game in different modes (AB, RB, SB).''
The StuG III G is best played as a support vehicle. Like the previous Semovente variants, it has excellent armour and can be quite a potent vehicle that enemies will often find hard to deal with from long ranges. Due to this, it's advised to go to a good spot overlooking common enemy positions at the beginning of the match. Make sure enemies don't breach your defenses, as the sides of the tank are a weak point from any range. Another downside of playing this vehicle is when it's brought close to the front lines (for example when capturing points). The StuG III G's armour will not be adequate against the close-range power of most vehicles. Most shots at close range will more than likely penetrate the armour, which will usually result in the vehicle being destroyed due to the small interior layout. So it is vital to maintain situational awareness when playing in a more risky playstyle. Make sure to support teammates from the flanks, attack from long ranges, and never close in the distance even for objectives unless necessary. If properly concealed, the enemy will never know where they are attacked as they concentrate their assault forwards.


The StuG III G has no defense against enemy aircraft, so if you see one heading towards you, it probably would be in you best interest to look for cover. Unlike the German variant, the Italian StuG III G does not have side skirts, so artillery might at times damage your tracks. In terms of armaments, the StuG III G is armed with the German-made 75 mm StuK40, a reliable cannon with plenty of great ammo options. Do carefully consider how many rounds are brought, as bringing more than necessary puts the vehicle at greater risk of being destroyed in one shot. In conclusion, be careful, try not to get detected by the enemy and find a place where the StuG III G can be in cover whilst engaging enemy tanks.


=== Pros and cons ===
 
=== Pros and cons ===
 
<!-- ''Summarise and briefly evaluate the vehicle in terms of its characteristics and combat effectiveness. Mark its pros and cons in a bulleted list. Try not to use more than 6 points for each of the characteristics. Avoid using categorical definitions such as "bad", "good" and the like - use substitutions with softer forms such as "inadequate" and "effective".'' -->
 
<!-- ''Summarise and briefly evaluate the vehicle in terms of its characteristics and combat effectiveness. Mark its pros and cons in a bulleted list. Try not to use more than 6 points for each of the characteristics. Avoid using categorical definitions such as "bad", "good" and the like - use substitutions with softer forms such as "inadequate" and "effective".'' -->
 +
''Summarise and briefly evaluate the vehicle in terms of its characteristics and combat effectiveness. Mark its pros and cons in a bulleted list. Try not to use more than 6 points for each of the characteristics. Avoid using categorical definitions such as "bad", "good" and the like - use substitutions with softer forms such as "inadequate" and "effective".''
  
 
'''Pros:'''
 
'''Pros:'''
  
* Good frontal armour
+
*
* Low silhouette
 
* Powerful 75 mm cannon
 
* Boxy design makes it excellent for angling


'''Cons:'''
 
'''Cons:'''
  
* Fixed casemate superstructure restricts gun movement to the front
+
*
* Mediocre mobility
 
* Left side is vulnerable to crew knockouts


== History ==
 
== History ==
 
<!-- ''Describe the history of the creation and combat usage of the vehicle in more detail than in the introduction. If the historical reference turns out to be too long, take it to a separate article, taking a link to the article about the vehicle and adding a block "/History" (example: <nowiki>https://wiki.warthunder.com/(Vehicle-name)/History</nowiki>) and add a link to it here using the <code>main</code> template. Be sure to reference text and sources by using <code><nowiki><ref></ref></nowiki></code>, as well as adding them at the end of the article with <code><nowiki><references /></nowiki></code>. This section may also include the vehicle's dev blog entry (if applicable) and the in-game encyclopedia description (under <code><nowiki>=== In-game description ===</nowiki></code>, also if applicable).'' -->
 
<!-- ''Describe the history of the creation and combat usage of the vehicle in more detail than in the introduction. If the historical reference turns out to be too long, take it to a separate article, taking a link to the article about the vehicle and adding a block "/History" (example: <nowiki>https://wiki.warthunder.com/(Vehicle-name)/History</nowiki>) and add a link to it here using the <code>main</code> template. Be sure to reference text and sources by using <code><nowiki><ref></ref></nowiki></code>, as well as adding them at the end of the article with <code><nowiki><references /></nowiki></code>. This section may also include the vehicle's dev blog entry (if applicable) and the in-game encyclopedia description (under <code><nowiki>=== In-game description ===</nowiki></code>, also if applicable).'' -->
 
+
''Describe the history of the creation and combat usage of the vehicle in more detail than in the introduction. If the historical reference turns out to be too long, take it to a separate article, taking a link to the article about the vehicle and adding a block "/History" (example: <nowiki>https://wiki.warthunder.com/(Vehicle-name)/History</nowiki>) and add a link to it here using the <code>main</code> template. Be sure to reference text and sources by using <code><nowiki><ref></ref></nowiki></code>, as well as adding them at the end of the article with <code><nowiki><references /></nowiki></code>. This section may also include the vehicle's dev blog entry (if applicable) and the in-game encyclopedia description (under <code><nowiki>=== In-game description ===</nowiki></code>, also if applicable).''
The story of the StuG begins during the interwar period of Germany, there was a clear missing asset for the German army, a vehicle which could fit the role of a self-propelled gun, which followed the same style of doctrine thanks to combat experiences in World War I. Overall, there was a major need for a mobile artillery piece which could keep up with the German infantry and fight enemy fortifications with a direct-fire assault role. After a few prototypes and refinement to the designs, the StuG III would officially enter full-scale production from January 1940, and would serve in many countries up till the end of the war in April 1945. The main reason it saw such extensive use was due to the many upgrades done on the vehicle to increase serviceability and it being a low cost platform to maintain operational. In terms of survivability, the StuG III featured about 50 mm of armour on the front, but about 30 mm of armour everywhere else, this was upgraded to 80 mm as the war progressed. The StuG in German service also had access ''Schürzen'' armour plates installed on the hull to protect the weaker hull sides against anti-tank rifles and HEAT rounds.
 
[[File:StuG III G (Italy).png|thumb|StuG III G (D.M.) During Training]]
 
The Italian versions would remove this, as was the case for many Italian vehicles. In terms of the Italian story of this tank, Germany had initially supplied 12 units of the Panzer IV G to Italy during the late stages of the Second World War. With these tanks, as well as 12 newly-received StuG III Gs, the 1st Armored Division Black Shirts "M" (for "Mussolini") was formed in May 1943, mainly starting from the very few survivors of the previous MVSN Battalions M who had been repatriated from the Russian front. The division was organised in 3 companies, with the third comprising the 12 StuGs which were armed with 7.5 cm L/48 cannons. Unlike their German counterpart, the side-skirts were removed from the tanks, but surprisingly were also modified with a smoke grenade launcher, installed onto the turret. The Italian StuGs would be painted in a light tan colour with the Divisione "M" logo usually painted on the turret. They didn't see any action during the war, most of them were still undergoing training at the time and most, if not all of the tanks would end up in Allied hands shortly after the war.


== Media ==
 
== Media ==
 
<!-- ''Excellent additions to the article would be video guides, screenshots from the game, and photos.'' -->
 
<!-- ''Excellent additions to the article would be video guides, screenshots from the game, and photos.'' -->
 
+
''Excellent additions to the article would be video guides, screenshots from the game, and photos.''
;Skins


* [https://live.warthunder.com/feed/camouflages/?vehicle=it_stug_III_ausf_G Skins and camouflages for the {{PAGENAME}} from live.warthunder.com.]


== See also ==
 
== See also ==

Revision as of 14:43, 14 March 2021

Rank VI | Premium | Golden Eagles
Chinese A-5C Pack
▄StuG III G
it_stug_iii_ausf_g.png
GarageImage StuG III G (Italy).jpg
▄StuG III G
AB RB SB
4.3 4.0 4.0
Research:13 000 Specs-Card-Exp.png
Purchase:76 000 Specs-Card-Lion.png
Show in game

Description

The ▄StuG III G is a rank III Italian tank destroyer with a battle rating of 4.3 (AB) and 4.0 (RB/SB). It was introduced in Update "Ixwa Strike".

General info

Survivability and armour

Smoke grenades
Creation of a smoke screen in front of the vehicle
Armourfront / side / back
Hull80 / 30 / 50
Turret80 / 30 / 30
Crew4 people
Visibility74 %

Describe armour protection. Note the most well protected and key weak areas. Appreciate the layout of modules as well as the number and location of crew members. Is the level of armour protection sufficient, is the placement of modules helpful for survival in combat? If necessary use a visual template to indicate the most secure and weak zones of the armour.

Armour type:

Armour Front (Slope angle) Sides Rear Roof
Hull 80 mm (50°) Lower glacis 

80 mm (19°) Lower plate 

30 mm (76°) Bottom junction glacis

30 + 5* mm (*Side skirts) 50 mm (15°) Upper plate 

50 mm Lower plate 

30 mm (66°) Bottom junction glacis

30 mm (4°) Front part 

16 mm Engine compartment 

30 mm (13°) Rear part

Turret 80 mm (0-11°) Upper plate 

80 mm (1-10°) Gun mantlet 

30 mm (69°) Upper glacis 

30 mm (50°) Side glacis overhanging the tracks

30 + 5* mm (*Side skirts) 30 mm 11 mm
Cupola 50 mm (cylindrical) 50 mm (cylindrical) 50 mm (cylindrical) 11 mm

Notes:

Mobility

Speedforward / back
AB44 / 9 km/h
RB and SB41 / 8 km/h
Number of gears6 forward
1 back
Weight24.4 t
Engine power
AB572 hp
RB and SB300 hp
Power-to-weight ratio
AB23.4 hp/t
RB and SB12.3 hp/t

Write about the mobility of the ground vehicle. Estimate the specific power and manoeuvrability, as well as the maximum speed forwards and backwards.

Game Mode Max Speed (km/h) Weight (tons) Engine power (horsepower) Power-to-weight ratio (hp/ton)
Forward Reverse Stock Upgraded Stock Upgraded
Arcade 44 9 24.4 _,___ 572 __.__ 23.44
Realistic 41 8 _,___ 300 __.__ 12.3

Modifications and economy

Repair costBasic → Reference
AB1 169 → 1 517 Sl icon.png
RB1 349 → 1 751 Sl icon.png
SB1 710 → 2 219 Sl icon.png
Total cost of modifications24 700 Rp icon.png
45 000 Sl icon.png
Talisman cost1 100 Ge icon.png
Crew training22 000 Sl icon.png
Experts76 000 Sl icon.png
Aces400 Ge icon.png
Research Aces320 000 Rp icon.png
Reward for battleAB / RB / SB
80 / 120 / 150 % Sl icon.png
142 / 142 / 142 % Rp icon.png
Modifications
Mobility Protection Firepower
Mods new tank traks.png
Tracks
Research:
1 700 Rp icon.png
Cost:
3 100 Sl icon.png
145 Ge icon.png
Mods new tank suspension.png
Suspension
Research:
1 100 Rp icon.png
Cost:
2 000 Sl icon.png
95 Ge icon.png
Mods new tank break.png
Brake System
Research:
1 100 Rp icon.png
Cost:
2 000 Sl icon.png
95 Ge icon.png
Mods new tank filter.png
Filters
Research:
1 200 Rp icon.png
Cost:
2 200 Sl icon.png
105 Ge icon.png
Mods new tank transmission.png
Transmission
Research:
2 700 Rp icon.png
Cost:
4 900 Sl icon.png
230 Ge icon.png
Mods new tank engine.png
Engine
Research:
2 700 Rp icon.png
Cost:
4 900 Sl icon.png
230 Ge icon.png
Mods tank tool kit.png
Improved Parts
Research:
1 700 Rp icon.png
Cost:
3 100 Sl icon.png
145 Ge icon.png
Mods extinguisher.png
Improved FPE
Research:
1 100 Rp icon.png
Cost:
2 000 Sl icon.png
95 Ge icon.png
Mods tank reinforcement it.png
Crew Replenishment
Research:
1 200 Rp icon.png
Cost:
2 200 Sl icon.png
105 Ge icon.png
Mods new tank horizontal aiming.png
Horizontal Drive
Research:
1 700 Rp icon.png
Cost:
3 100 Sl icon.png
145 Ge icon.png
Mods tank ammo.png
75mm_kwk_37_40_HEAT_ammo_pack
Research:
1 100 Rp icon.png
Cost:
2 000 Sl icon.png
95 Ge icon.png
Mod arrow 0.png
Mods tank cannon.png
Adjustment of Fire
Research:
1 100 Rp icon.png
Cost:
2 000 Sl icon.png
95 Ge icon.png
Mods tank ammo.png
75mm_kwk_40_APCR_ammo_pack
Research:
1 200 Rp icon.png
Cost:
2 200 Sl icon.png
105 Ge icon.png
Mods new tank vertical aiming.png
Elevation Mechanism
Research:
1 200 Rp icon.png
Cost:
2 200 Sl icon.png
105 Ge icon.png
Mods smoke screen.png
Smoke grenade
Research:
1 200 Rp icon.png
Cost:
2 200 Sl icon.png
105 Ge icon.png
Mods tank ammo.png
75mm_ger_Smoke_ammo_pack
Research:
2 700 Rp icon.png
Cost:
4 900 Sl icon.png
230 Ge icon.png

Armaments

Main armament

75 mm StuK40 L48 cannon
Ammunition54 rounds
Reloadbasic crew → aces
7.6 → 5.9 s
Vertical guidance-6° / 17°
Horizontal guidance-10° / 10°
Main article: StuK40 (75 mm)

Give the reader information about the characteristics of the main gun. Assess its effectiveness in a battle based on the reloading speed, ballistics and the power of shells. Do not forget about the flexibility of the fire, that is how quickly the cannon can be aimed at the target, open fire on it and aim at another enemy. Add a link to the main article on the gun: {{main|Name of the weapon}}. Describe in general terms the ammunition available for the main gun. Give advice on how to use them and how to fill the ammunition storage.

75 mm StuK40 Turret rotation speed (°/s) Reloading rate (seconds)
Mode Capacity Vertical Horizontal Stabilizer Stock Upgraded Full Expert Aced Stock Full Expert Aced
Arcade 54 -6°/+17° ±10° N/A __._ __._ __._ __._ __._ _.__ _.__ _.__ _.__
Realistic __._ __._ __._ __._ __._

Ammunition

Penetration statistics
Ammunition Type of
warhead
Penetration @ 0° Angle of Attack (mm)
10 m 100 m 500 m 1,000 m 1,500 m 2,000 m
PzGr 39 APCBC 140 137 125 112 100 89
Hl.Gr 38B HEAT 80 80 80 80 80 80
PzGr 40 APCR 166 162 146 128 112 98
Sprgr. 34 HE 10 10 10 10 10 10
Shell details
Ammunition Type of
warhead
Velocity
(m/s)
Projectile
Mass (kg)
Fuse delay
(m)
Fuse sensitivity
(mm)
Explosive Mass
(TNT equivalent) (g)
Ricochet
0% 50% 100%
PzGr 39 APCBC 750 6.8 1.2 14.0 28.9 48° 63° 71°
Hl.Gr 38B HEAT 450 4.4 0.0 0.1 872.1 62° 69° 73°
PzGr 40 APCR 930 4.1 N/A N/A N/A 66° 70° 72°
Sprgr. 34 HE 550 5.74 0.1 0.1 686 79° 80° 81°
Smoke shell characteristics
Ammunition Velocity
(m/s)
Projectile
Mass (kg)
Screen radius
(m)
Screen deploy time
(s)
Screen hold time
(s)
Explosive Mass
(TNT equivalent) (g)
K.Gr.Rot Nb. ___ ____ __ __ __ ___

Ammo racks

Full
ammo
1st
rack empty
2nd
rack empty
3rd
rack empty
4th
rack empty
5th
rack empty
6th
rack empty
Visual
discrepancy
54 __ (+__) __ (+__) __ (+__) __ (+__) __ (+__) __ (+__) __

Usage in battles

Describe the tactics of playing in the vehicle, the features of using vehicles in the team and advice on tactics. Refrain from creating a "guide" - do not impose a single point of view but instead give the reader food for thought. Describe the most dangerous enemies and give recommendations on fighting them. If necessary, note the specifics of the game in different modes (AB, RB, SB).

Pros and cons

Summarise and briefly evaluate the vehicle in terms of its characteristics and combat effectiveness. Mark its pros and cons in a bulleted list. Try not to use more than 6 points for each of the characteristics. Avoid using categorical definitions such as "bad", "good" and the like - use substitutions with softer forms such as "inadequate" and "effective".

Pros:

Cons:

History

Describe the history of the creation and combat usage of the vehicle in more detail than in the introduction. If the historical reference turns out to be too long, take it to a separate article, taking a link to the article about the vehicle and adding a block "/History" (example: https://wiki.warthunder.com/(Vehicle-name)/History) and add a link to it here using the main template. Be sure to reference text and sources by using <ref></ref>, as well as adding them at the end of the article with <references />. This section may also include the vehicle's dev blog entry (if applicable) and the in-game encyclopedia description (under === In-game description ===, also if applicable).

Media

Excellent additions to the article would be video guides, screenshots from the game, and photos.

See also

Links to the articles on the War Thunder Wiki that you think will be useful for the reader, for example:

  • reference to the series of the vehicles;
  • links to approximate analogues of other nations and research trees.

External links

Paste links to sources and external resources, such as:

  • topic on the official game forum;
  • other literature.


Italy tank destroyers
  Italy
M41  75/18 M41 · 75/32 M41 · 90/53 M41M
M42  75/34 M42
M43  105/25 M43 · M43 "G.C.Leoncello" · 75/34 M43 · 75/46 M43
Wheeled  Lancia 3Ro (100/17) · AS 42/47 · Breda 90/53 · Breda 501
Other  L3/33 CC · 47/32 L40
Germany  ▄StuG III G
USA  M36B1 · ▄M109G · M113A1 (TOW)
  Hungary
Zrínyi  Zrinyi I · Zrinyi II
USSR  ◔2S1