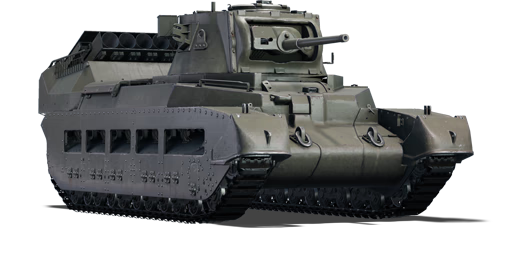
Difference between revisions of "Matilda Hedgehog"
(→Description) |
(Explained battle usage, and added a pro for the vehicle.) (Tag: Visual edit) |
||
(43 intermediate revisions by 17 users not shown) | |||
Line 1: | Line 1: | ||
− | + | {{Specs-Card|code=uk_matilda_hedgehog}} | |
− | |||
− | |||
− | |||
− | |||
− | {{Specs-Card | ||
− | |code=uk_matilda_hedgehog | ||
− | |||
− | |||
− | }} | ||
== Description == | == Description == | ||
<!-- ''In the description, the first part should be about the history of the creation and combat usage of the vehicle, as well as its key features. In the second part, tell the reader about the ground vehicle in the game. Insert a screenshot of the vehicle, so that if the novice player does not remember the vehicle by name, he will immediately understand what kind of vehicle the article is talking about.'' --> | <!-- ''In the description, the first part should be about the history of the creation and combat usage of the vehicle, as well as its key features. In the second part, tell the reader about the ground vehicle in the game. Insert a screenshot of the vehicle, so that if the novice player does not remember the vehicle by name, he will immediately understand what kind of vehicle the article is talking about.'' --> | ||
− | The ''' | + | <!-- [[File:GarageImage_{{PAGENAME}}.jpg|420px|thumb|left]] |
− | + | {{Break}} --> | |
− | It was introduced during [[Update "New Power"]] as a reward for [[Battle Pass: Season I]] | + | The '''{{Specs|name}}''' is a premium gift rank {{Specs|rank}} British heavy tank {{Battle-rating}}. It was introduced during [[Update "New Power"]] as a reward for [[Battle Pass: Season I]]. |
== General info == | == General info == | ||
=== Survivability and armour === | === Survivability and armour === | ||
− | + | ''Describe armour protection. Note the most well protected and key weak areas. Appreciate the layout of modules as well as the number and location of crew members. Is the level of armour protection sufficient, is the placement of modules helpful for survival in combat? If necessary use a visual template to indicate the most secure and weak zones of the armour.'' | |
− | |||
− | |||
− | |||
− | |||
− | |||
− | |||
− | |||
− | |||
'''Armour type:''' <!-- The types of armour present on the vehicle and their general locations --> | '''Armour type:''' <!-- The types of armour present on the vehicle and their general locations --> | ||
Line 40: | Line 23: | ||
| Turret || ___ - ___ mm ''Turret front'' <br> ___ mm ''Gun mantlet'' || ___ - ___ mm || ___ - ___ mm || ___ - ___ mm | | Turret || ___ - ___ mm ''Turret front'' <br> ___ mm ''Gun mantlet'' || ___ - ___ mm || ___ - ___ mm || ___ - ___ mm | ||
|- | |- | ||
− | | Cupola || | + | | Cupola || ___ mm || ___ mm || ___ mm || ___ mm |
|- | |- | ||
|} | |} | ||
− | '''Notes:''' | + | '''Notes:''' <!-- Any additional notes which the user needs to be aware of --> |
− | + | <!-- Example: * Suspension wheels are 20 mm thick, tracks are 30 mm thick, and torsion bars are 60 mm thick. --> | |
− | * | ||
− | |||
=== Mobility === | === Mobility === | ||
− | |||
<!-- ''Write about the mobility of the ground vehicle. Estimate the specific power and manoeuvrability, as well as the maximum speed forwards and backwards.'' --> | <!-- ''Write about the mobility of the ground vehicle. Estimate the specific power and manoeuvrability, as well as the maximum speed forwards and backwards.'' --> | ||
{{tankMobility|abMinHp=294|rbMinHp=168}} | {{tankMobility|abMinHp=294|rbMinHp=168}} | ||
− | |||
− | |||
− | |||
− | |||
− | |||
− | |||
== Armaments == | == Armaments == | ||
− | |||
=== Main armament === | === Main armament === | ||
− | |||
<!-- ''Give the reader information about the characteristics of the main gun. Assess its effectiveness in a battle based on the reloading speed, ballistics and the power of shells. Do not forget about the flexibility of the fire, that is how quickly the cannon can be aimed at the target, open fire on it and aim at another enemy. Add a link to the main article on the gun: <code><nowiki>{{main|Name of the weapon}}</nowiki></code>. Describe in general terms the ammunition available for the main gun. Give advice on how to use them and how to fill the ammunition storage.'' --> | <!-- ''Give the reader information about the characteristics of the main gun. Assess its effectiveness in a battle based on the reloading speed, ballistics and the power of shells. Do not forget about the flexibility of the fire, that is how quickly the cannon can be aimed at the target, open fire on it and aim at another enemy. Add a link to the main article on the gun: <code><nowiki>{{main|Name of the weapon}}</nowiki></code>. Describe in general terms the ammunition available for the main gun. Give advice on how to use them and how to fill the ammunition storage.'' --> | ||
{{main|QF 2-pounder (40 mm)}} | {{main|QF 2-pounder (40 mm)}} | ||
− | |||
− | |||
− | |||
{| class="wikitable" style="text-align:center" width="100%" | {| class="wikitable" style="text-align:center" width="100%" | ||
Line 88: | Line 57: | ||
==== Ammunition ==== | ==== Ammunition ==== | ||
− | { | + | {| class="wikitable sortable" style="text-align:center" width="100%" |
+ | ! colspan="8" | Penetration statistics | ||
+ | |- | ||
+ | ! rowspan="2" data-sort-type="text" | Ammunition | ||
+ | ! rowspan="2" | Type of<br>warhead | ||
+ | ! colspan="6" | '''Penetration @ 0° Angle of Attack (mm)''' | ||
+ | |- | ||
+ | ! 10 m !! 100 m !! 500 m !! 1,000 m !! 1,500 m !! 2,000 m | ||
+ | |- | ||
+ | | Shot Mk.1 AP/T || AP || 72 || 68 || 52 || 37 || 27 || 19 | ||
+ | |- | ||
+ | | Shell Mk.2 || HE || 4 || 4 || 4 || 4 || 4 || 4 | ||
+ | |- | ||
+ | | Shot Mk.IXB APCBC/T || APCBC || 89 || 86 || 77 || 66 || 57 || 50 | ||
+ | |- | ||
+ | | Shot Mk.1 APHV/T || AP || 80 || 75 || 58 || 41 || 30 || 21 | ||
+ | |- | ||
+ | | Shell Mk.1 AP/T || APHE || 66 || 62 || 49 || 36 || 26 || 20 | ||
+ | |- | ||
+ | |} | ||
+ | {| class="wikitable sortable" style="text-align:center" width="100%" | ||
+ | ! colspan="10" | Shell details | ||
+ | |- | ||
+ | ! rowspan="2" data-sort-type="text" | Ammunition | ||
+ | ! rowspan="2" | Type of<br>warhead | ||
+ | ! rowspan="2" | Velocity<br>(m/s) | ||
+ | ! rowspan="2" | Projectile<br>Mass (kg) | ||
+ | ! rowspan="2" | Fuse delay<br>(m) | ||
+ | ! rowspan="2" | Fuse sensitivity<br>(mm) | ||
+ | ! rowspan="2" | Explosive Mass<br>(TNT equivalent) (g) | ||
+ | ! colspan="3" | Ricochet | ||
+ | |- | ||
+ | ! 0% !! 50% !! 100% | ||
+ | |- | ||
+ | | Shot Mk.1 AP/T || AP || 792 || 1.08 || N/A || N/A || N/A || 47° || 60° || 65° | ||
+ | |- | ||
+ | | Shell Mk.2 || HE || 687 || 1.34 || 0 || 0.1 || 85 || 79° || 80° || 81° | ||
+ | |- | ||
+ | | Shot Mk.IXB APCBC/T || APCBC || 792 || 1.24 || N/A || N/A || N/A || 48° || 63° || 71° | ||
+ | |- | ||
+ | | Shot Mk.1 APHV/T || AP || 853 || 1.08 || N/A || N/A || N/A || 47° || 60° || 65° | ||
+ | |- | ||
+ | | Shell Mk.1 AP/T || APHE || 792 || 1.08 || 1.2 || 9 || 20.9 || 47° || 60° || 65° | ||
+ | |- | ||
+ | |} | ||
==== [[Ammo racks]] ==== | ==== [[Ammo racks]] ==== | ||
− | [[File: | + | <!-- [[File:Ammoracks_{{PAGENAME}}.png|right|thumb|x250px|[[Ammo racks]] of the {{PAGENAME}}]] --> |
− | <!-- '''Last updated: | + | <!-- '''Last updated:''' --> |
{| class="wikitable" style="text-align:center" | {| class="wikitable" style="text-align:center" | ||
|- | |- | ||
Line 102: | Line 115: | ||
! 5th<br>rack empty | ! 5th<br>rack empty | ||
! 6th<br>rack empty | ! 6th<br>rack empty | ||
− | |||
− | |||
! Visual<br>discrepancy | ! Visual<br>discrepancy | ||
|- | |- | ||
− | | '''93''' || | + | | '''93''' || __ ''(+__)'' || __ ''(+__)'' || __ ''(+__)'' || __ ''(+__)'' || __ ''(+__)'' || __ ''(+__)'' || __ |
|- | |- | ||
|} | |} | ||
− | |||
− | |||
− | |||
− | |||
=== Additional armament === | === Additional armament === | ||
− | |||
<!-- ''Some tanks are armed with several guns in one or more turrets. Evaluate the additional weaponry and give advice on its use. Describe the ammunition available for additional weaponry. Give advice on about how to use them and how to fill the ammunition storage. If there is no additional weaponry remove this subsection.'' --> | <!-- ''Some tanks are armed with several guns in one or more turrets. Evaluate the additional weaponry and give advice on its use. Describe the ammunition available for additional weaponry. Give advice on about how to use them and how to fill the ammunition storage. If there is no additional weaponry remove this subsection.'' --> | ||
{{main|Hedgehog}} | {{main|Hedgehog}} | ||
− | |||
− | |||
− | |||
− | |||
− | |||
{| class="wikitable" style="text-align:center" | {| class="wikitable" style="text-align:center" | ||
|- | |- | ||
− | ! colspan=" | + | ! colspan="5" | [[Hedgehog]] |
|- | |- | ||
! Capacity !! Vertical !! Horizontal !! Stabilizer | ! Capacity !! Vertical !! Horizontal !! Stabilizer | ||
Line 135: | Line 136: | ||
==== Ammunition ==== | ==== Ammunition ==== | ||
− | {{: | + | {| class="wikitable sortable" style="text-align:center" width="100%" |
+ | ! colspan="8" | Penetration statistics | ||
+ | |- | ||
+ | ! rowspan="2" data-sort-type="text" | Ammunition | ||
+ | ! rowspan="2" | Type of<br>warhead | ||
+ | ! colspan="6" | '''Penetration @ 0° Angle of Attack (mm)''' | ||
+ | |- | ||
+ | ! 10 m !! 100 m !! 500 m !! 1,000 m !! 1,500 m !! 2,000 m | ||
+ | |- | ||
+ | | Hedgehog projectile || HE || 80 || 80 || 80 || 80 || 80 || 80 | ||
+ | |- | ||
+ | |} | ||
+ | {| class="wikitable sortable" style="text-align:center" width="100%" | ||
+ | ! colspan="10" | Shell details | ||
+ | |- | ||
+ | ! rowspan="2" data-sort-type="text" | Ammunition | ||
+ | ! rowspan="2" | Type of<br>warhead | ||
+ | ! rowspan="2" | Velocity<br>(m/s) | ||
+ | ! rowspan="2" | Projectile<br>Mass (kg) | ||
+ | ! rowspan="2" | Fuse delay<br>(m) | ||
+ | ! rowspan="2" | Fuse sensitivity<br>(mm) | ||
+ | ! rowspan="2" | Explosive Mass<br>(TNT equivalent) (g) | ||
+ | ! colspan="3" | Ricochet | ||
+ | |- | ||
+ | ! 0% !! 50% !! 100% | ||
+ | |- | ||
+ | | Hedgehog projectile || HE || 45 || 29.5 || 0 || 0.1 || 25,280 || 79° || 80° || 81° | ||
+ | |- | ||
+ | |} | ||
==== [[Ammo racks]] ==== | ==== [[Ammo racks]] ==== | ||
− | [[File:Ammoracks_{{PAGENAME}} | + | <!-- [[File:Ammoracks_{{PAGENAME}}.png|right|thumb|x250px|[[Ammo racks]] of the {{PAGENAME}}]] --> |
− | <!-- '''Last updated: | + | <!-- '''Last updated:''' --> |
{| class="wikitable" style="text-align:center" | {| class="wikitable" style="text-align:center" | ||
|- | |- | ||
! Full<br>ammo | ! Full<br>ammo | ||
+ | ! 1st<br>rack empty | ||
! Visual<br>discrepancy | ! Visual<br>discrepancy | ||
|- | |- | ||
− | | '''7''' || | + | | '''7''' || __ ''(+__)'' || __ |
|- | |- | ||
|} | |} | ||
− | |||
− | |||
− | |||
− | |||
=== Machine guns === | === Machine guns === | ||
− | |||
<!-- ''Offensive and anti-aircraft machine guns not only allow you to fight some aircraft but also are effective against lightly armoured vehicles. Evaluate machine guns and give recommendations on its use.'' --> | <!-- ''Offensive and anti-aircraft machine guns not only allow you to fight some aircraft but also are effective against lightly armoured vehicles. Evaluate machine guns and give recommendations on its use.'' --> | ||
{{main|BESA (7.92 mm)}} | {{main|BESA (7.92 mm)}} | ||
− | |||
{| class="wikitable" style="text-align:center" width="50%" | {| class="wikitable" style="text-align:center" width="50%" | ||
Line 165: | Line 189: | ||
! Mount !! Capacity (Belt) !! Fire rate !! Vertical !! Horizontal | ! Mount !! Capacity (Belt) !! Fire rate !! Vertical !! Horizontal | ||
|- | |- | ||
− | | Coaxial || 4, | + | | Coaxial || 4,000 (225) || 600 || N/A || N/A |
|- | |- | ||
|} | |} | ||
− | == | + | == The Matilda Hedgehog is essentially identical to the Matilda Mk III found in the tech tree and therefore retains its strengths and weaknesses. However, the Hedgehog rockets are at the very rear of the tank in a fixed position and arc. This makes usage against moving vehicles difficult. However, for stationary targets the rockets are very effective due to the fixed arc, which causes the rockets to land on the roof of the opposing vehicle. The Hedgehog rockets fly for an estimated 190m (0.19/0.20km) before landing. == |
− | + | === Modules === | |
− | + | {| class="wikitable" | |
− | + | ! Tier | |
− | + | ! colspan="2" | Mobility | |
− | + | ! Protection | |
− | + | ! colspan="2" | Firepower | |
− | + | |- | |
− | + | | I | |
− | + | | Tracks | |
− | + | | | |
− | + | | Parts | |
− | === | + | | Horizontal Drive |
− | + | | Shell Mk.1 AP/T | |
− | + | |- | |
− | == | + | | II |
− | + | | Suspension | |
− | + | | Brake System | |
− | + | | FPE | |
− | + | | Adjustment of Fire | |
− | + | | Shot Mk.1 APHV/T | |
− | = | + | |- |
− | + | | III | |
− | + | | Filters | |
− | + | | | |
+ | | Crew Replenishment | ||
+ | | Elevation Mechanism | ||
+ | | | ||
+ | |- | ||
+ | | IV | ||
+ | | Transmission | ||
+ | | Engine | ||
+ | | | ||
+ | | Shot Mk.IXB APCBC/T | ||
+ | | | ||
+ | |- | ||
+ | ! colspan="6" | This is a premium vehicle: all modifications are unlocked on purchase | ||
+ | |- | ||
+ | |} | ||
=== Pros and cons === | === Pros and cons === | ||
− | <!-- ''Summarise and briefly evaluate the vehicle in terms of its characteristics and combat effectiveness. Mark its pros and cons in a bulleted list. Try not to use more than 6 points for each of the characteristics. Avoid using categorical definitions such as "bad", "good" and the like - use substitutions with softer forms such as "inadequate" and "effective".'' --> | + | <!-- ''Summarise and briefly evaluate the vehicle in terms of its characteristics and combat effectiveness. Mark its pros and cons in a bulleted list. Try not to use more than 6 points for each of the characteristics. Avoid using categorical definitions such as "bad", "good" and the like - use substitutions with softer forms such as "inadequate" and "effective".'' --> |
'''Pros:''' | '''Pros:''' | ||
− | * Identical | + | * Retains the same small size and excellent armour from its unmodified version. |
− | * | + | * Identical gun to its predecessor, meaning same excellent gun handling. |
− | * | + | * Rocket launcher can be lethal versus clusters of unmoving vehicles. |
− | + | * Rockets land on enemy tanks roof, a major weak spot. | |
'''Cons:''' | '''Cons:''' | ||
− | * Poor mobility on | + | * Poor mobility on and offroad, something retained from its predecessor the Matilda III. |
− | * Hedgehog launcher | + | * Keeps the same anemic 40 mm gun. |
− | * | + | * Hedgehog launcher is inaccurate against single targets and fires its shells in an arcing trajectory, requiring significant leading. |
− | + | * Retains the same cramped crew positions as the unmodified Matilda III. | |
− | |||
== History == | == History == | ||
− | + | ''Describe the history of the creation and combat usage of the vehicle in more detail than in the introduction. If the historical reference turns out to be too long, take it to a separate article, taking a link to the article about the vehicle and adding a block "/History" (example: <nowiki>https://wiki.warthunder.com/(Vehicle-name)/History</nowiki>) and add a link to it here using the <code>main</code> template. Be sure to reference text and sources by using <code><nowiki><ref></ref></nowiki></code>, as well as adding them at the end of the article with <code><nowiki><references /></nowiki></code>. This section may also include the vehicle's dev blog entry (if applicable) and the in-game encyclopedia description (under <code><nowiki>=== In-game description ===</nowiki></code>, also if applicable).'' | |
− | |||
− | |||
− | |||
− | |||
− | |||
− | |||
− | |||
== Media == | == Media == | ||
<!-- ''Excellent additions to the article would be video guides, screenshots from the game, and photos.'' --> | <!-- ''Excellent additions to the article would be video guides, screenshots from the game, and photos.'' --> | ||
− | + | [[File:Matilda Hedgehog Devblog Image 001.jpg|none|thumb|356x356px|Matilda Hedgehog devblog image.]] | |
− | |||
− | |||
− | |||
− | |||
− | |||
− | |||
− | |||
− | |||
− | |||
− | |||
− | |||
== See also == | == See also == | ||
Line 245: | Line 264: | ||
== External links == | == External links == | ||
− | + | ''Paste links to sources and external resources, such as:'' | |
+ | |||
* ''topic on the official game forum;'' | * ''topic on the official game forum;'' | ||
− | * ''other literature.'' | + | * ''other literature.'' |
− | |||
− | |||
{{Britain heavy tanks}} | {{Britain heavy tanks}} | ||
{{Britain premium ground vehicles}} | {{Britain premium ground vehicles}} |
Revision as of 15:15, 4 December 2020
Contents
- 1 Description
- 2 General info
- 3 Armaments
- 4 The Matilda Hedgehog is essentially identical to the Matilda Mk III found in the tech tree and therefore retains its strengths and weaknesses. However, the Hedgehog rockets are at the very rear of the tank in a fixed position and arc. This makes usage against moving vehicles difficult. However, for stationary targets the rockets are very effective due to the fixed arc, which causes the rockets to land on the roof of the opposing vehicle. The Hedgehog rockets fly for an estimated 190m (0.19/0.20km) before landing.
- 5 History
- 6 Media
- 7 See also
- 8 External links
Description
The Matilda Hedgehog is a premium gift rank II British heavy tank with a battle rating of 2.7 (AB/RB/SB). It was introduced during Update "New Power" as a reward for Battle Pass: Season I.
General info
Survivability and armour
Describe armour protection. Note the most well protected and key weak areas. Appreciate the layout of modules as well as the number and location of crew members. Is the level of armour protection sufficient, is the placement of modules helpful for survival in combat? If necessary use a visual template to indicate the most secure and weak zones of the armour.
Armour type:
Armour | Front (Slope angle) | Sides | Rear | Roof |
---|---|---|---|---|
Hull | ___ mm | ___ mm Top ___ mm Bottom |
___ mm | ___ - ___ mm |
Turret | ___ - ___ mm Turret front ___ mm Gun mantlet |
___ - ___ mm | ___ - ___ mm | ___ - ___ mm |
Cupola | ___ mm | ___ mm | ___ mm | ___ mm |
Notes:
Mobility
Game Mode | Max Speed (km/h) | Weight (tons) | Engine power (horsepower) | Power-to-weight ratio (hp/ton) | |||
---|---|---|---|---|---|---|---|
Forward | Reverse | Stock | Upgraded | Stock | Upgraded | ||
Arcade | 26 | 5 | 27.3 | 294 | 363 | 10.77 | 13.3 |
Realistic | 24 | 4 | 168 | 190 | 6.15 | 6.96 |
Armaments
Main armament
40 mm QF 2-pounder | Turret rotation speed (°/s) | Reloading rate (seconds) | |||||||||||
---|---|---|---|---|---|---|---|---|---|---|---|---|---|
Mode | Capacity | Vertical | Horizontal | Stabilizer | Stock | Upgraded | Full | Expert | Aced | Stock | Full | Expert | Aced |
Arcade | 93 | ±20° | ±150° | Vertical | 16.2 | 22.4 | 27.2 | 30.1 | 32.0 | 3.64 | 3.22 | 2.97 | 2.80 |
Realistic | 11.9 | 14.0 | 17.0 | 18.8 | 20.0 |
Ammunition
Penetration statistics | |||||||
---|---|---|---|---|---|---|---|
Ammunition | Type of warhead |
Penetration @ 0° Angle of Attack (mm) | |||||
10 m | 100 m | 500 m | 1,000 m | 1,500 m | 2,000 m | ||
Shot Mk.1 AP/T | AP | 72 | 68 | 52 | 37 | 27 | 19 |
Shell Mk.2 | HE | 4 | 4 | 4 | 4 | 4 | 4 |
Shot Mk.IXB APCBC/T | APCBC | 89 | 86 | 77 | 66 | 57 | 50 |
Shot Mk.1 APHV/T | AP | 80 | 75 | 58 | 41 | 30 | 21 |
Shell Mk.1 AP/T | APHE | 66 | 62 | 49 | 36 | 26 | 20 |
Shell details | |||||||||
---|---|---|---|---|---|---|---|---|---|
Ammunition | Type of warhead |
Velocity (m/s) |
Projectile Mass (kg) |
Fuse delay (m) |
Fuse sensitivity (mm) |
Explosive Mass (TNT equivalent) (g) |
Ricochet | ||
0% | 50% | 100% | |||||||
Shot Mk.1 AP/T | AP | 792 | 1.08 | N/A | N/A | N/A | 47° | 60° | 65° |
Shell Mk.2 | HE | 687 | 1.34 | 0 | 0.1 | 85 | 79° | 80° | 81° |
Shot Mk.IXB APCBC/T | APCBC | 792 | 1.24 | N/A | N/A | N/A | 48° | 63° | 71° |
Shot Mk.1 APHV/T | AP | 853 | 1.08 | N/A | N/A | N/A | 47° | 60° | 65° |
Shell Mk.1 AP/T | APHE | 792 | 1.08 | 1.2 | 9 | 20.9 | 47° | 60° | 65° |
Ammo racks
Full ammo |
1st rack empty |
2nd rack empty |
3rd rack empty |
4th rack empty |
5th rack empty |
6th rack empty |
Visual discrepancy |
---|---|---|---|---|---|---|---|
93 | __ (+__) | __ (+__) | __ (+__) | __ (+__) | __ (+__) | __ (+__) | __ |
Additional armament
Hedgehog | ||||
---|---|---|---|---|
Capacity | Vertical | Horizontal | Stabilizer | |
7 | +30°/+45° | N/A | N/A |
Ammunition
Penetration statistics | |||||||
---|---|---|---|---|---|---|---|
Ammunition | Type of warhead |
Penetration @ 0° Angle of Attack (mm) | |||||
10 m | 100 m | 500 m | 1,000 m | 1,500 m | 2,000 m | ||
Hedgehog projectile | HE | 80 | 80 | 80 | 80 | 80 | 80 |
Shell details | |||||||||
---|---|---|---|---|---|---|---|---|---|
Ammunition | Type of warhead |
Velocity (m/s) |
Projectile Mass (kg) |
Fuse delay (m) |
Fuse sensitivity (mm) |
Explosive Mass (TNT equivalent) (g) |
Ricochet | ||
0% | 50% | 100% | |||||||
Hedgehog projectile | HE | 45 | 29.5 | 0 | 0.1 | 25,280 | 79° | 80° | 81° |
Ammo racks
Full ammo |
1st rack empty |
Visual discrepancy |
---|---|---|
7 | __ (+__) | __ |
Machine guns
7.92 mm BESA | ||||
---|---|---|---|---|
Mount | Capacity (Belt) | Fire rate | Vertical | Horizontal |
Coaxial | 4,000 (225) | 600 | N/A | N/A |
The Matilda Hedgehog is essentially identical to the Matilda Mk III found in the tech tree and therefore retains its strengths and weaknesses. However, the Hedgehog rockets are at the very rear of the tank in a fixed position and arc. This makes usage against moving vehicles difficult. However, for stationary targets the rockets are very effective due to the fixed arc, which causes the rockets to land on the roof of the opposing vehicle. The Hedgehog rockets fly for an estimated 190m (0.19/0.20km) before landing.
Modules
Tier | Mobility | Protection | Firepower | ||
---|---|---|---|---|---|
I | Tracks | Parts | Horizontal Drive | Shell Mk.1 AP/T | |
II | Suspension | Brake System | FPE | Adjustment of Fire | Shot Mk.1 APHV/T |
III | Filters | Crew Replenishment | Elevation Mechanism | ||
IV | Transmission | Engine | Shot Mk.IXB APCBC/T | ||
This is a premium vehicle: all modifications are unlocked on purchase |
Pros and cons
Pros:
- Retains the same small size and excellent armour from its unmodified version.
- Identical gun to its predecessor, meaning same excellent gun handling.
- Rocket launcher can be lethal versus clusters of unmoving vehicles.
- Rockets land on enemy tanks roof, a major weak spot.
Cons:
- Poor mobility on and offroad, something retained from its predecessor the Matilda III.
- Keeps the same anemic 40 mm gun.
- Hedgehog launcher is inaccurate against single targets and fires its shells in an arcing trajectory, requiring significant leading.
- Retains the same cramped crew positions as the unmodified Matilda III.
History
Describe the history of the creation and combat usage of the vehicle in more detail than in the introduction. If the historical reference turns out to be too long, take it to a separate article, taking a link to the article about the vehicle and adding a block "/History" (example: https://wiki.warthunder.com/(Vehicle-name)/History) and add a link to it here using the main
template. Be sure to reference text and sources by using <ref></ref>
, as well as adding them at the end of the article with <references />
. This section may also include the vehicle's dev blog entry (if applicable) and the in-game encyclopedia description (under === In-game description ===
, also if applicable).
Media
See also
Links to the articles on the War Thunder Wiki that you think will be useful for the reader, for example:
- reference to the series of the vehicles;
- links to approximate analogues of other nations and research trees.
External links
Paste links to sources and external resources, such as:
- topic on the official game forum;
- other literature.
Britain heavy tanks | |
---|---|
Matilda | Matilda III · Matilda Hedgehog |
Churchill | Churchill I · Churchill III · Churchill VII · Churchill Crocodile · Churchill NA75 · Black Prince |
Post-war | Caernarvon · Conqueror |
Other | Independent · Excelsior · TOG II |
Britain premium ground vehicles | |
---|---|
Light tanks | A13 Mk I (3rd R.T.R.) · A13 Mk II 1939 · AEC Mk II · Crusader "The Saint" · Rooikat 105 |
Medium tanks | A.C.I · Grant I · Cromwell V (RP-3) · Sherman IC "Trzyniec" · A.C.IV · Comet I "Iron Duke IV" |
Centurion Mk.2 · ▄Strv 81 (RB 52) · Centurion Mk.5 AVRE · Centurion Mk.5/1 · ▄Sho't Kal Dalet · Centurion Action X | |
Vijayanta · Khalid · Challenger DS · Challenger 2 OES | |
Heavy tanks | Independent · Matilda Hedgehog · Excelsior · TOG II · Churchill Crocodile · Black Prince |
Tank destroyers | Alecto I · Achilles (65 Rg.) · QF 3.7 Ram |