
This guide covers the configuration of the most important controls for controllers and joysticks. At the end of the article there will be a section dedicated to specific axis like prop pitch, mixture and radiator control.
Setting up Axis
Dead zone

The dead zone is the radius around the center of the joystick in which any movement is ignored. This is especially helpful at combating stick drift or if the joystick is too sensitive to movement. Increasing the dead zone can help eliminate oscillations of the input axis near the center. While some devices offer built-in dead zones, some don’t. It is recommended to adjust this setting according to the requirements of your particular device.
How the dead zone works can be seen near the top of the controls tab, inside the axis visualization window with the physical axis is indicated as a red diamond while the axis with the dead zone effect applied is indicated by the green diamond. With a dead zone set up, the green diamond should only move AFTER the dead zone threshold has been exceeded. The threshold depends on the current dead zone setting.
Usually, the smallest dead zone is enough to achieve a neutral position without oscillations however older controllers may need a slightly higher value. The deadzone can also be set through the device settings on your device or in the game.
Nonlinearity

Ideally, the controller axis should be linear throughout their entire range, meaning a constant and uniform signal level is being transmitted from the controller to the game, all the way from neutral to the maximum deviation. Changing the level of the response is up to personal preference.
Nonlinearity can improve aiming accuracy by decreasing the sensitivity near the center of the controller, allowing for more accurate control near the middle while not sacrificing speed near the edges. The further from the center the joystick is, the higher the input response is.
Some virtual pilots prefer fully linear control (nonlinearity equal to 1), while others reduce the sensitivity near the center of the controller. This is entirely a matter of personal preference, and nonlinearity values should be found by experimentation (in a test flight). For many, nonlinearity values in the pitch, roll, and yaw axis range from 1 to 2.5.
How nonlinearity works can be seen near the top of the controls tab, inside the axis visualization window with the physical axis is indicated as a red diamond while the axis with the dead zone effect applied is indicated by the green diamond. With the nonlinearity response curve set, the logical axis will move more slowly than the physical axis near the center, but the difference between them will decrease faster as the stick offset gets closer to the edge, depending on the nonlinearity setting.
Some of the more expensive HOTAS devices have special response curve settings where the nonlinearity is fully adjustable outside of the game. It is also worth keeping in mind that not all controllers are inherently linear. For example, the X-52 is known for its nonlinear roll and pitch response curves, which cannot be corrected by any drivers (but only by using certain modifications to the device itself!). By setting the response nonlinearity in War Thunder for a device that is nonlinear in itself, you only amplify this nonlinearity, i.e. you achieve extremely low sensitivity near the center and extremely high sensitivity near the edge. This can lead to very rapid movement of the stick which will most likely result in a stall if you are flying an aircraft.
Before setting up nonlinear response in War Thunder, you need to find out if your controller has a linear response by nature.
You can check the linearity of your controller’s response using the free program joytester2 (easy to find using Google). The easiest way to check linearity in this program is to simply move the joystick handle in a circle. If the response is linear, the joystick will draw more or less regular circles in the upper left part of the program screen. A nonlinear response will produce figures closer to a rhombus (see the picture on the right).
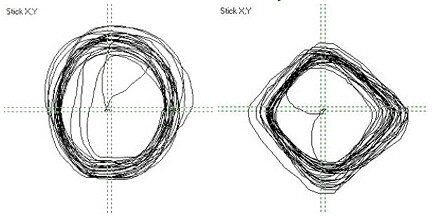
The same figures can be observed directly in the cockpit of the aircraft in the game, simply by moving the joystick handle in a circle and watching the movement of the stick.
Two cockpit view images show the linear and nonlinear responses as the joystick is moved counter-clockwise in a circle:

If your controller is already nonlinear, it is highly recommended to not increase the nonlinearity setting in the game as it will further increase the effect of nonlinearity of your joystick.
Invert axis
If an axis has an inverted response direction (most commonly found with throttle controls), this setting will help correct the response. If for example the throttle axis increases when moving the joystick assigned to it down, enabling this setting will ensure that the throttle axis increases when the joystick is moved up.
Multiplier
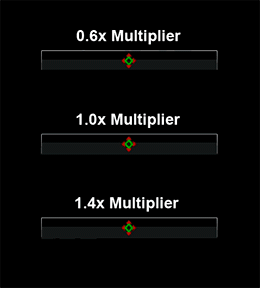
The “multiplier” parameter is the coefficient by which the values of the displacement along the physical axes of the controller for the game are multiplied. Setting this parameter to 1 will give you a full (100%) deviation of the control planes when the controller stick is moved to the limit. At a value less than 1, the total value of the control plane displacement will decrease. Thus, a value of 0.8 means 80% deviation of the control planes when the joystick is fully deflected.
How the multiplier setting works can be seen near the top of the controls tab, inside the axis visualization window with the physical axis is indicated as a red diamond while the axis with the dead zone effect applied is indicated by the green diamond. With a multiplier lower than 1, moving the joystick to the edge will show a value lower than 100%, more specifically being the value that you have set multiplied by 100% (so for example 0.8 multiplier gives an 80% value). If the multiplier value is over 1, the axis will reach 100% before the joystick reaches the edge.
A value less than 1, which reduces the total deflection along the axis, can help prevent stalling on tight turns. Apart from this, setting the multiplier to values other than 1 does not provide any other benefit, regardless of whether it is a joystick or a gamepad.
Correction
This option allows for adjusting an axis that is out of alignment. While most modern controllers are calibrated automatically, there are some that do not have this function so this setting helps restore the axis alignment.
How correction works is by adding a deviation to the logical axis from the physical axis, even if the physical axis is at 0. How the correction setting works can be seen near the top of the controls tab, inside the axis visualization window with the physical axis is indicated as a red diamond while the axis with the dead zone effect applied is indicated by the green diamond. By default, both axes are at the center but when correction is applied, the logical axis moves from the center.
Setting sensitivity

Simply put, it’s the response time (latency) between receiving a signal from your controller and how quickly your flight stick (and control surfaces) responds to it. At 100% (full scale), the virtual flight stick in the cockpit is in sync with your joystick, repeating your inputs as fast as they occur. Reduce the sensitivity, and the flight stick in the cockpit will take a while to respond, and your control surfaces will take a while to deflect. Set the sensitivity to minimum (empty scale), and the in-game feedback will be very slow, with a significant delay relative to your joystick’s movements. The controls will also take a similar delay to return to neutral when you release the stick. Turn the sensitivity back up to 100%, and the controls will once again be in full sync with your controller, deflecting and returning instantly.
Thus, reducing sensitivity can benefit those who play on gamepads as their deviations are smaller and require more precision. Here, reducing the sensitivity can help prevent too fast deviations of the control surfaces. This setting can can also benefit beginners unfamiliar with little experience or prevent problems associated with using super-sensitive controllers. In general, joysticks with their handles are larger in size than gamepad mini-joysticks and their axial deviations are also larger so they are easier to control. Usually, more experienced joystick users benefit the most from high or even max sensitivity.
Assigning buttons to an Axis
While this may seem strange at first, it is possible to use buttons (from your keyboard, mouse, etc) to control certain axis values. Especially for simulator battles, it can be beneficial to use this feature to control the radiator, mixture and propeller pitch of your aircraft.
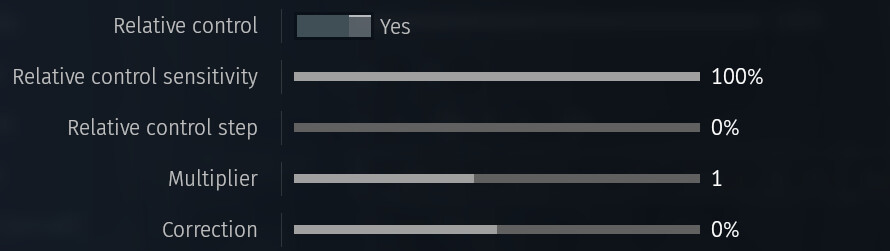
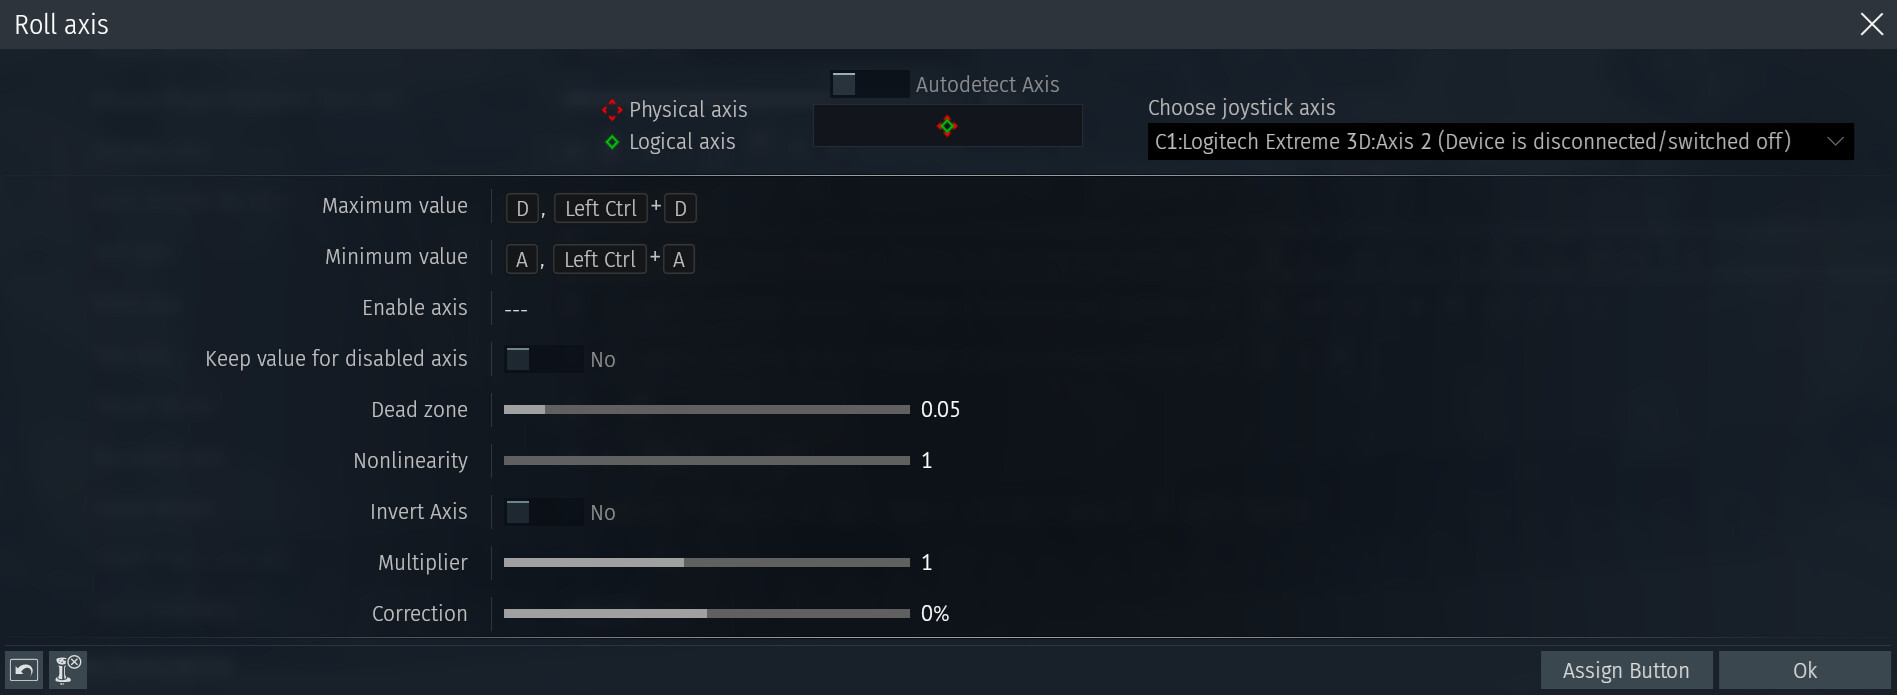
First of all, it is important to enable the Relative control setting on the relevant axis. When this setting is enabled, the “Maximum value” and “Minimum value” settings will change to “Increase value” and “Decrease value”. Now, by assigning buttons to these values, it is possible to control the axis without the need of a joystick.
Relative control set to “No” will only allow you to assign buttons for the maximum and minimum values of the axis. In this case, releasing the corresponding button will immediately return the axis value to neutral. Relative control set to “Yes” changes the parameters on the axis control screen, thus making it clear that it is now possible to increase/decrease the axis value using the buttons. More precise control of the axis value is now possible, while its value will be preserved even after releasing the button.
However, setting up the buttons to increase/decrease the axis value is just the beginning. Next, you need to set up the step at which the axis values should change when you press the buttons and how quickly the axes should react to repeated pressing of the buttons. The settings for Relative control sensitivity, Relative control step, Multiplier and Correction will affect how the game perceives pressing the specified buttons and how the axis values will change.
Relative control sensitivity sets the speed of repeating the pressed key. The lower its value, the slower the repeat is processed, the higher — the faster. Accordingly, the speed at which the axis value increases/decreases when the key is pressed changes. It works the same as the similar parameter set in Windows for the keyboard.
Relative control step is the percentage of the full axis range that the axis value will change with a single keypress. Using the propeller pitch as an example, which has a maximum range of 0-100%, with a Relative Step of 10%, each keypress should change the propeller pitch by 10% either way. However, it does not change by 10%, it only changes by 5%. This is because the Relative step scale has a range of 0-50%, which means that the values are reduced by half (i.e. 50%). If you want each keypress to change the propeller pitch by 10%, you would set the Relative control step scale to 20%. The Multiplier will also affect the result sent to the game, however, in the example above, the multiplier is set to “1”.
Using these parameters, it is possible to customize how the axis behaves according to your personal preferences. Correction can also be used to move the neutral position of the axis. For example, on the X-52 Pro, you can use the thumb slider to control the mix. Using a combination of Multiplier and Correction, you can adjust the slider so that it covers a range of 60%-120% of the mix.
Here, with the help of the Multiplier, we control the length of the desired segment of the axis. “0.5” is equivalent to 50% of the available length of the mix axis (0-120%), i.e. it sets a reduced segment of the axis with the length of 60% of the mix. With the Correction set to 25%, in combination with the Multiplier, the slider under the thumb will have a starting position at 60% of the mix and a maximum of 120%, thus controlling only half of the available axis. i.e. 60-120%. Not very intuitive, but it works!
Also note that to be able to control the propeller pitch, mixture and radiator, you must set the aircraft to Full Control in the control settings (Menu/Controls) and switch to manual engine control during flight (by default, engine control is automatic) OR use the Y menu to enable manual engine control (Y, 5, 4) in flight. On some later model aircraft, you may also need to disable the automatic propeller pitch and radiator controls to achieve full control.
Please beware that not all airacraft allow you to control these parameters.
Testing
In order to find the settings that best suit you, it is recommended to spend some time in the test flight observing how the joystick in your cockpit responds to your inputs. Ensure that its movements match the movements of your physical joystick (unless you have enabled the invert option on an axis). Then you can switch to the external view and see how the aircraft’s control surfaces respond to your inputs. During any part of the test flight, you can pause the game (P by default) or press the escape key and adjust any of the control settings and see the resulting changes. While the default options will suit most players, it is still recommended to experiment with various control schemes to see if one suits you better.