Pz.III J1 TD

From War Thunder Wiki
Jump to: navigation, search
Rank VI | Premium | Golden Eagles
Challenger DS Pack
This page is about the German medium tank Pz.III J1 TD. For other versions, see Panzer III (Family).
Pz.III J1 TD
germ_pzkpfw_iii_ausf_j_td.png
GarageImage Pz.III J1 TD.jpg
Pz.III J1 TD
AB RB SB
2.7 2.7 2.7
Class:
Show in game

Description

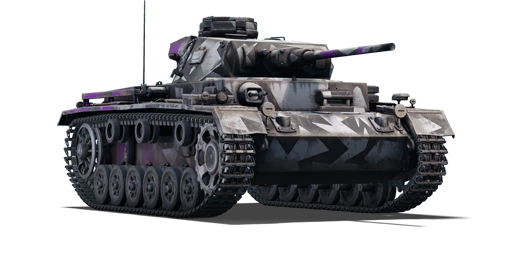
The Pz.III J1 TD is a gift rank II German medium tank with a battle rating of 2.7 (AB/RB/SB). It was introduced during Update "New Power" as a reward for watching War Thunder streams on Twitch.tv along with a unique skin for the vehicle.

The Pz.III J1, compared to its predecessor - Pz.III J, features only few, but very important upgrades.

Most importantly, the J1 variant is the first Panzer III to have the long barreled KwK 39 L/60 50 mm tank gun. This gun offers 102 mm of armour penetration at a range of 100 m and 85 mm at 500 m. In a practical sense, it is just enough to deal with most tanks at this BR, although targeting weak spots or side/rear armour is often necessary, especially against well-armoured heavy tanks like the KV-1 but that is why you have APCR ammunition. APCR comes in two sets, PzGr 40 and PzGr 40/1. PzGr 40 has the highest penetration - 137 mm at close range, but it loses penetration quite rapidly when shooting far targets and is also a higher tier modification. (->More info can be found below in the "Ammunition" section.)

The second important upgrade is the electric turret drive - greatly improving the turret traverse speed, and removing the long present weakness of all older Panzer III variants.

Optimal combat distance for this vehicle is somewhere between medium to close range. But don't be mistaken, the Panzer III J1 is not an frontline tank. You should be always on the move and harass the enemy without rest as any return fire will be lethal. Don't trust your armour and instead rely on your mobility. Flanking is the best option for J1 as you can use the high rate of fire for good effect and hopefully avoid the incoming retribution. You don't have the best mobility for a medium tank, but you definitely remain competitive against most enemy tanks you may encounter. Always try to find some good firing positions, with available cover, and if necessary, pull back and relocate. Always avoid direct close range confrontations with main enemy force; never try to fight more than 1 enemy at the time. However - playing purely as support/sniper tank isn't optimal either, because of your lower armour penetration.

General info

Survivability and armour

Smoke grenades
Creation of a smoke screen in front of the vehicle
Armourfront / side / back
Hull53 / 30 / 53
Turret50 / 30 / 30
Crew5 people
Visibility88 %

Armour type:

  • Rolled homogeneous armour
  • Cast homogeneous armour (Barrel shroud, Cupola)
Armour Front Sides Rear Roof
Hull 50 mm (12°) Front plate
25 mm (86°), 50 mm (53°) Front glacis
50 mm (23-69°) Lower glacis
30 mm 50 mm (15-41°) Top
50 mm (11-66°) Bottom
15 mm
Turret 50 mm (12-25°) Turret front
50 mm (12-46°) Gun mantlet
30 mm (22-25°) 30 mm (13-16°) 10 mm
Cupola 50 mm 10 mm

Notes:

  • Suspension wheels are 15 mm thick while tracks are 20 mm thick.

Mobility

Speedforward / back
AB60 / 12 km/h
RB and SB54 / 10 km/h
Number of gears6 forward
1 back
Weight21.8 t
Engine power
AB572 hp
RB and SB300 hp
Power-to-weight ratio
AB26.2 hp/t
RB and SB13.8 hp/t
Game Mode Max Speed (km/h) Weight (tons) Engine power (horsepower) Power-to-weight ratio (hp/ton)
Forward Reverse Stock Upgraded Stock Upgraded
Arcade 60 12 21.8 465 572 21.33 26.24
Realistic 54 10 265 300 12.16 13.76

Modifications and economy

Repair costBasic → Reference
AB390 → 531 Sl icon.png
RB430 → 586 Sl icon.png
SB517 → 704 Sl icon.png
Total cost of modifications6 960 Rp icon.png
6 760 Sl icon.png
Talisman cost530 Ge icon.png
Crew training3 000 Sl icon.png
Experts10 000 Sl icon.png
Aces115 Ge icon.png
Research Aces160 000 Rp icon.png
Reward for battleAB / RB / SB
30 / 40 / 40 % Sl icon.png
112 / 112 / 112 % Rp icon.png
Modifications
Mobility Protection Firepower
Mods new tank traks.png
Tracks
Research:
280 Rp icon.png
Cost:
270 Sl icon.png
60 Ge icon.png
Mods new tank traks.png
Winterketten
Research:
280 Rp icon.png
Cost:
270 Sl icon.png
60 Ge icon.png
Mods new tank suspension.png
Suspension
Research:
390 Rp icon.png
Cost:
380 Sl icon.png
80 Ge icon.png
Mods new tank break.png
Brake System
Research:
390 Rp icon.png
Cost:
380 Sl icon.png
80 Ge icon.png
Mods new tank filter.png
Filters
Research:
350 Rp icon.png
Cost:
340 Sl icon.png
75 Ge icon.png
Mods new tank transmission.png
Transmission
Research:
750 Rp icon.png
Cost:
730 Sl icon.png
155 Ge icon.png
Mods new tank engine.png
Engine
Research:
750 Rp icon.png
Cost:
730 Sl icon.png
155 Ge icon.png
Mods tank tool kit.png
Improved Parts
Research:
280 Rp icon.png
Cost:
270 Sl icon.png
60 Ge icon.png
Mods extinguisher.png
Improved FPE
Research:
390 Rp icon.png
Cost:
380 Sl icon.png
80 Ge icon.png
Mods tank reinforcement ger.png
Crew Replenishment
Research:
350 Rp icon.png
Cost:
340 Sl icon.png
75 Ge icon.png
Mods new tank horizontal aiming.png
Horizontal Drive
Research:
280 Rp icon.png
Cost:
270 Sl icon.png
60 Ge icon.png
Mods tank ammo.png
50mm_kwk_38_39_APCR1_ammo_pack
Research:
280 Rp icon.png
Cost:
270 Sl icon.png
60 Ge icon.png
Mods tank cannon.png
Adjustment of Fire
Research:
390 Rp icon.png
Cost:
380 Sl icon.png
80 Ge icon.png
Mods new tank vertical aiming.png
Elevation Mechanism
Research:
350 Rp icon.png
Cost:
340 Sl icon.png
75 Ge icon.png
Mods tank ammo.png
50mm_kwk_38_39_APCR2_ammo_pack
Research:
350 Rp icon.png
Cost:
340 Sl icon.png
75 Ge icon.png
Mods smoke screen.png
Smoke grenade
Research:
350 Rp icon.png
Cost:
340 Sl icon.png
75 Ge icon.png
Mods art support.png
Artillery Support
Research:
750 Rp icon.png
Cost:
730 Sl icon.png
155 Ge icon.png

Armaments

Main armament

Ammunition84 rounds
First-order22 rounds
Reloadbasic crew → aces
4.8 → 3.7 s
Vertical guidance-10° / 20°
Main article: KwK39 (50 mm)
50 mm KwK39 Turret rotation speed (°/s) Reloading rate (seconds)
Mode Capacity Vertical Horizontal Stabilizer Stock Upgraded Full Expert Aced Stock Full Expert Aced
Arcade 84 -10°/+20° ±180° N/A 13.3 18.4 22.4 24.8 26.4 4.81 4.26 3.92 3.70
Realistic 8.3 9.8 11.9 13.2 14.0

Ammunition

Penetration statistics
Ammunition Type of
warhead
Penetration @ 0° Angle of Attack (mm)
10 m 100 m 500 m 1,000 m 1,500 m 2,000 m
PzGr 39 APC 106 101 83 65 50 39
PzGr 40/1 APCR 130 121 90 62 43 29
PzGr 40 APCR 137 126 88 56 36 23
Sprgr. 38 HE 12 11 9 7 6 5
Shell details
Ammunition Type of
warhead
Velocity
(m/s)
Projectile
mass (kg)
Fuse delay
(m)
Fuse sensitivity
(mm)
Explosive mass
(TNT equivalent) (g)
Ricochet
0% 50% 100%
PzGr 39 APC 835 2.05 1.2 9 28.9 48° 63° 71°
PzGr 40/1 APCR 1,130 1.07 - - - 66° 70° 72°
PzGr 40 APCR 1,180 0.9 - - - 66° 70° 72°
Sprgr. 38 HE 870 1.82 0.4 0.1 217.6 79° 80° 81°

Ammo racks

Ammo racks of the Pz.III J1 TD
Full
ammo
1st
rack empty
2nd
rack empty
3rd
rack empty
4th
rack empty
Visual
discrepancy
84 70 (+14) 62 (+22) 34 (+50) (+83) No

Machine guns

Ammunition3 750 rounds
Belt capacity150 rounds
Reloadbasic crew → aces
10.4 → 8.0 s
Fire rate900 shots/min
Main article: MG34 (7.92 mm)
7.92 mm MG34
Mount Capacity (Belt) Fire rate Vertical Horizontal
Coaxial 3,750 (150) 900 N/A N/A

Usage in battles

Offensive

With this tank, you have essentially a "jack of all trades, somewhat good at all of them" kind of options set. You can stick with friendly tanks, and use the cannon's high rate-of-fire and excellent stats with APCR to nab scores from either destroying the enemy or getting team assists. Another way to go on the offensive is to go for a flanking move since at practical distances (400-1000m) the gun's penetration statistics are far less than the maximum advertised. However, the cannon still has enough power at those ranges to at least immobilize particularly important enemy tanks like a KV-1 or Churchill with a drivetrain shot. You can attempt multiple shots to destroy enemies, but by that point, you will begin receiving "responsive fire", and your tank's armour is not good enough to withstand more than 1-2 hits before being taken out.

A possible solution is to use "shoot and scoot" manoeuvres, popping out to fire and then scurrying to a different spot, but this poses issues if the terrain won't allow you to have a consistent cover (which may result in a downed tank between cover) or if there simply isn't much of any cover (like on the Kursk map's outer capture points).

Defensive

When on the defense, you have a number of advantages and some severe disadvantages - being able to hunker down and hammer in shots with the long 5 cm cannon away from the immediate frontlines mean that most tanks that you will face will likely be more focused on more offensive-oriented players in your team, which may cause them to unintentionally show their hull sides towards the Panzer III J1's position. This scenario, combined with your excellent rate of fire and penetration statistics, means you can make quick work of an unsuspecting light or medium tank, assuming you can find cover in a location the enemy will not be looking at.

If detected or ranged by a tank or tank destroyer (assuming they have an angle that negates your cover's protection), your armour will not protect you from very much, as even 20 mm AP rounds can penetrate the armour plates if close enough. If you simply find yourself stuck behind cover because the enemy has your position, it is advised to pop smoke (as you have multiple use smoke-grenade launchers) and use the smoke to full effect, making it as difficult as possible for enemy tanks to get an exact bearing on your position as you try to move to better or another cover in general.

Pros and cons

Pros:

  • High rate of fire
  • High shell velocity
  • Mobile and fast
  • Excellent gun depression
  • APCR ammo is great against moving targets
  • Can be very durable at times when you angle the armour

Cons:

  • Poor damage against modules and crew
  • Gun lacks penetration at the range, is likely to bounce on armour slopes
  • Overall weak armour
  • Modules are sensitive to damage
  • APCR is weak at long ranges and deals very little damage upon penetration

History

Development

The Panzerkampfwagen III medium tank, or the Panzer III was developed in the 1930s. Starting in early 1934, Heinz Guderian set down some specifications for a new tank, which the Army Weapons Department took up to design the tank to weigh no more than 24,000 kg with a top speed of 35 km per hour. This tank's role was to be the main tank of the German army and was expected to destroy opposing tanks, as opposed to a tank made to destroy anti-tank guns and opposing infantrymen, which the Panzer IV served as.

Daimler-Benz, Krupp, MAN, and Rheinmetall produced prototypes meeting the specifications and the Daimler-Benz model was chosen after testing in 1936-1937. The Panzer III model used a leaf-spring suspension in its early models (Ausf. A - Ausf. D) before utilizing a six-wheeled torsion-bar suspension in the Ausf. E and beyond. The Panzer III had a crew of five men, the commander, gunner, loader, driver, and assistant driver. The best feature of the Panzer III during its introduction that is the most overlooked was the three-man turret, which was not as common at the time. This frees the commander to be able to effectively command the tank while maintaining situational awareness, rather than be burdened by the role of a loader or gunner, improving combat effectiveness of the tank. The 37 mm (later 50 mm) anti-tank gun was also very effective against contemporary tanks. Despite this rather advanced design, the turret did not have a turret basket for the crew. It was a proven design and production began in May 1937. The total number of Panzer III tanks constructed in its production life was 5,774 units (excluding the far more produced StuG III variant).

Design

The Panzer III Ausf. J1 features a much better 50 mm gun compared to its predecessors, the 50 mm KwK 39, which is an improvement over the 50 mm KwK 38 by its longer barrel that provided additonal accuracy. Longer cartridges with more propellant charge were used, providing extra velocity and penetration. This new 50 mm gun gives the Panzer III a fighting edge against T-34s and M4 Shermans, which the older 50 mm KwK 38 had trouble fighting against. The Panzer III Ausf. J1 still featured the 50 mm armour thickness on the front and rear originally from the Ausf. J variant, but later models had new offset armour on the front of the hull and turret that provide 20 mm of effective protection These armour also apply as spaced armour due to not being attached to the hull or turret mantlet. The spaced armour on the front helped defend the tank against Soviet anti-tank rounds or HEAT rounds fired at it on those plates, as it dissipates the penetration power before striking the hull.

Combat usage

The Panzer III J1 was only a stopgap design to integrate the 50 mm KwK 39 into service as fast as possible. The final designs in its later models were later redesignated the Panzer III Ausf. L and Panzer III Ausf. M. It saw service on the eastern front, where it performed poorly against superior T-34 and KV-1 tanks. However, it also saw service in North Africa, where it would easily defeat allied light tanks such as the M3 Stuart and the Crusader, even when outnumbered. However, the introduction of more medium tanks by the allies in the African theater would prove to be problematic for the Panzer III. Those that survived the defeat in Africa would try to defend Sicily from the allied invasion of Italy.

Media

Skins
Videos

See also

External links

Paste links to sources and external resources, such as:

  • topic on the official game forum;
  • other literature.


Twitch Drop vehicles
Ground vehicles  M5A1 TD · Pz.II C TD · Pz.III J1 TD · Sd.Kfz.234/2 TD · BT-7 TD · Chi-Ha Kai TD · Strv m/39 TD
Aviation  P-40E-1 TD
Fleet  Dark Aggressor TD

Germany medium tanks
Pz.III  Pz.III B · Pz.III E · Pz.III F · Pz.III J · Pz.III J1 · Pz.III J1 TD · Pz.III L · Pz.III M · Pz.III N
Pz.IV  Pz.IV C · Pz.IV E · Pz.IV F1 · Pz.IV F2 · Pz.IV G · Pz.IV H · Pz.IV J · Pz.Bef.Wg.IV J
Pz.V  VK 3002 (M) · Panther A · Panther D · Panther F · Panther G · Ersatz M10 · Panther II
M48 upgrades  M48A2 G A2 · M48 Super
Leopard 1  Leopard I · Leopard A1A1 · Leopard A1A1 (L/44) · Leopard 1A5 · C2A1 · Turm III
Leopard 2  PT-16/T14 mod. · Leopard 2K · Leopard 2AV
  Leopard 2A4 · Leopard 2 (PzBtl 123) · Leopard 2 PL · Leopard 2A5 · Leopard 2 PSO · Leopard 2A6 · Leopard 2A7V
Trophies  ▀M4 748 (a) · ▀T 34 747 (r)
Other  Nb.Fz. · KPz-70
USA  mKPz M47 G · M48A2 C
USSR  ◊T-72M1