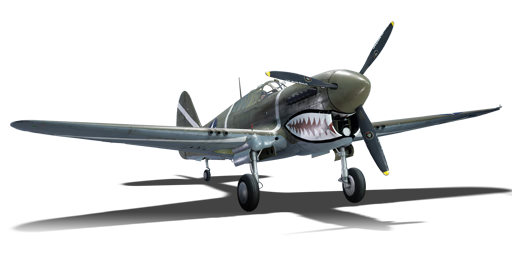
P-40F-10

From War Thunder Wiki
Jump to: navigation, search
Rank VI Israel | Premium | Golden Eagles
Merkava Mk.2D Pack
This page is about the American fighter P-40F-10. For other versions, see P-40 (Family). For other uses, see P40 (Disambiguation).
P-40F-10
p-40f_10.png
GarageImage P-40F-10.jpg
ArtImage P-40F-10.png
360://https://wiki.warthunder.com/images/4/4e/Cockpit_p-40f_10.jpg
P-40F-10
AB RB SB
2.3 2.7 2.7
Class:
Research:5 600 Specs-Card-Exp.png
Purchase:22 000 Specs-Card-Lion.png
Show in game

Description

The Allison engine found in many P-40 variants severely limited the Warhawks' capabilities. It lacked a supercharger gear for high-altitude performance and was overall lacklustre compared to other engines. To remedy that, a P-40D was fitted with a Merlin engine in 1941. It produced around 1,300 hp and would later lead to the P-40F. The P-40F was largely the same as the previous variant but the Packard-built Merlin engine immensely increased the Warhawk's capability. It was better suited at high altitudes, the range was far better, and overall performance was increased. Over 1,300 P-40Fs were built and some were exported to the Royal Air Force.

The P-40F-10 Warhawk was introduced in Update 1.79 "Project X". The new Packard-built Merlin engine greatly increases the Warhawk's ability to fight at higher altitudes. It still retains many of the same elements as the previous Warhawk variants. There are two ways to visually distinguish a P-40F from other variants: the P-40F lacks the upper air intake found on Allison-powered Warhawks and the fuselage was lengthened to accommodate the extra torque produced by the Merlin engine. Overall, the P-40F is a general improvement to the Warhawk family.

General info

Flight performance

Max speed
at 5 029 m615 km/h
Turn time20 s
Max altitude11 000 m
EnginePackard V-1650-1
TypeInline
Cooling systemWater
Take-off weight4 t

With the new features present on this plane, it now has a decent performance at high altitudes, as well as a superb diving capability while maintaining the ability to stand its ground in a dogfight, but not being the best at.

With a rather average climb ratio this plane will be able to reach 5,000 m in about 4 to 5 minutes, at that altitude it will maintain a decent straight-line acceleration and won't reach performance limits until 5,600 m. Above that altitude both the engine power and surfaces control will continuously decrease.

This plane has a good dive speed acceleration and it can also bear high maximum speeds, giving it a good Boom and Zoom ability. It will be able to get out of a dive if pulled up at a maximum speed between 740 km/h and 760 km/h, although surfaces control will begin to decrease at 725 km/h, making it harder to adjust the direction.

When turn fighting, the P-40 will show its best turn ratio and manoeuvrability at 450 km/h; and if needed, combat flaps can be safely used at this speed to provide a slight boost. However, once it begins to lose speed, two problems will appear. First, it will begin to lose rudder stability, meaning that movement on the plane's vertical axis (yaw) will get unstable and sluggish, thus becoming harder to get guns on target. Second, the plane's turn ratio will begin to worsen once the speed drops below 350 km/h.

Characteristics Max Speed
(km/h at 5,029 m)
Max altitude
(metres)
Turn time
(seconds)
Rate of climb
(metres/second)
Take-off run
(metres)
AB RB AB RB AB RB
Stock 588 569 11000 21.1 22.0 7.7 7.7 350
Upgraded 646 615 18.9 20.0 15.9 11.2

Details

Features
Combat flaps Take-off flaps Landing flaps Air brakes Arrestor gear
X X
Limits
Wings (km/h) Gear (km/h) Flaps (km/h) Max Static G
Combat Take-off Landing + -
819 300 595 530 245 ~12 ~6
Optimal velocities (km/h)
Ailerons Rudder Elevators Radiator
< 420 < 380 < 420 > 340

Survivability and armour

Crew1 person
Speed of destruction
Structural0 km/h
Gear300 km/h
Armour plates
  • 38 mm Bulletproof glass in front of pilot.
  • 3 mm Steel plate in front of oil cooling system.
  • 8 mm Steel plate behind the pilot.
Critical components
  • All critical components are located on the central airframe:
    • Self-sealing fuel tanks are located behind and under the pilot seat.
    • Engine and cooling systems are at the front of the plane.
    • Traction cables of control surfaces are in the tail section.
  • Except for the armament, there are no critical modules in the wings.
  • The wings can take a good amount of damage from MGs, except the tip that is easily blown off.
  • 20 mm ammunition will severe any wing clean.

Modifications and economy

Repair costBasic → Reference
AB623 → 782 Sl icon.png
RB1 297 → 1 629 Sl icon.png
SB1 801 → 2 262 Sl icon.png
Total cost of modifications10 320 Rp icon.png
13 830 Sl icon.png
Talisman cost750 Ge icon.png
Crew training6 300 Sl icon.png
Experts22 000 Sl icon.png
Aces250 Ge icon.png
Research Aces220 000 Rp icon.png
Reward for battleAB / RB / SB
40 / 100 / 200 % Sl icon.png
124 / 124 / 124 % Rp icon.png
Modifications
Flight performance Survivability Weaponry
Mods aerodinamic fuse.png
Fuselage repair
Research:
690 Rp icon.png
Cost:
910 Sl icon.png
95 Ge icon.png
Mods radiator.png
Radiator
Research:
690 Rp icon.png
Cost:
910 Sl icon.png
95 Ge icon.png
Mods compressor.png
Compressor
Research:
780 Rp icon.png
Cost:
1 000 Sl icon.png
110 Ge icon.png
Mods aerodinamic wing.png
Wings repair
Research:
870 Rp icon.png
Cost:
1 200 Sl icon.png
120 Ge icon.png
Mods new engine.png
Engine
Research:
870 Rp icon.png
Cost:
1 200 Sl icon.png
120 Ge icon.png
Mods metanol.png
Engine injection
Research:
1 100 Rp icon.png
Cost:
1 500 Sl icon.png
155 Ge icon.png
Mods armor frame.png
Airframe
Research:
780 Rp icon.png
Cost:
1 000 Sl icon.png
110 Ge icon.png
Mods armor cover.png
Cover
Research:
1 100 Rp icon.png
Cost:
1 500 Sl icon.png
155 Ge icon.png
Mods ammo.png
bmg50_belt_pack
Research:
690 Rp icon.png
Cost:
910 Sl icon.png
95 Ge icon.png
Mod arrow 1.png
Mods pilon bomb.png
FSBC mk.1
Research:
780 Rp icon.png
Cost:
1 000 Sl icon.png
110 Ge icon.png
Mod arrow 1.png
Mods weapon.png
bmg50_new_gun
Research:
870 Rp icon.png
Cost:
1 200 Sl icon.png
120 Ge icon.png
Mods pilon bomb.png
FMBC mk.1
Research:
1 100 Rp icon.png
Cost:
1 500 Sl icon.png
155 Ge icon.png

Armaments

Offensive armament

Ammunition1 686 rounds
Fire rate750 shots/min
Main article: M2 Browning (12.7 mm)

The P-40F-10 is armed with:

  • 6 x 12.7 mm M2 Browning machine guns, wing-mounted (281 rpg = 1,686 total)

Suspended armament

List of setups (3)
Setup 12 x 100 lb AN-M30A1 bomb
Setup 21 x 500 lb AN-M64A1 bomb
Setup 32 x 100 lb AN-M30A1 bomb
1 x 500 lb AN-M64A1 bomb

The P-40F-10 can be outfitted with the following ordnance:

  • Without load
  • 2 x 100 lb AN-M30A1 bombs (200 lb total)
  • 1 x 500 lb AN-M64A1 bomb (500 lb total)
  • 1 x 500 lb AN-M64A1 bomb + 2 x 100 lb AN-M30A1 bombs (700 lb total)

Usage in battles

The P-40F-10 performs similarly to the P-40E-1, although it is neither as fast (at lower altitudes) nor as good at turning. Although this is compensated with the new Merlin engine, providing a better performance at higher altitudes, as well as the re-designed tail section, which allows a better elevator control at higher speeds, making it a very competitive aircraft when using Boom and Zoom tactics. It can also take a good amount of machine gun hits while keeping the critical modules safe; however, cannons will pose a more serious threat specially if they hit the wings. This aircraft comes too with a good fire power, which considering all the characteristics listed previously, allows for the pilot to choose from different tactics as well as objectives when engaging enemy aircraft.

Early Game

At the start of a match it's advised to reach and altitude of 4,500 m to 5,000 m, for this WEP can be used, shallowly side climbing at a 20° angle, up to 3,500 m, then reducing throttle to 100% and a 17° angle (to avoid engine overheating) until the desired altitude is reached. Once up there start heading towards a more central map position, while keeping it leveled off in order to regain speed.

Bomber Hunting

Up here, enemy bombers will either be at the same altitude or lower. Packing 6 x 12.7 mm machine guns, the P-40 usually deals fatal damage to enemy bombers in only one pass, either destroying the wings or setting them on fire; making them a good target to aim for when in the air. Therefore, if any enemy bomber, or group of bombers are spotted nearby, it's a good decision to attack them. Just keep in mind to check the surroundings as you don't want to get jumped on by a group of enemy fighters while attacking their bombers.

Enemy Fighters

Taking advantage of the P-40F-10 capabilities, there are three ways in which you can attack enemy fighters. According to the situation, you should either:

  • Boom and Zoom: If you spot any enemy below you, take advantage of this plane's high maximum speed in a dive and use Boom and Zoom tactics; basically diving on them, start shooting once you are in range of your chosen gun convergence distance, as this will concentrate the most fire power on the center of the enemy plane, and then climb back regaining the lost altitude. Your plane can safely pull out of a dive at a maximum speed of 750 km/h; however, if you are aiming for a plane that's dogfighting an ally or has seen you before you opened fire, keep in mind that if you're going faster than 725 km/h the rudder as well as the aileron's control will begin to stiffen up, making it harder to follow the enemy plane's movements. To counter this, you can zoom back with the throttle set to 0% to lose some speed or, if the enemy hasn't noticed you yet, you can loop around in a horizontal axis every time you are going faster than your desired speed, until you reach your target.
  • Dogfight: If a dogfight approach is taken, this plane is able to outturn most axis fighters, except for Japanese ones. However, this will be relative to your energy state, since the performance of the P-40 will begin to decrease when going below a certain speed; therefore, it's recommended to first engage while going at around 500 km/h, this will provide you with the longest time before the aircraft's performance drops. Keep in mind that the plane will show its best turn ratio at about 450 km/h. Take advantage of the strong fire power of your aircraft to end these dogfights as soon as possible, and unless there are allies around to support you or the enemy aircraft is clearly more sluggish than yours at low speeds, do not stay in a dogfight if your speed goes below 300 km/h; you will notice that your turn ratio will get worse and the rudder control will become unstable. If you end up in this situation, the best decision would be to break from the dogfight, get some distance from the enemy and either: engage again if you have enough speed, this time with a Boom and Zoom mindset, or if the enemy is following and reaching you, force the enemy into scissors.
  • Boom and Run: Using this tactic is only viable if their is no dangerous enemy. This can be used to take out lower altitude planes, or ground targets. With the F-10 variant, this will throw out the altitude advantage and the improved high altitude, that is necessary to the P-40. If caught, try to either gain altitude, or make him overshoot and shred him to pieces with your armament. If you fail to do either, and it turns into a dogfight, try to run from the fight and set them up for a Boom and Zoom attack, or if you don't have enough speed force them into scissors.

Air SB

The P-40 can be used for BnZ fighting, bomber hunting and ground pounding in Sim. It is a decent plane with distinct pros and cons. Its heavy firepower of 6 x 12.7 mm MGs can critically damage the enemy and rip it apart. It has great dive speed and decent level speed, capable of outrunning slower opponents. However, it is a nose-heavy plane so unlike other planes, the P-40 has to trim the elevators upwards. It has quite limited visibility with lots of canopy frames and a razorback design. The P-40's over-the-nose visibility is one of the worst due to its big, long engine, and the small intake on top of the cowling, making leading very hard. Moreover, its engine tends to overheat frequently even with 95% throttle, meaning you have to cut throttle a lot to avoid damaging the engine.

Before entering a battle, it is recommended to set keybinds for trimming and vertical head movements to improve the forward visibility a bit. Take at least 30 minutes of fuel. Set the convergence between 250-500 m, with vertical targeting on.

The general tactics remain the same as above: BnZ the enemies. However against bombers, utilise deflection shooting instead of leading the shot like in realistic.

For ground pounding, the P-40 can carry a bomb payload of 2 x 100 lb or 1 x 500 lb or 2 x 100 lb + 1 x 500 lb (700 lb), making it a decent ground attack fighter for its rank. The Ground Targets belt for the .50 cals allow the P-40 to rip apart enemy AAA, Pillboxes, and even most German/Japanese light tanks. Pz.IIs, BT-5 and BT-7, Chi-Has, etc. can all be torn to shreds with the .50 cals, primarily from the side and top. The P-40 will wobble a lot (sideways mainly) so you must get used to smoothing the plane down in order to hit ground targets.

Manual Engine Control

MEC elements
Mixer Pitch Radiator Supercharger Turbocharger
Oil Water Type
Controllable Controllable
Auto control available
Not controllable
Not auto controlled
Controllable
Not auto controlled
Combined Controllable
2 gears
Not controllable

Pros and cons

Pros:

  • Good survivability
  • Can outrun most on-tier vehicles in a straight-line path
  • Good energy retention in a dive
  • Better performance at mid to high speeds
  • Effective armament with a relatively large ammo pool

Cons:

  • Engine is prone to overheating
  • Like the previous iteration of the P-40, does not do well in a turn fight
  • Sub-par climb rate
  • Rather unstable in pitch axis in SB
  • Extremely bad visibility over the nose in SB

History

Although early P-40s were equipped with one of the most powerful inline engines available to the American aircraft industry at the time, it quickly became apparent that even that wasn't enough. Due to its advanced and robust design, it's no secret that the P-40 was a relatively heavy aircraft for its type, resulting in power-to-weight issues which would never be fully solved. Nonetheless, Curtiss engineers continued tweaking and improving the design in all aspects, trying to lessen the drawbacks of high weight and insufficient power.

In 1940, the American Packard Motor Car Company acquired a licence to manufacture the Rolls-Royce Merlin engine, in an effort to satisfy the growing demand of the British aviation industry. Additionally, the licence gave American engineers access to a more powerful engine at a time where similar U.S. engines were not available. Naturally, Curtiss engineers didn't waste any time outfitting the P-40 with the brand new licence-built Merlin engine, resulting in the creation of the P-40F. Besides the internal engine upgrade, some external changes were also applied to the aircraft. For instance, the tail section of the fuselage was lengthened in an effort to counter the negative effects of strong engine torque on take-off and landing experienced on earlier modifications. With the changes applied, serial production of the new P-40F was scheduled to begin in 1942. As the British and Commonwealth air forces were particularly keen on a Merlin-engined P-40 variant, they were also the first ones to receive the new P-40Fs as early as summer of the same year.

Despite the British and Commonwealth forces receiving the P-40Fs first, the majority of the 1,300 manufactured machines served with units of the USAAF in the Mediterranean theatre. By the end of the Mediterranean campaign in late 1943, the P-40F had successfully proven the value of the applied changes by presenting itself as a more than capable air superiority fighter, when matched up against previously superior Axis counterparts such as the Bf 109F/G and M.C. 202/205. During its service in the Mediterranean, experienced pilots, applying the right tactics showed that the Warhawk could no longer be considered the underdog, but instead an equal at very least.

Interesting: The Soviet Union received P-40 fighters under the lend-lease program; they were considered to be aircraft with medium efficiency but were quite durable. Lieutenant Alexei Khlobystov in one battle conducted two successful rams and after that encounter, the pilot and his "Kittyhawk" returned to the airfield!

- From Devblog

Media

Skins
Videos

See also

Related development
Aircraft of comparable role, configuration and era

External links


Curtiss-Wright Corporation
Fighters  BF2C-1
  P-36A · Rasmussen's P-36A · P-36C · P-36G
  P-40C · P-40E-1 · P-40F-10
Bombers  SB2C-1C · SB2C-4
Floatplanes  SOC-1
Experimental  XP-55
Export  H-75A-1 · H-75A-4 · H-81A-2 · ▂P-40E-1 · ␗P-40E-1 · ▄P-40F-5 Lafayette · CW-21 · Hawk III
  ▄SB2C-5
Captured  ▀Hawk H-75A-2

USA fighters
P-26 Peashooter  P-26A-33 · P-26A-34 · P-26A-34 M2 · P-26B-35
P-36 Hawk  P-36A · Rasmussen's P-36A · P-36C · ○P-36C · P-36G
P-39 Airacobra  P-400 · P-39N-0 · P-39Q-5
P-40  P-40C · P-40E-1 · P-40E-1 TD · P-40F-10
P-43 Lancer  P-43A-1
P-47 Thunderbolt  P-47D-22-RE · P-47D-25 · P-47D-28 · P-47M-1-RE · ⋠P-47M-1-RE · P-47N-15
P-51 Mustang  P-51 · P-51A (Thunder League) · P-51C-10 · P-51D-5 · P-51D-10 · P-51D-20-NA · P-51D-30 · P-51H-5-NA
P-63 Kingcobra  P-63A-5 · P-63A-10 · P-63C-5 · ␠Kingcobra
Prototypes  XP-55
F2A Buffalo  F2A-1 · Thach's F2A-1 · F2A-3
BF2C  BF2C-1
F3F  F3F-2 · Galer's F3F-2
F4F Wildcat  F4F-3 · F4F-4
F4U Corsair  F4U-1A · F4U-1A (USMC) · F4U-1D · F4U-1C · F4U-4 · F4U-4B · F4U-4B VMF-214 · F2G-1
F6F Hellcat  F6F-5 · F6F-5N
F8F Bearcat  F8F-1 · F8F-1B
Other countries  ▃Ki-43-II · ▃Ki-61-Ib · ▃A6M2 · ▃Bf 109 F-4 · ▃Fw 190 A-8 · ▃Spitfire LF Mk IXc