Mi-24P HFS 80 (Germany)

From War Thunder Wiki
Jump to: navigation, search
Rank VI | Premium | Golden Eagles
Chinese A-5C Pack
This page is about the premium attack helicopter Mi-24P HFS 80 (Germany). For other versions, see Mi-24 (Family).
◄Mi-24P HFS 80
mi_24p_german_hfs80.png
GarageImage Mi-24P HFS 80 (Germany).jpg
ArtImage Mi-24P HFS 80 (Germany).png
◄Mi-24P HFS 80
Purchase:8 730 Specs-Card-Eagle.png
Show in game

Description

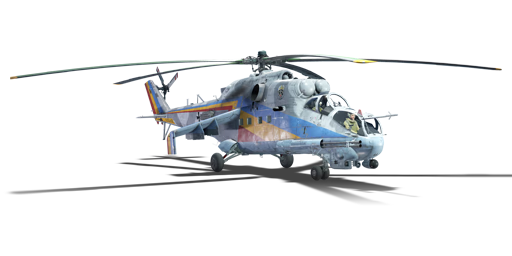
In 1981, a dedicated anti-tank variant of the Mi-24V was devised, replacing the gunner-controlled, nose-mounted 12.7 mm turret with a pilot-controlled fixed GSh-30-2K twin-barrel 30 mm cannon from an Su-25 for anti-tank duties. The resulting variant, named the Mi-24P, would quickly enter service, and would also be exported alongside the Mi-24V to many countries. One of these countries was East Germany, where the Mi-24P quickly found itself in useful service. Even after the re-unification of Germany, the Mi-24P was one of the very few ex-NVA aircraft types that was deemed "good" enough to be used by the Bundeswehr in active service rather than being sold or scrapped. The Mi-24P would serve with the Bundeswehr for four years before being retired in favour of the EC-665 Tiger for the anti-tank role, with the remaining Mi-24Ps either sold to Hungary or sent to WTD-61 for further German evaluation and testing. One of the last Mi-24Ps to leave German service was part of Heeresfliegerstaffel 80 (HFS-80), being painted with a special "farewell livery" to commemorate its end of service. This specific helicopter would be sold to Hungary shortly after in 1995.

The ◄Mi-24P HFS 80 (NATO reporting name: Hind-F) was introduced in Update 1.91 "Night Vision" as a premium rank VI German attack helicopter. This version differentiates from its tech tree counterpart only by premium bonuses and addition of the retirement livery belonging to Heeresfliegerstaffel 80 (Army Aviation Squadron 80) helicopter unit belonging to Unified Germany's Heer that continued to operate Soviet helicopters after reunification. As such, its gameplay is exactly identical to all the other Mi-24Ps in-game. One must heed caution when deploying this aircraft due to its large size and cumbersome controls making it a easy target, but should not completely wimp out of an offensive playstyle thanks to its powerful gun and decent armour and survivability.

General info

Flight performance

Max speed
at 1 000 m335 km/h
Max altitude4 950 m
Engine2 х Klimov TV3-117V
Power2 100 hp
Take-off weight12 t

With its large size and heavy armour for a helicopter, Hind can at times feel sluggish and slow to turn when compared to BO 105 helicopters. That being said, it can also fly incredibly fast, being the fastest helicopter in the German tech tree.

◄Mi-24P can achieve a whooping speed of 335 km/h when flying at 50 m altitude, without any problems. Be aware that at this speed, Hind behaves more like a plane rather than helicopter; sharp turns using only mouse control can take ages and helping yourself with keyboard controls can cause loss of lift, leading to crash.

Be aware that while you can exceed ◄Mi-24P's listed maximal speed by as much as 30 km/h without problems, once you hit 370 km/h and above, your helicopter will flop to the right side. This is especially dangerous during low altitude flight as you won't have time to recover, even with experienced crew.

Also be aware that when hovering, ◄Mi-24P is prone to vortex ring state, a dangerous condition leading to loss of lift and eventually, crash. It is of utmost importance to start moving in any direction, thus gaining lift, as soon as a warning pops up on your screen, otherwise you risk severely damaging if not losing your helicopter.

Characteristics Max Speed
(km/h at 1,000 m)
Max altitude
(metres)
AB RB
Stock 311 293 4950
Upgraded 359 335

Survivability and armour

HIRSS
Dissipates the flow of hot exhaust gases, reducing the likelihood of capture by IR-guidance missiles
IRCM
Protects against IR-guided missiles
Crew2 people
Speed of destruction
Structural520 km/h
Gear420 km/h

While lacking some defensive features such as titanium rotor blades or a titanium tub around its crew, ▀Mi-24P is well protected for its rank.

Rule of thumb is to keep your distance, fly low, and break line of sight whenever possible.

Armour

The greater the distance, the more useful your armour will be.

Critical components such as the engines and transmission are protected by 4 mm steel plates.

The crew sits in an armoured tub, consisting of 4 mm steel plates on the sides. The gunner position is uparmoured with 8 mm plates, while the pilot gets 4 mm steel plates in his seat. Both crew members get access to 55 mm armoured glass in the cockpit.

The armour layout can protect you comfortably from low-calibre machine guns and at distance, from .50 cal MGs which are commonly used by NATO tanks.

Larger calibres, such as those found on IFVs, can chew right through your armour, especially at close range.

Dedicated SPAAGs such as Shilkas, Tunguskas, Chieftain Marksmans and the likes can go through your armour with armour-piercing rounds, though they will need to hit critical components or crew directly. You can withstand a few hits of their explosive rounds and shrapnel, but do not expect to hover over them and survive. If the SPAAG in question has proximity fused rounds such as the WZ305, VEAK 40 or M247, it is unadvisable to try and get much closer as their rounds don't need to directly impact you to cause severe damage to you. The WZ305 lacks a radar meaning you may sneak up on it; The VEAK 40 and M247 however do have radars and if you're being locked it may be better to find a different attack vector.

SAMs will almost always destroy most of your critical components in one hit, though you can sometimes survive smaller ones and make it back to the helipad.

Mi-24P countermeasures
Red circle - HIRSS
Blue circle - IRCM
Green circle - Countermeasures launcher

Avionics

◄Mi-24P is equipped with a plethora of technologies which increase your survivability dramatically.

First, you have the option to install HIRSS, standing for "Hover Infrared Suppressor System", that allows your helicopter to reduce or almost eliminate all infrared radiation emitted by exhaust gases of its engines to its surroundings.

Second, you can install IRCM, non-coherent flashlamps and infrared signal emitters that direct its energy towards incoming missiles in an attempt to blind the missile's infrared sensors and confuse its tracking. In-game, it also causes IR locks to "wiggle" all around your helicopter when viewed through enemy scope, increasing the probability of miss.

Third, you are equipped with a RWR (radar warning receiver) from the get go. This piece of technology alerts you of active radars on the battlefield, be it ground or air based, and gives you warning when you get radar locked. It also lets you know the position of active radars relative to your helicopter and highlights which radar has locked you.

Lastly, you can equip a countermeasure launcher with a capacity of 192 of either flares, chaff or combination of both. Those are mounted right behind your wing pylons on the side of the Hind. Flares work against IR tracking missiles, while chaff works against both searching and tracking radar. As more and more SAM/MANPADS vehicles are being added (examples being the Japanese Type 93, Chinese PGZ04A, American LAV-AD, Italian SIDAM 25 (Mistral), German Ozelot/Gepard 1A2 and the Soviet Strela-10M2 among others like the Machbet from Israel), it is ideal to stay at ranges further away than 3-3.5 km as these early non-mouse guided SAMs will struggle to gain a lock on you at these ranges. This becomes more important with growing distance, as IR SAMs can't reach your maximum engagement range when you are using Shturms, which have a range of 5 km.

There is no real downside to mounting all of the countermeasures mentioned above, so keep all of them equipped all the time.

Sadly, the ◄Mi-24P is not equipped with MAW, missile approach warning, so you do not get alerted by missiles incoming in your direction.

Staying alive

Depending on the situation and payload, your approach to survival is radically different. Rule of thumb is that it is almost always better to stay low to the ground in order to break line of sight and to stay below altitude where proximity fuse on SAMs activates (usually 25 m above ground).

Also, you need to be aware that the HFS 80 livery with its bright unnatural colors can aid the enemy with visual detection.

Modifications and economy

Repair cost
AB5 031 Sl icon.png
RB2 949 Sl icon.png
SB4 106 Sl icon.png
Crew training10 000 Sl icon.png
Experts1 600 000 Sl icon.png
Aces2 000 Ge icon.png
Research Aces1 710 000 Rp icon.png
Reward for battleAB / RB / SB
Talisman.png 2 × 50 / 290 / 430 % Sl icon.png
Talisman.png 2 × 214 / 214 / 214 % Rp icon.png
Modifications
Flight performance Survivability Weaponry
Mods jet compressor.png
Compressor
Mods cd 98 main rotor.png
Replacing helicopter blades
Mods jet engine.png
Engine
Mods heli flak jacket.png
Flak jacket
Mods heli structure.png
Helicopter frame
Mods jet engine extinguisher.png
EFS(a)
Mods armor cover.png
Cover
Mods ammo.png
GSh-30-2K_belt_pack
Mod arrow 0.png
Mods pilon bomb.png
FAB-250
Mod arrow 0.png
Mods heli screen exhaust device.png
HIRSS
Mod arrow 0.png
Mods weapon.png
GSh-30-2K_new_gun
Mods pilon bomb.png
FAB-500
Mods air to air missile.png
R-60
Mod arrow 0.png
Mods heli false thermal targets.png
Flares/Chaff
Mod arrow 0.png
Mods gunpods.png
Gun pod UPK-23-250
Mod arrow 0.png
Mods gunpods.png
Gun pod GUV-8700
Mods atgm heli preset.png
RP-2-149TK
Mod arrow 0.png
Mods air to air missile.png
R-60 2
Mod arrow 0.png
Mods counterMeasures.png
IRCM
Mods ammo.png
ns23_belt_pack
Mods weapon.png
gunGShG_new_gun
Mods atgm heli preset.png
RP-2-149TK/2
Mods air to air missile.png
R-60MK
Mods night vision device.png
NVD

Since the ◄Mi-24P HFS 80 is a premium helicopter, it comes with all modifications unlocked. Just be sure to install all available countermeasures before heading into battle.

Armaments

Night vision devices
Improves visibility by enhancing natural light or active illumination.
Ballistic Computer
CCIP (Guns) CCIP (Rockets) CCIP (Bombs)
Icon GreenCheckmark.png Icon GreenCheckmark.png Icon GreenCheckmark.png

Offensive armament

Main article: GSh-30-2K (30 mm)

The Mi-24P HFS 80 (Germany) is armed with:

  • A choice between four presets:
    • 1 x 30 mm GSh-30-2K cannons, cheek-mounted (250 rpg)
    • 1 x 30 mm GSh-30-2K cannons, cheek-mounted (250 rpg) + HIRSS
    • 1 x 30 mm GSh-30-2K cannons, cheek-mounted (250 rpg) + 192 x Flares
    • 1 x 30 mm GSh-30-2K cannons, cheek-mounted (250 rpg) + 192 x Flares + IRCM

◄Mi-24P is armed with a 30 mm GSh-30-2K cannon. It can shred any air target unfortunate enough to get in its range. With ground belts, it can make short work of any light vehicle or SPAAG, though main battle tanks will shrug your fire without any serious damage.

Operator must be aware that the cannon has a high rate of fire and only 250 rounds available, so trigger discipline is a must.

Last thing to note is that the cannon is fixed to the ◄Mi-24P's right side and thus can be only aimed by turning the entire helicopter. This can sometimes be a problem at close range due to Hind's sluggish controls, and helicopters with cannons that can turn independently will have an edge over you.

Suspended armament

The Mi-24P HFS 80 (Germany) can be outfitted with the following ordnance:

1 2 3 4 5 6
Hardpoints Mi-24A.png
7.62 mm GShG-7.62 machine guns (1,800 rpg) 2* 2 2 2*
12.7 mm YaK-B machine guns (750 rpg) 1* 1 1 1*
23 mm GSh-23L cannons (250 rpg) 1 1 1 1
250 kg OFAB-250sv bombs 1 1 1 1
500 kg FAB-500M-54 bombs 1 1
S-8KO rockets 20 20 20 20
9M114 Shturm missiles 2 2 2 2
R-60 missiles 1, 2 1, 2
R-60MK missiles 1, 2 1, 2
Maximum permissible weight imbalance: 500 kg
* Machine gun pods must be equipped simultaneously as marked, including those on the same hardpoint
Default weapon presets
  • Without load
  • 2 x R-60 missiles
  • 4 x R-60 missiles
  • 2 x R-60MK missiles
  • 4 x R-60MK missiles
  • 80 x S-8KO rockets
  • 4 x 9M114 Shturm missiles
  • 8 x 9M114 Shturm missiles
  • 4 x 250 kg OFAB-250sv bombs (1,000 kg total)
  • 2 x 500 kg FAB-500M-54 bombs (1,000 kg total)
  • 4 x 23 mm GSh-23L cannons (250 rpg = 1,000 total)
  • 2 x 12.7 mm YaK-B machine guns (750 rpg = 1,500 total) + 2 x 7.62 mm GShG-7.62 machine guns (3,600 rpg = 7,200 total)

Compared to NATO helicopters in the German tech tree, ◄Mi-24P has the ability to perfectly tailor its payload to any battlefield scenario it can encounter.

GSh-23L cannon

◄Mi-24P is also able to equip gun pods containing 23 mm GSh-23L cannons. It is the same cannon as the one mounted in MiG-21s. ◄Mi-24P can equip up to 4 containers, each one containing 500 rounds of ammo. Sadly, you can't choose which belts to use.

S-8KO rockets

Another viable weapon, S-8KO rockets come in pods of 20, each missile is able to penetrate up to 400 mm. They are also very vast, with a speed of 610 m/s. Unfortunately, they contain only 1.32 kg equivalent of TNT, so scoring direct hits is a must. Hind can load up to 4 pods at once, giving you 80 missiles to launch at enemies.

R-60 AAM

Another weapon found on Russian MiG-21s, the R-60 is a powerful missile that is able to pull 30Gs, meaning they are very difficult to dodge without use of flares. They do not have as strong warheads as Sidewinders, but it is enough to severely cripple bigger planes and outright destroy smaller ones. Be aware as they can only achieve lock-on rear-aspect at maximum distance of 5 km, meaning you need to fire them at planes and helicopters from behind. Seeing that you also have the ability to equip the upgraded R-60Ms, there are not many scenarios where you would take these instead of the upgraded ones. You can equip up to 4 of them.

R-60M AAM

Direct upgrade to the R-60s, these are almost identical to the base version but with a slightly bigger warhead and the ability to lock onto enemy planes and helicopters from any aspect at a distance of 2 km (on top of 5 km range in rear-aspect). You can equip up to 4 of them.

OFAB-250sv bombs

Another weapon more commonly found on planes, the ◄Mi-24P can equip up to 1,000 kg of OFAB-250 bombs. These are dropped individually, thus in theory allowing the pilot to score 4 kills at least. Sadly, reality is often different - as your ballistic computer lacks the computing power to understand the sheer madness of mounting bombs on a helicopter, it is thus unable to provide aiming reticle for your bombs (as modern planes do). Your only hope of precisely dropping these is to attack in a manner similar to Stuka planes. While the thought of a ◄Mi-24P dive-bombing Abrams tanks certainly is funny, it is far from practical, given the setting in which helicopters operate.

FAB-500M-54 bomb

Same story as above, except ◄Mi-24P can only equip two of them. On the other hand, their explosive mass is higher, thus you do not need to be as precise as when dropping 250 kg bombs.

9M114 Shturm missile

Your weapon of choice when engaging enemy armour. Precursor of the 9M120 Ataka missile, Shturms are fast, capable of reaching speeds of 400 m/s (only slightly slower than Hellfires). They are able to penetrate only 560 mm of armour at max and are not equipped with tandem warheads, making them weaker against composite and reactive armour, which are common at its BR. That being said, you can load up to 8 of them, which is one of the highest numbers of ATGMs any German helicopter can carry. They have a range of 5 km, which is enough to comfortably sit outside of SPAAGs cannon range.

▀Mi-24P is armed only with a night vision device, severely limiting its ability to acquire targets at longer ranges. Night vision devices are only available to pilot and gunner when using 3rd person and cockpit view - your ATGM sight does not get any, thus crippling your effectiveness in long range engagements at night.

Usage in battles

◄Mi-24P (or any helicopter for that matter) usually adopts tactics of either helicopter rush or sniping with ATGMs.

The longer match goes on, the higher the chances of enemy AA appearing. This means your chance to successfully employ helicopter rush tactic gets lower as the match drags on, thus making helicopter rush viable only in the early game.

From mid to late game, you might want to go with tactic of sniping with Shturm ATGMs, picking off targets from maximum possible distance.

Using helicopter ATGMs is always a struggle between staying low, thus surviving longer, and climbing higher, thus getting a view on the battlefield unobstructed by buildings, hills, and trees.

If you decided to go with helicopter rush:

Recommended loadout: 80 x S-8KO rockets, ground belt for your cannon

While you can equip 4 x 250 kg of bombs instead of rockets, delivering those precisely is difficult due to lack of aiming reticle. Your ballistic computer is also unable to provide a firing solution, leaving you guessing more than aiming.

S-8KO rockets present much more precise and overall better choice of armament for this strategy.

Since your rockets are launched in pairs, aim for the roof armour on the back of the turret when approaching from side or slightly off the center if approaching from front or back. This will allow one of your rockets to score direct hit onto critical components of enemy tanks.

Tactics:

Let's get this out of the way first - helicopter rush tactics are a gamble, since it can lead to either great success (destroying several tanks from the enemy team for the price of one helicopter) or catastrophic failure (getting slapped by an XM1069 halfway to the combat zone), depending on whenever the enemy team has active AA at the start of the match.

Thankfully, ◄Mi-24P, thanks to its ballistic computer, speed, and armour can helicopter rush at the start of the round well. Be aware that it is more often than not a one way trip, since opponents will likely spawn dedicated AA after getting killed by rushing helicopter and will delete you from sky. Sometimes, you won't even get a chance to do that - some players anticipate helicopter rushes and start a game in AA vehicles, thus probably shutting down your helicopter even before it can do any damage.

That being said, when helicopter rushing at the start of the round, you need to approach the battlefield as low as possible, in order to avoid enemy radar and break line of sight by putting terrain, trees and structures between you and the enemy. Select heliport spawn closer to the battlefield, and start approaching either spawn or capture point; those have the highest chance of enemies being concentrated there.

Try to gain as much speed as possible before reaching your destination.

Once nearing 1 km distance from your objective, pull up and convert speed into attitude. While this will put you in the killzone of most dedicated AA vehicles in game, chances of those being active at the start of the match are low. You will also position yourself outside of most weapons carried by main battle tanks and IFVs - tank guns and most machine guns can't elevate high enough to effectively target you, keeping you out of harm's way. This will also allow you to easily target roof armour of enemy vehicles, which is usually thin and not protected by ERA, allowing your unguided rockets to slice right through.

As you climb, use your RWR to determine whenever the enemy team has AA or not - if you get pings from RWR, try to find and dispatch enemy AA before it can fire at you - this will allow you to stay alive for a little longer. Only then should you switch your attention to enemy tanks.

One last thing to note is that you will be heard before seen, as helicopters are usually very loud, and some skilled players can anticipate your direction from sound alone and can counter you as soon as you appear above horizon - tanks like M1A2 are equipped with proximity fuze HEAT-FS shells designed to take down low-flying helicopters, and most IFVs can elevate their guns high enough to engage you when you first emerge from behind the horizon. Thus gaining altitude is vital to success when helicopter rushing.

If you decided to go with sniping with Shturms:

Recommended loadout:

If there are no enemy planes active on the battlefield, pick loadout with the maximum number of Shturms ATGMs possible - these are your best choice at dispatching armoured targets.

If there are enemy planes active, pick loadout with R-60M missiles, those help you with clearing the airspace of any threats to your helicopter.

You can also pick secondary armament to go with your Shturms - either GSh-23L gun pods or S-8KO rocket pods.

GSh-23L cannon pods help you defend yourself at close range from air targets.

S-8KO rocket pods are not used in the conventional role of attacking ground targets in this loadout - instead, you use them defensively, to prematurely activate proximity fuze on enemy AA missiles. Simply fire a salvo in the way of an incoming missile and it should trigger. This is of utmost importance as skilled players will guide SAMs to your position manually, without use of radar, making traditional countermeasures useless.

Tactics:

While pilots can use rock formation in the red areas as a cover to great success, they can find themselves unable to defeat frontal armour of enemies moving in the middle of the map. Instead, they can try to reach rock formations in the blue area where they can engage weaker side armour of the enemies while still using cover provided by rock formations. Pilots should avoid yellow areas - while it enables side shots, there's no cover to hide behind.
Map of Sinai - While pilots can use rock formation in the red areas as a cover to great success, they can find themselves unable to defeat frontal armour of enemies moving in the middle of the map. Instead, they can try to reach rock formations in the blue area where they can engage weaker side armour of the enemies while still using cover provided by rock formations. Pilots should avoid yellow areas - while it enables side shots, there's no cover to hide behind.

Approach battlefield flying at low altitude, keep distance of 5 km (maximum range of your ATGMs). Bleed speed and start hovering. Finding any cover to hover behind and to break line of sight tremendously helps your survival - even trees can become your best friend.

Pop above the cover for a few seconds, launch a missile or two, then go back. Change position, rinse and repeat.

Check your RWR regularly in order to spot any active radars, be it airborne or ground based. Note that lack of active radar ping does not guarantee that the enemy team has no AA spawned - skilled players often turn off their radars in order to lure helicopters out of cover and guide their SAMs manually to you.

Stay around an altitude of 25 m when not engaging enemy tanks. You won't get detected by radar in most cases and proximity fuze of SAMs is disabled below 25 m. If you are higher and you detect incoming SAM, deploy countermeasures and try to duck below 25 m as fast as possible. Be aware that direct hit can and will obliterate you, but those are harder to pull off when dodging.

Staying in one place not only helps the enemy team to locate you sooner, but some tanks with laser range finders might able to shoot you down with tank guns at a range of several kilometres, since you present almost static target.

Shturms have mediocre penetration when compared to some high-end missiles and may find themselves unable to defeat modern composite or reactive armour, which are getting common at ◄Mi-24P BR. While destroying light tanks and SPAAGs and many older main battle tanks frontally is doable, your ATGMs simply don't have enough penetration to go through Challenger 2's turret cheeks or T-72B3's Relikt reactive armour for example.

That being said, that does not mean you cannot destroy those enemies. You just need to be smart about deploying your Shturms.

You should avoid engaging enemy tanks from the frontal arc. More often than not, a tank's strongest armour is its turret face and frontal plate on the hull. For example, Leopard 2A5s turret front is able to resist chemical munitions with penetration of up to 1,300 mm. On top of that, enemies can spot incoming missiles aimed at them when they are coming from the front, allowing them to take defensive measures, such as moving behind cover or deploying smoke grenades.

Instead, exploit Hind's high speed to get on flanks and hit enemy tanks from the side. Even with reactive armour, a well aimed hit below the turret of T-90A can detonate its ammo carousel and destroy it in one hit. While most players do check their corners and flanks, they usually wont spot missile coming from an elevated position until it's too late.

Pros and cons

Pros:

  • Has R-60M all-aspect missiles that are very effective against most aircraft
  • Durable airframe against small calibre rounds
  • Competitive speed for a helicopter
  • Has AAMs and ATGMs together in a loadout
  • Ability to equip 8 x Shturm missiles at once
  • 30 mm can be deadly against air targets

Cons:

  • ATGMs are have quite low penetration and lack a tandem warhead
  • Handles sluggishly at most speeds
  • Quite big and easy to spot
  • No thermal sights, only infrared night vision
  • HFS 80's bright and colorful livery can aid enemies in visual detection

History

The livery of this helicopter was likely inspired by the retirement livery of 9645 (NVA no.442; built no. 340335)[1] of the Heeresfliegerstaffel 80 (Army Aviation Squadron 80) in the German Army as one of their fleet of ex-DDR equipment; according to sources, this helicopter was sold to Hungary in 1995 (No. 335) as an addition to their fleet of Mi-24.[2][3]

Media

Skins
Videos

See also

Other Mi-24P variants

External links

Paste links to sources and external resources, such as:

  • topic on the official game forum;
  • other literature.

References


Mil Moscow Helicopter Plant
Attack  Mi-4AV
  Mi-8AMTSh · Mi-8TV
  Mi-24A · Mi-24P · Mi-24V
  Mi-28N · Mi-28NM
  Mi-35M
Export  ◊Mi-8TB
  ▂Mi-24D · ◔Mi-24D · ◔Mi-24V · ◔Mi-24P · ◊Mi-24P · ◄Mi-24P HFS 80
  Mi-28A

Germany helicopters
Attack 
Hip  ◊Mi-8TB
Hind  ◊Mi-24P · ◄Mi-24P HFS 80
Tiger  EC-665 Tiger UHT
Utility 
BO 105  BO 105 CB-2 · BO 105 PAH-1 · BO 105 PAH-1A1
Alouette  ◄SA 313B Alouette II
Huey  ◄UH-1D