
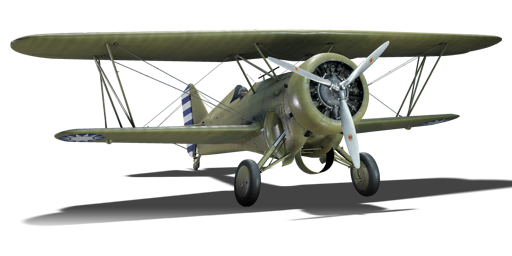
Hawk III

From War Thunder Wiki
Jump to: navigation, search
RANK 6 BRITAIN
Rooikat 105 PACK
Hawk III
hawk_iii.png
GarageImage Hawk III.jpg
Hawk III
AB RB SB
1.0 1.0 1.3
Purchase:250 Specs-Card-Eagle.png
Show in game

Description

The Hawk III is a premium rank I Chinese fighter with a battle rating of 1.0 (AB/RB) and 1.3 (SB). It was introduced in Update 1.91 "Night Vision". Players should note that the Hawk III's landing gear takes an extremely long time to retract and lower, so when landing, you should lower the landing gear well before you think you should.

General info

Flight performance

Arrestor gear
Accelerates braking by grabbing the brake cable on the deck of the aircraft carrier
Max speed
at 4 850 m444 km/h
Turn time13 s
Max altitude10 700 m
EngineWright R-1820-84
TypeRadial
Cooling systemAir
Take-off weight2 t
Characteristics Max Speed
(km/h at 4,850 m)
Max altitude
(metres)
Turn time
(seconds)
Rate of climb
(metres/second)
Take-off run
(metres)
AB RB AB RB AB RB
Stock 425 414 10700 13.9 14.4 12.0 12.0 274
Upgraded 466 444 13.0 13.3 19.3 15.2

Details

Features
Combat flaps Take-off flaps Landing flaps Air brakes Arrestor gear
X X X X
Limits
Wings (km/h) Gear (km/h) Flaps (km/h) Max Static G
Combat Take-off Landing + -
600 280 N/A N/A N/A ~12 ~6
Optimal velocities (km/h)
Ailerons Rudder Elevators Radiator
< 240 < 220 < 400 > 250
Compressor (RB/SB)
Setting 1
Optimal altitude 100% Engine power WEP Engine power
2,926 m 745 hp 856 hp

Survivability and armour

Crew1 person
Speed of destruction
Structural600 km/h
Gear280 km/h

The Hawk III does not have any armour, and the pilot is exposed. There is one large fuel tank located in front of the pilot.

Modifications and economy

Repair cost
AB300 Sl icon.png
RB96 Sl icon.png
SB183 Sl icon.png
Total cost of modifications5 540 Rp icon.png
550 Sl icon.png
Crew training150 Sl icon.png
Experts1 000 Sl icon.png
Aces20 Ge icon.png
Research Aces145 000 Rp icon.png
Reward for battleAB / RB / SB
Talisman.png 2 × 20 / 20 / 60 % Sl icon.png
Talisman.png 2 × 75 / 75 / 75 % Rp icon.png
Modifications
Flight performance Survivability Weaponry
Mods aerodinamic fuse.png
Fuselage repair
Mods radiator.png
Radiator
Research:
600 Rp icon.png
Cost:
60 Sl icon.png
45 Ge icon.png
Mods compressor.png
Compressor
Research:
660 Rp icon.png
Cost:
65 Sl icon.png
45 Ge icon.png
Mods new engine.png
Engine
Mods aerodinamic wing.png
Wings repair
Mods metanol.png
Engine injection
Research:
960 Rp icon.png
Cost:
95 Sl icon.png
70 Ge icon.png
Mods armor frame.png
Airframe
Mods armor cover.png
Cover
Research:
960 Rp icon.png
Cost:
95 Sl icon.png
70 Ge icon.png
Mods ammo.png
bmg30_belt_pack
Research:
600 Rp icon.png
Cost:
60 Sl icon.png
45 Ge icon.png
Mod arrow 1.png
Mods pilon bomb.png
Mk.41
Research:
660 Rp icon.png
Cost:
65 Sl icon.png
45 Ge icon.png
Mods weapon.png
bmg30_new_gun
Research:
1 100 Rp icon.png
Cost:
110 Sl icon.png
80 Ge icon.png

Armaments

Offensive armament

Ammunition1 200 rounds
Fire rate1 000 shots/min
Main article: Browning (7.62 mm)

The Hawk III is armed with:

  • 2 x 7.62 mm Browning machine guns, nose-mounted (600 rpg = 1,200 total)

The Browning machine guns aren't particularly powerful, even for the low battle rating. The small calibre of the machine guns (one of the smallest in the game) coupled to their low number (only 2) leads to a very poor one-second burst mass. To deal damage effectively, one must learn to lead accurately and track consistently, landing as many bullets on target for as long as possible. Avoid firing a volley of bullets in the target's flight path with minimal lead adjustments and waiting for the target to crash into your line of fire, since this means that the target will get only a few hits. This tactic is more for heavy-punching aircraft like late-war interceptors, while planes with small one-second burst mass like the Hawk III will struggle to kill. Also note that the projectiles have a large circular spread, even with the New machine guns modification installed. Therefore when shooting from ~500 m away, expect a significant drop in hits. Nevertheless, with precise aiming, the MGs are still adequate for destroying the wooden biplanes that the Hawk III encounters. Against aircraft, the universal belt is most effective.

Suspended armament

List of setups (2)
Setup 14 x 100 lb AN-M30A1 bomb
Setup 24 x 100 lb AN-M30A1 bomb
1 x 500 lb AN-M64A1 bomb

The Hawk III can be outfitted with the following ordnance:

  • Without load
  • 4 x 100 lb AN-M30A1 bombs (400 lb total)
  • 1 x 500 lb AN-M64A1 bomb + 4 x 100 lb AN-M30A1 bombs (900 lb total)

The Hawk III is very unique for a biplane fighter, as it has the ability to carry almost 1,000 lbs of bombs. Note that the 4 x 100 lb bombs will drop in 2 pairs, followed by the single 500 lb one. However, note that the full bomb load will impede flight performance quite significantly. Also, it is safer to set a bomb fuse of at least 2 seconds, since the Hawk III is a slow biplane, so dropping the 500 lb bomb when close to the ground will result in the player not being able to zoom out of the blast radius in time and getting destroyed by its own bomb.

Usage in battles

The Hawk III is a very unique, fun aircraft to fly and has a couple of very interesting perks. It is very competitive as a biplane fighter, and also has the ability to carry a very substantial bombload.

Air battles:

In air battles, the plane can be approached in several different ways. The first, and simplest, way is to play the Hawk III as a fighter. Indeed, the aircraft is highly manoeuvrable (can turn competitively with most aircraft except the I-15) and has a good top speed as well. In this style, take off, and climb altitude a bit, and then engage any targets available. However, do not fly too aggressively as the aircraft can get itself into sticky situations where it is being pursued by multiple enemy aircraft. Make sure to fly with teammates, and work together to avoid a quick death. The 7.7 mm Browning guns are rather weak, but more than enough to destroy the fabric and wood aircraft that the Hawk III faces normally. Finally, note that the aircraft's landing gear is manually cranked, and takes up to ~30 seconds to retract/deploy. Keep this in mind, and always deploy landing gear early when preparing to land.

The second, and more interesting, playstyle of the Hawk III is to fly it as a ground attacker. This is particularly interesting because the Hawk the can carry a large bomb load of 900 lbs, split between four 100 lb bombs and one 500 lb bomb. If flying this way, try to avoid engaging in fighter combat, as the bombs will decrease the Hawk's flight performance significantly. As well, the bombs are all of a lower size, meaning that they are best suited for destroying softer targets such as armoured cars and AAA batteries. Finally, note that the 100 lb bombs drop in pairs. This means that, instead of hitting five targets, you will only be able to hit three targets. A tactic to consider is, upon takeoff, fly to the nearest cluster of howitzers, trucks, AAAs, light tanks, or pillboxes. Climb at a shallow ~5 degrees so you can gather up some speed to fly across the map quickly. When arriving at target area you will be around 1 km above the ground which is generally enough for some shallow dive bombing runs. Since the 100 lb bombs drop first in 2 pairs, find some light targets like light tanks or even trucks to deliver the bombs. The 500 lb bomb is better for heavier targets like pillboxes and medium tanks, or even ships. Since the Hawk III is quite slow, you want to aim the bombs slightly higher to make up for their lack of momentum. Once the bombs are out, use your MGs to strafe soft targets. Make sure to constantly scan your surroundings and above for potential enemies. If, luckily, no one comes after you when you finish your strafing runs, climb around the main battle area to gather some altitude and observe the fight to pick a target to engage. If someone does attack you while you are strafing, engage WEP and level out or even dive a little if you have space to gather up enough speed for evasive manoeuvres. When empty loaded, the Hawk III's manoeuvrability is generally on par with other biplanes which allows you to fight back. Its rudder is quite effective, so make sure to utilise it in your manoeuvres. 

Ground battles:

As with the aforementioned ground attack playstyle, the Hawk III is a great complementary aircraft for lower-tier Chinese lineups. The aircraft's great manoeuvrability and good suspended ordnance means that it can be used as a potent early ground attacker. The relatively large bomb load should be used against more clustered targets, to maximize the amount of targets hit in a single strike. Since most tanks around this BR are averagely armoured, the Hawk's 3 bomb drops can grant you at least 3 tank kills if you deliver the bombs accurately. As mentioned before, the Hawk III has poor manoeuvrability when fully loaded, so the time at which you spawn with this aircraft can significantly affect you CAS performance. The best times to spawn in is where there are absolutely no enemy planes in sight, typically in the early stages of a match, though it can happen any time. Or, there are some enemy planes as well as friendly ones. These situations will allow the Hawk to focus on ground targets. The worst situation is when your Hawk is the only aircraft of your team, and the sky is already filled with roaming enemy planes. This will most certainly result in you being chased and downed before you can even drop your bombload. So pick your spawning time wisely, observe the sky before spawning in the Hawk III. 

As you spawn in and arrive above the battlefield, you will usually be around 700-1,000 m high which is enough for some dive bombing. Dive at around 45 degrees towards the target tank. This first bombing run will usually be quite fast since you have enough altitude to start with, and the Hawk III can accelerate up to ~440 km/h. As such, move your cursor slightly closer to the target as the bombs will have a flatter trajectory. Drop the bombs as late as you can for better accuracy, however you must watch the surrounding and pull up in time to avoid crashing. For later bombing runs aim slightly higher as you can be slower, resulting in a curvy trajectory for the bombs. If you see a SPAA firing at you, make sure to never get hit. The Hawk III is extremely fragile, just a few bullets will cause significant damage to your critical components like engine, or tear up the skin. The Hawk has extremely poor damage tolerance, so even if the engine or wings are very slightly damaged, the Hawk III will still lose plenty of lift and airspeed. 

Once the bombs are out, there are 2 options. One is to stay at the battlefield and strafe tanks with your MG or fight incoming enemy planes, until you are destroyed. The second option is only suitable if you think the battle can take quite long to finish: to fly back to base and reload the bombs. Being able to destroy 3 more tanks from above is an attractive option, at the price of wasting at least 5 minutes flying back and forth because the Hawk III is remarkably slow even without bombs, thus losing the chance to help your team in the mean while. The choice depends on you and the battle's situations.

If you bring the Hawk III to higher BR battles where heavier tanks might appear, keep in mind that your bombs can be a game changer, as they can destroy these heavily armoured tanks that your teammates might struggle to penetrate. These heavy vehicles can potentially wipe out half of your team if left undealt with, potentially leading to a defeat. Therefore keep an eye on the killfeed and chat to see if these tough nuts are present. These tanks include but are not limited to Valentine, Matilda, B1, M4A3 (105), Ka-Chi, etc. Prioritise them and preserve your bombs for them, especially the 500 lb one. 

Enemies worth noting:

  • He 112: the He 112 series are the early German monoplane fighters. These type of planes are generally faster than biplanes which can be threatening as they can easily close in or outrun you at will. Without a speed advantage, the Hawk III pilot can choose to fly straight until the He 112 begins to engage, then do evasive manoeuvres. The Hawk III, as a biplane, is way more agile thus your evasive manoeuvres are very likely to dodge their attacks and can bleed their energy. Try luring them into a dogfight instead of just letting yourself getting BnZ'ed by them, once they enter a dogfight try make it into a turnfight. If not, your superior manoeuvrability will still be your biggest advantage in a conventional dogfight. Aim for their engine and cockpit. With their engine damaged they lose the most important speed advantage. You might also get a pilot snipe as they have no armour protection whatsoever.
  • He 100: somewhat similar to the He 112s but this plane is way faster, easily flying at 500+ km/h. But don't let their speed scare you: the faster they are, the smaller their shooting window will be, meaning they will not be able to pound enough bullets at you. They also have a rather weak armament with low one-second burst mass to start with. The tactic remains the same: level fly/shallow dive to gain speed, and perform evasive manoeuvres once they start attacking. If you are experienced or want to try something dangerous, you can purposely expose your 6 o-clock towards them to lure them into pursuing you, then gradually tighten your manoeuvres which will make the engagement into a turnfight. Once they have relinquished the chance to zoom away and start turning with you, they are pretty much sitting ducks. 
  • Ki-27: this is a very dangerous foe. It is faster in dives, level flight, and has better acceleration. It is also extremely manoeuvrable for a monoplane, which, combined with its speed advantage, makes it a formidable opponent. As for the downsides: it has no armour, its airframe is fragile, and its armament is just as weak as yours. Dogfighting with it might result in a tie where both of you try to out-turn each other. Try leading it to your airfield or teammates. If you get the chance to shoot, do not waste it since it may easily slip out of your gunsight. Aim for its engine and pilot to reduce its speed and manoeuvrability. The Ki-27 has a white paint scheme, a monoplane configuration, fixed landing gears, radial engine, and a fuselage & cockpit similar to a Ki-43/44.
  • M13 MGMC/Flakpanzer I: any SPAAs are a threat to the weakly protected Hawk III, but these two are used the most commonly and are indeed more dangerous than others. The M13 MGMC is armed with twin 12.7 mm M2 HMG that have great velocity, trajectory, penetration, and ammo capacity. It will be able to spray red tracer shells for quite a while before needing to reload. 1-3 bullets can deal considerable damage to the Hawk III or even set an inextinguishable fire. The M13 is also armoured around the sides, making it immune to the Hawk III's 7.62 mm MGs, so the only way to destroy it is with your bombs, or strafing it from vertically above to trespass the armour and hit the crews. This also marks it out on the map for your teammates. The Flakpanzer I is somewhat the opposite: smaller belt size, but much greater damage. 1 shell can tear off a wing from the Hawk III. Apart from bombs, the Hawk III can destroy a Flakpanzer I from behind its turret, as the gunner is only protected at the front. Inexperienced SPAA players tend to fire at you from a long range missing all shots, which is a good thing as that deals zero damage and exposes their locations. The real threats are those who conceal themselves by holding back their fire until the unaware Hawk III fly too close. A sudden 2-second burst is enough to cripple the Hawk if not straight up destroying it. If you unfortunately do get ambushed like this, try your best to evade the burst by dodging in all 3 of your control axis and/or descending to treetop level. 

Manual Engine Control

MEC elements
Mixer Pitch Radiator Supercharger Turbocharger
Oil Water Type
Controllable Controllable
Not auto controlled
Not controllable
Not auto controlled
Not controllable
Not auto controlled
Separate Not controllable
1 gear
Not controllable

Pros and cons

Pros:

  • Large payload, good for destroying bases and ground targets in tank RB
  • Good manoeuvrability and speed when unladen
  • Has good low speed handling and low stall speed
  • Retractable gears reduce drag
  • Good manoeuvrability allows the plane to easily get bombs on target

Cons:

  • Armament is rather light and inflicts weak damage
  • Painfully long gear retraction and lowering time (51 seconds for lowering and retracting)

History

The Hawk III, a modification of the US Navy BF2C-1 by Curtiss Aeroplane and Motor Company, addressed issues that was experienced during the latter's service. With a new Wright R-1820-F53 engine Cyclone engine and wooden wings (to fix a vibration issue with the metal wings of the BF2C-1), the Hawk III managed to be more flyable than its preceding design.

With the US Navy's soured experience with the BF2C-1, the Hawk III saw more sales in the export model. Argentina, Thailand, and China bought Hawk IIIs in the late 1930s. China alone bought 102 Hawk III planes from the United States between March 1936 to June 1938.

In the Sino-Japanese War, the Hawk III planes acted as the Chinese front-line fighters against Japanese aircraft. While able to stand against Japanese biplane models, the appearance of monoplanes like the A5M shifted the balance towards the Japanese. As such, the Hawk III was slowly replaced by Soviet I-15 and I-16 fighter planes.

The last surviving Hawk III aircraft resides in Thailand at the Royal Thai Air Force Museum.

Media

Skins
Videos

See also

Related development
Aircraft of comparable role, configuration and era

External links


Curtiss-Wright Corporation
Fighters  BF2C-1
  P-36A · Rasmussen's P-36A · P-36C · P-36G
  P-40C · P-40E-1 · P-40F-10
Bombers  SB2C-1C · SB2C-4
Floatplanes  SOC-1
Experimental  XP-55
Export  H-75A-1 · H-75A-4 · H-81A-2 · ▂P-40E-1 · ␗P-40E-1 · ▄P-40F-5 Lafayette · CW-21 · Hawk III
  ▄SB2C-5
Captured  ▀Hawk H-75A-2

China fighters
British  ␗Gladiator Mk I
French  D.510C
Japanese  ␗A6M2 · ␗Ki-27 otsu · ␗Ki-43-III ko · ␗Ki-44-II hei · ␗Ki-61-I otsu · ␗Ki-84 ko
American  CW-21 · Hawk III · P-66 · ␗P-40E-1 · H-81A-2 · ␗P-43A-1 · ␗P-47D-23-RA · ␗P-47D-30 · ␗P-51D-20 · ␗P-51K
Soviet  ␗I-15bis · ␗I-153 M-62 · ␗I-16 Chung 28 · ␗I-16 type 5 · ␗I-16 type 10 · ␗I-16 type 17 · ␗La-11 · ␗La-9

China premium aircraft
Fighters  ␗A6M2 · D.510C · H-81A-2 · Hawk III · ␗Ki-45 hei/tei · ␗Ki-84 ko
Jet fighters  Shenyang F-5 · J-7D
Strike aircraft  A-5C · ␗F-84G-31-RE