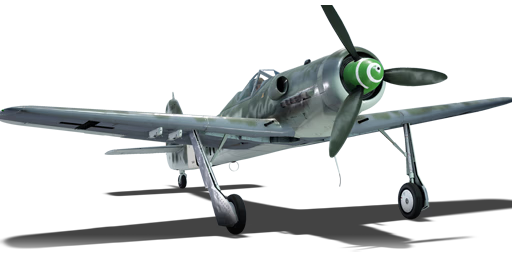
Fw 190 D-13

From War Thunder Wiki
Jump to: navigation, search
This page is about the German fighter Fw 190 D-13. For other versions, see Fw 190 (Family).
Fw 190 D-13
fw-190d-13.png
GarageImage Fw 190 D-13.jpg
Fw 190 D-13
AB RB SB
5.7 5.0 5.3
Show in game
STORE

Description

The Fw 190 D-13 is a premium gift rank IV German fighter with a battle rating of 5.7 (AB), 5.0 (RB), and 5.3 (SB). It has been in the game since the start of the Open Beta Test prior to Update 1.27. The Fw 190 D-13 is very similar to the Fw 190 D-12 in the German tech tree, with the only difference being the 20 mm MG 151 "Motorkanone" firing through the centre of the propeller, rather than the 30 mm Mk 108 cannon on the D-12.

As the final in-game variant of the Fw 190 series (excluding the later Ta 152 H-1) the Fw 190 D-13's main attributes include a very high top speed, heavy armament with a large ammunition pool, a fantastic engine built for high-altitude performance and it features hydraulic ailerons for an amazing high-speed roll rate. It is one of the only prop driven aircraft able to reach speeds exceeding 450 mph (725 km/h) while still retaining some ability to manoeuvre. This being said, the Fw 190 D-13 bears a heavy reliance on speed and engine power to be successful. Although constructed by the Germans during World War Two to be a bomber interceptor, the D-13 is more than capable of downing any aircraft it faces, even some first-generation jets such as the Meteor F. Mk.3 and the F-80A-5.

The Fw 190 D-13 is, however, plagued by some downfalls; namely, its ability to recover from a dive and its ability (or lack thereof) to turn fight. Because of these deficits, the Fw 190 D-13 is best utilized as an "energy fighter" capable of swift and deadly dive attacks in which no harm is put on the pilot. This is precisely how to effectively fly the D-13, as when caught in a sticky situation it can be difficult to evade potential assailants, especially Spitfires.

One of the most known abilities of the Fw 190 series is their ability to out roll enemies such as the Spitfire that "lock up" at higher speeds. If attacked from above and if the enemy is at a higher speed than the D-13, it is possible to perform a series of rolls called a "scissors". The goal of this manoeuvre is to both avoid the enemy's guns by rolling out of the way as well as allowing that enemy to overshoot, resulting in the D-13 pilot tailing the pursuer. Although difficult, manoeuvres such as these can turn the tables in a one-on-one dogfight and ensure survival.

The D-13 variant can be flown in a versatile fashion, as was already mentioned. With the destructive power of the Minengeschoß rounds, no bomber or fighter in the game can survive more than 50 cannon hits. Against fighters, the MG 151 cannons wielded by the D-13 and its predecessors get the job done, albeit it can be worse to aim them than the Hispanos.

Due to the extreme reliability of the MG 151 cannon attempt every shot possible. These cannons can often cut off an enemy's wing with a single shell. No matter which aircraft wielding the MG 151 cannon, a few successful hits with the Minengeschoß round will cause critical damage. Attempt every deflection shot possible, and if the rounds are not hitting the target pull harder. It is better to have rounds fly in front of an enemy plane than miles behind them. In order to pull ahead, make good use of combat/landing flaps. However, remember not to activate them at high speeds as they will rip off causing a momentary loss of control.

The role of the "Bomb Dora" can be done by any Fw 190 D. A wide array of payload options are available, but take a long time to research. None of them is powerful enough to destroy strategic bomb zones. In addition, the 50 kg bombs can only be dropped in pairs in RB & SB. In combination with the lack of an aiming reticle, it is recommended to only carry a main payload consisting of larger bombs. Bridges, heavy tanks, and heavy pillboxes should be the primary target for the 500 kg bomb. The other targets can be destroyed with ease by allied attackers.

General info

Flight performance

Max speed
at 9 700 m725 km/h
Turn time21 s
Max altitude12 000 m
EngineJunkers Jumo-213E1
TypeInline
Cooling systemWater
Take-off weight6 t
Characteristics Max Speed
(km/h at 9,700 m)
Max altitude
(metres)
Turn time
(seconds)
Rate of climb
(metres/second)
Take-off run
(metres)
AB RB AB RB AB RB
Stock 696 675 12000 22.8 23.7 12.9 12.9 317
Upgraded 761 725 20.4 21.6 22.4 17.1

Details

Features
Combat flaps Take-off flaps Landing flaps Air brakes Arrestor gear
X X X
Limits
Wings (km/h) Gear (km/h) Flaps (km/h) Max Static G
Combat Take-off Landing + -
912 310 N/A 700 310 ~12 ~6
Optimal velocities (km/h)
Ailerons Rudder Elevators Radiator
< 420 < 300 < 550 > 320
Compressor (RB/SB)
Setting 1
Optimal altitude 100% Engine power WEP Engine power
2,600 m 1,750 hp 2,074 hp
Setting 2
Optimal altitude 100% Engine power WEP Engine power
6,800 m 1,540 hp 1,825 hp
Setting 3
Optimal altitude 100% Engine power WEP Engine power
9,700 m 1,230 hp 1,458 hp

Survivability and armour

Crew1 person
Speed of destruction
Structural912 km/h
Gear310 km/h
  • 5 mm Steel - Fuel tank plate
  • 8 mm Steel - Under fuel tank plate
  • 6 mm Steel - Pilot seat
  • 8 mm Steel - Pilot seat
  • 12 mm Steel - Headrest
  • 3 mm Steel - Engine cowling
  • 57 mm Bulletproof glass

Modifications and economy

Repair cost
AB1 933 Sl icon.png
RB4 413 Sl icon.png
SB6 215 Sl icon.png
Crew training10 000 Sl icon.png
Experts320 000 Sl icon.png
Aces1 100 Ge icon.png
Research Aces1 050 000 Rp icon.png
Reward for battleAB / RB / SB
Talisman.png 2 × 100 / 230 / 480 % Sl icon.png
Talisman.png 2 × 172 / 172 / 172 % Rp icon.png
Modifications
Flight performance Survivability Weaponry
Mods aerodinamic fuse.png
Fuselage repair
Mods radiator.png
Radiator
Mods armor frame.png
Airframe
Mods compressor.png
Compressor
Mods aerodinamic wing.png
Wings repair
Mods new engine.png
Engine
Mods armor cover.png
Cover
Mods metanol.png
Engine injection
Mods pilon bomb.png
SC 50
Mod arrow 0.png
Mods napalm fire bomb.png
Flamm C 250
Mod arrow 0.png
Mods ammo.png
mg15120_belt_pack
Mod arrow 1.png
Mods pilon bomb.png
SC 50
Mod arrow 0.png
Mods napalm fire bomb.png
Flamm C 500
Mods pilon bomb.png
SC 250
Mod arrow 0.png
Mods weapon.png
mg15120_new_gun
Mods pilon bomb.png
SC 500

Armaments

Offensive armament

Main article: MG 151 (20 mm)

The Fw 190 D-13 is armed with:

  • 1 x 20 mm MG 151 cannon, nose-mounted (250 rpg)
  • 2 x 20 mm MG 151 cannons, wing-mounted (250 rpg = 500 total)

The three cannons are arranged with one in each wing and the third in the propeller shaft, firing through the propeller hub. Each are armed with the same amount of ammunition, which means that all guns will fire together until empty.

Suspended armament

The Fw 190 D-13 can be outfitted with the following ordnance:

1 2 3
Hardpoints Fw 190 D-9.png
50 kg SC50JA bombs 2 4 2
250 kg SC250JA bombs 1
500 kg SC500K bombs 1
Flam C 250 incendiary bombs 1
Flam C 500 incendiary bombs 1
Default weapon presets
  • Without load
  • 4 x 50 kg SC50JA bombs (200 kg total)
  • 8 x 50 kg SC50JA bombs (400 kg total)
  • 1 x 250 kg SC250JA bomb (250 kg total)
  • 1 x 500 kg SC500K bomb (500 kg total)
  • 1 x Flam C 250 incendiary bomb
  • 1 x Flam C 500 incendiary bomb

Usage in battles

The Fw 190 D-13's instrument panel.

Tactics

Generally, upon entering a match the D-13 is best utilized as a "side climber". Instead of climbing towards the enemy, take a different route. Once you reach a reasonable altitude, turn back towards the fray. By doing this, you end up arriving at the fight above both your teammates and your enemies, which is very helpful. Although this method takes more time, you can not only dive on unsuspecting enemies but you can also help other pilots on your team. If a teammate looks like he is having trouble shaking an enemy or pulling the lead, you can swoop in and help out.

In Realistic Battles, it is very important to have situational awareness while using D-13. Once at a good altitude (7-8,000 m) you can consider engaging the enemy. Ideally, this aircraft should never get into low altitude and low-speed engagements. Make use of the D-13's good climbing abilities. Instead of trying to drag enemies lower to the ground, keep them high and with low energy. You can use a very effective energy trap manoeuvre considering this aircraft's playstyle. To perform this manoeuvre, you must first have a higher energy state than the enemy and get them to climb after you. Once that is done, you can climb, stall them out, dive down, and use your powerful MG 21 cannons to shoot them down. It is only effective when the enemy is lower and has less energy than you. This becomes more and more possible the higher the altitudes go, especially when facing off planes built for low-altitude combat. Many of the enemy aircraft are not designed for fighting at high altitudes. If found at a low altitude and in a vulnerable state, use cloud cover to your advantage. Even if an enemy is within metres behind you, it is possible to lose them in thick clouds.

Another facet of the D-13's success lies in head-on attacks. Utilize the "fake out" - this entails lining the plane up with the enemy's and firing the cannons at a distance starting at around 1.0 mile or 1.60 km away. Unless the enemy plane is using stealth belts, you can judge when to pull off by watching for their tracers. By doing this, it becomes possible to completely avoid enemy fire while dishing out a deadly barrage of shells at a long range.

In order to successfully down a plane using this method, it is recommended to have the "20 mm belts" module unlocked for your aircraft. The Minengeschoß belt for MG 151 cannons is considered by many to be the best aircraft belt in the game. Unlike other cannon shells, the Minengeschoß is a thin-walled shell comprised of a high amount of HE filler. Instead of filling a metal round with high explosive, the Germans built an ammunition round out of HE and applied a thin layer of metal around it.

The main points:

  • Use Boom & Zoom tactics
  • Attempt every shot possible
  • Never turn fight with any plane, unless you are 100% sure, that enemy is in much lower energy state, and you can turn inside him, or when you are baiting for your teammates.
  • Always have an altitude advantage
  • Attempt every SAFE head on attack
  • Utilize "zoom climbing"

Manual Engine Control

MEC elements
Mixer Pitch Radiator Supercharger Turbocharger
Oil Water Type
Not controllable Controllable
Auto control available
Not controllable
Not auto controlled
Controllable
Not auto controlled
Combined Not controllable
3 gears
Not controllable

Pros and cons

Pros:

  • Excellent energy retention
  • Excellent dive acceleration
  • Great speed on both low and high altitudes
  • Very high top speed in a dive
  • Great high-speed manoeuvrability
  • Impressive high altitude performance
  • Great aileron control and roll rate especially at higher speeds
  • Heavy-hitting armament
  • High ammunition supply
  • Heavily armoured, especially around the fuel tanks
  • Good climb rate
  • Water injection (MW50) - WEP lasts at least 30 minutes
  • Flaps have a very high rip speed

Cons:

  • Awful turn rate at low speeds
  • Enormous turn circle
  • Any engine damage whatsoever reduces the ability to dogfight and gain speed by a high degree
  • Poor elevator authority at high speeds (can be difficult to pull out of a dive)

History


Archive of the in-game description

Focke-Wulf Fw 190 D-13 "Dora" single-engine high-altitude fighter

The Fw 190 D-13 was the last production variant in the family of Fw 190D aircraft with Junkers Jumo 213 engines. The first two prototypes were converted from production Fw 190 A-8s in October and November 1944. Both machines differed from the Fw 190 D-12 only in their armament. In the V of the Jumo 213E engine, a 20 mm Mauser MG 151/20 cannon with 220 rounds was mounted instead of the 30 mm Rheinmetall-Borsig MK 108 cannon. There were also two 20 mm synchronized Mauser MG.151/20 cannons in the wing roots.

Later, the Jumo 213 F-1 engine was installed on these planes, equipped with a 9-8213 H supercharger and an MW 50 injection system. Since the plan was to use aircraft from the D-13 series as high-altitude fighters, both prototypes were equipped with airtight cockpits.

The Fw 190 D-13 was not launched into full-scale production until March 1945. Planes were produced in the Fw 190 D-13/R11 variant, an all-weather interceptor fighter, and equipped with a PKS 12 automatic pilot, a FuG 125 Hermine radio system, and a heated cockpit canopy windscreen.

About 30 of these aircraft were built by the end of the war, and 20 were delivered to the JG 26 Fighter Wing.

The Fw 190 D-13/R5 variant was supposed to be equipped with a TSA-2D sight and a ventral ETC 504 rack and underwing ETC 71 racks for 50 kg SC 50 bombs. German forces planned for Fw 190 D-13/R5s to be subsequently armed with two Ruhrstahl X-4 air-to-air missiles.

Distinctive features of the Fw 190D included a rational layout of the engine components and the engine-propeller power plant and a well-designed automatic cooler temperature regulator. A well-tested fire control system was developed for the aircraft. When all gun positions fired simultaneously, aim was stable, and the pilot felt virtually no recoil. Extensive electrification of the equipment simplified the pilot's work.

These final German fighters, the Fw 190D and the Ta 152, were the swan song of the era of piston-engined machines.


Media

Skins
Videos

See also

Links to the articles on the War Thunder Wiki that you think will be useful for the reader, for example:

  • reference to the series of the aircraft;
  • links to approximate analogues of other nations and research trees.

External links


Focke-Wulf Aircraft Corporation (Focke-Wulf Flugzeugbau Aktiengesellschaft)
Fighters  Fw 190 A-1 · Fw 190 A-4 · Fw 190 A-5 · Fw 190 A-5/U2 · Fw 190 A-5/U12 · Fw 190 A-5/U14 · Fw 190 A-8
  Fw 190 C
  Fw 190 D-9 · Fw 190 D-12 · Fw 190 D-13
  Fw 190 F-8
  Ta 152 C-3* · Ta 152 H-1* · Ta 154 A-1*
Bombers  Fw 189 A-1 · Fw 200 C-1
Export  ▅Fw 190 A-5
Captured  ▃Fw 190 A-8 · ▂Fw 190 D-9
  * In 1944, the Germany Air Ministry changed new fighter aircraft designation to that of the chief designer. Kurt Tank was the chief designer at Focke-Wulf and later aircraft he designed were given the prefix of Ta.

Germany fighters
Heinkel 
He 51  He 51 A-1 · He 51 B-1 · He 51 B-2/H · He 51 C-1 · He 51 C-1/L
He 100  He 100 D-1
He 112  He 112 A-0 · He 112 B-0 · He 112 B-1/U2 · He 112 B-2/U2 · He 112 V-5
Messerschmitt 
Bf 109 (Jumo)  Flegel's Bf 109 A · Bf 109 B-1 · Bf 109 C-1
Bf 109 (DB-601)  Bf 109 E-1 · Bf 109 E-3 · Bf 109 E-4 · Bf 109 E-7/U2 · Bf 109 F-1 · Bf 109 F-2 · Bf 109 F-4 · Bf 109 F-4/trop
Bf 109 (DB-605)  Bf 109 G-2/trop · Bf 109 G-2 · Bf 109 G-6 · Bf 109 G-10 · Bf 109 G-14 · Bf 109 K-4
Focke-Wulf 
Fw 190 (early)  Fw 190 A-1 · Fw 190 A-4 · Fw 190 A-5 · Fw 190 A-5 · Fw 190 A-5/U2 · Fw 190 A-5/U14 · Fw 190 A-8 · Fw 190 C
Fw 190 (late)  Fw 190 D-9 · Fw 190 D-12 · Fw 190 D-13
Ta 152  Ta 152 C-3 · Ta 152 H-1
Blohm & Voss 
BV 155  BV 155 B-1
  Foreign:
USA  ▀P-47D-16-RE · ▀P-47D
USSR  ▀La-5FN · ▀Yak-1B
Britain  ▀Tempest Mk V
Italy  ▀CR.42 · ▀Marcolin's C.R.42 CN · ▀G.50 serie 2 · ▀G.50 AS serie 7 · ▀C. 200 serie 3 · ▀C. 200 serie 7 · ▀C. 202
Finland  ▀Hawk H-75A-2

Germany premium aircraft
Fighters  He 51 B-2/H · BV 155 B-1
He 112  He 112 B-1/U2 · He 112 B-2/U2
Bf 109  Flegel's Bf 109 A · Bf 109 E-7/U2 · Bf 109 G-2
Fw 190  Fw 190 A-5/U14 · Fw 190 C · Fw 190 D-13
Captured  ▀Marcolin's C.R.42 CN · ▀Hawk H-75A-2 · ▀Yak-1B · ▀La-5FN · ▀P-47D-16-RE · ▀P-47D · ▀Tempest Mk V
Twin-engine fighters  Bf 109 Z-1 · Ju 388 J · Ta 154 A-1
Jet fighters  ◄Sea Hawk Mk.100 · ◄G.91 R/4 · ◄MiG-21 SPS-K · ◊MiG-21 "Lazur-M"
Strike aircraft  Hs 129 B-2 (Romania) · ▀IL-2 (1942) · Bf 110 C-6 · Do 335 B-2 · He 219 A-7 · ◄Tornado IDS WTD61
Bombers  Ar 196 A-3 · BV 238 · Fw 189 A-1 · Ju 87 R-2 Libya · Ju 288 C · ▀Wellington Mk Ic