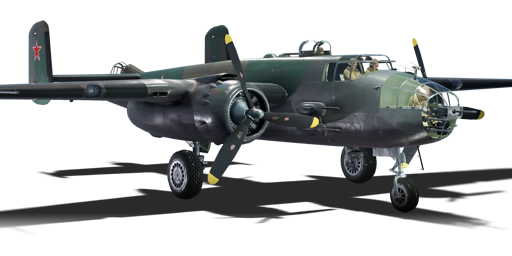
B-25J-30 (USSR)

From War Thunder Wiki
Jump to: navigation, search
Rank 7 USA
F-5C Pack
This page is about the premium bomber B-25J-30 (USSR). For other versions, see B-25 (Family).
▂B-25J-30
b_25j_30_vvs_ussr.png
GarageImage B-25J-30 (USSR).jpg
▂B-25J-30
Purchase:1 450 Specs-Card-Eagle.png
Show in game

Description

The ▂B-25J-30 Mitchell is a premium rank III Soviet bomber with a battle rating of 4.0 (AB/RB) and 4.3 (SB). It was introduced in Update 1.35.

The B-25J-30 is a lend-lease vehicle for the Soviets and is essentially identical in-game to the USAAF B-25J-20. The minor differences are the reinforced steel pilot seats and extra armour for the dorsal gunner.

The design of the B-25 was the result of years of work and failed bids to win contracts with the United States Army Air Corps (USAAC). Initially designed to meet requirements for a payload of 1,200 lb (540 kg), a range of 1,200 mi (1,900 km) and flying at speeds faster than 200 mph (320 km/h), prototypes were built, tested and refined. Although the original XB-21 and NA-40 never materialized into a production aircraft, requirements from the USAAC came out in March of 1939 for a medium bomber carrying a payload of 2,400 lb (1,100 kg) over 1,200 mi (1,900 km) at speeds around 300 mph (480 km/h), North American modified their design of NA-40 and developed the NA-62 which went into prototype testing as the YB-25 and then ordered into production as the B-25.

The B-25 turned out to be the archetype of the medium bomber, carrying upwards of 3,000 lb (1,361 kg) of bombs and could fly at speeds up to 340 mph (547 km/h). This twin-engine bomber was fast, it could carry a large payload for its size and had several defensive turrets and gunner stations at which it could defend itself from almost any angle. To increase its versatility, several models had forward-facing fixed machine guns fitted into the nose and the cheeks of the aircraft. Later models opted to removed the glazed nose and bombardier/nose-gunner station and outfit more machine guns and even a 75 mm autocannon for strafing ground targets and especially ships. This medium bomber at times acted more like a heavy attacker opting for low-level flights which would skim treetops and the ocean to sneak up on unwary targets. It was not uncommon for B-25s to fly just above the mast/smokestack height of enemy ships when attacking.

As later models moved from the dedicated bomber position and morphed into more of an attacker role, bomb payloads were reduced to allow for more armour around the cockpit and more offensive weapons and ammunition to fill the attacker mode it took on, especially under the command of U.S. Marine Corps squadrons. With more than 10,000 B-25 aircraft variants built, they saw action in all theatres of war and were even subject to part of the lend-lease program which China and the USSR benefitted from. So versatile was this aircraft that a flight of them were specifically outfitted and their crews trained to take off from an aircraft carrier and bomb mainland Japan in a daring raid. Impressive for an aircraft not meant to take off from an aircraft carrier.

The B-25 is a fantastic bomber, attacker or both and will suit many different pilots and their different approaches to the battlefields found in War Thunder. The tail gunner has been known to set many fighters alight with their dual .50 calibre machine guns and help to prolong the life of this bomber to allow the pilot to make it to their target whether it is to bomb it or strafe it.

General info

Flight performance

Max speed
at 3 049 m444 km/h
Turn time31 s
Max altitude7 500 m
Engine2 х Wright R-2600-29
TypeRadial
Cooling systemAir
Take-off weight16 t
Characteristics Max Speed
(km/h at 3,049 m)
Max altitude
(metres)
Turn time
(seconds)
Rate of climb
(metres/second)
Take-off run
(metres)
AB RB AB RB AB RB
Stock 423 410 7500 32.3 33.6 5.4 5.4 750
Upgraded 468 444 29.8 31.0 10.5 7.7

Details

Features
Combat flaps Take-off flaps Landing flaps Air brakes Arrestor gear
X X
Limits
Wings (km/h) Gear (km/h) Flaps (km/h) Max Static G
Combat Take-off Landing + -
591 294 382 320 293 ~5 ~2
Optimal velocities (km/h)
Ailerons Rudder Elevators Radiator
< 270 < 320 < 350 > 320

Survivability and armour

Crew7 people
Speed of destruction
Structural0 km/h
Gear294 km/h
  • 10 mm steel - front, sides & rear of the cockpit
  • 10 mm steel - the rim of pilot seats
  • 8 mm steel - below nose gunner
  • 8 mm steel - pilot seats
  • 9.5 mm - bulkhead after of dorsal turret
  • 6.35 mm steel - aft of waist gunners
  • 9.5 mm steel - tail turret
  • 38 mm Bulletproof glass - tail turret

Rugged, sturdy, though, the B-25 is all of those things. Featuring crew armour protection that outclasses the B-17 Flying Fortress in a handier, smaller design, the B-25J is a tough nut to crack and even harder to devoid of the crew. Calibres above 20 mm are a must for a quick kill, otherwise, the B-25 will repay in kind. Gunner positions throughout the bomber effectively cover the front, sides, top and rear of the aircraft with just the underbelly left relatively unprotected to fighters rising in a power climb. The rear gunner with his dual .50 calibre machine guns is especially devastating when they are trained on a tailing enemy fighter.

The two Wright R-2600 air-cooled radial engines are themself hard to destroy and with dropped payload, the B-25J can keep flying on just a single damaged engine, denying under armed fighters the ability to lethally cripple it. Yet this aircraft does have an Achilles heel, its fuel tanks. While present in all planes, the armour, crew and bomb bay take up all the necessary space within the fuselage, while leaving only space in the wings to house the fuel tanks. A common downfall of this aircraft is the structural failure of the wing spar due to wing fires of the fuel tanks.

Modifications and economy

Repair cost
AB824 Sl icon.png
RB2 198 Sl icon.png
SB2 944 Sl icon.png
Crew training10 000 Sl icon.png
Experts115 000 Sl icon.png
Aces500 Ge icon.png
Research Aces640 000 Rp icon.png
Reward for battleAB / RB / SB
Talisman.png 2 × 80 / 190 / 310 % Sl icon.png
Talisman.png 2 × 142 / 142 / 142 % Rp icon.png
Modifications
Flight performance Survivability Weaponry
Mods aerodinamic fuse.png
Fuselage repair
Mods radiator.png
Radiator
Mods armor frame.png
Airframe
Mods compressor.png
Compressor
Mods aerodinamic wing.png
Wings repair
Mods new engine.png
Engine
Mods armor cover.png
Cover
Mods metanol.png
Engine injection
Mods engine extinguisher.png
EFS
Mods ammo.png
bmg50_belt_pack
Mod arrow 0.png
Mods pilon bomb.png
FAB-100
Mod arrow 0.png
Mods weapon.png
bmg50_new_gun
Mods pilon bomb.png
FAB-250
Mod arrow 1.png
Mods ammo.png
bmg50_turret_belt_pack
Mod arrow 0.png
Mods turret gun.png
bmg50_turret_new_gun
Mods pilon bomb.png
FAB-500

Armaments

Offensive armament

Ammunition2 400 rounds
Fire rate750 shots/min
Main article: M2 Browning (12.7 mm)

The B-25J-30 (USSR) is armed with:

  • 2 x 12.7 mm Browning M2 machine guns, nose-mounted (400 rpg = 800 total)
  • 4 x 12.7 mm Browning M2 machine guns, cheek-mounted (400 rpg = 1,600 total)

Suspended armament

List of setups (8)
Setup 112 x 50 kg FAB-50sv (forged) bomb
Setup 28 x 100 kg FAB-100sv (forged) bomb
Setup 38 x 50 kg FAB-50sv (forged) bomb
4 x 100 kg FAB-100sv (forged) bomb
Setup 48 x 50 kg FAB-50sv (forged) bomb
2 x 250 kg FAB-250sv bomb
Setup 58 x 250 kg FAB-250sv bomb
Setup 69 x 50 kg FAB-50sv (forged) bomb
1 x 500 kg FAB-500sv (welded) bomb
Setup 73 x 500 kg FAB-500sv (welded) bomb
Setup 82 x 500 kg FAB-500sv (welded) bomb
4 x 250 kg FAB-250sv bomb

The B-25J-30 (USSR) can be outfitted with the following ordnance:

  • 12 x 50 kg FAB-50sv bombs (600 kg total)
  • 8 x 100 kg FAB-100sv bombs (800 kg total)
  • 4 x 100 kg FAB-100sv bombs + 8 x 50 kg FAB-50sv bombs (800 kg total)
  • 2 x 250 kg FAB-250sv bombs + 8 x 50 kg FAB-50sv bombs (900 kg total)
  • 4 x 250 kg FAB-250sv bombs (1,000 kg total)
  • 1 x 500 kg FAB-500sv bomb + 10 x 50 kg FAB-50sv bombs (1,000 kg total)
  • 3 x 500 kg FAB-500sv bombs (1,500 kg total)

Defensive armament

Ammunition300 rounds
Fire rate750 shots/min
Ammunition800 rounds
Fire rate750 shots/min
Ammunition250 rounds
Fire rate750 shots/min
Ammunition1200 rounds
Fire rate750 shots/min
Main article: M2 Browning (12.7 mm)

The B-25J-30 (USSR) is defended by:

  • 1 x 12.7 mm M2 Browning machine gun, nose turret (300 rpg)
  • 2 x 12.7 mm M2 Browning machine guns, dorsal turret (400 rpg = 800 total)
  • 1 x 12.7 mm M2 Browning machine gun, 2 x beam turrets (250 rpg)
  • 2 x 12.7 mm M2 Browning machine guns, tail turret (600 rpg = 1,200 total)

Usage in battles

Realistic:

In RB battles, the most efficient yet dangerous way of earning RP with the B-25 is to first dive-bomb a base at low altitude, then strafe soft ground targets or fend off incoming fighters.

For such playstyle, it is best to choose the 3 x 500 kg bombs loadout to destroy a base in one go. Universal belt is great for the offensive and defensive guns, and their convergence is up to you. At the start of the match, choose the nearest base from you and tag it on the map, this way other bombers are not likely to fight for that base. Now, with WEP, directly dive at the front edge of the base. The B-25 has a reasonably good dive acceleration and can soon dive at more than 500 km/h. However, keep watching the air speed as the B-25 will experience severe lock-up at more than 500 km/h and will rip at 570 km/h. The fastest way to get to the base is to maintain air speed around 550 km/h. While on your way, you can have a look at what ground targets are near that base. Make sure your altitude is well below 500 m when approaching the base. Flying this low can prevent the opponents from attacking from below, which minimises the lack of belly gunners of the B-25. Also, most fighters tend to chase after low-flying bombers, so if you successfully lured some enemies into chasing you, you have already done a great job for the friendly fighters, as they now have altitude advantage over the ones at your tail.

Once the base is near, level out and aim at it with the bombsight. Drop all 3 bombs at the center of the base, and immediately turn towards the nearest ground targets. Your priority should be soft targets like trucks, AA vehicles and artilleries, since they will be destroyed with a short burst of your 6x .50 cals. If you are lucky and found a long convoy of trucks, you will get plenty of RP out of it.

While strafing, you must constantly look around, above and on the minimap for any potential threats. If an enemy fighter dives on you, drop your altitude to tree-top level at once, this way the fighter is forced to face your tail guns and turrets. Use the gunner view to fire at it, but remember, leading the target correctly requires lots of practice. For the enemy fighter, there will always be 2-5 .50 cals spraying bullets at it, which is quite deadly for Japanese fighters like the A6M2/M3. Sometimes it only requires a single bullet to set those fragile fighters on fire, or to damage their large radial engines or coolers. However, the B-25 is equally likely to be set aflame or lose its tail very quickly. Once on fire there is nothing you can do except keep spraying bullets until you are destroyed.

Enemies worth noting:

  • Fw 190 A-5: The Fw 190 is armed with 4 x 20 mm cannons and 2 x 7.92 mm MGs, which are very destructive and have plenty of ammo, allowing them to easily critically damage the B-25 in a burst. The plane itself is fairly well armoured, especially the thick, sloped windscreen protecting the pilot. Therefore the deadly firepower and good protection make the Fw 190 a great threat to the B-25. When a Fw 190 is tailing the B-25, concentrate your fire on its big radial engine for better chance of crippling it. If you can, try to fly towards the higher-flying teammates to lure the Fw 190 into an altitude disadvantage.
  • A6M2 / M3: These fighters are well known for their manoeuvrability and climb rate. However when they are at your 6, their manoeuvrability is no longer an advantage as they have to constantly chase after you, making themselves a great target. The Zeros are poorly protected with a high chance of being set on fire, and their 20 mm cannons lack the damage to effectively hurt the B-25. When dealing with them, again, aim at their engine or even the unprotected cockpit for a pilot snipe.

Manual Engine Control

MEC elements
Mixer Pitch Radiator Supercharger Turbocharger
Oil Water Type
Controllable Controllable
Not auto controlled
Not controllable
Not auto controlled
Controllable
Auto control available
Separate Controllable
2 gears
Not controllable

Pros and cons

Pros:

  • Very effective front-facing armament of 6 x 12.7 mm machine for aerial attack or ground strafing
  • Durable airframe which can take a beating
  • Heavy defensive armament on both left and rights sides and especially the tail gunner
  • Can provide initial cover for other bombers until fighters reach their altitude
  • Can be used as a tactical bomber, strategic bomber or as an attacker
  • Able to land on an aircraft carrier
  • Good dive speed

Cons:

  • The belly of the aircraft lacks any defence
  • Poor climb rate and energy retention
  • Less effective as a dogfighter due to its size, however, can perform Boom & Zoom without too much manoeuvring
  • Less effective as a high-altitude bomber (accuracy), better for mid to low altitude bombing
  • The elevator is easily shot off, the plane can still be controlled using flaps and adjusting engine power

History


Archive of the in-game description

North American B-25J-30 Mitchell twin-engine medium bomber/ground-attack aircraft

New armored pilot seats appeared in the B-25J-25 series. Also, the wing leading edge was reinforced. Beginning with machine No. 44-30111, additional armor was fitted to the upper fuselage to prevent the turret-mounted machine guns from inadvertently hitting the bomber.

From aircraft No. 44-30309 on, the Americans provided for the mounting of chemical spray tanks, similar to the Soviet VAPs, on external bomb racks.

The B-25J-30 had T-64 launchers for unguided HVAR missiles installed under the wing panels. The mechanical bomb hoist was replaced with an electric one. The gunsights were upgraded again, and a new high-precision Norden N-9B bombsight was mounted on the aircraft, beginning with No. 44-86793.

Provisions were made for carrying new guided glide bombs from plane No. 44-86692 on. The work to equip the aircraft with such bombs had begun back in 1943. GT-1 glide bombs were actually torpedoes with wings and tail fins. In July 1945, they were used to strike ships at the Japanese ports of Sasebo and Nagasaki. In Sasebo, they managed to damage and set fire to two vessels. The third bomb did not hit its target but dropped on the harbour works.

Although the B-25 had a good flight range, sometimes it was not sufficient, given the size of the Pacific Ocean Theatre. Fuel quantity had to be increased, so B-25s were modified on front-line airfields. Various additional tanks, removed from aircraft of other types, were mounted in the fuselage near the radio set.

A total of 4,318 B-25J aircraft were delivered. 72 more bombers were practically ready when their production was discontinued. Some of those machines were nevertheless completed later. 800 B-25Js of the total number were assembled directly as the ground-attack aircraft version. In addition, North American produced so-called conversion kits, which allowed the aircraft to be quickly converted on a front-line airfield. Thus, the real number of machines flying as the ground-attack aircraft version significantly exceeded the original eight hundred.


Media

Skins

See also

Related development
Aircraft of comparable role, configuration and era

External links


North American Aviation
Fighters 
P-51A  P-51 · P-51A
P-51C  P-51C-10
P-51D  P-51D-5 · P-51D-10 · P-51D-20-NA · P-51D-30
P-51H  P-51H-5-NA
Twin-engine fighters  F-82E
Jet fighters  F-86A-5 · F-86F-2 · F-86F-25 · F-86F-35 · F-100D
Strike aircraft  A-36 · PBJ-1H · PBJ-1J
  FJ-4B · FJ-4B VMF-232
Bombers  B-25J-1 · B-25J-20
Export/Licence  ▂B-25J-30 · ␗B-25J-30
  ▄Mustang Mk IA · F-6C-10-NA · ␗P-51C-11-NT · ␗P-51D-20 · J26 David · J26 · P-51D-20-NA · ␗P-51K
  F-86F-30 ▅ · ␗F-86F-30 · F-86F-40 ▅ · F-86F-40 JASDF▅ · ␗F-86F-40
  ◄F-86K · ▄F-86K (Italy) · ▄F-86K (France)
  ␗F-100A · ▄F-100D · ␗F-100F
Captured  ▅P-51C-11-NT
  Canadair Limited license-built the F-86 as the CL-13 for use in Canada and export to Europe.
  Fiat license-built the F-86K for the Italian Air Force though another 120 NAA built F-86Ks were also sold to the Italians.
See Also  Mitsubishi Heavy Industries · Canadair Limited · Fiat Aviation

USSR bombers
SB and Ar  SB 2M-100 · SB 2M-103 · SB 2M-103 MV-3 · SB 2M-103U · SB 2M-103U MV-3 · SB 2M-105 · Ar-2
Yer-2 (petrol)  Yer-2 (M-105) · Yer-2 (M-105) TAT · Yer-2 (M-105R) TAT · Yer-2 (M-105R) LU
Yer-2 (diesel)  Yer-2 (ACh-30B) (e) · Yer-2 (ACh-30B) (l)
Tu  Tu-2 · Tu-2S · Tu-2S-44 · Tu-2S-59 · Tu-4
Pe  Pe-2-1 · Pe-2-31 · Pe-2-83 · Pe-2-110 · Pe-2-205 · Pe-2-359 · Pe-8
IL  DB-3B · IL-4
Po  Po-2 · Po-2M
Other  MBR-2-M-34 · TB-3M-17-32 · Yak-4 · Be-6
Lend-Lease  ▂PBY-5A Catalina · ▂Hampden TB Mk I · ▂A-20G-30 · ▂B-25J-30

USSR premium aircraft
Fighters  Krasnolutsky's I-15bis · I-16 type 28 · Zhukovsky's I-153-M62 · I-153P · I-180S · I-301 · ITP (M-1)
  LaGG-3-4 · LaGG-3-23 · LaGG-3-34 · Dolgushin's La-7 · La-11
  Eremin's Yak-3(e) · Yak-3 (VK-107) · Yak-3T · Golovachev's Yak-9M
  ▂P-39K-1 · ▂Pokryshkin's P-39N-0 · ▂P-39Q-15 · ▂P-40E-1 · ▂P-47D-27 · ▂P-63A-5 · ▂P-63A-10 · ▂P-63C-5
  ▂Hurricane Mk IIB · ▂Spitfire Mk IXc · ▂Fw 190 D-9
Twin-engine fighters  I-29
Jet fighters  Su-11 · MiG-15bis ISh · MiG-17AS · MiG-21S (R-13-300) · MiG-23ML
Strike aircraft  IL-2M "Avenger" · IL-2 M-82 · IL-8 (1944) · Su-6 · Tandem MAI · TIS MA · Su-8 · Tu-1
  Yak-38 · Su-7BMK · Su-25K · Su-39
Bombers  Po-2M · Be-6 · MBR-2-M-34 · Pe-2-205 · TB-3M-17-32
  ▂PBY-5A Catalina · ▂Hampden TB Mk I · ▂A-20G-30 · ▂B-25J-30