Ar 234 C-3
This page is about the German jet bomber Ar 234 C-3. For the other version, see Ar 234 B-2. |
Contents
Description
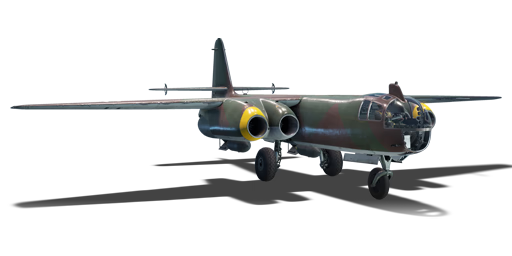
After constant reliability issues with the Junkers Jumo 004 engine, a test flight was conducted with the BMW 003 engine. Although it had less thrust than the Jumo, it was significantly lighter and helped improve the thrust-to-weight ratio. This led to a variant called the Ar 234 C. The C featured airframe improvements, better cockpit visibility, and most importantly, the addition of four BMW 003 engines, two mounted under each wing. The new engines and airframe improvements greatly increased the top speed to an astounding 857 km/h (535 mph). Unfortunately for Germany, it was in complete disarray and only a handful Ar 234 Cs were produced and even fewer were in active service.
The Ar 234 C-3 was introduced in Update 1.49 "Weapons of Victory". As with all bombers, the Ar 234 C-3 receives a bomber airspawn which is a huge advantage. Unlike the Ar 234 B, the C-3 has two MG 151 cannons mounted near the nose along with ample ammunition. This allows the C-3 to be used rather effectively as a heavy fighter, especially with the air spawn advantage. As a bomber, the Ar 234 C-3 is also good due to its high top speed along with the bomber sight. However, the Ar 234 C-3 is only able to carry up to three bombs, all of which are mounted externally which creates a huge amount of drag. Players should also be careful when diving for bases as the Ar 234 C-3 lacks any airbrake. At higher speeds, the Ar 234 compresses a lot so players using it for bombing or attacking fighters should be wary of going too fast.
General info
Flight performance
The Ar 234 C-3 is all you need as a jet bomber. Acceleration is decent and maximum speed at 500 m is 850 km/h when stock. When upgraded, acceleration is great, energy retention is nice and can reach up to 900 km/h IAS at 1,000 m.
Climb rate is great even when stock. Combining the +3,500 m first spawn altitude and nice climb rate, the Arado Ar 234 C-3 is a great choice for bomber players. The dive speed is incredible and together with perfect energy retention, you can reach very high speeds in a matter of seconds. There is no WEP, however, but that's not very important.
How to land?
Landing is not hard, but a is little dangerous. You can land after a dive, as well as when slow. Landing at low speeds is really easy, but here are the steps when landing after a dive:
- Decrease throttle to 0%, go up at 90° and lose speed.
- After falling down, open combat flaps, then take-off flaps. Throttle must be about 30%.
- Open landing gear and landing flaps to lose more speed, landing with negative or 0 degrees is recommended (see the notes for why). Landing gear will extend really fast.
- You can land at about 300 km/h as well as lower speeds, so don't worry about it.
- Use brakes and the recoil of your two 20 mm cannons to complete your landing!
Some notes:
- Do not power the engines off. You may need to throttle up and get more stability.
- Do not perform hard manoeuvres; you're at high speed after a dive so the pilot can lose its control and may lead to a crash.
- Flaps are really important for landing, so if you don't have them or they're damaged, decrease speed as much as possible.
- The mono-landing gear under cockpit placement is strong enough to sustain hard landing.
- Why 0 or negative degree when landing? There's no landing gear at the back. So approaching at a positive degree may cause the tail to touch the ground and cause a lot of damage.
- Don't worry about the absence of air brakes, as your brakes work well. Do manoeuvres at low engine power in order to lose speed.
Characteristics | Max Speed (km/h at 0 m - sea level) |
Max altitude (metres) |
Turn time (seconds) |
Rate of climb (metres/second) |
Take-off run (metres) | |||
---|---|---|---|---|---|---|---|---|
AB | RB | AB | RB | AB | RB | |||
Stock | 847 | 840 | 13000 | 30.2 | 31.0 | 23.9 | 22.4 | 700 |
Upgraded | 866 | 857 | 28.1 | 29.0 | 33.6 | 28.5 |
Details
Features | |||||
---|---|---|---|---|---|
Combat flaps | Take-off flaps | Landing flaps | Air brakes | Arrestor gear | Drogue chute |
✓ | ✓ | ✓ | X | X | ✓ |
Limits | ||||||
---|---|---|---|---|---|---|
Wings (km/h) | Gear (km/h) | Flaps (km/h) | Max Static G | |||
Combat | Take-off | Landing | + | - | ||
1000 | 400 | 527 | 498 | 350 | ~8 | ~4 |
Optimal velocities (km/h) | |||
---|---|---|---|
Ailerons | Rudder | Elevators | Radiator |
< 500 | < 500 | < 650 | N/A |
Engine performance
Engine | Aircraft mass | ||||||
---|---|---|---|---|---|---|---|
Engine name | Number | Basic mass | Wing loading (full fuel) | ||||
BMW 003 | 4 | 6,880 kg | 372 kg/m2 | ||||
Engine characteristics | Mass with fuel (no weapons load) | Max Takeoff Weight | |||||
Weight (each) | Type | 13m fuel | 20m fuel | 30m fuel | 43m fuel | ||
673 kg | Axial-flow turbojet | 7,810 kg | 8,293 kg | 8,999 kg | 9,980 kg | 11,100 kg | |
Maximum engine thrust @ 0 m (RB/SB) | Thrust to weight ratio @ 0 m (100%) | ||||||
Condition | 100% | WEP | 13m fuel | 20m fuel | 30m fuel | 43m fuel | MTOW |
Stationary | 801 kgf | N/A | 0.41 | 0.39 | 0.36 | 0.32 | 0.29 |
Optimal | 801 kgf (0 km/h) |
N/A | 0.41 | 0.39 | 0.36 | 0.32 | 0.29 |
Survivability and armour
- No armour
- Fuel tanks in the fuselage
Modifications and economy
Armaments
Offensive armament
The Ar 234 C-3 is armed with:
- 2 x 20 mm MG 151 cannons, chin-mounted (250 rpg = 500 total)
Suspended armament
The Ar 234 C-3 can be outfitted with the following ordnance:
- 3 x 250 kg SC250JA bombs (750 kg total)
- 3 x 500 kg SC500K bombs (1,500 kg total)
- 1 x 1,000 kg SC1000L2 bomb (1,000 kg total)
- 1 x 1,000 kg SC1000L2 bomb + 2 x 250 kg SC250JA bombs (1,500 kg total)
Usage in battles
The standard bombs on the Ar 234 C-3 are the 3 x 250 kg bombs. You will have access to them even if your Arado is stock. The 3 x 500 kg bombs need to be researched first. Additionally, this variant of the Arado possesses 2 x 20 mm MG 151 cannons, so one of the best ways to use your Ar 234 to ensure you can farm RP and SL for your modifications is:
1. Equip the 3 x 500 kg bombs and start the match at the air spawn point.
2. On maps such as Berlin, move to one of the enemy bases and drop your 3 x 500 kg bombs. 1.5 tonnes worth of bombs is not enough to destroy a base, so from there you have two options to choose from:
2.1 Go back to the airfield and get new bombs
If you choose to go back to the airfield to get new bombs, be aware that unfortunately, the Arado does not have any air brakes, which is a problem as it has particularly good energy retention and some pilots may find it hard to safely land.
When landing the Arado, decrease speed by turning before you reach the airfield (aim to be at 400 km/h or less) then align with the landing strip, activate your flaps and proceed with the landing. If using the landing gear, ensure that you are at extremely low speed before landing or that the landing strip is long enough to stop on. The Arado has extremely good energy retention and is very heavy, so it does take a long time to stop. You can land without gear, which, while obviously dangerous, offers a much better chance to stop in time on shorter landing strips. To do this, land flat on the belly and avoid allowing the wings to touch the ground before you stop moving.
2.2 Search for enemy targets
Once you have dropped your bombs, you can turn your sights to enemy aircraft; the Arado C-3 is quite capable as a fighter, especially in comparison to other German BR 7.0 jets. It doesn't suffer from the same issues as the Me 262, which lacks in power and once it loses energy, often struggles to regain it, or the Ho 229, which can rip its wings very easily in high-G manoeuvres. With the Arado, you won't encounter these kinds of problems, providing you don't attempt to turn fight. The Arado C-3 has the best climb rate of any BR 7.0 German jet. It also possesses a roll rate to rival the Me 262, so with your 4 powerful engines, you have everything you need to take on other jets. As such, once you've finished your bombing run, turn and climb towards the battlefield, and try to maintain altitude above other jets. Once you're reasonably high, pick vulnerable targets and dive in for a pass, taking a shot at them and then moving away to retain your energy. Avoid exceeding 750 km/h when stock, as the dive can become increasingly hard to slow. Once all modifications have been researched, however, the aircraft provides a reasonable amount of additional leeway before it encounters issues. If everything falls apart and you find yourself with fighters on your tail, try to keep accelerating if possible and try to lure the enemies toward your own teammates so that they can assist you.
Baiting:
The Ar 234 C-3 is a great jet bomber. With its 3,500 m spawn altitude, nice acceleration, energy retention and dive speed, you can easily become bait and set up enemies to be downed by your allies. To do so, climb to 4,000 m, en route to the enemy location, drop your bombs to lighten your load. Once in the vicinity of the enemy start to dive on them. The goal is to keep the enemy aircraft busy chasing you, however, if you happen to get behind one, don't be shy about introducing them to your cannons.
You can use cockpit periscope to check the type of enemy planes from a very high distance.
Pros and cons
Pros:
- Great overall fight performance, with high top speed and acceleration
- Very good climb rate, handling, and energy retention when fully upgraded, capable of dogfighting when needed
- Landing gear can handle speeds up to 400 km/h
- Durable flaps that can be used at speeds lower than 550 km/h, even in the landing flap configuration
- Four engines provides the much-needed speed increase from the previous model
- 2 x MG 151 20 mm cannons provide decent air-to-air performance
- Has periscope gunsight at top-right of the cockpit, aids in more effective targeting, helps you identify enemy aircraft types sooner
Cons:
- Atrocious stock grind; very low stock bomb load, and the default 20 mm belt has very poor damage output
- 20 mm has low muzzle velocity for a jet, can be difficult to aim while turning or at range
- Generally mediocre flight performance while stock; sluggish handling and acceleration, and it is hard to recover from dives in speeds beyond 750 km/h
- Pilot can be easily knocked out
- Low overall payload, which means that you only can destroy 1 enemy base with the heaviest payload
- Doesn't have air brakes, which when combined with the plane's very good energy retention can make landing potentially very dangerous
- No gunsight in the non-scoped cockpit, you have to rely on perception to aim
History
After successful tests were completed, the BMW 003 engine was deemed to be an improvement over the unreliable Junkers Jumo 004. The new generation of the Ar 234, the Ar 234 C, would be fitted with four BMW 003 engines with two mounted under each wing. In addition to the engine upgrade, the Ar 234 C also featured better cockpit visibility and better aerodynamics. This greatly increased the top speed and range of the 234 C over the B variant.
Despite the significant improvements, the Arado 234 C was built in very small numbers. Only around 14 Ar 234 Cs variants were built before the main production plant for Arado had to be destroyed. Fuel shortages, allied air supremacy, and more meant that only a mere handful of Ar 234s were even able to take to the skies. Out of the over 200 Ar 234s produced and delivered, less than 25% were in active service by the time the war was over. The Ar 234, especially the C variant, arrived far too late in the war to have any significant impact.
Media
- Skins
- Videos
See also
Links to the articles on the War Thunder Wiki that you think will be useful for the reader, for example:
- reference to the series of the aircraft;
- links to approximate analogues of other nations and research trees.
External links
Arado Aircraft Corporation (Arado Flugzeugwerke) | |
---|---|
Bombers | Ar 196 A-3 |
Jet Bombers | Ar 234 B-2 · Ar 234 C-3 |
Export | ▄Ar 196 A-5 |
Germany jet aircraft | |
---|---|
Luftwaffe | |
He 162 | He 162 A-1 · He 162 A-2 |
Me 163 | Me 163 B · Me 163 B-0 |
Ho 229 | Ho 229 V3 |
Ar 234 | Ar 234 B-2 · Ar 234 C-3 |
Me 262 | Me 262 A-1a · Me 262 A-1a/Jabo · Me 262 A-1a/U1 · Me 262 A-1/U4 · Me 262 A-2a |
Me 262 C-1a · Me 262 C-2b | |
LSK | |
Fighters | ◊MiG-15bis · ◊Lim-5P · ◊MiG-19S |
◊MiG-21MF · ◊MiG-21bis-SAU · ◊MiG-21 "Lazur-M" | |
◊MiG-29 | |
Attackers | ◊MiG-23BN · ◊MiG-23MF · ◊MiG-23MLA |
◊Su-22UM3K · ◊Su-22M4 | |
◊IL-28 | |
Luftwaffe | |
F-84 | ◄F-84F |
F-86 | ◄CL-13A Mk 5 · ◄CL-13B Mk.6 · ◄F-86K |
F-104 | ◄F-104G |
F-4 | ◄F-4F Early · ◄F-4F · ◄F-4F KWS LV |
G.91 | ◄G.91 R/3 · ◄G.91 R/4 |
Tornado | ◄Tornado IDS WTD61 · ◄Tornado IDS MFG · ◄Tornado IDS ASSTA1 |
Other | Alpha Jet A · ◄Sea Hawk Mk.100 |
Ex-LSK | ◄MiG-21 SPS-K · ◄MiG-29G |
Swiss Air Force | |
◌Hunter F.58 · FFA P-16 |