Location Editor. Manual to create a location
This article is a manual explaining main ideas of creating location in Location Editor.
Contents
Beginning
The Location Editor (further shortly LE) itself looks like WT’s typical icon named ‘LocationEd’. You can also open LE in WarThunderCDK’s folder with programme named ‘dagored’. After opening LE there will show up a dialogue box which offers to choose a location. It is better to choose the location named ‘location_sample’.
After location choosing there can result pretty long location downloading (longer than 1 minute, but lesser than 5 minutes). If LE crashes, then the location, what you've been working on, will download faster than the first time since LE knows what location was used recently. If the chosen location downloaded, we will see location of Iwo Jima.
Basics
Movement
To fly around a location, firstly, you have to be sure that window, which shows you a location, is bolded in yellow at the borders. Press Spacebar in order to move camera in any direction. Movement in location’s space is pretty much similar to movement in games: W – forward, S – backwards, A – left, D – right.
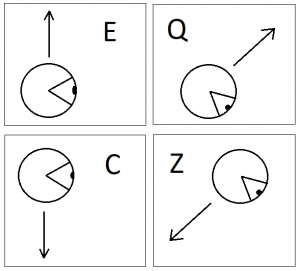
Also, there are 2 pairs of keys more in movement’s set: E and C, Q and Z.
E and C are responsible to move the editor-person (you, in this case) perpendicularly relatively the ground. E – moves you up, C – moves you down.
Q and Z are responsible to move the editor-person (you, in this case) perpendicularly relatively your angle of view. Q – moves you conditionally ‘up’, Z – moves you conditionally ‘down’.
The speed of movement is by default not very high so it's recommended to use "Turbo" to move faster. To activate it you have to press Left Shift and any of above-mentioned movement keys.
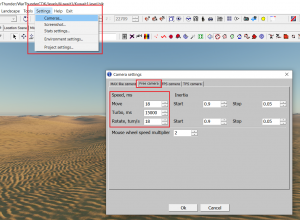
Besides, you can change speed of moving manually, too. Find on the very highest panel of LE tab ‘Settings’, find subtab ‘Cameras…’ and go to tab ‘Free camera’. Edit column ‘Speed, ms’ as you wish.
Panel of Instruments
Out of all instruments we will review only those that are not marked with a red cross. Those that are marked with red cross, their functions are not very well studied either unknown.
| Instrument | Description | Commentary |
|---|---|---|
| Show properties panel | Opens location settings panel | Opens with button 'P' |
| Hill up mode | Allows to create hills | Activates with button '1' |
| Hill down mode | Allows to create ravines | Activates with button '2' |
| Align mode | Allows to align height to the height of neighbouring area | Activates with button '3' |
| Smooth mode | Smooths an area | Activates with button '4' |
| Select | Prevents landscape transformations | Activates with button 'Q' |
| Move | Allows to move an object | Activates with button 'W' |
| Move over surface | Allows to move an object relatively the surface | Activates with buttons 'Ctrl', 'Alt' and 'W' |
| Rotate | Allows to rotate an object | Activates with button 'R' |
| Scale | Allows to scale size of an object | Activates with button 'R' |
| Drop object | Drops an object on the ground | Activates with button 'Ctrl', 'Alt' and 'D' |
| Select objects by name | Opens list of all present objects on location | Opens with button 'H' |
| Show/hide object props panel | Opens panel of object properties | Opens with button 'P' if object is selected |
| Show/hide layers dialog | Opens dialogue box where you can manipulate with entities', splines' and polygons' properties | |
| Hide splines | Hides all splines | Activates with buttons 'Ctrl' and '0' |
| Select only points | Allows to select only points of splines/polygons | Activates with buttons 'Ctrl' and '1' |
| Select only splines | Allows to select only splines | Activates with buttons 'Ctrl' and '2' |
| Select only entities | Allows to select only entities | Activates with buttons 'Ctrl' and '3' |
| Select only splines and entities | Allows to select only splines and entities | Activates with buttons 'Ctrl' and '7' |
| Select only snow sources | Allows to select only snow sources | Activates with buttons 'Ctrl' and '5' |
| Create entity | Creates an object | |
| No rotation; X, Y and Z to normal | No rotation: is set by default if you don't rotate anything
X, Y and Z to normal: can set to 0 degrees | |
| Create spline | Creates a spline | |
| Create polygon | Creates a polygon | |
| Create snow source | Creates a snow source | |
| Refine spline | Allows to insert additional points into spline/polygon | |
| Split spline | Allows to split a spline at selected point | |
| Split poly | Allows to split a polygon | |
| Reverse spline(s) | Reverses spline's direction | |
| Close selected spline(s) | Closes a spline without making it a polygon | |
| Un-close spline at selected point | Uncloses a spline at selected point |
Location Properties
We will review only 5 of all these categories: Mesh (1), Brush (2), Script Parameters (3), Heightmap Parameters (4) and Textures (5).
Mesh
Mesh itself represents a plain that is made of triangles. Meanwhile, triangles form landscape of location.
Technically, it's needed only 1 option yet in this category – Vertices, since it represents number of triangles used in creating landscape. The larger is number, the more precise landscape will be. But be aware that really large numbers (billions of vertices or greater) can cause lags while editing location.
Option ‘Rebuild mesh’ helps to download all the changes we have done by importing heightmap, changing landscape with brushes, etc.
Brush
Brushes help to change landscape manually but in the most cases there is no need when you use heightmaps. They help actually in mask role rather than their true role.
We will take a look only at Power(height) and Brush radius. The rest we don’t need yet.
Power(height). The bigger number is, the higher will terrain tower up.
Brush radius. The bigger number is, the bigger brush radius is.
Script Parameters
This category is responsible for creating location's layers. Layers represent any kind of ground type in War Thunder. They can be sand, dirt, rocks, grass, and whatever else. Besides this feature, some sorts of layers can also generate structures that are linked to those layers, for example, city layers ("berlin_city_b") or forest layers ("air_smolensk_forest_a"). However, this category will be discussed in detail later, in chapter "Location's ground".
Heightmap Parameters
Category "Heightmap Parameters" sets location's size, its offset vertically from water surface (0 meters), height scale (distance from the lowest point of location to the highest point), and size of detailed heightmap (this function generates bunch of smaller triangles in much bigger triangles (vertices) so heightmap would be more detailed on certain area).
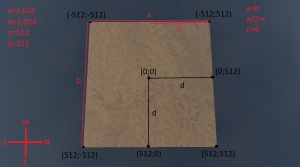
Cell size. This option is responsible for location's physical size. A 'cell', in general, is a square with landscape. The more cells are, the bigger location is.
By default, all cells are 1,024m×1,024m. You can calibrate size of a cell by creating a new heightmap, but not the existing one.
- Example. Iwo Jima location is 32,768m×32,768m with the centre at coordinates (0;0). The cell that is in the centre of the whole location, has centre which coordinates also equal to (0;0). (1) Consequently, the centremost cell and the whole location share the same centre coordinates. From this conclusion we can also conclude that (2) location expands from the centre (or coordinates (0;0)) in all directions. (3) If the location expands from its centre, then the number of cells cannot in any situation match with location's size (16×1,024=16,384, but not 32,768). This is because location's expansion happens also in negative coordinates. There will be always one half of the length of the location in negative coordinates, and another half – in positive.
Height scale. This option represents distance from the lowest point of location to the highest point.
In location realities, the lowest point of location can be considered as whole negative integer (-10 meters, -100 meters) since it's not necessary what's under the water. But, if you want to create waterless location, you have to know what's the lowest point. The highest point always must be known.
In order to set height scale, you need simple knowledge in mathematics. Subtract from the highest point the lowest point (or (highest point integer) minus (lowest point integer)).
Height offset. This option makes location go higher or lower relatively water surface.
Detailed Heightmap area. This option makes cells of detailed heightmap (vertices begin to have smaller triangles within them) with their centre at (0;0). Size of detailed heightmap and its placement on location can be modified in according section.
Textures
"Textures" category covers responsibilities of recovering base layer ground texture after deleting and creating a new heightmap, creating vertical textures (hill, mountain slopes, etc.), and other features, but the latter won't be discussed in this tutorial due to their unknown properties and functions.
Plugins and F3
Plugins
Plugins are already integrated into the editor and ready to use. In order to summon dialogue box with all plugins you have to press button F11 (be sure that you don’t move around location, or else box won’t appear).
P.S. Due to plugin ‘(filter) Water surface geom’, which makes water to disappear, some people don’t know what to do and how to change it back. This also relates to plugins that are responsible for the ground (‘(filter) LandMesh’, ‘(filter) HeightMap’, Landscape).
F3 Button
F3 button, when pressed, shows net made of triangles that tells how the landscape of location is changed. The first net shows landscape deformation without layers, another – with them.
Location's Ground
Location's ground is understood as landscape and layers as one whole thing.
- Landscape precise interpretation depends on vertices amount and presence of detailed heightmap.
- Layers make a location look better via, for instance, adding a layer for rivers' banks, a forest layer, a city layer, etc.
Layers, as it is said earlier, are located in Location's Properties' category 'Script Parameters'. In category 'Script Parameters' layers can be created, deleted and used, obviously. There always must exist at least 1 layer since the very first layer defines how location's ground will look. Information, how to create area of second layer on top of the first one, is written in chapter 'Masks'.
Splines, Polygons and Objects
Splines
Splines are actually curvatives that help make roads, borders, lampposts, fences, Czech hedgehogs, and more.
Instruction how to make a spline.
- Click the button that makes a spline;
- Put some points that make whole spline;
- Click Right Mouse Button to end spline creating;
- Select spline, click button P and we’re in spline’s settings;
- Choose whatever you need in ‘Spline asset class’.
Polygons
Their name says it all. They action on certain area but not only on certain curvative like splines. Polygons cannot be used to lay texture of second layer on first layer but you can make an artificial pond or river, or town with it. Option ‘Border class asset’ behaves like splines: makes roads, borders, and more, but on polygon’s perimeter.
Instruction how to make a polygon.
- Click the button that makes a polygon;
- Put some points that make whole spline;
- Connect the last point with the first in order to form polygon;
- Confirm that you want to close it;
- Move to its settings (button P) and choose whatever you need in ‘Land asset class’ or ‘Border asset class’ (one of them can be left empty).
Objects
In LE objects are almost all things that you can encounter in the game: tanks, planes, ships, buildings, trees, bushes, stones, and nonsense that has left after Halloween or Christmas, or another event. Objects are useful to place something as one unique thing rather than placing huge amount of things.
P.S. Objects in Location Editor and units in Mission Editor are different things! Objects are like ‘decorations’ like M60 and T-62 tanks in Fulda, meanwhile units can move, attack, etc.
Instruction how to make an object.
- Click the button that makes an object;
- Choose what we want it would be;
- Place the object there where we need to.
P.S. If you need a single object, after placing it click Right Mouse Button to stop placing the same object over and over.
Warning. I do not recommend to place effects from ‘fx’ tab. Location Editor crashes every time when an fx object is attempted to be placed.
Masks
We shall start with that mask, in other words, is something that can be placed onto something, in this case a layer onto layer.
All masks locate in 'Script Parameters' in every layer’s settings. I strongly don’t recommend to use existing masks since they are used already. In this case, you can create a new mask which can be named as you wish. New mask will present in every layer’s settings so there is no need to create tons of them.
After creating a new mask, choose the layer you need, the new mask, click button ‘Props…’. You have to activate two options in there: ‘Write weight to DetTex’ and ‘Write weight to Land #1’. (*)
Choose any of 4 brushes (Hill up mode, Hill down mode, Align mode, Smooth mode). Activate option ‘Show blue-white mask’ in ‘Script Parameters’ in order to see all the changes you have done with the new mask. Next, click button ‘Edit’ in that layer’s settings, what you want to build town, forest, or anything else with, and start to kind of 'paint'.
When you are done, click button ‘Done’ in the layer’s settings and click another button ‘Generate color map’.
(*) If you leave activated only parameter ‘Write weight to DetTex’, there will change only textures of the ground; If you leave activated only parameter ‘Write weight to Land #1’, there will appear only structures that the layer generates (if that layer even generates any structure).
Solution to 'I've created new heightmap but textures disappeared'
Say, you had deleted heightmap of Iwo Jima or anything else, and created a new one. But there is a giant absolutely black plateau. This happens because of ground texture (not layer) missing. Console says ‘HeightMap tile texture is missing!’.
Move to category ‘Textures’, subcategory ‘Tile detail texture’ and put into ‘tex’ texture 'detail_ground'. It’s better to write it into search filter since you will search for it for ages.
If the first layer in ‘Script Parameters’ exists and it has texture, close the editor, save all the changes, and open LE again.
Voila, you have absolutely flat location now.
Location Export into the Game and Test Drive
You have created a location and you wish to play on it.
For the first step, find in the left upper corner button ‘Project’, click ‘Export to game (PC format)’, click everywhere ‘OK’.
Then you need to save .bin file in folder WarThunder/content/pkg_local/levels. Follow into the folder after saving .bin file as well.
You can see that every .bin file has its neighbour .blk file with the exact name. .blk file is important so the game could know how big the location is, what’s properties of the location, etc. Without it, you can’t play on location.
Copy one of present .blk files, rename it exactly after location’s name. Open the .blk file with Notepad or any text editor. We are interested only in coordinates. Change coordinates in rows ‘mapCoord0’ and ‘mapCoord1’ (also ‘tankMapCoord0’ and ‘tankMapCoord1’, if you want to ride tanks on location too) to coordinates of the most (negative; negative) point and the most (positive; positive) point.
Coordinates represent two points in two-dimensional space that form kind of rectangle or, in this case, square, which borders are considered as location's borders. The first point always must be in (negative; negative) coordinates, and the second – in (positive; positive) coordinates.
Back to editing .blk file, ‘mapCoord0’ and ‘tankMapCoord0’ require negative coordinates, whilst ‘mapCoord1’ and ‘tankMapCoord1’ – positive.
We are done here. Next, open Mission Editor. Open your location that locates in content/pkg_local/levels. Create unit, choose tank/plane, add it into team A. The most important part is you have to open subcategory ‘mission’ in category 'Mission Settings' and change ‘level’ to your location, or else you will spawn in the middle of Pacific ocean, since Mission Editor always by default sets it to 'levels/water.bin'.
Save your mission, send it into ‘UserMissions’ folder. Launch War Thunder, find in the left upper corner category ‘Battles’, click ‘User Missions’, seek your mission and start it. If everything is done correctly, you will spawn on your location.


