Difference between revisions of "User:RideR2"
m (Added more images) (Tag: Visual edit) |
m (Added more text) |
||
| Line 9: | Line 9: | ||
:1. Run mission editor (missioned.cmd in WarThunderCDK folder). | :1. Run mission editor (missioned.cmd in WarThunderCDK folder). | ||
| − | :2. | + | :2. Select a map in '''Select binary dump file''' window by pressing '''...''' tab (all map files are stored here: '''WarThunder\levels''') |
| − | ::''Note: | + | ::''Note: You can edit a mission without loaded map, location in scene viewer is just a preview.'' |
| − | :3. | + | :3. Set basic settings in the Mission Editor. |
::*Choose the side toolbar '''Mission Settings -> mission''' | ::*Choose the side toolbar '''Mission Settings -> mission''' | ||
| Line 21: | Line 21: | ||
::*Choose a location map in '''level''' tab | ::*Choose a location map in '''level''' tab | ||
::*Choose time of a day and weather in '''Weather params''' tab | ::*Choose time of a day and weather in '''Weather params''' tab | ||
| + | ::*Change the number of tickets in '''scoreLimit''' which you can find in '''Versus params''' tab | ||
| + | ::''Note: by default it's set to 5000'' | ||
| + | ::*Change the number of tickets that are lost after someone dies in '''deathPenaltyMul''' which you can find in '''Versus params''' tab | ||
| + | ::''Note: by default it's set to 100 tickets'' | ||
== Creating slots for players == | == Creating slots for players == | ||
| − | :[[File:Unit Creation Icon.jpg|thumb|Unit creation icon]]1. Create a new unit by pressing '''Create unit''' icon and place it somewhere (you can control the map view by pressing '''SPACE''') | + | :[[File:Unit Creation Icon.jpg|thumb|Unit creation icon]]1. Create a new unit by pressing '''Create unit''' icon and place it somewhere (you can control the map view by pressing '''SPACE'''). |
| − | :[[File:Unit Properties Icon.jpg|thumb|Unit properties icon]]2. Open it's properties (by for example pressing '''P''') | + | :[[File:Unit Properties Icon.jpg|thumb|Unit properties icon]]2. Open it's properties (by for example pressing '''P'''). |
::*Change the '''Name:''' to '''t1_player01''' | ::*Change the '''Name:''' to '''t1_player01''' | ||
| Line 31: | Line 35: | ||
::*Find a '''dummy''' unit in '''Class''' tab and select it | ::*Find a '''dummy''' unit in '''Class''' tab and select it | ||
| − | :[[File:Copying Units.jpg|thumb]]3. Copy '''t1_player01''' unit | + | :[[File:Copying Units.jpg|thumb]]3. Copy '''t1_player01''' unit . |
::''Note: We will need it to create slots for the mission, so it's preferable to create 16 of them, the game supports up to 32 players per team'' | ::''Note: We will need it to create slots for the mission, so it's preferable to create 16 of them, the game supports up to 32 players per team'' | ||
| Line 42: | Line 46: | ||
::*Now you should see lots of copies of this unit named '''t1_player02, t1_player03, t1_player04 etc.''' | ::*Now you should see lots of copies of this unit named '''t1_player02, t1_player03, t1_player04 etc.''' | ||
| − | :[[File:Copying Units 2.jpg|thumb]]4. Create the same amount of '''t2_player''' units by copying '''t1_player''' units | + | :[[File:Copying Units 2.jpg|thumb]]4. Create the same amount of '''t2_player''' units by copying '''t1_player''' units. |
::*In Unit copying window change '''Name of clone(s):''' to '''t2_player01''' | ::*In Unit copying window change '''Name of clone(s):''' to '''t2_player01''' | ||
| Line 49: | Line 53: | ||
::*Now you should see lots of copies of '''t1_player''' units named '''t2_player01, t2_player02, t2_player03 etc.''' | ::*Now you should see lots of copies of '''t1_player''' units named '''t2_player01, t2_player02, t2_player03 etc.''' | ||
| − | :5. Go back to side toolbar '''Mission Settings''' to add these units to make them usable as slots for players in your multiplayer mission | + | :5. Go back to side toolbar '''Mission Settings''' to add these units to make them usable as slots for players in your multiplayer mission. |
::*Select '''player_teamA''' | ::*Select '''player_teamA''' | ||
| Line 58: | Line 62: | ||
== Creating respawn zones for players == | == Creating respawn zones for players == | ||
| − | :1. Choose the side toolbar '''Triggers / Missions Obj. Navigat | + | === Setting up a trigger for respawn action === |
| + | |||
| + | :1. Choose the side toolbar '''Triggers / Missions Obj. Navigat'''[[File:Trigger properties icon.jpg|thumb|Trigger properties icon]] | ||
:2. Press the '''Trigger''' button to create a new trigger | :2. Press the '''Trigger''' button to create a new trigger | ||
| − | :3. Press the '''Properties and Trigger/MissionObj info''' icon which you can find on top toolbar to show the tab with trigger properties | + | :3. Press the '''Properties and Trigger/MissionObj info''' icon which you can find on top toolbar to show the tab with trigger properties. |
| − | :4. Select your new trigger and change it's '''Name''' to for example '''respawn'''[[File:Creating Respawn Zones.jpg|thumb]] | + | :4. Select your new trigger and change it's '''Name''' to for example '''respawn'''.[[File:Creating Respawn Zones.jpg|thumb]] |
| − | :5. Make sure that '''Enabled''' is switched on | + | :5. Make sure that '''Enabled''' is switched on. |
| − | :6. In lower part of this toolbar select '''periodicEvent {time=1.00}''' in the '''Elements:''' window | + | :6. Change the '''Events''' type. |
| − | : | + | ::*In lower part of this toolbar select '''periodicEvent {time=1.00}''' in the '''Elements:''' window |
| − | : | + | ::*Select '''Elements''' button on the bottom and press '''periodicEvent''' |
| − | : | + | ::''Note: (if nothing happens then select one of folders in the '''Elements:''' window and then switch back to '''periodicEvent {time=1.00}''')'' |
| − | : | + | ::*A new window should appear, select '''initMission''' there and press '''Ok''' or double click on '''initMission''' |
| − | : | + | |
| − | : | + | === Adding air spawns for airplanes and ground spawns for ground units === |
| − | : | + | |
| + | :1. Create areas for respawn action.[[File:Area Creation Icons.jpg|thumb|Area creation icons]] | ||
| + | ::*Press one of area creation icons on the top toolbar | ||
| + | ::*Press the ground on the map view in the place where you want to put your respawn area | ||
| + | :::*press only if you selected the first icon | ||
| + | :::*press and drag (you change it's size by doing that) if you selected other icons (sphere, cylinder or box) | ||
| + | :2. Change properties of your area. | ||
| + | ::*Change '''Name:''' to '''t1_spawnarea_01''' | ||
| + | ::*Make at least 10 areas that are named '''t1_spawnarea_01''', '''t1_spawnarea_02''', '''t1_spawnarea_03''' etc. | ||
| + | ::*copy all created '''t1_spawnarea''' areas and call them '''t2_spawnarea_01''', '''t2_spawnarea_01''', '''t2_spawnarea_01''' etc (you need them for both teams) | ||
| + | ::''Note: If those spawns are meant to be for airplanes then place them in the air, if for tanks then place them on the ground, if for ships then place them on the sea level'' | ||
| + | :3. Add a respawn action. | ||
| + | ::*Press the '''Action''' button in the trigger properties toolbar | ||
| + | ::*Below '''Filter:''' type '''missionMarkAsRespawnPoint''' | ||
| + | ::*Press '''Ok''' or double click on '''missionMarkAsRespawnPoint''' | ||
| + | :4. Add respawn areas to '''missionMarkAsRespawnPoint''' action. | ||
| + | ::*Select '''missionMarkAsRespawnPoint''' action in '''Elements:''' window | ||
| + | ::*Add all existing t1_spawnarea areas to the tab next to '''target''', you can create more of them by just pressing a wide '''target''' tab below | ||
| + | ::*Change the '''loc_name''' (name of that spawn zone which will be visible in game, you can use spaces and capital letters) or leave it be if you want the game to set default respawn names (Respawn #1, #2 etc.) | ||
| + | ::*Press a wide '''team''' tab, a new selectable tab should appear, press it and select '''A''' | ||
| + | ::*Press a wide '''tags''' tab on the bottom of option, it will create an expandable window with tabs of all available tags in the game, select those that you want to use in your mission ('''air''' for airplanes, '''tank''' for ground units, '''ship''' for boats and ships) | ||
| + | :5. Copy existing '''missionMarkAsRespawnPoint''' action to make respawn zones for the second team. | ||
| + | ::*Below the '''Elements:''' window, there should be a '''copy''' tab, select '''missionMarkAsRespawnPoint''' action and then press this '''copy''' tab | ||
| + | ::*Press '''Paste ...''' tab, a new window should appear | ||
| + | ::*Select '''missionMarkAsRespawnPoint''' action there and press ok | ||
| + | ::*Now you should see two the same actions in the '''Elements:''' window, select the second one | ||
| + | ::*Change all '''target''' areas to those that are meant to be for the second team (B / T2) | ||
| + | ::*Switch the '''team''' tab to '''B''' | ||
::''Note: You can speed up changing '''target'<nowiki/>'''''<nowiki/>'''s by creating an '''area_squad''' unit and then putting all t2_spawnarea areas there, then selecting this squad in the ''missionMarkAsRespawnPoint'''''<nowiki/>'' action propeties'' | ::''Note: You can speed up changing '''target'<nowiki/>'''''<nowiki/>'''s by creating an '''area_squad''' unit and then putting all t2_spawnarea areas there, then selecting this squad in the ''missionMarkAsRespawnPoint'''''<nowiki/>'' action propeties'' | ||
| − | |||
| + | === Adding airfield spawn for airplanes === | ||
| + | :1. Create an airfield unit. | ||
| + | ::* Select '''Create unit''' icon on the top toolbar [[File:Unit Creation Icon.jpg|thumb|Unit creation icon]] | ||
| + | ::* Select created unit | ||
| + | ::* Open it's properties (by for example pressing '''P''')[[File:Unit Properties Icon.jpg|thumb|Unit properties icon]] | ||
| + | ::* Change it's '''Name:''' to '''airfield_01''' | ||
| + | ::* Change it's '''type''' to objectGroups | ||
| + | ::* Select one of available airfields in '''Class''' tab | ||
| + | ::''Note: all names of airfields start with '''dynaf_'' | ||
| + | ::* Change it's '''army''' to 1 | ||
| + | ::''Note: depends for which team you want to make it, remember that 1 = A team, 2 = B team''' | ||
| + | :2. Add a respawn action. | ||
| + | ::*Press the '''Action''' button in the trigger properties toolbar | ||
| + | ::*Below '''Filter:''' type '''missionMarkAsRespawnPoint''' | ||
| + | ::*Press '''Ok''' or double click on '''missionMarkAsRespawnPoint''' | ||
| + | :3. Add the airfield to '''missionMarkAsRespawnPoint''' action. | ||
| + | ::*Select '''missionMarkAsRespawnPoint''' action in '''Elements:''' window | ||
| + | ::*Add '''airfield_01''' to the tab next to '''target''' | ||
| + | ::*Change the '''loc_name''' (name of that spawn zone which will be visible in game, you can use spaces and capital letters) or leave it be if you want the game to set default respawn names (Respawn #1, #2 etc.) | ||
| + | ::*Select '''isAirfield''' | ||
| + | ::*Press a wide '''team''' tab, a new selectable tab should appear, press it and select '''A''' | ||
| + | ::*Select '''Object''' and set it to '''airfield_01''' | ||
| + | ::*Press a wide '''tags''' tab on the bottom of option, it will create an expandable window with tabs of all available tags in the game, select those that you want to use in your mission (air) | ||
== Saving your mission == | == Saving your mission == | ||
Revision as of 12:50, 22 October 2019
Just a test page.
Multiplayer Missions
How to create a basic multiplayer mission
- 1. Run mission editor (missioned.cmd in WarThunderCDK folder).
- 2. Select a map in Select binary dump file window by pressing ... tab (all map files are stored here: WarThunder\levels)
- Note: You can edit a mission without loaded map, location in scene viewer is just a preview.
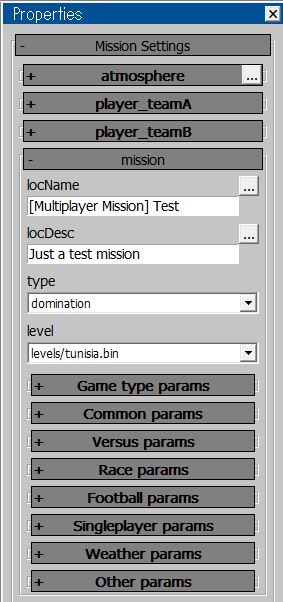
- 3. Set basic settings in the Mission Editor.
- Choose the side toolbar Mission Settings -> mission
- Choose a name for your mission in name tab
- Note: You can't use capital letters and there should be no spaces
- Choose a name for your mission that will be displayed for other players in locName tab (you can use space there and for example write down [Multiplayer Mission] Test)
- Choose a description for your mission in locDesc tab
- Set a mission type to domination in type tab
- Choose a location map in level tab
- Choose time of a day and weather in Weather params tab
- Change the number of tickets in scoreLimit which you can find in Versus params tab
- Note: by default it's set to 5000
- Change the number of tickets that are lost after someone dies in deathPenaltyMul which you can find in Versus params tab
- Note: by default it's set to 100 tickets
Creating slots for players
- 1. Create a new unit by pressing Create unit icon and place it somewhere (you can control the map view by pressing SPACE).
- 2. Open it's properties (by for example pressing P).
- Change the Name: to t1_player01
- Switch it's type to armada
- Find a dummy unit in Class tab and select it
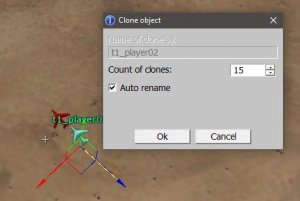
- 3. Copy t1_player01 unit .
- Note: We will need it to create slots for the mission, so it's preferable to create 16 of them, the game supports up to 32 players per team
- Select the unit
- Press W
- While holding Shift select one of displayed arrows and then drag it until a new unit appears
- The CDK will show you a new window, in this window change the Count of clones: amount to the number that you want for your mission
- Select Auto rename
- Press Ok
- Now you should see lots of copies of this unit named t1_player02, t1_player03, t1_player04 etc.
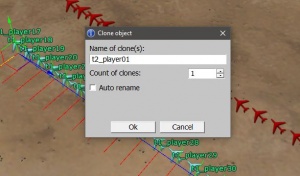
- 4. Create the same amount of t2_player units by copying t1_player units.
- In Unit copying window change Name of clone(s): to t2_player01
- Change the Count of clones: amount to the number that equals amount of t1_player units (set it to 1)
- Press Ok
- Now you should see lots of copies of t1_player units named t2_player01, t2_player02, t2_player03 etc.
- 5. Go back to side toolbar Mission Settings to add these units to make them usable as slots for players in your multiplayer mission.
- Select player_teamA
- Press wing to add new slots and add all t1_player units there one by one there
- Select player_teamB
- Press wing to add new slots and add all t2_player units there one by one there
Creating respawn zones for players
Setting up a trigger for respawn action
- 1. Choose the side toolbar Triggers / Missions Obj. Navigat
- 2. Press the Trigger button to create a new trigger
- 3. Press the Properties and Trigger/MissionObj info icon which you can find on top toolbar to show the tab with trigger properties.
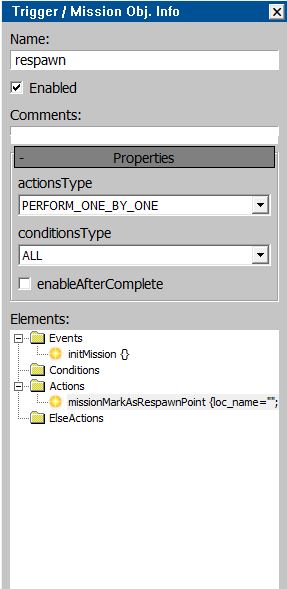
- 4. Select your new trigger and change it's Name to for example respawn.
- 5. Make sure that Enabled is switched on.
- 6. Change the Events type.
- In lower part of this toolbar select periodicEvent {time=1.00} in the Elements: window
- Select Elements button on the bottom and press periodicEvent
- Note: (if nothing happens then select one of folders in the Elements: window and then switch back to periodicEvent {time=1.00})
- A new window should appear, select initMission there and press Ok or double click on initMission
Adding air spawns for airplanes and ground spawns for ground units
- 1. Create areas for respawn action.
- Press one of area creation icons on the top toolbar
- Press the ground on the map view in the place where you want to put your respawn area
- press only if you selected the first icon
- press and drag (you change it's size by doing that) if you selected other icons (sphere, cylinder or box)
- 2. Change properties of your area.
- Change Name: to t1_spawnarea_01
- Make at least 10 areas that are named t1_spawnarea_01, t1_spawnarea_02, t1_spawnarea_03 etc.
- copy all created t1_spawnarea areas and call them t2_spawnarea_01, t2_spawnarea_01, t2_spawnarea_01 etc (you need them for both teams)
- Note: If those spawns are meant to be for airplanes then place them in the air, if for tanks then place them on the ground, if for ships then place them on the sea level
- 3. Add a respawn action.
- Press the Action button in the trigger properties toolbar
- Below Filter: type missionMarkAsRespawnPoint
- Press Ok or double click on missionMarkAsRespawnPoint
- 4. Add respawn areas to missionMarkAsRespawnPoint action.
- Select missionMarkAsRespawnPoint action in Elements: window
- Add all existing t1_spawnarea areas to the tab next to target, you can create more of them by just pressing a wide target tab below
- Change the loc_name (name of that spawn zone which will be visible in game, you can use spaces and capital letters) or leave it be if you want the game to set default respawn names (Respawn #1, #2 etc.)
- Press a wide team tab, a new selectable tab should appear, press it and select A
- Press a wide tags tab on the bottom of option, it will create an expandable window with tabs of all available tags in the game, select those that you want to use in your mission (air for airplanes, tank for ground units, ship for boats and ships)
- 5. Copy existing missionMarkAsRespawnPoint action to make respawn zones for the second team.
- Below the Elements: window, there should be a copy tab, select missionMarkAsRespawnPoint action and then press this copy tab
- Press Paste ... tab, a new window should appear
- Select missionMarkAsRespawnPoint action there and press ok
- Now you should see two the same actions in the Elements: window, select the second one
- Change all target areas to those that are meant to be for the second team (B / T2)
- Switch the team tab to B
- Note: You can speed up changing target's by creating an area_squad unit and then putting all t2_spawnarea areas there, then selecting this squad in the missionMarkAsRespawnPoint action propeties
Adding airfield spawn for airplanes
- 1. Create an airfield unit.
- Select Create unit icon on the top toolbar
- Select created unit
- Open it's properties (by for example pressing P)
- Change it's Name: to airfield_01
- Change it's type to objectGroups
- Select one of available airfields in Class tab
- Note: all names of airfields start with dynaf_
- Change it's army to 1
- Note: depends for which team you want to make it, remember that 1 = A team, 2 = B team'
- 2. Add a respawn action.
- Press the Action button in the trigger properties toolbar
- Below Filter: type missionMarkAsRespawnPoint
- Press Ok or double click on missionMarkAsRespawnPoint
- 3. Add the airfield to missionMarkAsRespawnPoint action.
- Select missionMarkAsRespawnPoint action in Elements: window
- Add airfield_01 to the tab next to target
- Change the loc_name (name of that spawn zone which will be visible in game, you can use spaces and capital letters) or leave it be if you want the game to set default respawn names (Respawn #1, #2 etc.)
- Select isAirfield
- Press a wide team tab, a new selectable tab should appear, press it and select A
- Select Object and set it to airfield_01
- Press a wide tags tab on the bottom of option, it will create an expandable window with tabs of all available tags in the game, select those that you want to use in your mission (air)
Saving your mission
- 1. On the most top bar select Mission Editor
- 2. Press Save mission (Ctrl+M)
- 3. Select where you want to save your mission and set it's name, remember to save it's as .blk file
That's all, now all you need is to upload your mission somewhere (any hosting service will do as long as it's link will end as .blk and don't forget to delete https:// part of that link, otherwise the game won't be able to read it unless it's a live.warthunder.com link) or live.warthunder.com site, but don't forget to add a proper image and description for your mission. More details you will find here.


