Difference between revisions of "User:wolftale/TITLE"
m (moved thumbnail pictures) (Tag: Visual edit) |
m (→Crew Distribution) (Tag: Visual edit) |
||
| Line 42: | Line 42: | ||
== Crew Distribution == | == Crew Distribution == | ||
| − | The single most important factor in the crew's survivability is not their number, but where they're located on the ship during combat. On all vessels, crew are housed in compartments, each of which is capable of having a different durability and number of crew. As damage is dealt to a compartment, crew will be depleted according to the total durability of the compartment. For example, if a compartment has 500 HP and contains 4 crew, a single crew member will be lost | + | The single most important factor in the crew's survivability is not their number, but where they're located on the ship during combat. On all vessels, crew are housed in compartments, each of which is capable of having a different durability and number of crew. As damage is dealt to a compartment, crew will be depleted according to the total durability of the compartment. For example, if a compartment has 500 HP and contains 4 crew, a single crew member will be lost for every 125 damage dealt to the compartment until it is destroyed. Compartments cannot be repaired and crew will not re-occupy damaged or destroyed compartments. Crew can also be found in critical machine spaces. This means that targeting an enemy ship's boilers, engines, turrets, ammunition handling rooms, and command and control structures is usually an efficient way to guarantee maximum crew loss. Exactly which of these modules contain crew varies from ship to ship, but in general there are two formats of crew layouts often referred to in the naval community as: "simple" and "complex." |
=== Simple Layout === | === Simple Layout === | ||
Revision as of 05:56, 29 September 2024
Below is a draft of a page on naval crew mechanics:
Contents
Ship Crew Mechanics
The crew is the lifeblood of any war machine. Boats and ships can require as little as a handful of men or as many as thousands of personnel to operate efficiently. In War Thunder naval battles, the crew loss mechanic is used to simulate victory through attrition, whether that's by sailor casualties or by structural damage that otherwise makes the vessel un-salvageable. Damage to critical components as well as special compartments reduces the percentage of crew who are able to perform their duties. Once the number of remaining usable crew drops below the minimum number required to operate the vessel, the ship will be scuttled instantly.
Percentage of Available Crew
The percentage of available crew is displayed on the HUD. Starting out in naval battles, you will notice that your crew percentage does not add up to 100%, even if you have just entered the battlefield and taken no damage at all. This is because the term "100% crew" is used to represent the maximum possible degree of readiness afforded to crews that have maxed out the "Crew Interchangability" and "Leadership" skills as well as upgraded their qualification on the vessel to Ace status.
Minimum Crew to Repair
On most vessels classified as frigates or larger, there is a threshold at which there is no longer enough free crew to carry out repairs. At this point, the hull will fail in multiple places and the ship will take on water until it sinks. During this time you will be unable to perform any method of damage control. Exactly where this threshold is located depends on the number of crew on board the vessel as well as the aforementioned crew skills affecting the ship's survivability. However, the threshold is usually reached once the percentage of available crew has dropped to the low double or high single digits.
For example, the destroyer USS Mitscher carries 350 men. For an expert crew with the maximum possible skill level, the vessel will become unrepairable and start to sink once only 122 men remain, listed as around 5% on the HUD. For an untrained crew, the ship will start to sink at 14%.
| Stock | Maximum | |
|---|---|---|
| Minimum to Repair | 171 | 122 |
| Percentage on HUD | ~14% | ~5% |
Destruction Threshold
All vessels will be destroyed instantly once the percentage of free crew hits 0%. However, the exact number of crew this percentage represents changes depending on the skills referenced above. Using the USS Mitscher as an example again, we can see that she will always instantly sink at 0%, but where that threshold is placed is heavily dependent on the interchangeability skills of the crew.
| Stock | Maximum | |
|---|---|---|
| Minimum to Survive | 147 | 105 |
| Percentage on HUD | ~0% | ~0% |
Crew Distribution
The single most important factor in the crew's survivability is not their number, but where they're located on the ship during combat. On all vessels, crew are housed in compartments, each of which is capable of having a different durability and number of crew. As damage is dealt to a compartment, crew will be depleted according to the total durability of the compartment. For example, if a compartment has 500 HP and contains 4 crew, a single crew member will be lost for every 125 damage dealt to the compartment until it is destroyed. Compartments cannot be repaired and crew will not re-occupy damaged or destroyed compartments. Crew can also be found in critical machine spaces. This means that targeting an enemy ship's boilers, engines, turrets, ammunition handling rooms, and command and control structures is usually an efficient way to guarantee maximum crew loss. Exactly which of these modules contain crew varies from ship to ship, but in general there are two formats of crew layouts often referred to in the naval community as: "simple" and "complex."
Simple Layout
The simple layout is used by boats, as well as some larger gunboats and frigates. In this model, the crew compartments span the entire watertight hull sections of the craft. This means that dealing damage to any intact part of the ship's hull has the potential to remove crew and sink it. On these types of boats, the individual machinery spaces are unlikely to contain crew themselves, as an attacker will be dealing crew damage to get to them anyway.
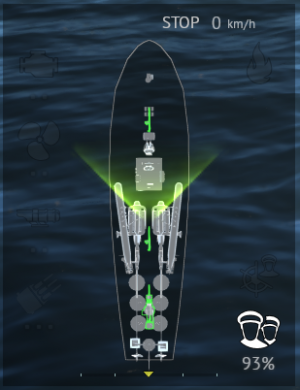
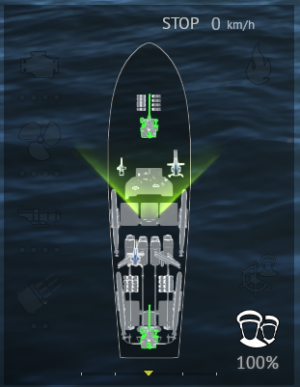
For example, the G-5 motor torpedo boat shown above has three crew compartments of varying size. The bow contains two crew members, the amidships and engineering section houses two, and the stern section has one. The pilothouse in the boat's superstructure also houses one sailor, for a total of six. When destroyed, the engines and gun turret don't reduce the number of available crew. Since the minimum number of crew needed to operate the G-5 is two men, the boat will only sink once there is one sailor left aboard. At the maximum crew skill level, an attacker would need to destroy all three hull compartments to sink the boat, or a combination of hull compartments and the bridge. Since the bridge always contains one crew member and can be repeatedly repaired, it is technically possible to destroy the G-5 without damaging its hull by destroying the bridge five times in a row. In combat, however, this scenario is very unlikely.
Complex Layout
All bluewater vessels as well as some larger gunboats and frigates use a more complicated layout. This requires enemy shells to penetrate deeper into the hull to deal crew damage, and allows captains to take advantage of multi-layer protection schemes. In this model, the crew compartments are represented as rectangular prisms on the centerline of the ship at different points. Like on coastal vessels, they can be of any size and house any number of crew.
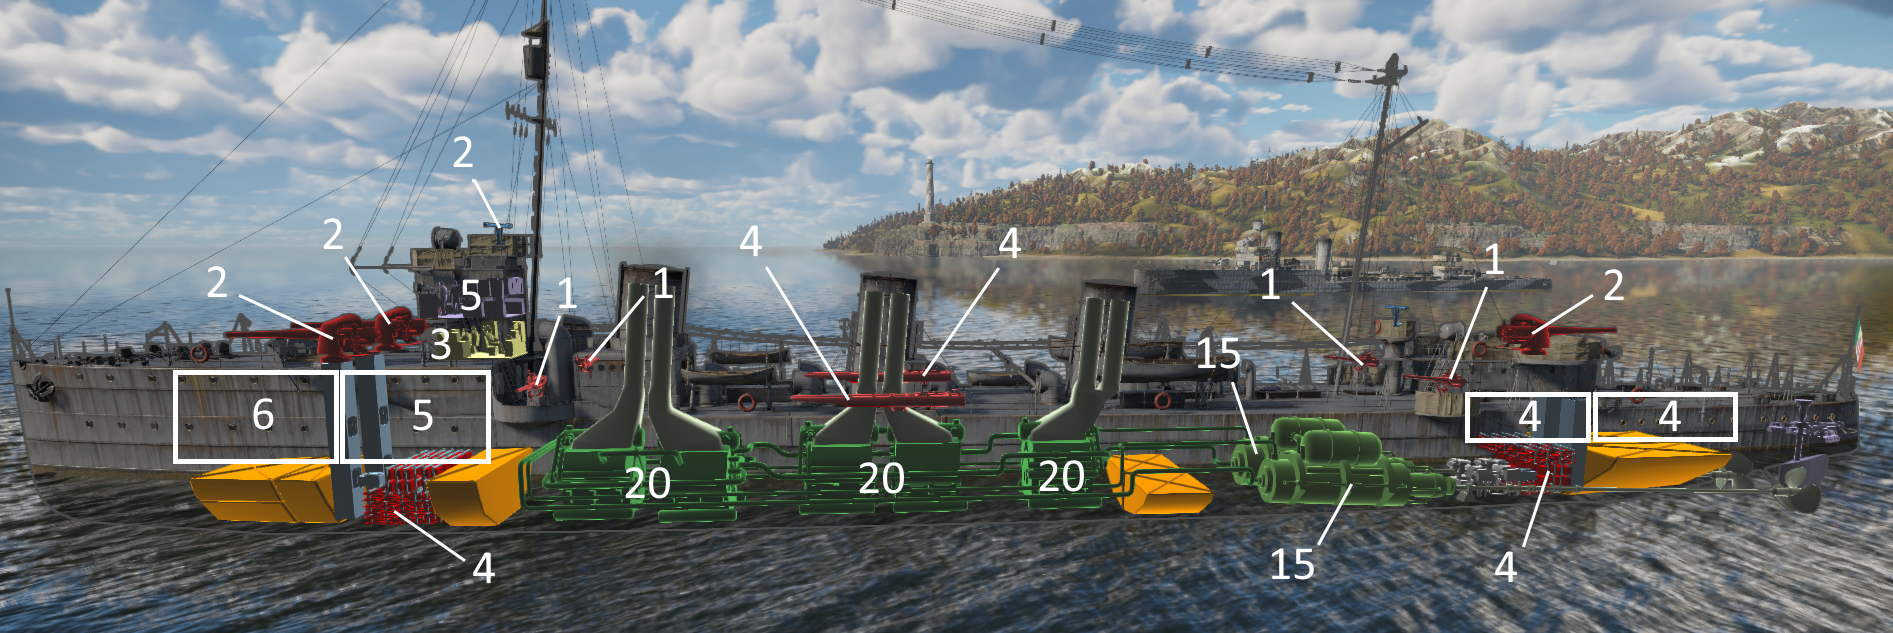
Important modules also contain crew. Boilers and engines typically contain the most, making them prime targets. The bridge, as well as ammunition handling, radio, and fire control rooms contain some level of additional crew. Most rangefinders and weapons on the primary and auxiliary control groups will house a small number above deck as well. Special weapons such as torpedo launchers can contain crew, but only if they are manned. Crew will not be lost if the enemy elected not to bring torpedoes into battle in the first place.
The crew distribution for Italian destroyer RN Aquila is shown above. The machinery spaces contain the most crew by far with the next best target being the crew compartments above them, outlined with white boxes. Aquila has no hull armour to speak of and therefore hitting her engines is the fastest way to sink her with crew damage. However, against battleships with large armoured citadels, targeting the more exposed crew compartments is a good way to deal damage if one finds oneself unable to penetrate their belt.


