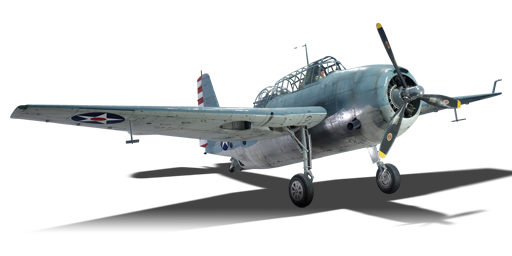
TBF-1C

From War Thunder Wiki
Jump to: navigation, search
Rank 7 USA
F-5C Pack
This page is about the American bomber TBF-1C. For the British version, see Avenger Mk II (Great Britain).
TBF-1C
tbf-1c.png
GarageImage TBF-1C.jpg
360://https://wiki.warthunder.com/images/7/73/Cockpit_tbf-1c.jpg
TBF-1C
Research:4 000 Specs-Card-Exp.png
Purchase:2 100 Specs-Card-Lion.png
Show in game

Description

To replace the outdated TBD Devastator, several companies put forth their designs. Grumman's design was the TBF Avenger, a single-engine torpedo bomber. It was to be fitted with the Wright R-2600-8, a double-row 14-cylinder radial engine that produced 1,700 hp. Although it was extremely heavy, the U.S. Navy selected Grumman's design and ordered two prototypes in 1940. One special feature of the TBF Avenger was the Sto-Wings which folded the wings inwards to remedy the issue with the heights of carrier hangar decks. The TBF Avenger would be widely used by both the U.S. and Royal Navy during the war. American Avengers saw use at the Battle of Eastern Solomons and Guadalcanal; managing to sink a Japanese light carrier and a battleship. They also brought havoc against submarine crews such as I-52.

Introduced since the start of the Open Beta Test prior to Update 1.27, the TBF-1C Avenger is a decent torpedo bomber. It has access to AN-M66A2 (2,000 lb) bombs as well as Mk. 13-6 torpedos. Defensive armament is lacking with only one single 12.7 mm turret providing fire from the top and a single 7.62 turret mounted in the underside. The Avenger does have two 12.7 mm machine guns for offensive fire but is quite lacklustre. The TBF-1C Avenger is a formidable torpedo bomber however it's very vulnerable to enemy fighters.


General info

Flight performance

Arrestor gear
Accelerates braking by grabbing the brake cable on the deck of the aircraft carrier
Max speed
at 3 650 m432 km/h
Turn time30 s
Max altitude7 100 m
EngineWright R-2600-8
TypeRadial
Cooling systemAir
Take-off weight8 t
Characteristics Max Speed
(km/h at 3,650 m)
Max altitude
(metres)
Turn time
(seconds)
Rate of climb
(metres/second)
Take-off run
(metres)
AB RB AB RB AB RB
Stock 414 398 7100 31.1 32.4 3.2 3.2 307
Upgraded 452 432 29.0 30.0 7.3 5.1

Details

Features
Combat flaps Take-off flaps Landing flaps Air brakes Arrestor gear
X X X
Limits
Wings (km/h) Gear (km/h) Flaps (km/h) Max Static G
Combat Take-off Landing + -
612 397 N/A N/A 285 ~6 ~2
Optimal velocities (km/h)
Ailerons Rudder Elevators Radiator
< 300 < 220 < 220 > 318

Survivability and armour

Crew4 people
Speed of destruction
Structural0 km/h
Gear397 km/h
  • 6.35 mm Steel - Armour plate in the nose
  • 12.7 mm Steel - Armour plate behind the pilot
  • 12.7 mm Steel - Armour plate in dorsal gunner's seat
  • 12.7 mm Steel - Armour plate in front of dorsal gunner
  • 12.7 mm Steel - Armour plate in front of ventral gunner
  • 6.35 mm Steel - Armour plate under the ventral gunner
  • 40 mm Bulletproof glass in front of dorsal gunner
  • 0.1 mm Wood - Connecting ventral gunner's armour

Modifications and economy

Repair costBasic → Reference
AB227 → 291 Sl icon.png
RB334 → 429 Sl icon.png
SB551 → 708 Sl icon.png
Total cost of modifications4 450 Rp icon.png
2 695 Sl icon.png
Talisman cost300 Ge icon.png
Crew training600 Sl icon.png
Experts2 100 Sl icon.png
Aces45 Ge icon.png
Research Aces110 000 Rp icon.png
Reward for battleAB / RB / SB
20 / 40 / 80 % Sl icon.png
100 / 100 / 100 % Rp icon.png
Modifications
Flight performance Survivability Weaponry
Mods aerodinamic fuse.png
Fuselage repair
Research:
220 Rp icon.png
Cost:
135 Sl icon.png
60 Ge icon.png
Mods radiator.png
Radiator
Research:
220 Rp icon.png
Cost:
135 Sl icon.png
60 Ge icon.png
Mods armor frame.png
Airframe
Research:
200 Rp icon.png
Cost:
120 Sl icon.png
55 Ge icon.png
Mods compressor.png
Compressor
Research:
200 Rp icon.png
Cost:
120 Sl icon.png
55 Ge icon.png
Mods aerodinamic wing.png
Wings repair
Research:
280 Rp icon.png
Cost:
170 Sl icon.png
75 Ge icon.png
Mods new engine.png
Engine
Research:
280 Rp icon.png
Cost:
170 Sl icon.png
75 Ge icon.png
Mods armor cover.png
Cover
Research:
290 Rp icon.png
Cost:
175 Sl icon.png
80 Ge icon.png
Mods metanol.png
Engine injection
Research:
290 Rp icon.png
Cost:
175 Sl icon.png
80 Ge icon.png
Mods ammo.png
bmg30_turret_belt_pack
Research:
220 Rp icon.png
Cost:
135 Sl icon.png
60 Ge icon.png
Mod arrow 0.png
Mods pilon torpedo.png
ITC mk.III
Research:
220 Rp icon.png
Cost:
135 Sl icon.png
60 Ge icon.png
Mod arrow 1.png
Mods turret gun.png
bmg30_turret_new_gun
Research:
200 Rp icon.png
Cost:
120 Sl icon.png
55 Ge icon.png
Mods ammo.png
bmg50_belt_pack
Research:
200 Rp icon.png
Cost:
120 Sl icon.png
55 Ge icon.png
Mod arrow 1.png
Mods pilon bomb.png
AN-Mk 1
Research:
200 Rp icon.png
Cost:
120 Sl icon.png
55 Ge icon.png
Mod arrow 1.png
Mods ammo.png
bmg50_turret_belt_pack
Research:
280 Rp icon.png
Cost:
170 Sl icon.png
75 Ge icon.png
Mod arrow 0.png
Mods pilon torpedo.png
Improved torpedo
Research:
280 Rp icon.png
Cost:
170 Sl icon.png
75 Ge icon.png
Mods turret gun.png
bmg50_turret_new_gun
Research:
290 Rp icon.png
Cost:
175 Sl icon.png
80 Ge icon.png
Mods weapon.png
bmg50_new_gun
Research:
290 Rp icon.png
Cost:
175 Sl icon.png
80 Ge icon.png
Mods pilon bomb.png
LBC-17
Research:
290 Rp icon.png
Cost:
175 Sl icon.png
80 Ge icon.png

Flight performance is often a secondary criteria for an attack bomber. Focus on improved armament, especially the Improved torpedo (Mk.13-1 Case) that makes attacking ships much easier. Machine gun upgrades may not be needed initially, as the stock M2 Browning does well enough. The turrets, however, profit from upgrades, gaining longer and more accurate fire.

Of course, performance upgrades don't hurt (Compressor, Engine and Engine Injection are often essential pick-ups). Airframe and Cover can be used to further bolster the durable aircraft. Other upgrades can be scheduled toward the end.

Armaments

Offensive armament

Ammunition620 rounds
Fire rate750 shots/min
Main article: M2 Browning (12.7 mm)

The TBF-1C is armed with:

  • 2 x 12.7 mm M2 Browning machine guns, wing-mounted (310 rpg = 620 total)

Suspended armament

List of setups (6)
Setup 14 x 500 lb AN-M64A1 bomb
Setup 21 x Mk.13-6 torpedo (2216 lbs)
Setup 31 x Mk.13-6 Case Torpedo (2216 lbs)
Setup 41 x 2000 lb AN-M66A2 bomb
Setup 51 x 1600 lb AN-Mk 1 armor-piercing bomb
Setup 62 x 1000 lb A.P. AN-MK 33 bomb

The TBF-1C can be outfitted with the following ordnance:

  • 4 x 500 lb AN-M64A1 bombs (2,000 lb total)
  • 1 x 2,216 lb Mk.13-6 torpedo
  • 1 x 2,216 lb Mk.13-6 Case torpedo
  • 1 x 2,000 lb AN-M66A2 bomb (2,000 lb total)
  • 1 x 1,600 lb AN-Mk 1 bomb (1,600 lb total)
  • 2 x 1,000 lb A.P. AN-MK 33 bombs (2,000 lb total)

Defensive armament

Ammunition400 rounds
Fire rate750 shots/min
Ammunition500 rounds
Fire rate1000 shots/min

The TBF-1C is defended by:

  • 1 x 12.7 mm M2 Browning machine gun, dorsal turret (400 rpg)
  • 1 x 7.62 mm Browning machine gun, ventral turret (500 rpg)

Usage in battles

As with all torpedo bombers, maintain low altitude, high speed, and fighter cover. The optimal distance for launching a torpedo is 1 km from the target. Engage enemy ships from directly ahead or astern which makes "leading" the target much easier. If torpedo bombing is not an option, the TBF-1C can carry bombs for attacking ground targets.

The Avenger lacks much significant offensive armament, but in a pinch it can serve as a backup fighter. This aircraft is not particularly fast or manoeuvrable, but continuing the trend among mid-tier American aircraft, it is extremely durable. Do not attack enemy aircraft head-on as the TBF-1C's guns are wing-mounted (causing convergence issues) and the large engine or pilot can be knocked out quickly by enemy fire.

Fly low and fast, head towards your target, drop your ordnance and bug out. However, if there are no hostile fighters in the area, you can destroy some enemy ground installations, e.g. AA, light vehicles, landing crafts and anti-tank positions after this.

Despite being a light bomber/torpedo bomber, the Avenger comes with a bombsight, just like the old TBD Devastator, albeit without the telescopic sight in the pilot's cockpit. This makes precision bombing in Realistic battles possible, as even novice pilots will be able to drop the 500 kg bombs with excellent accuracy. Once you spot a target, fly out about 1.5 km horizontally from the target (remember to keep focus on said target and its general location while being aware of any obstacles in your way), then begin to slowly fly over said target. Open the bomb bay and switch to the bombsight view, then drop your ordnance.

Simulator mode

Hands-off carrier take-off (Auto engine control): Start engine, flaps: raised, elevator trim: 0%, aileron trim: 0%, rudder trim: 14% right, WEP throttle, hands off controls until you lift off the carrier.

Level-type carrier landing final approach (Auto engine control): Drop any secondary weapons you may still have, make sure your alignment with the carrier and heading are good for landing, use your stick to hold an altitude of 40 m (120 ft), slow down below 200 km/h (125 mph / 108 kt), elevator trim: 2%, aileron trim: 18%, rudder trim: 0%, after gently slowing down to 123 km/h (77 mph / 67 kt) set throttle to about 55% (you will have to adjust throttle a lot, though), just before the carrier (less than 1 km (0.62 mi)) cut throttle and reset all trim to 0%, landing should be easy after that.

Manual Engine Control

MEC elements
Mixer Pitch Radiator Supercharger Turbocharger
Oil Water Type
Controllable Controllable
Auto control available
Controllable
Not auto controlled
Controllable
Not auto controlled
Separate Controllable
2 gears
Not controllable

Pros and cons

Pros:

  • Robust construction
  • Adaptive secondary ordnance for different maps e.g. naval or ground based operations
  • Very good vision from pilot's seat in cockpit
  • Very stable
  • Good defensive gunner coverage
  • Tail hook for carrier-based missions

Cons:

  • Limited bomb selection for a bomber
  • Wing mounted 12.7 mm machine guns factoring in convergence
  • Poor low altitude performance, especially when turning
  • Heavy and fairly slow
  • Big target at low altitude
  • Ventral gunner has little protection, easily knocked out
  • Only has landing flaps
  • Touchy controls, tends to over-respond to small control inputs (SB)

History

TBF-1 Avenger dropping Mk.XIII torpedo, 1942
TBF-1 Avenger dropping a Mk.XIII torpedo, 1942
Typical Monthly Production Grumman TBF-1
February, 1942 5
June, 1942 60
November, 1942 100

Significant engagements involving the TBF-1

Battle Of Midway - June 4, 1942
The Battle of Midway was a massive naval engagement that occurred 6 months after Pearl Harbour. Initiated by the Japanese, the attack on Midway was supposed to be a surprise attack that repeated their success at Pearl Harbor. However, due to American efforts in cracking Japanese communication codes in the days and weeks prior to the operation, the American defenders were warned about the attack far in advance.

The first combat mission of the TBF-1 was on June 4, 1942 at the battle of Midway. Only six TBF-1s were available and were initially attached to torpedo squadron VT-8. All apart from one (with significant damage) were shot down during the battle.

Eastern Solomons - August 24-25, 1942
IJN Admiral Yamamoto's infamous naval counter-strike against the US. The opposing naval forces met; the US Navy had only two carriers: USS Saratoga (VT-8) and USS Enterprise (VT-3). The Imperial Japanese Navy had the carriers: IJN Shōkaku, IJN Zuikaku, and light carrier IJN Ryūjō. By August, TBF Avengers had been delivered to the two US ships. Overall, 26 TBF-1s from VT-8 and VT-3 were launched during this engagement. Their torpedoes helped sink IJN Ryūjō for the loss of seven Avengers.

Guadalcanal - Nov, 12-13, 1942
Avengers from USS Enterprise (CV-6) crippled and assisted in the destruction of the 37,000 ton battleship IJN Hiei. Guadalcanal was the last large-scale Japanese naval attack and the Hiei was the first Japanese battleship sunk by US forces. TBF-1s were further used by Marine Scout Bombing Squadron 131 (VMSB-131).


Archive of the in-game description

The TBF Torpedo Bomber was created to replace the outdated Devastators, which suffered from insufficient speed and short range. The TBF, also known as the Avenger, had good range and load capacity and the ability to carry cargo inside the fuselage. It was an ideal solution for a carrier-based transport aircraft. During the war, the Avenger earned a reputation as a very accurate bomber.

One unique feature of the TBF-1 was its wings. After the plane landed, they were folded back onto the side of the fuselage and parallel to it. This was done to solve the problem of the insufficient height of aircraft carrier hangar decks, which conflicted with standard upward-folding wings. Thanks to hydraulic actuators, the wings could be retracted or extended by the pilot in just a few seconds, without any help from ground personnel.

The TBF was widely used during World War II by not only U.S. forces but also those of Great Britain and New Zealand. In Great Britain, the aircraft was named the Tarpon and was one of the most extensively used British torpedo-bombers.


Media

Skins

See also

External links


Grumman Aircraft Engineering Corporation
Aircraft 
Fighters 
F3F  F3F-2 · Galer's F3F-2
F4F Wildcat  F4F-3 · F4F-4
XF5F Skyrocket  XF5F · XP-50
F6F Hellcat  F6F-5 · F6F-5N
F7F Tigercat  F7F-1 · F7F-3
F8F Bearcat  F8F-1 · F8F-1B
Jet Fighters 
F9F Panther/Cougar  F9F-2 · F9F-5 · F9F-8
F-11 Tiger  F11F-1
F-14 Tomcat  F-14A Early · F-14B
Jet Strike Aircraft 
A-6 Intruder  A-6E TRAM
Bombers  TBF-1C
Export  ▄Martlet Mk IV · ▄F6F-5 · ▄F6F-5N · ▄F8F-1B · ▄Avenger Mk II · ▄Hellcat Mk II
  ▄F-14A IRIAF
Naval Vehicles 
Patrol Gunboat Hydrofoil (PGH)  USS Flagstaff

USA bombers
Dive  SB2U-2 · SB2U-3 · SBD-3 · SB2C-1C · SB2C-4
Torpedo  TBD-1 · PBY-5 Catalina · PBY-5A Catalina · TBF-1C · BTD-1
Medium  B-10B · B-18A · B-34 · PV-2D · B-25J-1 · B-25J-20 · A-26C-45 · A-26C-45DT · B-26B
Heavy  B-17E · B-17E/L · B-17G-60-VE · PB4Y-2 · B-24D-25-CO · B-29A-BN
Hydroplanes  OS2U-1 · OS2U-3 · PBM-1 "Mariner" · PBM-3 "Mariner" · PBM-5A "Mariner"