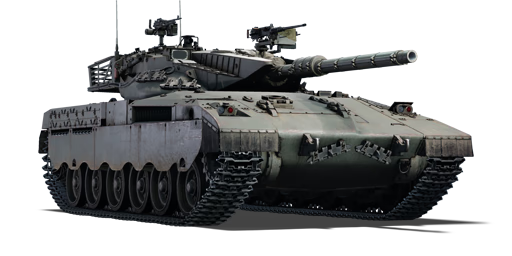
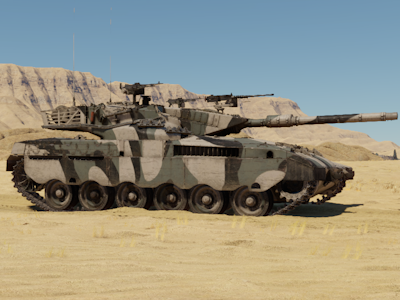
Merkava Mk.1 (USA)
This page is about the American medium tank Merkava Mk.1 (USA). For other versions, see Merkava (Family). |
Contents
Description
The Merkava Mk.1 was the first variant of the Merkava main battle tank family. The Israeli Army and the British Army started working together on design notes for the Chieftain main battle tank, which was initially used by the British Army, in the late 1960s with the goal of Israel acquiring and domestically manufacturing the vehicle. A four-year study included the delivery of two prototypes. Britain ultimately decided not to sell the Chieftain to Israel because it was already being given to Arab nations, who were then pursuing their own development plans. After the Suez Crisis, Israel Tal, then a brigade commander, revived plans to build an Israeli-made tank by learning from the Yom Kippur War of 1973, during which Israeli troops were outnumbered by those of Middle Eastern Arab nations. Israel Tal's choice led to the development of the Merkava Mk.1, which started its service in 1979. It was designed and constructed with mass production in mind. The Merkava Mk.1 had a diesel engine that produced 908 horsepower and had a power-to-weight ratio of 14 horsepower/tonne, weighing 63 tonnes. It was mounted with a 105 mm M64 L71A tank gun, an authorized replica of the 105 mm M68 tank gun used by the U.S. Army, while the British Centurion medium tank, which was extensively used during the Yom Kippur War and functioned admirably in the Golan's rugged terrain, provided the Merkava design's tracks and road wheels. During the 1982 Lebanon War, Israel deployed the 180 units of the Merkava Mk.1 into battle. By removing the palletized ammunition racks, some Merkava Mk.1s were transformed into improvised APCs or armoured ambulances. Up to ten troops or walking wounded could be accommodated via the entrance in the back.
Introduced during Update 1.87 "Locked On" as a reward for the 2019 "Battlefield Engineer" crafting event, the Merkava Mk.1 provides a unique tank to the U.S. ground forces. The placement of the engine at the front of the tank rather than the back, as is traditional, is one of the Merkava design's most distinctive features. The goal of such a design was to increase crew survivability, because Israel is a small country with few resources and manpower, making it essential for them to survive conflicts. Due to its significantly improved survivability compared to conventional main battle tanks, players will enjoy experiencing one of the Middle East's most iconic major combat tanks.
General info
Survivability and armour
This tank has an extremely low profile, sloped frontal armour that is extremely sloped everywhere.
Even if anything penetrates the front of the hull, the shell will then have to go through an assortment of modules and protection beyond the initial hull. The first in the way is a fuel tank, which shields the engine. Even if that is penetrated, there is still a list of rolled homogeneous armour behind it. Even if that is penetrated, the engine will take the entirety of shrapnel with seemingly no failure. This will often result in the tank catching fire with a destroyed transmission and/or engine but with no other damage the tank. If one tries to fire straight at the driver, the shell will most likely just ricochet, bounce off the turret and away unless it was APDS or APFSDS. Even then, any shell that hit directly from the front will likely only take down the driver.
The hull is also quite protected against ATGMs, as the module placement absorbs as much damage as IPM1 and M1A1 Abrams NERA, so missiles should be fired at the turret instead unless one tries to just burn down the vehicle. In arcade mode, if an ATGM tank operator wants to destroy the tank fast, they should consider hitting the upper part of the hull next to the turret, for if only the engine is hit by projectile, then HEAT can overpenetrate it and spall into mid-section of the tank, sometimes just barely reaching the ready ammo rack and detonating it. In Realistic battle mode, simply hitting turret with ATGM might actually destroy the vehicle in one hit due to the crew loss.
The turret is well-protected, with its well-angled armour structure and layers of homogeneous armour. As such, anything short of APDS from specifically sniper tanks like Chieftain Mk 3 or APFSDS have a high chance of doing no damage. The only place with no protection is the turret ring, which is vulnerable to well-aimed APHE shots.
The side hull armour of the tank is considerably weaker though and can be penetrated by APDS-equipped SPAA and light tanks. Tracks still block some shots, but it's possible to destroy the entirety of turret compartment with a high enough rate-of-fire before tank turns around. AP-I belt would probably fail to penetrate it, though.
The sides of the base of the turret seem to be a viable target for HESH, unlike the rest of the tank. Though, even there vehicle has a little fuel tank, which has a tendency to derail spalling away from last turret crew member.
As such, Merkava should avoid exposing its sides, to protect its turret crew and ammunition.
In addition to the assortment of armour, the vehicle has smoke launchers and smoke shells to cover itself.
Ammunition is stored in the very back of the vehicle, at the very bottom and is covered with even more armour lists. Most of the attacks from front of the vehicle or from above will inevitably hit side skirts, turret, or other modules in way of the shell and achieve nothing. In case enemy tank attacks from behind, even tank's back is protected with layers of spaced armour, rolled homogeneous armour and fuel tanks, completely neutralizing weak chemical shells (such as HESH), or derailing HEATFS spall away from critical components. Only firing HEATFS diagonally through the shield in the middle of Merkava's rear seems to consistently achieve hitting ammunition or crew. Using AP based ammunition instead is highly advised.
Armour type:
Armour | Front (Slope angle) | Sides | Rear | Roof |
---|---|---|---|---|
Hull | 60 mm (67-76°) Front glacis 60 - 90 mm (30-57°) Lower glacis |
50 + 10 mm Top 50 + 10 mm Bottom |
30 mm (12-44°) mm | 20 - 30 mm |
Turret | 30 - 65 mm (1-71°) Turret front Variable thickness armour (0-75°) Gun mantlet |
65 mm Upper turret armour
Variable Thickness Armour mm (0-60°) Lower turret armour |
65 mm (11° - 66°) | 30 mm |
Cupola | 30 mm | 30 mm | 30 mm | 30 mm |
Notes:
Mobility
Game Mode | Max Speed (km/h) | Weight (tons) | Engine power (horsepower) | Power-to-weight ratio (hp/ton) | |||
---|---|---|---|---|---|---|---|
Forward | Reverse | Stock | Upgraded | Stock | Upgraded | ||
Arcade | 61 | 12 | 61 | 1395 | 1,717 | 22.87 | 28.15 |
Realistic | 55 | 11 | 796 | 900 | 13.05 | 14.75 |
In Arcade battles, the Merkava Mk.1 (USA) has a top speed of about 51 km/h forward. However, either due to extreme recklessness of its drivers, or better than average acceleration, it often gets to position faster than expected. Its reverse speed is quite low though, being about -10 km/h at best. In Realistic mode, its top speed is supposed to be about 46 km/h forward and about -8 km/h in reverse.
Modifications and economy
Armaments
Main armament
The Merkava Mk.1 uses a 105 mm Sharir cannon with a two-plane stabilizer. The default reload rate is 8.7 seconds and with crew training it will go down to 6.7 seconds. First-stage ammo stowage on the turret floor has 14 shells and the 48 remaining shells are in the back.
105 mm Sharir | Turret rotation speed (°/s) | Reloading rate (seconds) | |||||||||||
---|---|---|---|---|---|---|---|---|---|---|---|---|---|
Mode | Capacity | Vertical | Horizontal | Stabilizer | Stock | Upgraded | Full | Expert | Aced | Stock | Full | Expert | Aced |
Arcade | 54 | -8°/+20° | ±180° | Two-plane | 38.1 | 52.7 | 64.0 | 70.8 | 75.3 | 8.71 | 7.70 | 7.10 | 6.70 |
Realistic | 23.8 | 28.0 | 34.0 | 37.6 | 40.0 |
Ammunition
The gun can be loaded with:
- M152: HEATFS; a shaped charge that can penetrate any vehicle's armour frontally. Like the APFSDS shot, increased armour thickness results in reduced amount of spalling (shrapnel) after penetration. You are able to take out enemies on any distance, since the HEAT round does not lose penetration with distance travelled - very handy on large maps like Kursk. Unlike APFSDS it has one downside: given that it is a chemical round, its fuse is highly sensitive in regards to its practical application in battle. As a result, virtually anything, such as trees or even a fence, will set it off prematurely, so you cannot fire through obstructions with this kind of round. Knowledge of potential opponents vehicle layouts will be very handy to use. It is the stock shell.
- M156: HESH; high-explosive squash head projectiles work very differently from other shell types. It ignores any angle, except for ricochet, and deals damage by metal-flakes which are blown off inside the armour by the exterior explosion. To create this deadly shrapnel inside the tank, make sure to only hit armour plates which are a direct part of the interior crew compartment of the tank. Hitting exterior parts of a tank like spaced armour, the suspension, tracks etc. will not harm crew members/modules at all. Currently, only true armour thickness (as opposed to the line of sight thickness) will provide sufficient means of protection, benefiting the USSR turret designs and in general German tanks. Like all high-explosive shells, the fuse is very sensitive and can be set-off by most objects e.g. fences, trees, pillars. The slow muzzle velocity of this shell can make it quite hard to hit targets at longer distances, but at the same time it can be handy because its arc trajectory, allows it to land hits on enemies hiding behind shallow hills.
- M111: APFSDS; a kinetic rod with high penetration power but without explosive. It is capable of easily penetrating the majority of the foes it meets, but these rounds do require finesse as to their placing. Because the projectile lacks an explosive filler, the best bet is to try and either knock out the majority of the enemy tank's crew or to destroy the enemy by ammo or fuel detonation through hitting their respective storage capacities. This, of course, requires knowledge about the vehicles the Merkava Mk.1 (USA) may face - so be sure to use the game's X-Ray view in the hangar and analyse the potential foes for their weak spots! Also, keep in mind that with increased armour thickness the amount of shrapnel shrinks.
- M416: Smoke; useful to blind enemy vehicles that are too remote for you to disable so that you can progress towards objectives.
Penetration statistics | |||||||
---|---|---|---|---|---|---|---|
Ammunition | Type of warhead |
Penetration @ 0° Angle of Attack (mm) | |||||
10 m | 100 m | 500 m | 1,000 m | 1,500 m | 2,000 m | ||
M152 | HEATFS | 400 | 400 | 400 | 400 | 400 | 400 |
M156 | HESH | 127 | 127 | 127 | 127 | 127 | 127 |
M111 | APFSDS | 337 | 335 | 330 | 322 | 314 | 306 |
Shell details | ||||||||||||
---|---|---|---|---|---|---|---|---|---|---|---|---|
Ammunition | Type of warhead |
Velocity (m/s) |
Projectile mass (kg) |
Fuse delay (m) |
Fuse sensitivity (mm) |
Explosive mass (TNT equivalent) (kg) |
Ricochet | |||||
0% | 50% | 100% | ||||||||||
M152 | HEATFS | 1,174 | 10.5 | 0.05 | 0.1 | 1.27 | 65° | 72° | 77° | |||
M156 | HESH | 731 | 11.4 | 0.1 | 4 | 3.17 | 73° | 77° | 80° | |||
M111 | APFSDS | 1,455 | 4.2 | - | - | - | 78° | 80° | 81° |
Smoke shell characteristics | ||||||
---|---|---|---|---|---|---|
Ammunition | Velocity (m/s) |
Projectile mass (kg) |
Screen radius (m) |
Screen deploy time (s) |
Screen hold time (s) |
Explosive mass (TNT equivalent) (g) |
M416 | 732 | 11.6 | 20 | 5 | 25 | 50 |
Ammo racks
Full ammo |
1st rack empty |
2nd rack empty |
3rd rack empty |
Visual discrepancy |
---|---|---|---|---|
54 | 31 (+23) | 7 (+47) | 1 (+53) | No |
Notes:
- Shells are modeled individually and disappear after having been shot or loaded.
- Rack 3 is a ready rack, taking up 6 rounds before rear hull racks 1 and 2 are filled with ammunition. Due to the unique layout of the Merkava and the ammo racks being away from the front, it would not harm the tank's survivability by a large margin to carry more ammunition.
Machine guns
As for machine gun armament, the Merkava Mk.1 has one 12.7 mm M2HB and three 7.62 mm FN MAG 60-40 machine guns.
Their penetration statistics are standard for their calibre.
12.7 mm M2HB | ||||
---|---|---|---|---|
Mount | Capacity (Belt) | Fire rate | Vertical | Horizontal |
Coaxial | 1,000 (200) | 577 | N/A | N/A |
7.62 mm FN MAG 60-40 | ||||
---|---|---|---|---|
Mount | Capacity (Belt) | Fire rate | Vertical | Horizontal |
Coaxial | 6,000 (200) | 600 | N/A | N/A |
Pintle (Commander) | 1,800 (200) | 600 | -10°/+50° | ±120° |
Pintle (Loader) | 1,800 (200) | 600 | -10°/+50° | ±120° |
Usage in battles
At its BR, the Merkava will face some strong enemies. Although the Merkava is designed to maximize crew survivability, don't entirely rely on it. Between the armour plates sits your engine, transmission and fuel tank. These modules can absorb some damage, but in return you will lose mobility completely or even catch on fire.
The gun carried by the Merkava is familiar to all top rank tank commanders: 105 mm Sharir cannon which is a modified version of the British L7 gun. The shells it fires are quite promising. When stock, it can fire M152 HEATFS shell instead of the normal APDS shell. After research tankers can fire the powerful M111 APFSDS shell. This shell can penetrate most enemies the Merkava might face. When uptiered, play more as a support role since you can only shoot weak spots of your enemies' front.
The mobility of the Merkava Mk.1 is subpar by MBT standards. Teammates and enemies will both move faster than you, so keep that in mind. Be careful when you approaching the front line, as enemies may already be waiting to ambush you. Due to the poor mobility, it is recommend again to play as a support tank. You can also play as a flank guard, as you can easily defeat light tanks.
In terms of threats:
- Be careful for most MBTs that fire kinetic rounds.
- Leopards /Type 74 /OF-40: They carry the same gun as the Merkava, have similar ammunition, but are much faster. Their mobility makes them a threat when flanking. They are easy to kill due to weak armour.
- AMX-30B2 BRENUS: It has better mobility than the Merkava and ERA, which can cause trouble for players which have not yet research the M111 round. Stay back, tell your teammates, and let them finish it. It will be much easier to deal if you have the M111 round.
Pros and cons
Pros:
- Armour is surprisingly effective, due to it being multi-layered
- Different ammunition types are cheap to use
- ATGMs, rockets, and HESH rounds may have problems destroying this vehicle
Cons:
- APFSDS does not care about module-based protection and will go straight through the entire vehicle
- Second layer of defence has a lot of openings, which can be exploited with side shots so the vehicle cannot be angled effectively
- Turret ring and middle rear weak spots compromise vehicle's defences, making it vulnerable to APHE at close ranges
- Side hull armour is weak, can be destroyed by light tanks with +30 mm cannons
- Slow for its tier, made worse in uptiers
- Thermal signature is in the front of the tank, that make you very visible on thermals
History
During the mid-1960s, Israel began researching the possibility of developing and manufacturing a domestically designed tank. The need for such a vehicle became even more emphasized after failed negotiations with Great Britain around the same time led to Israel not being permitted to licence produce the Chieftain MBT. Thus, during the late 1960s official development on a domestic Israeli tank began.
The Israeli tank was primarily designed around combat experiences gained during the Yom Kippur War, resulting in heavy emphasis being put on crew survivability. By 1974, first prototypes of the new "Merkava" tank were constructed and put through initial testing. After nearly a decade of development, the Merkava Mk.1 was adopted for service by the IDF in December 1979 and modernized versions continue to serve with Israeli forces today.
- From Devblog
Media
- Skins
- Images
- Videos
See also
Links to the articles on the War Thunder Wiki that you think will be useful for the reader, for example:
- reference to the series of the vehicles;
- links to approximate analogues of other nations and research trees.
External links
Israeli Ordnance Corps (חיל החימוש) | |
---|---|
Medium Tanks | M-51 · M-51 (W) |
MBTs | |
Magach | Magach 1 · Magach 2 · Magach 3 · Magach 3 (ERA) · ▃Magach 3 (ERA) · Magach 5 |
Magach 6 · Magach 6A · Magach 6B · Magach 6C · Magach 6R · Magach 6M · Gal Batash | |
Sho't | Sho't · Sho't Kal Alef · Sho't Kal Gimel · Sho't Kal Dalet · ▄Sho't Kal Dalet |
Tiran | Tiran 4 · Tiran 4S |
Merkava | ▃Merkava Mk.1 · Merkava Mk.1B · Merkava Mk.2B · ▃Merkava Mk.2B · Merkava Mk.2D |
Merkava Mk.3B · Merkava Mk.3C · ▃Merkava Mk.3D · Merkava Mk.4B · Merkava Mk.4M | |
Tank destroyers | Zachlam Tager |
See Also | Chrysler Defense · Department of Tank Design · Morozov Design Bureau |
USA medium tanks | |
---|---|
M2 | M2 |
M3 | M3 Lee · ▃Grant I |
M4 | M4 · Calliope · M4A1 · M4A1 (76) W · M4A2 · M4A2 (76) W · M4A3 (105) · M4A3 (76) W · M4/T26 |
M26 Pershing | T20 · T25 · M26 · M26 T99 · M26E1 |
M46/47/48 Patton | M46 · M46 "Tiger" · M47 · M48A1 · T54E1 · T54E2 |
M60 | M60 · M60A1 (AOS) · M60A1 RISE (P) · M60A2 · M60A3 TTS · M728 CEV · 120S |
MBT-70 | MBT-70 · XM803 |
M1 Abrams | XM1 (Chrysler) · XM1 (GM) |
M1 Abrams · M1 KVT · IPM1 | |
M1A1 · M1A1 HC · M1A1 Click-Bait | |
M1A2 Abrams · M1A2 SEP · M1A2 SEP V2 | |
Other | T95E1 |
Australia | M1A1 AIM |
Canada | M4A5 |
Israel | ▃Magach 3 (ERA) · ▃Merkava Mk.1 · ▃Merkava Mk.2B · ▃Merkava Mk.3D |
Turkey | M60 AMBT |