Leopard 2A6

From War Thunder Wiki
Jump to: navigation, search
Rank VI Israel | Premium | Golden Eagles
Merkava Mk.2D Pack
This page is about the German medium tank Leopard 2A6. For other versions, see Leopard 2 (Family).
germ_leopard_2a6.png
GarageImage Leopard 2A6.jpg
ArtImage Leopard 2A6.png
Leopard 2A6
AB RB SB
11.7 11.7 11.7
Class:
Research:200 000 Specs-Card-Exp.png
Purchase:1 100 000 Specs-Card-Lion.png
Show in game

Description

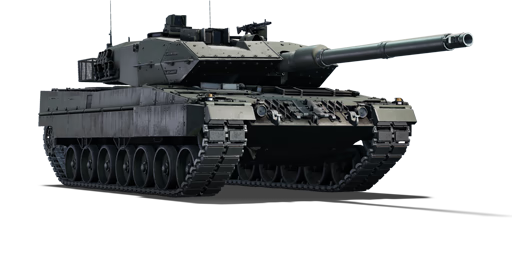
The Leopard 2A6 is the seventh variant of the Leopard 2 main battle tank family. It is commonly referred to as the "long" Leopard 2A5 since it is nearly identical to the Leopard 2A5 variant but incorporates the new longer-barrelled 120 mm Rheinmetall L/55 tank gun. This version not only allows for heavier and newer ammunition to be fired, but it also results in greater muzzle velocity, range, and precision. Otherwise, only slight improvements are introduced compared to the previous Leopard 2A5 variant. Several subvariants were developed, including the Leopard 2A6A1, a command variant derived from the KWS I program. Additional radios (depending on the level of command) are installed in the vehicle to accommodate communications for section, platoon, troop, company, squadron, or battalion leaders. Another well-known subvariant is the Leopard 2A6M, a Leopard 2A6 with improved mine protection beneath the hull chassis and internal improvements to improve crew survivability. Canada borrowed 20 Leopard A6Ms from Germany in the summer of 2007 for deployment to Afghanistan.

Introduced in Update "New Power", the Leopard 2A6 seeks to give superior firepower to combat increasingly strong adversaries in future battlefields, and it is equipped with cutting-edge technology. The Leopard 2A6 can fire the latest armour piercing fin stabilised discarding sabot (APFSDS) with the new 120 mm Rheinmetall L/55 tank gun, allowing players to engage the most modern opponents with ease. The tank layouts are nearly identical to the Leopard 2A5, with the same crew placements and overall layouts.

General info

Survivability and armour

Composite armour
Balanced protection against all types of ammunition
Smoke grenades
Creation of a smoke screen in front of the vehicle
Armourfront / side / back
Hull80 / 30 / 20
Turret75 / 80 / 20
Crew4 people
Visibility87 %
The frontal KE protection of the Leopard 2A6 against 3BM42 at 500 m.

The Leopard 2A6 retains the same excellent armour than its predecessor, the hull remains well protected and the turret cheeks are just as impenetrable. Add-on hull armour boosts the ability to protect against HEAT-FS and early APFSDS rounds. The wedges on the front of the turret are able to be blown off if a round with enough energy hits it. This isn't an issue since the armour underneath has ~710 mm of KE protection. The gunner's optic is also moved into the roof to eliminate the weak spot which was easily penetrated by any tank.

The frontal CE protection of the Leopard 2A6 against MIM-146.

Be aware of High Explosive rounds and ATGMs though. If these land on your commander's cupola, the fragments can knock out 3/4 crew members inside the turret. A hit to the lower part of the V shaped turret cheeks with an ATGM will most likely send fragments into your hull, penetrate and either detonate your ammo or incapacitate several crew members. Don't get hit by an ATGM-

The frontal hull can be penetrated by all APFSDS rounds and ATGM warheads at its Battle Rating - if possible, hiding it by hulldowning properly is recommended.

Armour Front (Slope angle) Sides Rear Roof
Hull 35 mm (53-82°) Upper glacis
40 mm (50-51°) Lower glacis
10 mm (5°) Upper hull
35 mm (0°) Lower forward hull
20 mm (0°) Lower rear hull
20 mm (12-50°) All rear 20 mm (0-8°) Hull roof incl. engine deck
Turret 80 mm (57-59°) Right cheek add-on
80 mm (55-58°) Left cheek add-on
30 mm (63°) Upper mantlet add-on
400 mm (1°) Mantlet armour
250 mm (9°) Mantlet shroud
80 mm (20-22°) Right add-on
80 mm (22°) Left add-on
35 mm (0°) Forward
15 mm (0°) Rear
20 mm (10°) Basket
20 mm (70°) Turret underside
35 - 40 mm (80-89°) Forehead Armour
14 mm (68-82°) Forward sides
20 mm (89°) Rear turret
20 mm (83°) Basket
Composite armour Front Sides
Hull Upper+Lower glacis
440 - 480 mm Kinetic
600 mm Chemical
N/A
Turret Cheeks
850 - 950 mm Kinetic
1200 mm Chemical
Gun mantlet (Centre)
260 - 325 mm Kinetic
600 - 690 mm Chemical
Gun mantlet (Outer)
425 - 460 mm Kinetic
825 - 905 Chemical
Side armour
260 mm Kinetic
230 - 285 mm Chemical

Notes:

  • Upper hull and Lower rear hull overlap (10 + 20 mm thick)
  • Upper mantlet add-on and Mantlet armour overlap (30 + 400 mm thick)
  • Holes in the engine deck are covered by 8 mm of mesh

Mobility

Speedforward / back
AB76 / 35 km/h
RB and SB69 / 31 km/h
Number of gears8 forward
4 back
Weight59.9 t
Engine power
AB2 862 hp
RB and SB1 500 hp
Power-to-weight ratio
AB47.8 hp/t
RB and SB25.0 hp/t
Game Mode Max Speed (km/h) Weight (tons) Engine power (horsepower) Power-to-weight ratio (hp/ton)
Forward Reverse Stock Upgraded Stock Upgraded
Arcade 76 35 59.9 2,032 2,862 33.92 47.78
Realistic 69 31 1,327 1,500 22.15 25.04

The only drawback compared to the previous model would be the Leopard 2A6's mobility since, despite the half ton increase in weight, the engine remains the same, so the Leopard 2A6 retains the rather average mobility at its BR like the Leopard 2A5. Although, this difference is negligible and it is by no means a slow vehicle. The engine is, as with all Leopard 2 variants, the MTU MB 873 Ka-501 engine which produces 1,500 hp (1,100 KW) at 2,600 RPM.

Modifications and economy

Repair costBasic → Reference
AB4 712 → 7 011 Sl icon.png
RB4 567 → 6 795 Sl icon.png
SB5 780 → 8 600 Sl icon.png
Total cost of modifications287 700 Rp icon.png
483 000 Sl icon.png
Talisman cost3 200 Ge icon.png
Crew training310 000 Sl icon.png
Experts1 100 000 Sl icon.png
Aces2 300 Ge icon.png
Research Aces1 350 000 Rp icon.png
Reward for battleAB / RB / SB
160 / 200 / 210 % Sl icon.png
256 / 256 / 256 % Rp icon.png
Modifications
Mobility Protection Firepower
Mods new tank traks.png
Tracks
Research:
21 000 Rp icon.png
Cost:
32 000 Sl icon.png
430 Ge icon.png
Mods new tank suspension.png
Suspension
Research:
18 000 Rp icon.png
Cost:
28 000 Sl icon.png
370 Ge icon.png
Mods new tank break.png
Brake System
Research:
18 000 Rp icon.png
Cost:
28 000 Sl icon.png
370 Ge icon.png
Mods new tank filter.png
Filters
Research:
16 000 Rp icon.png
Cost:
24 000 Sl icon.png
330 Ge icon.png
Mods new tank transmission.png
Transmission
Research:
20 000 Rp icon.png
Cost:
31 000 Sl icon.png
410 Ge icon.png
Mods new tank engine.png
Engine
Research:
20 000 Rp icon.png
Cost:
31 000 Sl icon.png
410 Ge icon.png
Mods tank tool kit.png
Improved Parts
Research:
6 300 Rp icon.png
Cost:
32 000 Sl icon.png
430 Ge icon.png
Mods extinguisher.png
Improved FPE
Research:
5 400 Rp icon.png
Cost:
28 000 Sl icon.png
370 Ge icon.png
Mods tank reinforcement ger.png
Crew Replenishment
Research:
16 000 Rp icon.png
Cost:
24 000 Sl icon.png
330 Ge icon.png
Mods new tank horizontal aiming.png
Horizontal Drive
Research:
21 000 Rp icon.png
Cost:
32 000 Sl icon.png
430 Ge icon.png
Mods tank cannon.png
Adjustment of Fire
Research:
18 000 Rp icon.png
Cost:
28 000 Sl icon.png
370 Ge icon.png
Mods new tank vertical aiming.png
Elevation Mechanism
Research:
16 000 Rp icon.png
Cost:
24 000 Sl icon.png
330 Ge icon.png
Mods smoke screen.png
Smoke grenade
Research:
16 000 Rp icon.png
Cost:
24 000 Sl icon.png
330 Ge icon.png
Mods thermal sight.png
NVD
Research:
16 000 Rp icon.png
Cost:
24 000 Sl icon.png
330 Ge icon.png
Mods art support.png
Artillery Support
Research:
20 000 Rp icon.png
Cost:
31 000 Sl icon.png
410 Ge icon.png
Mods tank ammo.png
120mm_DM_APDS_FS_ammo_pack
Research:
20 000 Rp icon.png
Cost:
31 000 Sl icon.png
410 Ge icon.png
Mods tank laser rangefinder.png
Laser rangefinder
Research:
20 000 Rp icon.png
Cost:
31 000 Sl icon.png
410 Ge icon.png

Armaments

Laser rangefinder
Reduces the error and increases the maximum measurable distance of the rangefinder
Night vision device
Improves visibility by enhancing natural light or active illumination.
Thermal imager
Allows to see thermal radiation in the infrared range day and night

Main armament

Two-plane stabilizer
Reduces the swing of the gun in two planes while moving
Ammunition42 rounds
First-order15 rounds
Reloadbasic crew → aces
7.8 → 6.0 s
Vertical guidance-9° / 20°
Main article: Rh120 L/55 (120 mm)

The Leopard 2A6 has access to the DM53 APFSDS, a high penetrating APFSDS shell. Such shell is able to penetrate M1A2 Abrams, Challenger 2 and T-80U more easily than its predecessor.

120 mm Rh120 L/55 Turret rotation speed (°/s) Reloading rate (seconds)
Mode Capacity Vertical Horizontal Stabilizer Stock Upgraded Full Expert Aced Stock Full Expert Aced
Arcade 42 -9°/+20° ±180° Two-plane 38.1 52.7 64.0 70.8 75.3 7.80 6.90 6.36 6.00
Realistic 23.8 28.0 34.0 37.6 40.0

Ammunition

Penetration statistics
Ammunition Type of
warhead
Penetration @ 0° Angle of Attack (mm)
10 m 100 m 500 m 1,000 m 1,500 m 2,000 m
DM12A1 HEATFS 480 480 480 480 480 480
DM33 APFSDS 496 494 486 476 466 456
DM53 APFSDS 652 650 640 628 616 604
Shell details
Ammunition Type of
warhead
Velocity
(m/s)
Projectile
mass (kg)
Fuse delay
(m)
Fuse sensitivity
(mm)
Explosive mass
(TNT equivalent) (kg)
Ricochet
0% 50% 100%
DM12A1 HEATFS 1,190 13.5 0.05 0.1 2.15 65° 72° 77°
DM33 APFSDS 1,690 4.3 - - - 78° 80° 81°
DM53 APFSDS 1,750 5 - - - 78° 80° 81°

Ammo racks

Ammo racks of the Leopard 2A6
Full
ammo
1st
rack empty
2nd
rack empty
Visual
discrepancy
42 16 (+26) (+41) No

Notes:

  • Shells are modeled individually and disappear after having been shot or loaded.
  • Rack 2 is a first stage ammo rack. It totals 15 shells and gets filled first when loading up the tank.
  • This rack is also emptied early: the rack depletion order at full capacity is: 2 - 1.
  • Simply not firing when the gun is loaded will move ammo from rack 1 into rack 2. Firing will interrupt the restocking of the ready rack.

Machine guns

Ammunition4 400 rounds
Belt capacity200 rounds
Reloadbasic crew → aces
10.4 → 8.0 s
Fire rate1 200 shots/min
Ammunition2 000 rounds
Belt capacity200 rounds
Reloadbasic crew → aces
10.4 → 8.0 s
Fire rate1 200 shots/min
Main article: MG3A1 (7.62 mm)
7.62 mm MG3A1
Mount Capacity (Belt) Fire rate Vertical Horizontal
Coaxial 4,500 (1,000) 1,200 N/A N/A
Pintle 2,000 (1,000) 1,200 -8°/+20° ±120°

Usage in battles

The Leopard 2A6 retains almost the same mobility and exactly the same armour as Leopard 2A5. It does have a better gun with a better round. Yet, its playstyle remains the same.

Hull-Down Long Distance Combat
  • The Leopard 2A6's turret is one of the hardest in the game to penetrate. But, it shares the same weak spot as any other vehicle at its BR - the mantlet area. It can also be destroyed by a well-aimed shot with an ATGM.
  • To eliminate the risk of getting penetrated in the gun mantlet, the use of commander's thermals which are at the roof are recommended for scouting the area without exposing the turret itself at all. Make sure to always enable Commander's fire control, so the turret itself rotates with the sight. When you spot a target, you can use the laser rangefinder whilst still being in commander's view, then switch to gunner's sight, quickly peek, eliminate the target and quickly reverse back behind cover. Your turret will be exposed for only around 2 seconds, giving your target very slim chances to retaliate.
  • Stay still only when taking a shot at the target, never any longer, since the longer you stay exposed, the higher the risk that your gun, along with some crew members is going to get taken out.
  • This strategy makes you more or less immortal. You can fight and win against multiple opponents at a distance. CAS and flankers can still defeat you though. Watch your flanks.
Close-Quarters Combat
  • Use 3rd person view in close quarters, always. This gives you a much better situational awareness than 10 degrees of FoV in gunner's sight. Night battles are an exception, you can use commander's thermals at medium ranges, which have a better FoV than the gunner's sight. Rotate your camera around all the time.
  • Have your headphones on and watch out for engine sounds. They can give you a heads up against an enemy coming close that you don't see yet.
  • In close quarters, any vehicle at your BR can penetrate you and so can you. Don't rush around mindlessly and pay attention to your surroundings.
  • Sticking around your teammates can improve your lifespan.
  • Since you can get penetrated easily from the front, you always have to shoot first to win. You need to be especially careful against Swedish Leopards and all Russian T-series tanks at your BR, since you have to aim for their weak spots more precisely than they need to aim at yours. If they manage to shoot you anywhere in the hull or the mantlet area, you have a problem. Meanwhile, you have to aim at the driver's hatch of T-series or the mantlet from the front and in the case of Strv 122s, only the mantlet is a reliable way of disabling them from the front.
  • Never, ever peek around a corner if the enemy behind it is aiming at the corner. Your chances of shooting first are slim to none and you will most likely die.
  • If uneven terrain such as a hill separates you and there is an enemy vehicle that is aware of you and aiming at you, you can peek first, provided you do it properly - don't use gunner's sight. Use 3rd person view and aim with the center of the outer crosshair circle directly at their mantlet area. Then, peek as fast as you can and as soon as you see the inner crosshair circle connect with what you are aiming at, take the shot immediately. When you learn to do this quickly enough, you will always win in this situation against any vehicle you face.
  • If an enemy vehicle is rushing at you and going to peek around a corner, let them. You can easily shoot faster than they do.

Pros and cons

Pros:

  • Incredibly powerful DM53 APFSDS round (650 mm of penetration at 100 m)
  • Great all-round turret armor
    • The add-on wedge armour makes the turret cheeks impenetrable (average of 850 mm against APFSDS and 1,450 mm against HEAT)
    • Small mantlet weak spot
    • Side turret covered by add-on armour can bounce early APFSDS shells and newer ones too if you get lucky
  • Commander's camera with 2nd generation thermal imager; this is similar to binoculars, but with thermals
  • Good armour on the UFP (430 mm against APFSDS) makes it immune to older shells, though all vehicles at its BR except some SPAAs can reliably penetrate it
  • Extremely good gun handling for an MBT: 40°/s for both turret rotation and gun elevation speed (with Ace crew) and -9°/+20° of maximum vertical guidance
  • Gunner optics are now mounted on top of the turret, removing the annoying weak spot present on the Leopard 2A4
  • Cannon barrel and cannon breech can absorb impact rounds which may otherwise penetrate the turret and injure crew members

Cons:

  • Lower glacis (~250 mm of KE protection against APFSDS) can still be penetrated by most shells, similar to most MBTs
  • 16 shells in the ready-rack may be insufficient when playing in Arcade Battles; be prepared to fall back and wait for a minute for the rack to replenish
  • Huge hull ammo-rack if more than 16 shells are carried makes the tank vulnerable to HE shells and presents an annoying hull weak spot
  • Hull penetrations are likely fatal; a penetrating shot on the left side of the hull will most likely knock out the driver, gunner and commander, while a penetrating shell on the right side of the hull will most likely hit the ammo-rack, in both cases destroying the tank
  • The wedges can be shot off with several hits, though the turret cheeks alone provide 710 mm against KE
  • Despite all the added armour, the turret ring and the mantlet are both easily penetrated, and the enemy will most likely aim at these two spots to disable or destroy the tank
  • 1st Gen Thermals for the Gunner

History

Following the rollout of the Leopard 2A5 modification with enhanced protection, German engineers, in cooperation with international partners, immediately began working on improving the MBTs firepower.

This was achieved by, among other minor modifications, lengthening the Rh 120 L44 cannon by 1,320 mm, thus creating the Rh 120 L55. As a result, the Leopard 2A6's firing range was extended in addition to other ballistic properties being improved.

Production of the vehicle began in the early 2000s by converting older Leopard 2A4 and A5 models to the new standard. Initially, around 225 Leopard 2A6s were produced for the German Bundeswehr. Apart from domestic use, the Leopard 2A6 also sees service with Dutch, Canadian, Greek and Portuguese forces, among others. In particular, the Leopard 2A6 was deployed with Canadian forces to Afghanistan in 2007, marking its first operational use.

The Leopard 2A6 is still in service today and, along with other variants, forms the spearhead of the armoured units of the German Bundeswehr.

- From Devblog

Media

Skins
Images
Videos

See also

Links to the articles on the War Thunder Wiki that you think will be useful for the reader, for example:

  • reference to the series of the vehicles;
  • links to approximate analogues of other nations and research trees.

External links


Germany medium tanks
Pz.III  Pz.III B · Pz.III E · Pz.III F · Pz.III J · Pz.III J1 · Pz.III J1 TD · Pz.III L · Pz.III M · Pz.III N
Pz.IV  Pz.IV C · Pz.IV E · Pz.IV F1 · Pz.IV F2 · Pz.IV G · Pz.IV H · Pz.IV J · Pz.Bef.Wg.IV J
Pz.V  VK 3002 (M) · Panther A · Panther D · Panther F · Panther G · Ersatz M10 · Panther II
M48 upgrades  M48A2 G A2 · M48 Super
Leopard 1  Leopard I · Leopard A1A1 · Leopard A1A1 (L/44) · Leopard 1A5 · C2A1 · Turm III
Leopard 2  PT-16/T14 mod. · Leopard 2K · Leopard 2AV
  Leopard 2A4 · Leopard 2 (PzBtl 123) · Leopard 2 PL · Leopard 2A5 · Leopard 2 PSO · Leopard 2A6 · Leopard 2A7V
Trophies  ▀M4 748 (a) · ▀T 34 747 (r)
Other  Nb.Fz. · KPz-70
USA  mKPz M47 G · M48A2 C
USSR  ◊T-72M1