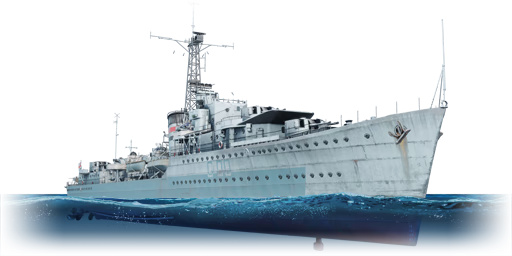
HMS Jervis

From War Thunder Wiki
Jump to: navigation, search
Rank VI Israel | Premium | Golden Eagles
Merkava Mk.2D Pack
HMS Jervis
uk_destroyer_j_class.png
GarageImage HMS Jervis.jpg
HMS Jervis
AB RB SB
4.3 4.3 4.3
Purchase:1 000 Specs-Card-Eagle.png
Show in game

Description

The J-class, HMS Jervis (F00), 1944 is J-class destroyer named after Admiral John Jervis. Jervis was laid down on 26th August 1937 and commissioned on 8th May 1939. Unlike other J-class destroyers, Jervis' role was to serve as a flotilla leader for the J-class destroyers forming the 7th Destroyer Flotilla. She was identical to K-class destroyer leader Kelly and N-class destroyer leader Napier. On the second day after war broke out, September 2nd 1939, Jervis managed to capture a blockade runner and two more until the end of 1939. She continued to serve in Home Waters until 1940 when she was sent to the Mediterranean where she served until late 1943. In 1941, she took part in the Battle of Cape Matapan where she torpedoed and sunk Italian heavy cruiser Zara with three torpedoes that hit her magazines and caused fatal explosion. After that, a boarding party from Jervis captured the crippled heavy cruiser Pola, took off the wounded and let HMS Nubian torpedo and sink the heavily damaged ship. She also participated in the Battle of Crete and the First Battle of Sirte. On her way back to Alexandria, she was badly damaged by Italian human torpedo attack and had to undergo a six-week long repair. During 1942, Jervis took part in the Second Battle of Sirte. She also supported Allied landings on Sicily, Anzio, and other places in the Mediterranean. She was decommissioned in September 1944 after taking part in the Normandy landings. She was recommissioned in May 1945 and served in the Mediterranean again until May 1946 when she was placed in reserve. She was sold for scrap in 1954. Jervis was awarded 13 battle honours for her service, two other ships that also served with Jervis matched that number, namely HMS Orion and HMS Nubian, with a single ship exceeding it: the flagship of Mediterranean fleet, HMS Warspite, with 15 to her name.

HMS Jervis is a British destroyer introduced in Update "New Power". Her armament consists of three twin 120 mm Mk. XII turrets on CPXIX mounts with 12 rounds per minute utilizing first stage ammunition, after that one is depleted, the rate of fire drops to still very impressive 10 rounds per minute. Her anti-aircraft weaponry consists of a single quadruple 40 mm QF Mk.IIc autocannon, four twin 20 mm Oerlikon Mk.V autocannons, and two single 20 mm Oerlikon Mk.II autocannons. She is also armed with single quintuple and single quadruple Mk. IX torpedo launchers with 533 mm Mk. IX torpedoes with base range of 10 km, above average speed of 76 km/h and one of the heaviest payloads of 587.2 kg TNT equivalent. Jervis suffers from the same issue as many other Royal Navy destroyers, namely very vulnerable magazines above the waterline under the forward turrets that could after single hit lead to catastrophic magazine detonation. Utilizing manoeuvrability and speed to evade enemy shells is advised.

General info

Survivability and armour

Armourfront / side / back
Main fire tower3 / 3 / 0 mm
Hull16 mm (steel)
Superstructure4 mm (steel)
Number of section7
Displacement2 369 t
Crew208 people

In real life, HMS Jervis is famous for not suffering any crew loss during her extensive career in World War II, despite occasionally taking serious battle damage. However, the "Lucky J" does not have her immense luck to save her crew from incoming fire in the game.

The Jervis' protection is practically nonexistent. She has only 3.2 mm of casemate armour to protect her main guns, and her Oerlikon autocannon mounts ironically have thicker (but still bad) gun shields of 12.7 mm in thickness. Simply put, the Jervis will take full damage from any of the large cannon calibres, and even small autocannons can pose a threat to her survival.

To make matters worse, almost every vital part of the Jervis is exposed to enemy fire to an extent, her engines, and transmissions are sitting above the waterline with no fuel tanks to absorb incoming shots, and are thus easy to knock out. Her ready ammo racks are fatal weak spots, as they are placed just nearby the main turrets. Any HE shells that would detonate around her turrets will most likely detonate them, causing severe damage to the ship.

Mobility

Speedforward / back
AB85 / 31 km/h
RB69 / 25 km/h

Being a destroyer with relatively low displacement, the Jervis is very fast and manoeuvrable. Due to her very poor protection, using her mobility is a key to survive.

Mobility Characteristics
Game Mode Upgrade Status Maximum Speed (km/h) Turn Time (s) Turn Radius (m)
Forward Reverse
AB Stock ___ ___
Upgraded 85 31
RB/SB Stock ___ ___
Upgraded 69 25

Modifications and economy

Repair cost
AB1 687 Sl icon.png
RB1 570 Sl icon.png
Crew training4 800 Sl icon.png
Experts32 000 Sl icon.png
Aces250 Ge icon.png
Research Aces440 000 Rp icon.png
Reward for battleAB / RB / SB
Talisman.png 2 × 150 / 320 / 50 % Sl icon.png
Talisman.png 2 × 124 / 124 / 124 % Rp icon.png
Modifications
Seakeeping Unsinkability Firepower
Mods new ship hull.png
Dry-Docking
Mods new ship rudder.png
Rudder Replacement
Mods new ship screw.png
Propeller Replacement
Mods new ship engine.png
Engine Maintenance
Mods ship damage control crew.png
Damage Control Division
Mods ship fire control crew.png
Fire Division
Mods engine smoke screen system.png
Smokescreen
Mods ship anti fragmentation protection.png
Shrapnel Protection
Mods ship venting.png
Ventilation
Mods new ship pumps.png
New Pumps
Mods ship ammo wetting.png
Ammo Wetting
Mods tank ammo.png
120mm_uk_navy_AP_ammo_pack
Mods ammo.png
40mm_qf_mkxv_he_ammo_pack
Mods new aa caliber turrets.png
Anti-Air Armament Targeting
Mods he frag dist fuse ship.png
120mm_uk_navy_dist_fuse_he_ammo_pack
Mods ammo.png
40mm_qf_mkxv_ap_ammo_pack
Mods new aux caliber turrets.png
Auxiliary Armament Targeting
Mods ship rangefinder.png
Improved Rangefinder
Mods ship rangefinder.png
Improved Rangefinder
Mods new main caliber turrets.png
Primary Armament Targeting
Mods torpedo.png
Torpedo Mode
Mods he frag proxi fuze ship.png
120mm_uk_navy_radio_fuse_he_ammo_pack

Armament

Primary armament

3 х Turret2 x 4.7 inch/45 Mk.XII cannon, CPXIX mounting
Ammunition400 rounds
Vertical guidance-10° / 40°

The Jervis is equipped with six 120 mm 4.7 inch/45 Mk.XII cannons, mounted in three twin turrets in A-Bs-X setup. These guns have very good traverse speed, and the placement of the turrets allow the B and X turrets to completely turn around, which will come in handy when using it with quick turning to avoid incoming shots.

The 120 mm guns have a short reload time of 5 seconds (ace crew) and feature four types of ammunition; HE, SAP, HE-TF, and HE-VT. The HE shell is reliable against destroyers and some light cruisers, while the SAP shell is only useful for dealing internal damage at close range due to poor penetration. As the turrets have fast traverse speed and good coverage, the anti-air shells will be useful for engaging enemy planes at range if you wish to.

Penetration statistics
Ammunition Type of
warhead
Penetration @ 0° Angle of Attack (mm)
1,000 m 2,500 m 5,000 m 7,500 m 10,000 m 15,000 m
HE Mk.VIIA HE 35 35 35 35 35 35
SAP Mk.VA SAP 116 92 63 44 33 29
HE-TF Mk.VIIA HE-TF 35 35 35 35 35 35
HE-VT Mk.VIIA HE-VT 35 35 35 35 35 35
Shell details
Ammunition Type of
warhead
Velocity
(m/s)
Projectile
mass (kg)
Fuse delay
(s)
Fuse sensitivity
(mm)
Explosive mass
(TNT equivalent) (g)
Ricochet
0% 50% 100%
HE Mk.VIIA HE 808 22.68 0 0.1 3,000 79° 80° 81°
SAP Mk.VA SAP 808 22.68 0.015 5 900 47° 60° 65°
HE-TF Mk.VIIA HE-TF 808 22.68 0 0.1 3,000 79° 80° 81°
Proximity-fused shell details
Ammunition Type of
warhead
Velocity
(m/s)
Projectile
mass (kg)
Fuse delay
(m)
Fuse sensitivity
(mm)
Arming
distance (m)
Trigger
radius (m)
Explosive mass
(TNT equivalent) (g)
Ricochet
0% 50% 100%
HE-VT Mk.VIIA HE-VT 808 22.68 0 0.1 244 23 3,000 79° 80° 81°

Secondary armament

Turret4 x 40 mm 2pdr QF Mk.IIc automatic cannon
Ammunition8960 rounds
Belt capacity56 rounds
Fire rate200 shots/min

The Jervis is outfitted with four 40 mm Pom-pom autocannons in a single quadruple turret as a secondary armament. The turret is located at the midship section, just behind the funnel. The turret can fully rotate but is unable to fire directly at the front and the rear, thus limiting its usage to enemies coming from above or the broadsides of the ship. While the placement of the Pom-pom turret restricts its usage, it can be very deadly against any boats or aircraft within its range.

  • Universal: HEF · AP-T · HEF · AP-T
  • 40 mm HE: HEF · HEF · HEF · AP-T
  • 40 mm AP: AP-T · AP-T · AP-T · HEF

Penetration statistics
Ammunition Penetration @ 0° Angle of Attack (mm)
10 m 100 m 500 m 1,000 m 1,500 m 2,000 m
AP-T 60 57 48 39 32 26
HEF 3 3 3 3 3 3
Shell details
Ammunition Velocity
(m/s)
Projectile
mass (kg)
Fuse delay
(m)
Fuse sensitivity
(mm)
Explosive mass
(TNT equivalent) (g)
Ricochet
0% 50% 100%
AP-T 701 0.91 - - - 47° 60° 65°
HEF 701 0.82 0 0.1 71 79° 80° 81°

Anti-aircraft armament

4 х Turret2 x 20 mm/70 Oerlikon Mark V autocannon
Ammunition3600 rounds
Belt capacity60 rounds
Fire rate450 shots/min
2 х Turret20 mm/70 Oerlikon Mk.II autocannon
Ammunition1800 rounds
Belt capacity60 rounds
Fire rate450 shots/min

For dedicated anti-air defence, the Jervis features ten 20 mm Oerlikon autocannons, with two pairs of dual-mounted Mk V on the bridge and between torpedo launchers and another pair of single-mounted Mk II at the stern. The placement of the guns provides wide coverage against surface and aerial threats, though it is always recommended to man the guns yourself if the enemy gets too close.

Additional armament

Setup 19 x 533 mm Mk.IX** torpedo
Main article: Mk.IX** (533 mm)

The Jervis is loaded with 9 x 533 mm Mk.IX** torpedoes. These torpedoes have 587.2 kg of TNT explosive as the warhead, which is noticeably more powerful than the variants found on British cruisers, and is enough to tackle all targets the Jervis will face. The torpedoes also have a decent top speed of 76 km/h without modification. As the torpedoes have a maximum range of 10 km which is within the range that the Jervis will usually engage, and the torpedo mode modification only adds 3.7 km of extra range, it is advised to uninstall these modifications to increase the torpedo's effectiveness.

Usage in battles

The Jervis is essentially a glass cannon that is good at delivering damage, but bad at taking it. Due to her abysmal protection, rushing into the enemy or trading shots with them is essentially a suicide, as most of your critical modules can be quickly taken out before you can take your enemy down. Instead, play as a support ship and stay behind your allies, your guns, and torpedoes are a great asset for taking down destroyers and harassing enemy cruisers, and your anti-air defence will keep any of the inbound aircraft or PT boats at bay. With HMS Jervis, you shouldn't travel in a straight line for too long as the enemy will target you, instead using your good mobility and turret traverse speed to avoid incoming fire and do a quick snapshot of them.

Pros and cons

Pros:

  • Fast-firing 120 mm cannons with very good coverage
  • Good turret traverse speed, the B and X turrets are fully traversable
  • Very fast and manoeuvrable
  • Good anti-air armament
  • Powerful torpedoes with decent range

Cons:

  • Extremely poor protection
  • All the internal modules can be easily damaged
  • Very low crew count
  • Turrets are easy to knock out
  • Ready ammo racks is exposed to enemy fire and can be detonated

History

HMS Jervis, J-class Flotilla Leader, was a destroyer of the J class. Commissioned just before the outbreak of war, Jervis saw extensive service in the Mediterranean and Atlantic theatres. She participated in multiple major engagements in the Mediterranean, and later participated in the D-Day landings of 1944. Jervis was retired at the end of the war, and later scrapped. She was highly decorated and received 13 battle honours for her service in the Second World War. Jervis also gained a reputation for being extremely lucky, as she never lost a single crew member during her 5 and a half years of service.[1][2]

Design and Development

HMS Jervis on sea trials, early 1939.

The Jervis, as a member of the J class, was designed as a smaller follow-up to the preceding Tribal-class destroyers. Being smaller, the J class had a stronger balance between guns and torpedo armament, compared to the "gunship-style" Tribal-class destroyers. Jervis, in particular, was fitted with additional command space to accommodate the Flotilla commander. Jervis displaced 2600 tons, and was capable of 36 knots (66 km/h).[1] Her main armament consisted of six 4.7-inch (120 mm) guns in three dual turrets, two mounted at the bow and one at the stern.[1] She also carried numerous anti-aircraft defences as well as eight 533 mm torpedo tubes in two quad-mounts.[1]

Jervis was laid down in mid-1937 and was launched in September 1938. She was completed and commissioned in May 1939, just months before the outbreak of the Second World War.

Service history

Following her completion and commissioning, the Jervis served as the flagship of the 7th Destroyer fleet. She first served as a patrol vessel in the North Sea, hunting for axis blockade runners; however, she collided with a freighter in March 1940 and was dry docked for repairs.[2] Once the repairs were completed, she was assigned to the Mediterranean squadron, where she saw extensive service. She escorted convoys to Malta, participated in shore bombardment missions, and provided screening services to the British Mediterranean fleet.[2]

In 1941, Jervis served in the Battle of Cape Matapan, where she sank the crippled Italian cruiser Zara and boarded Zara's sister ship Pola. She later participated in the battles of Crete and Sirte, where she managed to survive undamaged despite heavy allied losses.[2] Later on, she was immobilized for six weeks by an Italian manned torpedo.[1][2]

In 1944, Jervis was reassigned to the British Atlantic fleet, and provided fire support for the forces landing at Gold Beach for the D-Day landings. She was thereafter decommissioned for a refit, which gave her additional anti-aircraft protection.[2] She returned to the Mediterranean after her recommissioning, and served as a patrol ship as World War II drew to a close. Following the end of the war, she was laid up in reserve and used by the cadets as a training ship. After being used for explosive tests, Jervis was given to the ship-breakers for scrap.[2]

HMS Jervis is known as an extremely lucky ship: despite being active for almost the entirety of the war and having served in 13 major naval engagements, she never lost a single crew member.[1] In fact, she was one of just two J-class ships to survive the war. She received 13 battle honours for her service during the Second World War, making her one of the most highly decorated British warships in modern history.[1][2]

Media

Skins

See also

Links to articles on the War Thunder Wiki that you think will be useful for the reader, for example:

  • reference to the series of the ship;
  • links to approximate analogues of other nations and research trees.

External links

References

Citations
  1. 1.0 1.1 1.2 1.3 1.4 1.5 1.6 D-Day Encyclopedia. (2020)
  2. 2.0 2.1 2.2 2.3 2.4 2.5 2.6 2.7 Smith, G. (2004)
Bibliography
  • D-Day Encyclopedia. (2020). HMS Jervis - F00 - D-Day. Retrieved November 28, 2020, from https://www.dday-overlord.com/en/material/warships/hms-jervis
  • Smith, G. (2004). HMS Jervis, Destroyer. Retrieved November 28, 2020, from http://www.naval-history.net/xGM-Chrono-10DD-36J-JervisJERVIS%201a.htm


R. & W. Hawthorn, Leslie and Company
Destroyers 
V-class  HMS Verdun
J-class  HMS Jervis
Battle-Class  HMS Armada

Britain destroyers
Town-class  HMS Churchill · HMS Montgomery
V-class  HMS Valhalla · HMS Vega · HMS Verdun
G-class  HMS Grafton · ORP Garland
Hunt-class  HMS Calpe · HMS Brissenden
Tribal-class  HMCS Haida · HMS Eskimo · HMS Mohawk
J-class  HMS Jervis
K-class  HMS Kelvin
N-class  HMAS Nepal
Battle-class  HMS Armada · HMS Cadiz · HMAS Tobruk
Daring-class  HMS Daring · HMS Diamond · HMS Diana

Britain premium ships
Motor torpedo boats  MTB-1(2) · MTB-422 · Fairmile D (5001) · HMS Gay Archer
Motor gun boats  MGB-75 · SGB Grey Goose
Gunboats  HMS Spey
Sub-chasers  LÉ Orla
Frigates  HMS Whitby
Destroyers  HMS Montgomery · HMS Valhalla · HMS Verdun · ORP Garland · HMS Jervis · HMCS Haida · HMS Mohawk · HMS Cadiz · HMS Diamond
Light cruisers  HMS Belfast
Battleships  HMS Iron Duke