Difference between pages "M5A1" and "P-47D-27 (USSR)"
(Edits.) |
Colok76286 (talk | contribs) (→Modules: Added premium banner text) |
||
| Line 1: | Line 1: | ||
| − | {{Specs-Card|code= | + | {{Specs-Card|code=p-47d_ussr}} |
{{About | {{About | ||
| − | | about = | + | | about = premium fighter '''{{PAGENAME}}''' |
| − | | usage = | + | | usage = other versions |
| − | | link = | + | | link = P-47 (Family) |
}} | }} | ||
== Description == | == Description == | ||
| − | <!--''In the description, the first part | + | <!-- ''In the description, the first part should be about the history of and the creation and combat usage of the aircraft, as well as its key features. In the second part, tell the reader about the aircraft in the game. Insert a screenshot of the vehicle, so that if the novice player does not remember the vehicle by name, he will immediately understand what kind of vehicle the article is talking about.'' --> |
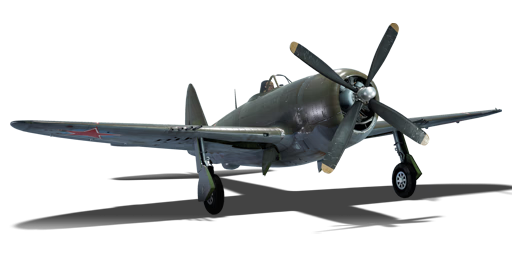
| − | [[File: | + | [[File:GarageImage_P-47D-27_USSR.jpg|420px|thumb|left]] |
{{break}} | {{break}} | ||
| − | The '''{{Specs|name}}''' is | + | The '''{{Specs|name}}''' is a premium rank {{Specs|rank}} Russian fighter {{Battle-rating}}. It was introduced in [[Update 1.43]]. This aircraft is a Soviet lend-lease version of the iconic American [[P-47D-25]], with only minor differences including a camouflage colour scheme and Russian forged and welded FAB bombs weighed in kilograms instead of the American bombs AN-M series bombs weighed in pounds. |
| + | |||
| + | The fighter does, however, retain the eight deadly 12.7 mm M2 Browning machine guns which this fighter is renowned for, easily ripping off wings and also setting fuel tanks ablaze. The fighter's overall good energy retention makes this an excellent Boom & Zoom fighter but is restricted by its slow initial climbing ability. To counter the slow climb, side climbing at the start is recommended if looking for an altitude advantage to make the most use out of Boom & Zoom. This fighter also doubles as a great ground attacker, mounting an impressive payload (1,250 kg total!), unfortunately, the US did not include HVAR rockets with the lend-lease package, thus they are not available for the Soviet version. | ||
== General info == | == General info == | ||
| − | === | + | === Flight performance === |
| − | + | ''Describe how the aircraft behaves in the air. Speed, manoeuvrability, acceleration and allowable loads - these are the most important characteristics of the vehicle.'' | |
| − | |||
| − | |||
| − | |||
| − | |||
| − | |||
| − | |||
| − | |||
| − | |||
| − | |||
| − | |||
| − | |||
| − | |||
| − | |||
| − | |||
| − | |||
| − | |||
| − | |||
| − | |||
| − | |||
| − | |||
| − | |||
| − | |||
| − | |||
{| class="wikitable" style="text-align:center" | {| class="wikitable" style="text-align:center" | ||
|- | |- | ||
| − | ! colspan=" | + | ! colspan="8" | Characteristics |
| − | |||
| − | |||
| − | |||
| − | |||
| − | |||
| − | |||
| − | |||
| − | |||
|- | |- | ||
| − | ! colspan=" | + | ! colspan="8" | ''Stock'' |
|- | |- | ||
| − | ! colspan=" | + | ! colspan="2" | Max Speed<br>(km/h at 9,144 m) |
| − | ! | + | ! rowspan="2" | Max altitude<br>(meters) |
| − | ! | + | ! colspan="2" | Turn time<br>(seconds) |
| + | ! colspan="2" | Rate of climb<br>(meters/second) | ||
| + | ! rowspan="2" | Take-off run<br>(meters) | ||
|- | |- | ||
| − | + | ! AB !! RB !! AB !! RB !! AB !! RB | |
| − | |||
| − | |||
|- | |- | ||
| − | | | + | | 676 || 657 || {{Specs|ceiling}} || 26.2 || 27.2 || 7.3 || 7.3 || 600 |
| − | | | ||
| − | | | ||
|- | |- | ||
| − | ! colspan=" | + | ! colspan="8" | ''Upgraded'' |
|- | |- | ||
| − | ! colspan=" | + | ! colspan="2" | Max Speed<br>(km/h at 9,144 m) |
| − | ! | + | ! rowspan="2" | Max altitude<br>(meters) |
| − | ! | + | ! colspan="2" | Turn time<br>(seconds) |
| + | ! colspan="2" | Rate of climb<br>(meters/second) | ||
| + | ! rowspan="2" | Take-off run<br>(meters) | ||
|- | |- | ||
| − | + | ! AB !! RB !! AB !! RB !! AB !! RB | |
| − | |||
| − | |||
|- | |- | ||
| − | | | + | | 729 || 700 || {{Specs|ceiling}} || 23.8 || 25.0 || 15 || 10.6 || 600 |
| − | | | ||
| − | | | ||
|- | |- | ||
|} | |} | ||
| − | == | + | ==== Details ==== |
| − | === | ||
| − | |||
| − | |||
| − | |||
{| class="wikitable" style="text-align:center" | {| class="wikitable" style="text-align:center" | ||
|- | |- | ||
| − | ! colspan=" | + | ! colspan="5" | Features |
|- | |- | ||
| − | ! | + | ! Combat flaps !! Take-off flaps !! Landing flaps !! Air brakes !! Arrestor gear |
| − | ! | ||
| − | ! | ||
|- | |- | ||
| − | | | + | | ✓ || ✓ || ✓ || X || X <!-- ✓ --> |
|- | |- | ||
| − | + | |} | |
| + | |||
| + | {| class="wikitable" style="text-align:center" | ||
|- | |- | ||
| − | ! | + | ! colspan="5" | Limits |
| − | |||
| − | |||
| − | |||
| − | |||
| − | |||
|- | |- | ||
| − | | | + | ! rowspan="2" | Wing-break speed<br>(km/h) |
| + | ! rowspan="2" | Gear limit<br>(km/h) | ||
| + | ! rowspan="2" | Combat flaps<br>(km/h) | ||
| + | ! colspan="2" | Max Static G | ||
|- | |- | ||
| − | + | ! + !! - | |
|- | |- | ||
| − | + | | {{Specs|destruction|constructions}} || {{Specs|destruction|chassis}} || 520 || ~12 || ~5 | |
| − | | | ||
| − | |||
| − | |||
| − | |||
| − | |||
| − | | | ||
| − | | | ||
|- | |- | ||
|} | |} | ||
| − | + | {| class="wikitable" style="text-align:center" | |
| − | {| class="wikitable | ||
| − | |||
|- | |- | ||
| − | + | ! colspan="4" | Optimal velocities | |
| − | |||
| − | ! colspan=" | ||
|- | |- | ||
| − | ! | + | ! Ailerons<br>(km/h) |
| − | ! | + | ! Rudder<br>(km/h) |
| − | ! | + | ! Elevators<br>(km/h) |
| − | ! | + | ! Radiator<br>(km/h) |
| − | |||
| − | |||
|- | |- | ||
| − | | | + | | < 402 || < 420 || < 470 || > 335 |
| − | |||
| − | |||
| − | |||
| − | |||
|- | |- | ||
|} | |} | ||
| − | {| class="wikitable | + | |
| − | + | {| class="wikitable" style="text-align:center" | |
|- | |- | ||
| − | ! | + | ! colspan="3" | Compressor (RB/SB) |
| − | |||
| − | |||
| − | |||
| − | |||
| − | |||
| − | |||
| − | |||
| − | |||
| − | |||
|- | |- | ||
| − | ! | + | ! colspan="3" | Setting 1 |
| − | |||
| − | |||
|- | |- | ||
| − | + | ! Optimal altitude | |
| + | ! 100% Engine power | ||
| + | ! WEP Engine power | ||
|- | |- | ||
| − | | | + | | 8,500 m || 2,000 hp || 2,300 hp |
|- | |- | ||
| − | |||
| − | |||
|} | |} | ||
| − | ===== | + | === Survivability and armour === |
| − | [[ | + | <!-- ''Examine the survivability of the aircraft. Note how vulnerable the structure is and how secure the pilot is, whether the fuel tanks are armoured, etc. Describe the armour, if there is any, and also mention the vulnerability of other critical aircraft systems.'' --> |
| − | {| class="wikitable | + | |
| + | * 38 mm of bulletproof glass in cockpit | ||
| + | * 9.5 mm steel under bulletproof glass in cockpit | ||
| + | * 9.5 mm steel behind pilot's seat | ||
| + | |||
| + | == Armaments == | ||
| + | === Offensive armament === | ||
| + | <!-- ''Describe the offensive armament of the aircraft, if any. Describe how effective the cannons and machine guns are in a battle, and also what belts or drums are better to use. If there is no offensive weaponry, delete this subsection.'' --> | ||
| + | {{main|Browning M2 (12.7 mm)}} | ||
| + | |||
| + | The '''''{{PAGENAME}}''''' is armed with: | ||
| + | |||
| + | * 8 x 12.7 mm Browning M2 machine guns, wing-mounted (425 rpg = 3,400 total) | ||
| + | |||
| + | === Suspended armament === | ||
| + | <!-- ''Describe the aircraft's suspended armament: additional cannons under the wings, bombs, rockets and torpedoes. This section is especially important for bombers and attackers. If there is no suspended weaponry remove this subsection.'' --> | ||
| + | {{main|FAB-250M43 (250 kg)|FAB-500 (500 kg)}} | ||
| + | |||
| + | The '''''{{PAGENAME}}''''' can be outfitted with the following ordnance: | ||
| + | |||
| + | * Without load | ||
| + | * 1 x 250 kg FAB-250M43 bomb (250 kg total) | ||
| + | * 2 x 500 kg FAB-500 bombs (1,000 kg total) | ||
| + | * 2 x 500 kg FAB-500 bombs + 1 x 250 kg FAB-250M43 bomb (1,250 kg total) | ||
| + | |||
| + | == Usage in battles == | ||
| + | <!-- ''Describe the tactics of playing in an aircraft, the features of using aircraft in a team and advice on tactics. Refrain from creating a "guide" - do not impose a single point of view, but instead, give the reader food for thought. Examine the most dangerous enemies and give recommendations on fighting them. If necessary, note the specifics of the game in different modes (AB, RB, SB).'' --> | ||
| + | As with the normal P-47D-25, the D-27 can be used one of two modes, first as an excellent Boom & Zoom fighter, using its great energy retention and amazing armament against high flying bombers and fighters. Another option is as a fighter bomber, utilising the impressive payload and adequate diving characteristics of the P-47 (be aware of dropping order of the bombs, the 500 kg bombs drop first and then the 250 kg under the fuselage is dropped). The 500 kg bombs are able to make short work of any tank whether light or heavy in its tier, but the 250 kg bomb can only provide enough explosive power to destroy softer targets, like armoured cars and SPAA. The way both 500 kg bombs drop should either be used against a group of tanks (combined battles) or against large pillboxes. Other than that, the P-47 can be used in multiple roles, unfortunately, using bombs restricts flight to only staying at a low level where the P-47's engine is less effective. | ||
| + | |||
| + | If you are using it as a high altitude fighter initially side climbing is recommended, as you gain a vast advantage over other enemies. The hit and run tactics work best for the P-47, singling out a lone fighter below you, diving towards them and a 2-second burst from the M2 Brownings will most likely destroy them. Always try to avoid a head-on engagement, as your engine is exposed from the front and most likely break down if something manages to hit it. If you are willing to engage a heavy bomber main targets should be the wings and elevators, as they are easy targets for the P-47. | ||
| + | |||
| + | '''Simulator / EC''' | ||
| + | |||
| + | In Simulator / Enduring Confrontation, bulkier planes that suffer in AB & RB shine and that of course includes the P-47. Sitting at BR 3.7, the lowest BR for rank 3 EC, it can respawn infinitely which makes it a great learning platform for new EC players. In Sim, the P-47 has stable control handling, all-round unobstructed vision and fast speed, and it offers a wide range of additional armaments of bombs plus the original 8 x .50 cal, meaning it is an excellent multi-role aircraft. It can perform base-bombing, ground pounding, bomber intercepting and traditional BnZ fighting. | ||
| + | |||
| + | For base bombing, choose the maximum setup of 1 x 250 kg, and 2 x 500 kg bombs to maximise the damage. The fastest way to get to a base is to remain at tree-top level upon taking off. This way there is no need to climb so the P-47 can pick up quite some speed like that, even with the full bombload. It is also harder to be seen, since the P-47's dark colour will blend in with the ground for some maps. When approaching the base, check its position with the minimap to ensure it's the right target. When the base fills up the gunsight, pull up to around 500 m and then dive at the base at a rather shallow angle. When the gunsight slices past the furthest edge of the base, release all the bombs, bank to the direction of the nearest friendly airfield, descend back to tree-top level and fly back. If you are lucky, you might even catch some enemy bombers that just took-off from a nearby airfield. They will be some nice RP for you. Overall, base bombing is the safest way to get rewards. | ||
| + | |||
| + | For ground pounding, you can choose to take the full bombload if you want. Use the bombs and rockets to take out pillboxes and tanks. The aiming method for bombs is pretty similar to base bombing, but there are differences for the 250 kg and 500 kg, as their drop are different and you want to adapt the aim to be more precise, because now the targets are much smaller. Dive at a shallow angle to approach the target, try to get as close as possible but avoid crashing into the ground. When the gunsight slices through and just above the target, drop the 500 kg bombs. When the target is at the center of the gunsight and fills up around 1/3 of it, release the 250 kg. The 8 MGs are perfect for killing trucks, AA guns and artilleries as they have plenty of ammo. However, constantly watch your surrounding, especially your high 6 for any incoming enemies. | ||
| + | |||
| + | You want to be more careful when hunting bombers, since with the Sim control (whether it be mouse joystick or a real stick) the plane will manoeuvre much more gently, making itself a great target for the bomber's gunners. DO NOT follow behind a bomber's 6 unless you are sure that its tail gunners are unconscious. Chasing behind a bomber makes yourself pretty much stationary for the tail gunners, and you will be showered with bullets. The big radial engine of the P-47 will usually get damaged. Instead, before launching an attack, get an altitude advantage over the bomber by flying around 2 km above it. The bomber should only fill up about 1/6 of your gunsight. The best position for an attack is at the bomber's high 6 so you can adjust the lead much easier. Dive at the bomber, but not directly at it, try to predict where you two will crash by imagining yourself as a missile, that's where you should aim at (deflection shooting). To maximise the damage it is better to aim for their wings and engines, as the fuselage usually soaks up quite some bullets. Only fire when the bomber passes in front of your guns. This short window might seems inadequate to do anything, but the 8 MG on the P-47 are actually quite destructive, as sometimes it only takes one bullet to set the target aflame. | ||
| + | |||
| + | As for dogfighting, because almost all aerial battles in Sim occurs at below 3,000 m, the P-47 can easily climb to this altitude and gather up lots of speed before engaging a battle. The tactic is similar to the RB one above. If, unfortunately, you find yourself being chased at your 6 and you don't know how to do any defensive manoeuvres, do a large, smooth turn towards the nearest friendly airfield to avoid bleeding too much speed. Then shallow-dive towards your airfield. The P-47 can quite easily outrun opponents like the A6M or Bf-109 E, but struggles to outrun Bf-109 F/G, FW-190 A or other P-47. Another way of disengaging is to do a sudden split-S to dodge under the chaser. Average Sim players will now try and see where you went, if not immediately losing track of you. You can then run for your airfield or shallow climb for another attack. | ||
| + | |||
| + | '''Enemies worth noting:''' | ||
| + | |||
| + | * [[Me 264]]: This giant is one of the few bombers who get air spawns in Sim, so it usually flies higher than you think. On top of this, the Me 264 is armed with large calibre MG and cannons all over it, therefore tailing a 264 is basically suicide unless all of their gunners are knocked out. You can treat the 264 almost like a B-29 or B-17 as they are very similar in both design and defensive capabilities. It is best to head-on the 264 if you can as you can easily knock out the pilots due to its glazed nose while also taking minimal damage. However the bomber lacks a ventral turret on its belly, making it easy to deal damage from below, but be weary of the downwards facing rear 20 mm cannon near the tail. The safest way to attack is from a higher altitude, dive at an oblique angle and focus fire on the wings and nose. Never engage if you have no altitude advantage. | ||
| + | |||
| + | * [[Bf 110 (Family)|Bf 110]], [[Ki-45 (Family)|Ki-45]], [[A-26 (Family)|A-26]]: As mentioned before, those twin engine aircraft are a big threat since their lack of manoeuvrability comparing to single engine fighters are minimised in Sim. They are usually armed with heavy guns & cannons in the nose, so an accurate burst will tear any plane apart, including the P-47. The P-47 manoeuvres rather sluggishly and you might get out-turned from even those heavy fighters, so engage them with either altitude or speed advantage to avoid being targeted. If they are not manoeuvring aggressively, aim for their wings or engines. If the fight is intense and you cannot smooth the aim, just burst anywhere as long as you hit them, the 12.7 mm bullets will damage their flight models quite a bit. | ||
| + | |||
| + | === Manual Engine Control === | ||
| + | {| class="wikitable" style="text-align:center" | ||
| + | |- | ||
| + | ! colspan="7" | MEC elements | ||
| + | |- | ||
| + | ! rowspan="2" | Mixer | ||
| + | ! rowspan="2" | Pitch | ||
| + | ! colspan="3" | Radiator | ||
| + | ! rowspan="2" | Supercharger | ||
| + | ! rowspan="2" | Turbocharger | ||
|- | |- | ||
| − | ! | + | ! Oil !! Water !! Type |
| − | ! | ||
| − | ! | ||
| − | ! | ||
| − | ! | ||
| − | |||
|- | |- | ||
| − | || | + | | Controllable || Controllable<br>Auto control available || Controllable<br>Not auto controlled || Controllable<br>Not auto controlled || Separate || Controllable<br>1 gear || Auto controlled |
|- | |- | ||
|} | |} | ||
| − | === | + | === Modules === |
| − | + | {| class="wikitable" | |
| − | { | + | ! Tier |
| − | + | ! colspan="2" | Flight performance | |
| − | + | ! Survivability | |
| + | ! colspan="2" | Weaponry | ||
|- | |- | ||
| − | + | | I | |
| + | | Fuselage repair | ||
| + | | Radiator | ||
| + | | | ||
| + | | Offensive 12 mm | ||
| + | | | ||
|- | |- | ||
| − | + | | II | |
| + | | | ||
| + | | Compressor | ||
| + | | Airframe | ||
| + | | | ||
| + | | FMBC mk.1 | ||
|- | |- | ||
| − | + | | III | |
| − | + | | Wings repair | |
| − | + | | Engine | |
| − | + | | | |
| + | | New 12 mm MGs | ||
| + | | | ||
|- | |- | ||
| − | | | + | | IV |
| + | | | ||
| + | | Engine injection | ||
| + | | Cover | ||
| + | | | ||
| + | | FLBC mk.1 | ||
|- | |- | ||
| − | ! colspan=" | + | ! colspan="6" |This is a premium vehicle: all modifications are unlocked on purchase |
| − | |||
| − | |||
| − | |||
| − | |||
| − | |||
| − | |||
| − | |||
|- | |- | ||
|} | |} | ||
| − | == | + | === Pros and cons === |
| − | <!--'' | + | <!-- ''Summarise and briefly evaluate the vehicle in terms of its characteristics and combat effectiveness. Mark its pros and cons in the bulleted list. Try not to use more than 6 points for each of the characteristics. Avoid using categorical definitions such as "bad", "good" and the like - use substitutions with softer forms such as "inadequate" and "effective".'' --> |
| − | |||
| − | |||
| − | |||
| − | |||
| − | |||
| − | |||
| − | |||
'''Pros:''' | '''Pros:''' | ||
| − | * | + | * Excellent multi-role fighter in the Soviet tree |
| − | * | + | * Outstanding payload (1,250 kg total!) |
| − | * | + | * 4 x Browning M2's on each wing will make short work of any fighter/attacker |
| − | + | * Plenty of ammo provides 33 seconds of sustained fire | |
| − | * | + | * Bubble canopy provides excellent view (SB) |
| − | * | + | * Amazing energy retention makes it an excellent diver |
| − | * | + | * Low repair cost |
'''Cons:''' | '''Cons:''' | ||
| − | * | + | * Heavy fighter, sluggish and difficult to manoeuvre at slow speeds |
| − | * | + | * Bad turning ability |
| − | * | + | * Engine performance is worse in low altitudes |
| − | * | + | * Worse performance when mounting bombs |
| − | * | + | * Slow climbing |
| + | * Larger than the average fighter | ||
| + | * Bomb drop order makes it less viable for prolonged ground attacking | ||
== History == | == History == | ||
| − | + | ''Describe the history of the creation and combat usage of the aircraft in more detail than in the introduction. If the historical reference turns out to be too long, take it to a separate article, taking a link to the article about the vehicle and adding a block "/History" (example: <nowiki>https://wiki.warthunder.com/(Vehicle-name)/History</nowiki>) and add a link to it here using the <code>main</code> template. Be sure to reference text and sources by using <code><nowiki><ref></ref></nowiki></code>, as well as adding them at the end of the article with <code><nowiki><references /></nowiki></code>. This section may also include the vehicle's dev blog entry (if applicable) and the in-game encyclopedia description (under <code><nowiki>=== In-game description ===</nowiki></code>, also if applicable).'' | |
| − | |||
| − | |||
| − | |||
| − | |||
| − | |||
| − | |||
| − | |||
| − | |||
| − | |||
| − | |||
| − | |||
| − | |||
| − | |||
| − | |||
| − | === In-game description === | ||
| − | |||
| − | |||
| − | |||
| − | |||
| − | |||
== Media == | == Media == | ||
| − | '' | + | ''Excellent additions to the article would be video guides, screenshots from the game, and photos.'' |
| − | == | + | == See also == |
| − | ''Links to the articles on the War Thunder Wiki that you think will be useful for the reader, for example | + | ''Links to the articles on the War Thunder Wiki that you think will be useful for the reader, for example:'' |
| − | * ''reference to the series of the | + | * ''reference to the series of the aircraft;'' |
* ''links to approximate analogues of other nations and research trees.'' | * ''links to approximate analogues of other nations and research trees.'' | ||
| − | + | == External links == | |
| − | |||
| − | == | ||
''Paste links to sources and external resources, such as:'' | ''Paste links to sources and external resources, such as:'' | ||
* ''topic on the official game forum;'' | * ''topic on the official game forum;'' | ||
| + | * ''encyclopedia page on the aircraft;'' | ||
* ''other literature.'' | * ''other literature.'' | ||
| − | {{ | + | {{AirManufacturer Republic}} |
| + | {{USSR fighters}} | ||
| + | {{USSR premium aircraft}} | ||
Revision as of 12:42, 6 July 2020
Contents
| This page is about the premium fighter P-47D-27 (USSR). For other versions, see P-47 (Family). |
Description
.jpg)
The ▂P-47D-27 Thunderbolt is a premium rank III Russian fighter
with a battle rating of 3.7 (AB/SB) and 4.3 (RB). It was introduced in Update 1.43. This aircraft is a Soviet lend-lease version of the iconic American P-47D-25, with only minor differences including a camouflage colour scheme and Russian forged and welded FAB bombs weighed in kilograms instead of the American bombs AN-M series bombs weighed in pounds.
The fighter does, however, retain the eight deadly 12.7 mm M2 Browning machine guns which this fighter is renowned for, easily ripping off wings and also setting fuel tanks ablaze. The fighter's overall good energy retention makes this an excellent Boom & Zoom fighter but is restricted by its slow initial climbing ability. To counter the slow climb, side climbing at the start is recommended if looking for an altitude advantage to make the most use out of Boom & Zoom. This fighter also doubles as a great ground attacker, mounting an impressive payload (1,250 kg total!), unfortunately, the US did not include HVAR rockets with the lend-lease package, thus they are not available for the Soviet version.
General info
Flight performance
Describe how the aircraft behaves in the air. Speed, manoeuvrability, acceleration and allowable loads - these are the most important characteristics of the vehicle.
| Characteristics | |||||||
|---|---|---|---|---|---|---|---|
| Stock | |||||||
| Max Speed (km/h at 9,144 m) |
Max altitude (meters) |
Turn time (seconds) |
Rate of climb (meters/second) |
Take-off run (meters) | |||
| AB | RB | AB | RB | AB | RB | ||
| 676 | 657 | 12200 | 26.2 | 27.2 | 7.3 | 7.3 | 600 |
| Upgraded | |||||||
| Max Speed (km/h at 9,144 m) |
Max altitude (meters) |
Turn time (seconds) |
Rate of climb (meters/second) |
Take-off run (meters) | |||
| AB | RB | AB | RB | AB | RB | ||
| 729 | 700 | 12200 | 23.8 | 25.0 | 15 | 10.6 | 600 |
Details
| Features | ||||
|---|---|---|---|---|
| Combat flaps | Take-off flaps | Landing flaps | Air brakes | Arrestor gear |
| ✓ | ✓ | ✓ | X | X |
| Limits | ||||
|---|---|---|---|---|
| Wing-break speed (km/h) |
Gear limit (km/h) |
Combat flaps (km/h) |
Max Static G | |
| + | - | |||
| 520 | ~12 | ~5 | ||
| Optimal velocities | |||
|---|---|---|---|
| Ailerons (km/h) |
Rudder (km/h) |
Elevators (km/h) |
Radiator (km/h) |
| < 402 | < 420 | < 470 | > 335 |
| Compressor (RB/SB) | ||
|---|---|---|
| Setting 1 | ||
| Optimal altitude | 100% Engine power | WEP Engine power |
| 8,500 m | 2,000 hp | 2,300 hp |
Survivability and armour
- 38 mm of bulletproof glass in cockpit
- 9.5 mm steel under bulletproof glass in cockpit
- 9.5 mm steel behind pilot's seat
Armaments
Offensive armament
The P-47D-27 (USSR) is armed with:
- 8 x 12.7 mm Browning M2 machine guns, wing-mounted (425 rpg = 3,400 total)
Suspended armament
The P-47D-27 (USSR) can be outfitted with the following ordnance:
- Without load
- 1 x 250 kg FAB-250M43 bomb (250 kg total)
- 2 x 500 kg FAB-500 bombs (1,000 kg total)
- 2 x 500 kg FAB-500 bombs + 1 x 250 kg FAB-250M43 bomb (1,250 kg total)
Usage in battles
As with the normal P-47D-25, the D-27 can be used one of two modes, first as an excellent Boom & Zoom fighter, using its great energy retention and amazing armament against high flying bombers and fighters. Another option is as a fighter bomber, utilising the impressive payload and adequate diving characteristics of the P-47 (be aware of dropping order of the bombs, the 500 kg bombs drop first and then the 250 kg under the fuselage is dropped). The 500 kg bombs are able to make short work of any tank whether light or heavy in its tier, but the 250 kg bomb can only provide enough explosive power to destroy softer targets, like armoured cars and SPAA. The way both 500 kg bombs drop should either be used against a group of tanks (combined battles) or against large pillboxes. Other than that, the P-47 can be used in multiple roles, unfortunately, using bombs restricts flight to only staying at a low level where the P-47's engine is less effective.
If you are using it as a high altitude fighter initially side climbing is recommended, as you gain a vast advantage over other enemies. The hit and run tactics work best for the P-47, singling out a lone fighter below you, diving towards them and a 2-second burst from the M2 Brownings will most likely destroy them. Always try to avoid a head-on engagement, as your engine is exposed from the front and most likely break down if something manages to hit it. If you are willing to engage a heavy bomber main targets should be the wings and elevators, as they are easy targets for the P-47.
Simulator / EC
In Simulator / Enduring Confrontation, bulkier planes that suffer in AB & RB shine and that of course includes the P-47. Sitting at BR 3.7, the lowest BR for rank 3 EC, it can respawn infinitely which makes it a great learning platform for new EC players. In Sim, the P-47 has stable control handling, all-round unobstructed vision and fast speed, and it offers a wide range of additional armaments of bombs plus the original 8 x .50 cal, meaning it is an excellent multi-role aircraft. It can perform base-bombing, ground pounding, bomber intercepting and traditional BnZ fighting.
For base bombing, choose the maximum setup of 1 x 250 kg, and 2 x 500 kg bombs to maximise the damage. The fastest way to get to a base is to remain at tree-top level upon taking off. This way there is no need to climb so the P-47 can pick up quite some speed like that, even with the full bombload. It is also harder to be seen, since the P-47's dark colour will blend in with the ground for some maps. When approaching the base, check its position with the minimap to ensure it's the right target. When the base fills up the gunsight, pull up to around 500 m and then dive at the base at a rather shallow angle. When the gunsight slices past the furthest edge of the base, release all the bombs, bank to the direction of the nearest friendly airfield, descend back to tree-top level and fly back. If you are lucky, you might even catch some enemy bombers that just took-off from a nearby airfield. They will be some nice RP for you. Overall, base bombing is the safest way to get rewards.
For ground pounding, you can choose to take the full bombload if you want. Use the bombs and rockets to take out pillboxes and tanks. The aiming method for bombs is pretty similar to base bombing, but there are differences for the 250 kg and 500 kg, as their drop are different and you want to adapt the aim to be more precise, because now the targets are much smaller. Dive at a shallow angle to approach the target, try to get as close as possible but avoid crashing into the ground. When the gunsight slices through and just above the target, drop the 500 kg bombs. When the target is at the center of the gunsight and fills up around 1/3 of it, release the 250 kg. The 8 MGs are perfect for killing trucks, AA guns and artilleries as they have plenty of ammo. However, constantly watch your surrounding, especially your high 6 for any incoming enemies.
You want to be more careful when hunting bombers, since with the Sim control (whether it be mouse joystick or a real stick) the plane will manoeuvre much more gently, making itself a great target for the bomber's gunners. DO NOT follow behind a bomber's 6 unless you are sure that its tail gunners are unconscious. Chasing behind a bomber makes yourself pretty much stationary for the tail gunners, and you will be showered with bullets. The big radial engine of the P-47 will usually get damaged. Instead, before launching an attack, get an altitude advantage over the bomber by flying around 2 km above it. The bomber should only fill up about 1/6 of your gunsight. The best position for an attack is at the bomber's high 6 so you can adjust the lead much easier. Dive at the bomber, but not directly at it, try to predict where you two will crash by imagining yourself as a missile, that's where you should aim at (deflection shooting). To maximise the damage it is better to aim for their wings and engines, as the fuselage usually soaks up quite some bullets. Only fire when the bomber passes in front of your guns. This short window might seems inadequate to do anything, but the 8 MG on the P-47 are actually quite destructive, as sometimes it only takes one bullet to set the target aflame.
As for dogfighting, because almost all aerial battles in Sim occurs at below 3,000 m, the P-47 can easily climb to this altitude and gather up lots of speed before engaging a battle. The tactic is similar to the RB one above. If, unfortunately, you find yourself being chased at your 6 and you don't know how to do any defensive manoeuvres, do a large, smooth turn towards the nearest friendly airfield to avoid bleeding too much speed. Then shallow-dive towards your airfield. The P-47 can quite easily outrun opponents like the A6M or Bf-109 E, but struggles to outrun Bf-109 F/G, FW-190 A or other P-47. Another way of disengaging is to do a sudden split-S to dodge under the chaser. Average Sim players will now try and see where you went, if not immediately losing track of you. You can then run for your airfield or shallow climb for another attack.
Enemies worth noting:
- Me 264: This giant is one of the few bombers who get air spawns in Sim, so it usually flies higher than you think. On top of this, the Me 264 is armed with large calibre MG and cannons all over it, therefore tailing a 264 is basically suicide unless all of their gunners are knocked out. You can treat the 264 almost like a B-29 or B-17 as they are very similar in both design and defensive capabilities. It is best to head-on the 264 if you can as you can easily knock out the pilots due to its glazed nose while also taking minimal damage. However the bomber lacks a ventral turret on its belly, making it easy to deal damage from below, but be weary of the downwards facing rear 20 mm cannon near the tail. The safest way to attack is from a higher altitude, dive at an oblique angle and focus fire on the wings and nose. Never engage if you have no altitude advantage.
- Bf 110, Ki-45, A-26: As mentioned before, those twin engine aircraft are a big threat since their lack of manoeuvrability comparing to single engine fighters are minimised in Sim. They are usually armed with heavy guns & cannons in the nose, so an accurate burst will tear any plane apart, including the P-47. The P-47 manoeuvres rather sluggishly and you might get out-turned from even those heavy fighters, so engage them with either altitude or speed advantage to avoid being targeted. If they are not manoeuvring aggressively, aim for their wings or engines. If the fight is intense and you cannot smooth the aim, just burst anywhere as long as you hit them, the 12.7 mm bullets will damage their flight models quite a bit.
Manual Engine Control
| MEC elements | ||||||
|---|---|---|---|---|---|---|
| Mixer | Pitch | Radiator | Supercharger | Turbocharger | ||
| Oil | Water | Type | ||||
| Controllable | Controllable Auto control available |
Controllable Not auto controlled |
Controllable Not auto controlled |
Separate | Controllable 1 gear |
Auto controlled |
Modules
| Tier | Flight performance | Survivability | Weaponry | ||
|---|---|---|---|---|---|
| I | Fuselage repair | Radiator | Offensive 12 mm | ||
| II | Compressor | Airframe | FMBC mk.1 | ||
| III | Wings repair | Engine | New 12 mm MGs | ||
| IV | Engine injection | Cover | FLBC mk.1 | ||
| This is a premium vehicle: all modifications are unlocked on purchase | |||||
Pros and cons
Pros:
- Excellent multi-role fighter in the Soviet tree
- Outstanding payload (1,250 kg total!)
- 4 x Browning M2's on each wing will make short work of any fighter/attacker
- Plenty of ammo provides 33 seconds of sustained fire
- Bubble canopy provides excellent view (SB)
- Amazing energy retention makes it an excellent diver
- Low repair cost
Cons:
- Heavy fighter, sluggish and difficult to manoeuvre at slow speeds
- Bad turning ability
- Engine performance is worse in low altitudes
- Worse performance when mounting bombs
- Slow climbing
- Larger than the average fighter
- Bomb drop order makes it less viable for prolonged ground attacking
History
Describe the history of the creation and combat usage of the aircraft in more detail than in the introduction. If the historical reference turns out to be too long, take it to a separate article, taking a link to the article about the vehicle and adding a block "/History" (example: https://wiki.warthunder.com/(Vehicle-name)/History) and add a link to it here using the main template. Be sure to reference text and sources by using <ref></ref>, as well as adding them at the end of the article with <references />. This section may also include the vehicle's dev blog entry (if applicable) and the in-game encyclopedia description (under === In-game description ===, also if applicable).
Media
Excellent additions to the article would be video guides, screenshots from the game, and photos.
See also
Links to the articles on the War Thunder Wiki that you think will be useful for the reader, for example:
- reference to the series of the aircraft;
- links to approximate analogues of other nations and research trees.
External links
Paste links to sources and external resources, such as:
- topic on the official game forum;
- encyclopedia page on the aircraft;
- other literature.
| Republic Aviation Corporation | |
|---|---|
| Fighters | P-43A-1 |
| P-47D-22-RE · P-47D-25 · P-47D-28 · P-47M-1-RE · ⋠P-47M-1-RE · P-47N-15 | |
| Jet Aircraft | F-84B-26 · F-84F · F-84G-21-RE |
| F-105D | |
| Export | J9 Early* |
| ␗P-43A-1 | |
| ▄Thunderbolt Mk.1 · ▄P-47D-22-RE · ␗P-47D-23-RA · ▂P-47D-27 · ␗P-47D-30 · ▄P-47D-30 | |
| ◄F-84F · ▄F-84F (Italy) · ▄F-84F (France) · F-84F IAF · F-84F | |
| ␗F-84G-21-RE · ▄F-84G-21-RE · ▄F-84G-26-RE · ␗F-84G-31-RE | |
| Captured | ▀P-47D-16-RE · ▀P-47D |
| *The company was named "Seversky Aircraft Company" before being renamed in 1939 | |
| USSR fighters | |
|---|---|
| I-15 | I-15 WR · I-15 M-22 · I-15 M-25 · I-15bis · Krasnolutsky's I-15bis |
| I-153 M-62 · Zhukovsky's I-153-M62 · I-153P | |
| I-16 | I-16 type 5 · I-16 type 10 · I-16 type 18 · I-16 type 24 · I-16 type 27 · I-16 type 28 · I-180S |
| I-29 | I-29 |
| I-185 | I-185 (M-71) · I-185 (M-82) |
| I-225 | I-225 |
| ITP | ITP (M-1) |
| MiG-3 | MiG-3-15 · MiG-3-15 (BK) · MiG-3-34 |
| LaGG | I-301 · LaGG-3-4 · LaGG-3-8 · LaGG-3-11 · LaGG-3-23 · LaGG-3-34 · LaGG-3-35 · LaGG-3-66 |
| La | La-5 · La-5F · La-5FN · La-7 · Dolgushin's La-7 · La-7B-20 · La-9 · La-11 |
| Yak-1/7 | Yak-1 · Yak-1B · Yak-7B |
| Yak-3 | Yak-3 · Yak-3P · Yak-3T · Yak-3U · Yak-3 (VK-107) |
| Yak-9 | Yak-9 · Yak-9B · Golovachev's Yak-9M · Yak-9T · Yak-9K · Yak-9U · Yak-9UT · Yak-9P |
| Other countries | ▂P-40E-1 · ▂P-47D-27 · ▂Hurricane Mk IIB · ▂Fw 190 D-9 · ▂Spitfire Mk IXc |
| P-39 | ▂P-39K-1 · ▂Pokryshkin's P-39N-0 · ▂P-39Q-15 |
| P-63 | ▂P-63A-5 · ▂P-63A-10 · ▂P-63C-5 |
| USSR premium aircraft | |
|---|---|
| Fighters | Krasnolutsky's I-15bis · I-16 type 28 · Zhukovsky's I-153-M62 · I-153P · I-180S · I-301 · ITP (M-1) |
| LaGG-3-4 · LaGG-3-23 · LaGG-3-34 · Dolgushin's La-7 · La-11 | |
| Yak-3 (VK-107) · Yak-3T · Golovachev's Yak-9M | |
| ▂P-39K-1 · ▂Pokryshkin's P-39N-0 · ▂P-39Q-15 · ▂P-40E-1 · ▂P-47D-27 · ▂P-63A-5 · ▂P-63A-10 · ▂P-63C-5 | |
| ▂Hurricane Mk IIB · ▂Spitfire Mk IXc · ▂Fw 190 D-9 | |
| Twin-engine fighters | I-29 |
| Jet fighters | Su-11 · MiG-15bis ISH · MiG-17AS · MiG-21S (R-13-300) · MiG-23ML |
| Strike aircraft | IL-2M "Avenger" · IL-2 M-82 · IL-8 (1944) · Su-6 · Tandem MAI · TIS MA · Su-8 · Tu-1 |
| Yak-38 · Su-7BMK · Su-25K · Su-39 | |
| Bombers | Po-2M · Be-6 · MBR-2-M-34 · Pe-2-205 · TB-3M-17-32 |
| ▂PBY-5A Catalina · ▂Hampden TB Mk I · ▂A-20G-30 · ▂B-25J-30 | |
