|
|
| Line 1: |
Line 1: |
| − | {{Specs-Card|code=f-4k}} | + | {{Specs-Card|code=fr_m3a3_stuart}} |
| | {{About | | {{About |
| − | | about = jet fighter '''{{PAGENAME}}''' | + | | about = light tank '''{{PAGENAME}}''' |
| − | | usage = other versions | + | | other |
| − | | link = F-4 Phantom II (Family) | + | | usage-1 = other vehicles of the family |
| | + | | link-1 = M3 Stuart (Family) |
| | + | | usage-2 = other uses |
| | + | | link-2 = M3 (Disambiguation) |
| | }} | | }} |
| | | | |
| − | == Description ==<!-- ''In the description, the first part should be about the history of and the creation and combat usage of the aircraft, as well as its key features. In the second part, tell the reader about the aircraft in the game. Insert a screenshot of the vehicle, so that if the novice player does not remember the vehicle by name, he will immediately understand what kind of vehicle the article is talking about.'' --> | + | == Description == |
| | + | <!-- ''In the description, the first part should be about the history of the creation and combat usage of the vehicle, as well as its key features. In the second part, tell the reader about the ground vehicle in the game. Insert a screenshot of the vehicle, so that if the novice player does not remember the vehicle by name, he will immediately understand what kind of vehicle the article is talking about.'' --> |
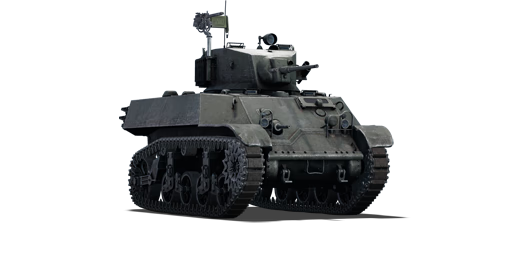
| | [[File:GarageImage_{{PAGENAME}}.jpg|420px|thumb|left]] | | [[File:GarageImage_{{PAGENAME}}.jpg|420px|thumb|left]] |
| | {{Break}} | | {{Break}} |
| − | The '''{{Specs|name}}''', otherwise known as the F-4K, is a rank {{Specs|rank}} British jet fighter {{Battle-rating}}. It was introduced in [[Update "Starfighters"]]. Like the other British Spey Phantom, the [[Phantom FGR.2]], this Phantom comes with AIM-9Ds, stock RHAW, and two turbofan engines that differentiate it from other [[F-4 Phantom II (Family)|Phantoms]] in the game. This Phantom is the naval variant of the British Phantom FGR.2, and as such has several adaptations for use on the smaller flight decks of British Carriers, including a longer nose wheel, slotted elevators like on the [[F-4E]], larger leading-edge flaps, a tougher undercarriage, Spey 203s with a quicker Afterburner activation time, and a slew of other upgrades that are not modeled in War Thunder, such as a folding nose radome, drooping ailerons to aid in lift, and a different radar to the FGR.2 (AN/AWG-11 as opposed to the AN/AWG-12 in the FGR, and the AN/AWG-10 in the base F-4J model). The FG.1 takes off a good deal faster than the FGR.2 thanks to the more rapid gain of afterburner thrust, higher angle of attack possible due to the extended nose wheel, and the larger flaps. | + | The '''{{Specs|name}}''' is a rank {{Specs|rank}} French light tank {{Battle-rating}}. It was introduced in [[Update 1.97 "Viking Fury"]]. |
| | | | |
| | == General info == | | == General info == |
| − | === Flight performance === | + | === Survivability and armour === |
| − | <!-- ''Describe how the aircraft behaves in the air. Speed, manoeuvrability, acceleration and allowable loads - these are the most important characteristics of the vehicle.'' --> | + | <!-- ''Describe armour protection. Note the most well protected and key weak areas. Appreciate the layout of modules as well as the number and location of crew members. Is the level of armour protection sufficient, is the placement of modules helpful for survival in combat? If necessary use a visual template to indicate the most secure and weak zones of the armour.'' --> |
| − | ''Describe how the aircraft behaves in the air. Speed, manoeuvrability, acceleration and allowable loads - these are the most important characteristics of the vehicle.''
| |
| | | | |
| − | {| class="wikitable" style="text-align:center" width="70%" | + | {| class="wikitable" |
| − | ! rowspan="2" | Characteristics
| |
| − | ! colspan="2" | Max Speed<br>(km/h at 10,667 m)
| |
| − | ! rowspan="2" | Max altitude<br>(metres)
| |
| − | ! colspan="2" | Turn time<br>(seconds)
| |
| − | ! colspan="2" | Rate of climb<br>(metres/second)
| |
| − | ! rowspan="2" | Take-off run<br>(metres)
| |
| | |- | | |- |
| − | ! AB !! RB !! AB !! RB !! AB !! RB | + | ! Armour !! Front (Slope angle) !! Sides !! Rear !! Roof |
| | |- | | |- |
| − | ! Stock
| + | |Hull || 25 mm (46-49°) ''Front Glacis - upper plate'' <br> 20 mm (spherical) ''MG port'' <br> 50 mm (24-27°) ''Front Glacis - joint plate'' <br> 50 mm (44-46°) ''Front Glacis - lower plate'' <br> 44.4 mm (25-43°) ''Lower Glacis'' || 25.4 mm || 25.4 mm (1-26°) ''Upper part'' <br> 25.4 mm (21°) ''Lower part'' || 12.7 mm |
| − | | 2,195 || 2,158 || rowspan="2" | {{Specs|ceiling}} || 26.5 || 26.9 || 178.0 || 168.0 || rowspan="2" | 850 | |
| | |- | | |- |
| − | ! Upgraded
| + | |Turret || 38.1 mm (12-14°) ''Turret front'' <br> 50.8 mm ''Gun mantlet'' || 31.75 mm <br> 15 mm ''Add-on tracks'' || 31.75 mm || 12.7 mm |
| − | | 2,350 || 2,268 || 25.5 || 26.0 || 244.7 ||210.0 | |
| | |- | | |- |
| | |} | | |} |
| | | | |
| − | ==== Details ==== | + | '''Notes:''' |
| − | {| class="wikitable" style="text-align:center" width="50%" | + | * Suspension wheels, tracks and bogies are 15 mm thick. |
| | + | * Mudguards and rear storage box are 4 mm thick |
| | + | |
| | + | The frontal armour on the {{Specs|pseudonym}} is pretty tough for a light tank with 25 mm on the front & sides of the hull, and a large, 50 mm thick gun mantlet covering up most of its frontal turret. When angled correctly it can bounce off quite a few shots. However it can still be easily penetrated by average guns on its BR. From the front the 4 crews are sitting pretty close together, thus making it highly possible to get one-shot by shells with explosives like the Soviet 45 mm AP or the German short 75 mm APHE. The transmission and the engine are all quite small and low, and the ammoracks are also small, reducing the chance of being immobile or ammoracked. There is also an empty area under the turret crews and in front of the driving compartment, which will absorb those shells with weak damage. |
| | + | |
| | + | === Mobility === |
| | + | <!-- ''Write about the mobility of the ground vehicle. Estimate the specific power and manoeuvrability, as well as the maximum speed forwards and backwards.'' --> |
| | + | |
| | + | {{tankMobility|abMinHp=406|rbMinHp=232}} |
| | + | |
| | + | One of the best aspect of the {{Specs|pseudonym}} is its superior mobility. It has a top speed of 58 km/h and doesn't lose too much speed on soft terrains as it's tracked, making it one of the fastest tanks at the BR alongside with the famous BT series tanks. The turning ability is also amazing, since the hull is short and wide enough, allowing it to turn agilely. However, when trying to stop the tank while it is travelling at full speed, the brakes tend to be inefficient, giving it a long braking distance and making it very sluggish when stopping. |
| | + | |
| | + | == Armaments == |
| | + | === Main armament === |
| | + | <!-- ''Give the reader information about the characteristics of the main gun. Assess its effectiveness in a battle based on the reloading speed, ballistics and the power of shells. Do not forget about the flexibility of the fire, that is how quickly the cannon can be aimed at the target, open fire on it and aim at another enemy. Add a link to the main article on the gun: <code><nowiki>{{main|Name of the weapon}}</nowiki></code>. Describe in general terms the ammunition available for the main gun. Give advice on how to use them and how to fill the ammunition storage.'' --> |
| | + | {{main|M6 (37 mm)}} |
| | + | |
| | + | The M3A3 is armed with a 37 mm M6 cannon as its main armament, the same gun as the preceding [[M8 LAC (China)|M8]]. While being 1.3 BR higher than the M8, the M3A3's gun still packs a fierce punch if aiming at the correct area and firing at the correct distance. It is a small calibre fast-firing gun with a maximum penetration of 84 mm at 100 m (M51B1/B2 shell), being able to penetrate most of the opponents it will face. While it lacks the post-penetration damage to one-shot most enemy, it can quickly finish them off with its fast reload. The penetration and trajectory drop a lot beyond 500 m. Note that the gun has a vertical stabiliser, giving the player a huge advantage in some cases, but keep in mind that the stabiliser only works when the tank is slower than 10 km/h. |
| | + | |
| | + | {| class="wikitable" style="text-align:center" width="100%" |
| | + | |- |
| | + | ! colspan="5" | [[M6 (37 mm)|37 mm M6]] || colspan="5" | Turret rotation speed (°/s) || colspan="4" | Reloading rate (seconds) |
| | |- | | |- |
| − | ! colspan="6" | Features | + | ! Mode !! Capacity !! Vertical !! Horizontal !! Stabilizer |
| | + | ! Stock !! Upgraded !! Full !! Expert !! Aced |
| | + | ! Stock !! Full !! Expert !! Aced |
| | |- | | |- |
| − | ! Combat flaps !! Take-off flaps !! Landing flaps !! Air brakes !! Arrestor gear !! Drogue chute | + | ! ''Arcade'' |
| | + | | rowspan="2" | 174 || rowspan="2" | -10°/+20° || rowspan="2" | ±180° || rowspan="2" | Vertical || __.__ || __.__ || __.__ || __.__ || __.__ || rowspan="2" | _.__ || rowspan="2" | _.__ || rowspan="2" | _.__ || rowspan="2" | _.__ |
| | |- | | |- |
| − | | X || ✓ || ✓ || ✓ || ✓ || ✓ <!-- ✓ --> | + | ! ''Realistic'' |
| | + | | __.__ || __.__ || __.__ || __.__ || __.__ |
| | |- | | |- |
| | |} | | |} |
| | | | |
| − | {| class="wikitable" style="text-align:center" width="50%" | + | ==== Ammunition ==== |
| | + | {| class="wikitable sortable" style="text-align:center" width="100%" |
| | + | ! colspan="8" | Penetration statistics |
| | |- | | |- |
| − | ! colspan="7" | Limits | + | ! rowspan="2" data-sort-type="text" | Ammunition |
| | + | ! rowspan="2" | Type of<br>warhead |
| | + | ! colspan="6" | '''Penetration @ 0° Angle of Attack (mm)''' |
| | |- | | |- |
| − | ! rowspan="2" | Wings (km/h) | + | ! 10 m !! 100 m !! 500 m !! 1,000 m !! 1,500 m !! 2,000 m |
| − | ! rowspan="2" | Gear (km/h) | |
| − | ! colspan="3" | Flaps (km/h) | |
| − | ! colspan="2" | Max Static G | |
| | |- | | |- |
| − | ! Combat !! Take-off !! Landing !! + !! -
| + | | M74B1 || AP || 79 || 76 || 65 || 54 || 45 || 37 |
| | |- | | |- |
| − | | {{Specs|destruction|body}} || {{Specs|destruction|gear}} || N/A || 625 || 463 || ~11 || ~4 | + | | M51B1/B2 || APCBC || 87 || 84 || 73 || 60 || 50 || 41 |
| | |- | | |- |
| | |} | | |} |
| − | | + | {| class="wikitable sortable" style="text-align:center" width="100%" |
| − | {| class="wikitable" style="text-align:center" | + | ! colspan="10" | Shell details |
| | + | |- |
| | + | ! rowspan="2" data-sort-type="text" | Ammunition |
| | + | ! rowspan="2" | Type of<br>warhead |
| | + | ! rowspan="2" | Velocity<br>(m/s) |
| | + | ! rowspan="2" | Projectile<br>Mass (kg) |
| | + | ! rowspan="2" | Fuse delay<br>(m) |
| | + | ! rowspan="2" | Fuse sensitivity<br>(mm) |
| | + | ! rowspan="2" | Explosive Mass<br>(TNT equivalent) (g) |
| | + | ! colspan="3" | Ricochet |
| | |- | | |- |
| − | ! colspan="4" | Optimal velocities (km/h) | + | ! 0% !! 50% !! 100% |
| | |- | | |- |
| − | ! Ailerons !! Rudder !! Elevators !! Radiator
| + | | M74B1 || AP || 883 || 0.87 || N/A || N/A || N/A || 47° || 60° || 65° |
| | |- | | |- |
| − | | < 810 || < 750 || < 700 || N/A | + | | M51B1/B2 || APCBC || 883 || 0.87 || N/A || N/A || N/A || 48° || 63° || 71° |
| | |- | | |- |
| | |} | | |} |
| | | | |
| − | ==== Engine performance ==== | + | ==== [[Ammo racks]] ==== |
| | + | [[File:Ammoracks_{{PAGENAME}}.png|right|thumb|x250px|[[Ammo racks]] of the {{PAGENAME}}]] |
| | {| class="wikitable" style="text-align:center" | | {| class="wikitable" style="text-align:center" |
| | |- | | |- |
| − | ! colspan="3" | Engine | + | ! Full<br>ammo |
| − | ! colspan="4" | Aircraft mass | + | ! 1st<br>rack empty |
| | + | ! 2nd<br>rack empty |
| | + | ! 3rd<br>rack empty |
| | + | ! 4th<br>rack empty |
| | + | ! Visual<br>discrepancy |
| | |- | | |- |
| − | ! colspan="2" | Engine name || Number
| + | | '''174''' || 131 ''(+43)'' || 87 ''(+87)'' || 44 ''(+130)'' || 1 ''(+173)'' || Yes |
| − | ! colspan="2" | Empty mass || colspan="2" | Wing loading (full fuel)
| |
| | |- | | |- |
| − | | colspan="2" | Rolls-Royce Spey 203 || 2 | + | |} |
| − | | colspan="2" | 14,200 kg || colspan="2" | 408 kg/m<sup>2</sup>
| + | |
| − | |-
| + | === Machine guns === |
| − | ! colspan="3" | Engine characteristics
| + | <!-- ''Offensive and anti-aircraft machine guns not only allow you to fight some aircraft but also are effective against lightly armoured vehicles. Evaluate machine guns and give recommendations on its use.'' --> |
| − | ! colspan="3" | Mass with fuel (no weapons load) || rowspan="2" | Max Takeoff<br />Weight
| + | {{main|M1919A4 (7.62 mm)}} |
| − | |- | + | |
| − | ! Weight (each) || colspan="2" | Type
| + | The M3A3 has two [[M1919A4 (7.62 mm)|7.62 mm M1919A4]] machine guns, one being coaxial to the main gun and the other roof-mounted. The two machine guns can quickly incapacitate the exposed crews on some vehicles or do some serious damage to those low-passing planes. The machine gun is only enough to destroy poorly protected vehicles such as AS 42, FlakPz I and GAZ-AAA. The penetration of around 10 mm is not enough to go through the frontal armour of those not-so-weakly-armoured tanks like SU-5-1, Panzerjager 1 or 15cm sIG 33 B Sfl. If you are skilled the two machine gun can effectively damage low-flying biplanes. |
| − | ! 7m fuel || 20m fuel || 26m fuel
| + | |
| − | |- | + | {| class="wikitable" style="text-align:center" width="50%" |
| − | | 1,860 kg || colspan="2" | Afterburning low-bypass turbofan
| |
| − | | 15,807 kg || 18,707 kg || 20,055 kg || 25,400 kg
| |
| | |- | | |- |
| − | ! colspan="3" | {{Annotation|Maximum engine thrust @ 0 m (RB / SB)|The maximum thrust produced by each engine, while mounted in the aircraft. NOTE: Thrust varies significantly depending on speed & altitude.}} | + | ! colspan="5" | [[M1919A4 (7.62 mm)|7.62 mm M1919A4]] |
| − | ! colspan="4" | Thrust to weight ratio @ 0 m (WEP)
| |
| | |- | | |- |
| − | ! Condition || 100% || WEP | + | ! Mount !! Capacity (Belt) !! Fire rate !! Vertical !! Horizontal |
| − | ! 7m fuel || 20m fuel || 26m fuel || MTOW | |
| | |- | | |- |
| − | | ''Stationary'' || 5,110 kgf || 9,010 kgf | + | | Pintle || 4,300 (250) || 500 || -10°/+70° || -60°/+15° |
| − | | 1.14 || 0.96 || 0.90 || 0.71
| |
| | |- | | |- |
| − | | ''Optimal'' || 5,110 kgf<br />(0 km/h) || 10,265 kgf<br />(1,200 km/h) | + | | Coaxial || 3,200 (250) || 500 || N/A || N/A |
| − | | 1.31 || 1.10 || 1.03 || 0.81 | |
| | |- | | |- |
| | |} | | |} |
| − | '''Radiator can be manually controlled for increased time with afterburner without the engines overheating'''
| |
| − |
| |
| − | === Survivability and armour ===
| |
| − | <!-- ''Examine the survivability of the aircraft. Note how vulnerable the structure is and how secure the pilot is, whether the fuel tanks are armoured, etc. Describe the armour, if there is any, and also mention the vulnerability of other critical aircraft systems.'' -->
| |
| − | ''Examine the survivability of the aircraft. Note how vulnerable the structure is and how secure the pilot is, whether the fuel tanks are armoured, etc. Describe the armour, if there is any, and also mention the vulnerability of other critical aircraft systems.''
| |
| − |
| |
| − | == Armaments ==
| |
| − | === Suspended armament ===
| |
| − | <!-- ''Describe the aircraft's suspended armament: additional cannons under the wings, bombs, rockets and torpedoes. This section is especially important for bombers and attackers. If there is no suspended weaponry remove this subsection.'' -->
| |
| − | {{main|G.P. Mk.I (1,000 lb)|AIM-9D Sidewinder|SNEB type 23|M61 (20 mm)}}
| |
| − |
| |
| − | The '''''{{PAGENAME}}''''' can be outfitted with the following ordnance:
| |
| − |
| |
| − | * 1 x 20 mm M61 cannon, belly-mounted (gunpod) (1,200 rpg)
| |
| − | * 8 x 1,000 lb G.P. Mk.I bombs + 1 x 20 mm M61 cannon, belly-mounted (gunpod) (1,200 rpg) (8,000 lb total)
| |
| − | * 108 x SNEB type 23 rockets + 1 x 20 mm M61 cannon, belly-mounted (gunpod) (1,200 rpg)
| |
| − | * 4 x AIM-9D Sidewinder missiles + 1 x 20 mm M61 cannon, belly-mounted (gunpod) (1,200 rpg)
| |
| − | * 4 x 1,000 lb G.P. Mk.I bombs + 4 x AIM-9D Sidewinder missiles + 1 x 20 mm M61 cannon, belly-mounted (gunpod) (1,200 rpg) (4,000 lb total)
| |
| − | * 4 x AIM-9D Sidewinder missiles
| |
| | | | |
| | == Usage in battles == | | == Usage in battles == |
| − | <!-- ''Describe the tactics of playing in the aircraft, the features of using aircraft in a team and advice on tactics. Refrain from creating a "guide" - do not impose a single point of view, but instead, give the reader food for thought. Examine the most dangerous enemies and give recommendations on fighting them. If necessary, note the specifics of the game in different modes (AB, RB, SB).'' -->[[File:PHANTOM FG 1 COOL 5.png|thumb|533x533px|An [[F-4M|F-4M/FGR.2]] (front) and F-4K/FG.1 (back), both in the post-1983 RAF Medium Sea Grey camouflage scheme, flying above a Norwegian Fjord. While outwardly similar, the two Spey Phantoms perform slightly differently.]] | + | <!-- ''Describe the tactics of playing in the vehicle, the features of using vehicles in the team and advice on tactics. Refrain from creating a "guide" - do not impose a single point of view but instead give the reader food for thought. Describe the most dangerous enemies and give recommendations on fighting them. If necessary, note the specifics of the game in different modes (AB, RB, SB).'' --> |
| − | The F-4K/Phantom FG.1 is the ultimate energy fighter- its advantages over other aircraft are sheer power, roll rate, its unrivalled ability to climb to high altitudes, and its nearly unparalleled speed and thrust-to-weight ratio down low. The twin Rolls-Royce Spey 203 engines produce just over 9,000 kgf thrust when you are stationary- that is to say, on the runway- and over 10,000 kgf when you're travelling at near-supersonic speeds.
| + | The M3A3 Stuart is best used as a point-capper and a hit-n-run tank. Its extreme mobility gives the player uncountable ways to play with the enemy. At the start of a battle, it can quickly cap a nearby point first, but note that some wheeled vehicles, like the [[Sd.Kfz.234/2|Sd.Kfz.234]] series in a mixed battle can still outrun the M3A3 on-road, therefore posing a great threat. Or it can get to an ambush position near the point and wait until the prey comes. With its reliable gun, the M3A3 should be able to destroy the first wave of enemies easily and quickly. |
| | | | |
| − | Side-climb high- around 8,000-9,000 metres will do- and attack those beneath you. The Phantom's '''fantastic''' climb rate, as well as the FG.1's faster acceleration to maximum speed than '''any other F-4, including the FGR.2''', gives it an excellent climb advantage over any and all opposition up to around 5,000 metres (16,500 feet), and with side-climbing can easily manage to get to 10,000 metres (33,000 feet) before anybody else can, save for F-4E's. It must be noted however that the Phantom's high-altitude controllability is not very good, and the aircraft flies like a brick above 7500 metres (24,000 feet).
| + | In the middle stages of a battle, the M3A3 can utilise its excellent mobility and get to wherever needs help while carefully looking around. If the M3A3 unexpectedly encounter an enemy in its path, don't panic! Circle around the enemy and try to force it to turn, this way it usually cannot aim at the M3A3 accurately, then reduce the M3A3's speed down under 10 km/h and keep moving. Now the M3A3's stabiliser will give the tank a great chance to hit while on the move as it stabilises the gun when the tank is under 10 km/h, making it easier time to put the gun on target while moving compared to the enemy. |
| | | | |
| − | Unlike other F-4s, British Phantoms have stock RWR in the odd square section mounted on top of the tail. This gives the F-4K an additional advantage in combat, as unlike other phantoms, it can from the outset detect enemy radar impulses and thus at least know the direction of enemy aircraft, as well as the likelihood that they have been detected on an enemy's radar. This RWR can also differentiate between simple radar pings and a radar lock, which is invaluable in deciding whether one needs to start evasive maneuvers to try break the lock or whether it is simply a sign of a distant enemy contact.
| + | The frontal armour of this tank is also quite good at a distance. Find a building or a big rock as cover and angle the hull for about 40 degrees. When ready to fire, go out of cover and stop once the 37 mm gun is exposed, don't go out too much or the thin side armour will be exposed to be hit. Keep in mind that with this tactic the player should only engage the low-penetrating enemies at more than 400 m, as their penetration will drop significantly at that distance while the M3A3 can still penetrate 73 mm of armour, which is enough to go through most of its opponents like the [[T-50]], [[SU-76M]] or [[Crusader Mk III]]. |
| | | | |
| − | The Ferranti AN/AWG-11 Radar can scan up to 370 kilometers away in a 120 degree arc, but generally you should keep the radar scanning in a 120 degree search pattern for targets at 18.5km away from you. The radar also has an Air Combat Mode, or '''ACM''' mode, that shortens the radar search to an 11-by-11 degree search pattern with a maximum range of 9.25km. In this mode, it will lock on the first target that it manages to detect and will not stop tracking nor switch to another target until the lock is lost. While unlike other aircraft it does not give you a lead indicator, it is a useful tool for detecting and tracking targets that are not visible due to cloud, distance, or other such factors.
| + | '''Enemies worth noting:''' |
| | | | |
| − | The AIM-9Ds do excellently when launched from 2.3-5.5 kilometers (1.5-2.5 miles) away, but not up close. They are superior to the AIM-9E, with 16 Gees of maximum overload as opposed to 10 Gees, but they are still inferior to the [[R-60|R-60/AA-8 Aphid]] (30G) and the [[AIM-9J Sidewinder|AIM-9J]] (20G). However, it is of note that the AIM-9D's seeker head is able to lock on and maintain a lock at much longer distances than either missile. It is possible to kill aircraft from 8-10km away given the right conditions and a bit of luck.
| + | Specific enemy vehicles that bear mentioning are firstly any Germans with the [[KwK38 (20 mm)|20 mm KwK/FlaK38]] cannon, this gun might be small but can have up to 64 mm of penetration, which is enough to go through the M3A3 almost anywhere. These guns can also fire 10 rounds at 280 rounds/min before having to reload the clip, meaning that they will very easily take out your crew before you have a chance to respond. To counter, the best chance you have is to angle your frontal armour which can make it difficult for the PzGr 40 rounds to penetrate. The Russian [[T-50]] and [[T-126]] are vehicles you will also see commonly, these have fairly thick and angled frontal armour that will prevent you from easily getting through. These tanks can also carry an APHEBC round that will destroy you in one shot with little difficulty, to counter you should use your speed to attempt to get a side shot into either the turret or engine. If the T-50 cannot move you can outrun its turret and finish it without much difficulty. |
| | | | |
| − | Any British Phantom should '''not''' be taken close to the beginning furball. All mentioned facts combined give the image of a long-range missile-hauler with a licence to kill from long range given by Her Majesty Queen Elizabeth II herself. This is indeed the case. British Phantoms perform admirably in a support role in a furball, killing tailsitting MiGs, Mirages and Phantoms, as well as taking out enemy aircraft who go high to try to attack aircraft with an energy advantage, and enemy aircraft extending away from the furball to make another pass. [[File:Phantom FG1 SC1.png|thumb|Phantom FG.1 over El Alamein]]
| + | It is likely that the M3A3 will encounter some rough heavies, like the [[Matilda III]] and the [[B1 bis]]. The best tactic against these types of targets is to use the M3A3's fast speed, get within 200 m from them and attack, with shooting at point-blank range being the most effective way. Before conducting an attack, check the M3A3's and the enemy's surroundings to make sure no one will ambush the M3A3. While charging, use the M3A3's quick turns to suddenly change direction to avoid being shot if they are aiming and firing at the M3A3. Once the tank is at the ideal distance, manoeuvre so that the gun is perpendicular to their armour. Do not shoot if the enemy is angling! The small calibre 37 mm gun is very likely to bounce off or not penetrate against sloped armour. |
| | | | |
| − | This, however, does '''not''' mean that the Phantom FG.1 cannot handle itself in a dogfight. The FG.1 is more than capable of engaging aircraft up close (between 0-1.5km away), with a powerful M61 Vulcan. You can easily kill aircraft in a head-on, but that doesn't mean that you should commit and stay there! Always break off if you see enemy tracer, or at the very least when the enemy aircraft is 1km away, lest you would like your own example of the World's Best Distributor of MiG Parts spread all over the sky. When using the Vulcan, one has two options on how to engage, one of which is more risky than the other, and depends on your aircraft being spaded.
| + | For the Matilda III, shoot at the middle of the near-vertical frontal plate to knock out the driver first, since the 37 mm shell is not enough to knock out the gunner after penetrating. Once it is immobile, go to its side and finish it by shooting its hull sides. Or, shoot the right side of the gun mantlet to disable its gunner. For the best chance of penetration, do not shoot its turret side. |
| | | | |
| − | * The first method of engagement is a fairly standard low-risk hit-and-run pass. Approach the enemy, shoot, and break off. There's nothing too special about it, and it relies more on the Phantom's blinding speed to get into the target area, the Vulcan's overwhelming Burst Mass to put at least a few rounds on the target, and then get out of the danger zone as soon as possible lest you become the target of unwanted attention. It requires little in the way of skill and little in the way of performance upgrades, as the FG.1 already has considerable engine power. However, it does not allow for sustained time on target and gives you only a small window of opportunity to make the shot.[[File:PHANTOM FG 1 COOL 2.png|thumb|Phantom FG.1 above the North Atlantic.]]
| + | For the B1, either aim for the near-vertical frontal armour plate at the right side of the hull, or the turret ring to incapacitate the commander/gunner, or simply move to its side and knock out the crews one by one by hitting its flat side armour. |
| − | * The second method of engagement is much more risky, more rewarding, and requires a fair amount of pilot skill and a '''fully upgraded plane'''. In addition, this method is '''specific''' to British Phantoms, if not the FG.1 in '''general''', as the FG.1 is the '''only''' Phantom which has this type of afterburner performance. Pilots are '''not''' recommended to try this in the [[F-4C]], [[F-4E]] or [[F-4EJ]]. Conversely, this tactic works very effectively against turning non-spey phantoms. This method should '''not''' be used above 5000 metres under any circumstances. This method works best while in cloud and with an ACM lock on the enemy. The Phantom has its best roll performance at '''700-950km/h''' (380-515 kts) and can use its takeoff flaps below 700km/h without risking them ripping off. You can use the airbrakes to slow the aircraft to the required speed, and then by tapping the flaps from raised to takeoff position, you can turn a little tighter than usual, and then use your outstanding afterburner performance to rapidly regain speed. You can out-accelerate any phantom in-game below 5000 metres, and even from a slower start you can rapidly close the gap. This maneuver can also be attempted at an angle to the horizontal, although speed can become a much greater concern (both flap rip speed and stall speeds). While this tactic may at first seem illogical- speed, after all, is the lifeblood of jet battles- the fast afterburner acceleration of the Spey Phantom can often ensure that you do not end up stalling. This tactic is, however, highly situational and requires a fair bit of situational awareness and pilot skill to pull off. Phantom neophytes shouldn't attempt this until they have at least spaded it and grown comfortable with it.
| |
| − | | |
| − | The Astute reader may have noticed that the engagement ranges described leave a "dead zone" between 1.5-2.4km away from the aircraft. This is correct. Unless the enemy is low, slow, or simply unaware of their surroundings, they can easily dodge the AIM-9Ds at this range, and they are too far away for a reliable guns kill. Pilots have two options should they come to this impasse. They can either break off the engagement, extend a little to a more comfortable range (hopefully 3km) and fire a missile, '''or''' head straight at the enemy, casting all pretenses of subtlety to the wind to go for a guns kill with the Vulcan. The choice is up to the pilot to decide.
| |
| − | | |
| − | '''Dodging Missiles: The Do's and Don'ts.'''
| |
| − | [[File:PHANTOM FG 1 COOL 6.png|thumb|A Phantom FG.1 breaking away to the left while a [[Phantom FGR.2]] presses onwards.]]
| |
| − | The Phantom FG.1 is slightly more maneuverable than the FGR.2 due to aerodynamic modifications to allow it to perform better at speeds. This means it has a slightly easier time dodging missiles. However, the easiest to avoid missiles is to not let the enemy get the opportunity to launch them at all. Keep your tail pointed '''away''' from enemy radars and the front of enemies. Utilize oblique angles and the Phantom's blinding speed and unrivalled acceleration to get out of missile lock range, and use head-on passes to avoid IRM locks on targets you wish to get gun kills on, before extending out quickly with full afterburner. Do not stay still for prolonged periods of time without checking behind you for tell-tale white streaks or the missile markers. In addition, don't let MiG-21s get close to you. Fly at an oblique angle to them (but keep your tailplane out of clear sight!) until you reach 2.5km. The R60s, while having a lock range of 3.5km, have an effective range of around 2.5km, making them almost useless at longer ranges (unlike the AIM-9Ds, which are most effective when '''at''' long range, and maneuvers when seen from a distance mean smaller course corrections). Matra Magics are harder to evade using distance, but a similar rule applies, where having at least 3-5 kilometers between you and the enemy and travelling at an angle that obscures your engines from enemy aircraft helps massively in avoiding missile launches. Maneuvering and flares should be an absolute last resort. Pre-emptive maneuvering to deprive the enemy of chances to lock is the first and foremost way to avoid getting blown out of the sky.[[File:PHANTOM FG 1 COOL.png|left|thumb|A Phantom FG.1 of 111 Squadron, or "Treble One", patrolling over the North Atlantic.]]If you need to maneuver, though, '''remember to turn off the afterburner'''. The Afterburner provides a large beacon-like heat signature that any IRM can track with a modicum of ease. Break either '''into''' a missile (if fired from beyond 1.5km) or '''away''' from a missile (if fired from below that distance) while popping flares. Press your flare button at least twice to release a sufficient amount to decoy off the enemy missile. If dodging SAMs at low altitude during Ground Battles matches, try to put terrain features such as trees, buildings and cliffs between you and the missile to force the radar to break a lock, and break towards the missile in order to increase the G-force it needs to pull. While you can do this to some extent in Air RB, there aren't often many terrain features to begin with, and missiles are usually IRMs, which means that they don't require the launcher to continuously maintain line-of-sight with the target they launched at. Another method to dodge missiles is a barrel roll while popping flares, executed at the last possible moment, while the missile is below 1km away. This method, while risky, is sometimes the only way you can evade close-range missiles such as the [[Hunter F.6]]'s [[SRAAM]]<nowiki/>s, the [[MiG-21MF (Germany)|MiG-21MF]] and [[MiG-21SMT]]'s R-60s and the [[Mirage IIIC]]'s R.550 Magics, as well as helicopter-mounted IRMs such as the [[9M39 Igla]] on Russian helicopters, the [[AIM-92 Stinger]] on US helicopters, the British [[Starstreak]], and the [[Mistral]] on French, German, and Italian helicopters.
| |
| | | | |
| | === Modules === | | === Modules === |
| | {| class="wikitable" | | {| class="wikitable" |
| | ! Tier | | ! Tier |
| − | ! Flight performance | + | ! colspan="2" | Mobility |
| − | ! Survivability | + | ! Protection |
| − | ! colspan="3" | Weaponry | + | ! colspan="2" | Firepower |
| | |- | | |- |
| | | I | | | I |
| − | | Compressor | + | | Tracks |
| − | | Fuselage repair
| |
| | | | | | |
| − | | 1000 LB GP | + | | Parts |
| − | | Flares | + | | Horizontal Drive |
| | + | | M51B1/B2 |
| | |- | | |- |
| | | II | | | II |
| − | | New boosters | + | | Suspension |
| − | | Airframe | + | | Brake System |
| − | | Offensive 20 mm | + | | FPE |
| − | | Matra SNEB | + | | Adjustment of Fire |
| − | | | + | | Airstrike |
| | |- | | |- |
| | | III | | | III |
| − | | Wings repair | + | | Filters |
| − | | G-suit
| |
| | | | | | |
| − | | AIM-9D | + | | Crew Replenishment |
| | + | | Elevation Mechanism |
| | | | | | |
| | |- | | |- |
| | | IV | | | IV |
| | + | | Transmission |
| | | Engine | | | Engine |
| − | | Cover
| |
| − | | New 20 mm cannons
| |
| − | |
| |
| | | | | | |
| | + | | Artillery Support |
| | + | | Improved optics |
| | |- | | |- |
| | |} | | |} |
| − |
| |
| − | '''Flares''' should be one of your top priorities, as well as the '''1000 LB GP''' upgrade. These give you a fighting chance against your missile-armed opponents, and the bombs provide a relatively reliable source of RP {{rp}} as you work towards better equipping the aircraft for dogfights later down the line. '''Compressor''' and '''Engine''' provide the single largest addition to performance, far more than any of the other upgrades, and should be prioritised. The Airframe and Cover are not priorities, but New Boosters help immensely with taking on trickier opponents. The Offensive 20mm and New 20mm cannon upgrades are not priorities, as the M61 is more accurate than one would think, and with a cyclic fire rate of 6000 rounds per minute, belt composition simply does '''not''' matter. In addition to that, the belts themselves are '''much''' too expensive, coming at 3.3K-4.9K Silver Lions {{Sl}}.
| |
| | | | |
| | === Pros and cons === | | === Pros and cons === |
| − | <!-- ''Summarise and briefly evaluate the vehicle in terms of its characteristics and combat effectiveness. Mark its pros and cons in the bulleted list. Try not to use more than 6 points for each of the characteristics. Avoid using categorical definitions such as "bad", "good" and the like - use substitutions with softer forms such as "inadequate" and "effective".'' --> | + | <!-- ''Summarise and briefly evaluate the vehicle in terms of its characteristics and combat effectiveness. Mark its pros and cons in a bulleted list. Try not to use more than 6 points for each of the characteristics. Avoid using categorical definitions such as "bad", "good" and the like - use substitutions with softer forms such as "inadequate" and "effective".'' --> |
| | | | |
| | '''Pros:''' | | '''Pros:''' |
| | | | |
| − | * Great top speed; one of the fastest aircraft in the game | + | * Great firepower: cannon has good penetration, excellent rate of fire and gun depression of -10 degrees, allowing the M3 to manoeuvre to any terrain and adapt to it well |
| − | * Decent manoeuvrability for a plane of its size | + | * Excellent acceleration, top speed and turning ability on all terrains; easily outruns common opponents like the [[Pz.III (Disambiguation)|Pz.III]] and Crusader |
| − | * Excellent engine performance at low altitude | + | * Access to a vertical stabiliser which most tanks don't have, giving it an advantage in a sudden encounter |
| − | * Great rate of climb, rivaled only by the F-104 Starfighter
| + | * Respectable sloped armour that, if angled, might bounce some shells from a distance, such as the 37 mm M6 on other M3 Stuarts |
| − | * Adequate selection of secondary ordnance | + | * Small turret profile makes it harder to get hit |
| − | * Powerful M61 Vulcan can wreak havoc against enemy aircraft
| |
| − | * Cheaper repair cost than the other F-4's
| |
| | | | |
| | '''Cons:''' | | '''Cons:''' |
| | | | |
| − | * As with most jets, tends to bleed off energy in sustained turns | + | * Weak armour against high-penetration shells like the 76 mm F-34/ZIS-5 |
| − | * Relatively large target | + | * Its shells do not have explosive filler, severely limiting the post-penetration effect especially against spacious tanks like the [[LVT(A)(1)]] |
| − | * Limited payload options compared to American Phantoms | + | * Inefficient brakes when trying to stop the tank at full speed |
| − | * Engines lose their edge higher up compared to US turbojets | + | * Hull is fairly tall for a light tank and the crews are closely packed, reducing its survivability |
| − | * Control Authority suffers above ~8000 metres | + | * While fast, it is still slower than the Sd.Kfz.234 series on the road |
| | | | |
| | == History == | | == History == |
| − | <!-- ''Describe the history of the creation and combat usage of the aircraft in more detail than in the introduction. If the historical reference turns out to be too long, take it to a separate article, taking a link to the article about the vehicle and adding a block "/History" (example: <nowiki>https://wiki.warthunder.com/(Vehicle-name)/History</nowiki>) and add a link to it here using the <code>main</code> template. Be sure to reference text and sources by using <code><nowiki><ref></ref></nowiki></code>, as well as adding them at the end of the article with <code><nowiki><references /></nowiki></code>. This section may also include the vehicle's dev blog entry (if applicable) and the in-game encyclopedia description (under <code><nowiki>=== In-game description ===</nowiki></code>, also if applicable).'' --> | + | <!-- ''Describe the history of the creation and combat usage of the vehicle in more detail than in the introduction. If the historical reference turns out to be too long, take it to a separate article, taking a link to the article about the vehicle and adding a block "/History" (example: <nowiki>https://wiki.warthunder.com/(Vehicle-name)/History</nowiki>) and add a link to it here using the <code>main</code> template. Be sure to reference text and sources by using <code><nowiki><ref></ref></nowiki></code>, as well as adding them at the end of the article with <code><nowiki><references /></nowiki></code>. This section may also include the vehicle's dev blog entry (if applicable) and the in-game encyclopedia description (under <code><nowiki>=== In-game description ===</nowiki></code>, also if applicable).'' --> |
| − | <!--''Describe the history of the creation and combat usage of the aircraft in more detail than in the introduction. If the historical reference turns out to be too long, take it to a separate article, taking a link to the article about the vehicle and adding a block "/History" (example: <nowiki>https://wiki.warthunder.com/(Vehicle-name)/History</nowiki>) and add a link to it here using the <code>main</code> template. Be sure to reference text and sources by using <code><nowiki><ref></ref></nowiki></code>, as well as adding them at the end of the article with <code><nowiki><references /></nowiki></code>. This section may also include the vehicle's dev blog entry (if applicable) and the in-game encyclopedia description (under <code><nowiki>=== In-game description ===</nowiki></code>, also if applicable).''-->
| |
| − | | |
| − | ===Background===
| |
| − | From the late 1950s onwards the British Government began looking to replace a number of its early second-generation jet aircraft. The RAF was looking to replace the [[Canberra_(Family)|English Electric Canberra]] in the long-range interdictor role, and the [[Hunter_(Family)|Hawker Hunter]] in the close air support role; meanwhile the Royal Navy was looking to replace their de Havilland Sea Vixens in the fleet air defence role<ref name="WikipediaPhantomUK">Wikipedia: McDonnell Douglas Phantom in UK service</ref>. Two aircraft programs were started to produce suitable replacements; the BAC TSR-2 was to be a highly advanced strike and reconnaissance aircraft to replace the Canberra. Meanwhile the Hunter and the Sea Vixen would be replaced by different versions of the P.1154; a Mach 2 capable VTOL aircraft developed from the P.1127 (the predecessor of famous Harrier Jump Jet). The Navy were not entirely happy with the idea of the navalised P.1154, believing that it did not suit their needs; and in 1964 they dropped out of the programme, deciding to purchase the F-4 Phantom from America instead. In the same year a new government was elected and in 1965 cancelled both the TSR-2 and P.1154 programmes on cost grounds, leaving the RAF without its much needed Canberra and Hunter replacements. The Government announced a plan to purchase the F-111K from America to replace the TSR-2 program (the F-111K would also eventually be cancelled on grounds of cost), while the Hunter would be replaced by F-4 Phantoms from America<ref name="BurkePhantom">Burke 2016</ref>.
| |
| − | | |
| − | ===Development===
| |
| − | Both the Royal Navy and RAF were now set to purchase the F-4 Phantom. The RAF could have operated standard F-4 Phantoms (and to some extent would have preferred to)<ref name="BurkePhantom" />, however the aircraft was going to need modifications in order to be able to operate off of the UK's aircraft carriers, which were smaller than the ones Phantoms usually operated from. In a bid to help the British aviation industry (which had been hurt by a number of cancelled programmes), and make the aircraft suitable for use by the Royal Navy it was agreed that all UK Phantoms would be significantly modified, by British companies, from their US counterparts. The most notable change would be the replacement of the American J79 turbojet engines with larger and more powerful Rolls-Royce Spey turbofans; a modified rear fuselage to accommodate the new engines would also be built by BAC, and the aircraft's radar system would be built under license by Ferranti<ref name="WikipediaPhantomUK" />.
| |
| | | | |
| − | It was decided that the UK Phantoms would be based off of the F-4J, which was then the primary version in service with the US Navy at the time<ref name="WikipediaPhantomUK" />. As the RAF and Royal Navy had differing requirements it was decided that two variants of the UK Phantom would be designed: the first variant, for the Royal Navy, would be designated F-4K or Phantom FG.1; while the RAF variant would be developed from the navy variant and be designated F-4M or Phantom FGR.2. Work began on modifying the F-4J to meet the Royal Navy's needs; the nose radome had to be made to hinge 180 degreed, to allow the Phantom fit on the smaller deck elevators of British carriers, and a telescopic nose gear was installed to allow the aircraft to sit pitched nose-up on the flight deck (by up to 11°), reducing take-off distance<ref name="WikipediaPhantomUK" />. The new engines were installed at a slight downwards angle to further increase take-off performance and the rear fuselage to be redesigned to both accommodate the new engines and cope with the increased heat they produced; the air intakes also had to be made larger, and additional intake doors added in the fuselage to provide the Speys with the airflow they required<ref name="BurkePhantom" />. Many other small changes were also made to UK Phantoms. The first F-4K prototype flew on 27 June 1966, with the First F-4M prototype flying on 17 February 1967.
| + | The US lend-leased a total of 651 light tanks to the Free French forces, including 273 M3A3s, delivered prior to D-Day. All the light tanks of 2nd French Armoured Div. were M3A3s during the 1944 fighting in France. 1st and 5th Divisions had a mix of M3A3 and M5A1. Three of the five armoured recon battalions integral to the Free French infantry divisions also had a mixed fleet, while the 2 non-divisional armoured recon battalions, the 1st and 2nd Spahis Algeriens, were entirely M3A3-equipped. They would continue in service from D-Day until the end of the war in Europe. |
| − | | |
| − | ===Service===
| |
| − | The first F-4Ks were delivered in April 1968 and were designated Phantom FG.1, early the following year they began test flights from HMS Eagle and the USS Saratoga. During the testing the intense heat produced by the downward-angled Spey engines, while the afterburner was engaged, caused the flight deck plating of the USS Saratoga to buckle<ref name="BurkePhantom" />. On-board HMS Eagle heavy-duty steel plating had to be welded to the flight deck; and be cooled using water from the ship's fire hoses between flights, in order to stop it from melting<ref name="SearlesPhantom">Searles n.d.</ref>. When the HMS Ark Royal was upgraded to operate Phantoms it had to have water-cooled blast deflectors and decking installed to prevent the Phantom's engines from damaging the flight deck <ref name="BurkePhantom" />. HMS Ark Royal had finished its refit in 1970, by which point the refit of HMS Eagle had been cancelled, along with plans to build two additional aircraft carriers. With the Navy now only having one carrier capable of operating Phantoms it was decided to reduce the Navy's Phantom fleet down to 28 aircraft, with the other 20 FG.1s being transferred to the RAF. The remaining Royal Navy Phantoms would serve on the HMS Ark Royal (R09) until her retirement.
| |
| − | | |
| − | The first F-4Ms entered RAF service in May 1969, filling the role of tactical strike aircraft; they were given the designation Phantom FGR.2 (with FGR standing for Fighter/Ground attack/Reconnaissance). The RAF's Phantom FGR.2 was overall very similar to the Navy's FG.1 variant, but had a number of changes; they used a slightly different version of Spey engines (the FG.1 had faster afterburner engagement to aid with aborted landings on aircraft carriers), and naval features like the telescopic nose gear, slotted tail, and cockpit-controlled wing folding were dropped. The FGR.2 also had different avionics, the radar was slightly different and additional functionality such as an inertial navigation / attack system was added, as well as modification needed to allow the FGR.2 to use a gun pod and reconnaissance pod, among other changes<ref name="GledhillPhantom">Gledhill 2017</ref>. Both the FGR.2 and FG.1 would later be modified with squared off tails, holding a radar warning receiver.
| |
| − | | |
| − | The Phantom FG.1s were withdrawn from Royal Navy service in 1978, with the decommissioning of HMS Ark Royal, and were transferred to the RAF to serve in air defence roles. The Phantom FG.1 was not originally equipped to carry a gun pod while in Royal Navy service, following their transfer to RAF service they were modified in order to carry the SUU-23/A 20 mm gun pod (the same one used by the RAF Phantom FGR.2s). The Phantoms were replaced in Navy service by the Harrier Jump Jet, which was able to operate from the Navy's new Invincible-class aircraft carriers (which were smaller than the HMS Ark Royal).
| |
| − | | |
| − | Following the Falklands War in 1982 the UK deployed a Squadron of FGR.2s to defend the Falkland Islands from any future attack; however this left a gap in the Air defence of the UK Mainland. It was decided to purchase 15 more F-4Js from America to fill this gap. The F4-Js were upgraded to F-4S standard and entered service with the RAF on 19 October 1984 under the designation Phantom F.3 or F-4J(UK)<ref name="BurkePhantom" />. The Phantom remained the UK's primary Air defence aircraft until it was gradually replaced by the Panavia Tornado; the last FG.1s retired on 30 January 1990, the last F.3s retired on 31 January 1991, and the FGR.2 left RAF service on 1 November 1992. The FGR.2 was due to retire earlier however just before retirement it was called back into service to defend RAF Akrotiri, on Cyprus, during the First Gulf War<ref name="BurkePhantom" />.
| |
| − | | |
| − | A total of 48 Phantom FG.1s, 118 Phantom FGR.2s and 15 Phantom F.3s were built<ref name="WikipediaPhantomUK" />.
| |
| − | | |
| − | ===Further development plans===
| |
| − | Prior to the Phantom's retirement from RAF service there had been a plan to retrofit them with an upgraded version of the Spey engine. A program was started to design the new engines; they would have various improvements, the most notable of which being new turbine blades, reportedly manufactured from a single metal crystal<ref name="ThrustSSC">SSC Programme Ltd 1997</ref>. These blades would increase the operating life of the engines under normal conditions, but also give the option of operating the engines at higher temperatures, and thus higher thrust (although this would come at the expense of reduced engine life). These engines were known as Spey 205s and had a maximum thrust of 25,000 lb (11,340 kgf)<ref name="ThrustSSC" />, compared to 20,515 lb (9,305 kgf) for the regular Spey engines; although it is unclear if they would be used at this thrust rating while in service. With the Phantom retired the Spey 205 programme was cancelled, and no engines were produced under the Spey 205 name; however 12 Spey 202 engines had been upgraded to Spey 205 standard for testing (and are now generally referred to as Spey 205s, or Spey 202 hybrids)<ref name="BourneSSC">Bourne 1997</ref>. It is known that after the programme was cancelled two of the Spey 205 prototypes, along with two standard Spey 202s were obtained by the ThrustSSC programme (the world's fastest car)<ref name="ThrustSSC" />, although reports vary on whether the car was fitted with Spey 202s or 205s when it completed its record-breaking run.
| |
| − | | |
| − | ===Comparison with American Phantoms===
| |
| − | The Rolls-Royce Spey engines gave British Phantoms notably different performance to their American counterparts. At low altitude British Phantoms accelerated faster than standard F-4Js and had a higher top speed; it was estimated that they had a 30% shorter take-off distance and a 20% faster climb to altitude<ref name="WikipediaPhantomUK" />. The Spey turbofan engines were also more fuel efficient than the J-79 turbojets, giving British Phantoms a 10 - 15 % increase in range compared to American aircraft<ref name="GledhillPhantom" />. The main drawback of the British design was that the reshaped fuselage produced more drag than the original design, meaning that at high altitude British Phantoms were slower and performed worse than their American counterparts (British Phantoms topped out at about Mach 1.9 at altitude, while American Phantoms could reach Mach 2.1)<ref name="BurkePhantom" />.
| |
| | | | |
| | == Media == | | == Media == |
| − | {{Youtube
| + | ''Excellent additions to the article would be video guides, screenshots from the game, and photos.'' |
| − | | url = https://www.youtube.com/watch?v=YTV8OmfpR0Y&t=310s
| |
| − | | caption = War Thunder Phantom FG Mk1 Review So Far - TWM12
| |
| − | }}
| |
| | | | |
| | == See also == | | == See also == |
| − | | + | ''Links to the articles on the War Thunder Wiki that you think will be useful for the reader, for example:'' |
| − | * [[Phantom FGR.2]] - Royal Air Force variant | + | * ''reference to the series of the vehicles;'' |
| | + | * ''links to approximate analogues of other nations and research trees.'' |
| | | | |
| | == External links == | | == External links == |
| − | <!--''Paste links to sources and external resources, such as:''
| + | ''Paste links to sources and external resources, such as:'' |
| − | | |
| | * ''topic on the official game forum;'' | | * ''topic on the official game forum;'' |
| − | * ''encyclopedia page on the aircraft;'' | + | * ''encyclopedia page on the tank;'' |
| − | * ''other literature.''--> | + | * ''other literature.'' |
| − | | |
| − | * [[Wikipedia:McDonnell_Douglas_Phantom_in_UK_service|[Wikipedia<nowiki>]</nowiki> McDonnell Douglas Phantom in UK service]]
| |
| − | * [https://www.thunder-and-lightnings.co.uk/phantom/history.php Thunder And Lightning: McDonnell-Douglas/BAC F-4K/M Phantom 2]
| |
| − | | |
| − | ===Citations===
| |
| − | <references />
| |
| − | | |
| − | ===Bibliography===
| |
| − | | |
| − | * Bourne, Nigel. (1997). Development of the Rolls-Royce Military Spey Mk202 Engine. Retrieved from [http://www.thrustssc.com/ ThrustSSC]
| |
| − | * Burke, Damien. (2016). McDonnell-Douglas/BAC F-4K/M Phantom II. Retrieved from [https://www.thunder-and-lightnings.co.uk/phantom/history.php Thunder and Lightnings]
| |
| − | * Gledhill, David. (2017). Phantom in the Cold War: RAF Wildenrath 1977 - 1992. Barnsley: Pen & Sword Aviation.
| |
| − | * Searles, Dick. (n.d.). HMS Eagle Deck Trials 1969. Retrieved from [https://www.phantomf4k.org/video-library/hms-eagle-deck-trials-1969 Phantom F4K - Fleet Air Arm Royal Navy]
| |
| − | * SSC Programme Ltd. (1997). The Story of the Rolls-Royce Spey. Retrieved from [http://thrustssc.com/ ThrustSSC]
| |
| − | * Wikipedia. (n.d.). McDonnell Douglas Phantom in UK service. Retrieved from [https://en.wikipedia.org/wiki/McDonnell_Douglas_Phantom_in_UK_service Wikipedia]
| |
| | | | |
| − | {{AirManufacturer McDonnell}} | + | {{France light tanks}} |
| − | {{Britain jet aircraft}}
| |
▄M3A3 Stuart
Research:9 200 
Purchase:16 000 
Description
The ▄Light Tank M3A3 Stuart is a rank II French light tank
with a battle rating of 2.3 (AB) and 2.7 (RB/SB). It was introduced in Update 1.97 "Viking Fury".
General info
Survivability and armour
| Armour |
Front (Slope angle) |
Sides |
Rear |
Roof
|
| Hull |
25 mm (46-49°) Front Glacis - upper plate
20 mm (spherical) MG port
50 mm (24-27°) Front Glacis - joint plate
50 mm (44-46°) Front Glacis - lower plate
44.4 mm (25-43°) Lower Glacis |
25.4 mm |
25.4 mm (1-26°) Upper part
25.4 mm (21°) Lower part |
12.7 mm
|
| Turret |
38.1 mm (12-14°) Turret front
50.8 mm Gun mantlet |
31.75 mm
15 mm Add-on tracks |
31.75 mm |
12.7 mm
|
Notes:
- Suspension wheels, tracks and bogies are 15 mm thick.
- Mudguards and rear storage box are 4 mm thick
The frontal armour on the ▄M3A3 Stuart is pretty tough for a light tank with 25 mm on the front & sides of the hull, and a large, 50 mm thick gun mantlet covering up most of its frontal turret. When angled correctly it can bounce off quite a few shots. However it can still be easily penetrated by average guns on its BR. From the front the 4 crews are sitting pretty close together, thus making it highly possible to get one-shot by shells with explosives like the Soviet 45 mm AP or the German short 75 mm APHE. The transmission and the engine are all quite small and low, and the ammoracks are also small, reducing the chance of being immobile or ammoracked. There is also an empty area under the turret crews and in front of the driving compartment, which will absorb those shells with weak damage.
Mobility
| Game Mode
|
Max Speed (km/h)
|
Weight (tons)
|
Engine power (horsepower)
|
Power-to-weight ratio (hp/ton)
|
| Forward
|
Reverse
|
Stock
|
Upgraded
|
Stock
|
Upgraded
|
| Arcade
|
65
|
8
|
14.4
|
406
|
500
|
28.19
|
34.72
|
| Realistic
|
59
|
7
|
232
|
262
|
16.11
|
18.19
|
One of the best aspect of the ▄M3A3 Stuart is its superior mobility. It has a top speed of 58 km/h and doesn't lose too much speed on soft terrains as it's tracked, making it one of the fastest tanks at the BR alongside with the famous BT series tanks. The turning ability is also amazing, since the hull is short and wide enough, allowing it to turn agilely. However, when trying to stop the tank while it is travelling at full speed, the brakes tend to be inefficient, giving it a long braking distance and making it very sluggish when stopping.
Armaments
Main armament
The M3A3 is armed with a 37 mm M6 cannon as its main armament, the same gun as the preceding M8. While being 1.3 BR higher than the M8, the M3A3's gun still packs a fierce punch if aiming at the correct area and firing at the correct distance. It is a small calibre fast-firing gun with a maximum penetration of 84 mm at 100 m (M51B1/B2 shell), being able to penetrate most of the opponents it will face. While it lacks the post-penetration damage to one-shot most enemy, it can quickly finish them off with its fast reload. The penetration and trajectory drop a lot beyond 500 m. Note that the gun has a vertical stabiliser, giving the player a huge advantage in some cases, but keep in mind that the stabiliser only works when the tank is slower than 10 km/h.
| 37 mm M6 |
Turret rotation speed (°/s) |
Reloading rate (seconds)
|
| Mode |
Capacity |
Vertical |
Horizontal |
Stabilizer
|
Stock |
Upgraded |
Full |
Expert |
Aced
|
Stock |
Full |
Expert |
Aced
|
| Arcade
|
174 |
-10°/+20° |
±180° |
Vertical |
__.__ |
__.__ |
__.__ |
__.__ |
__.__ |
_.__ |
_.__ |
_.__ |
_.__
|
| Realistic
|
__.__ |
__.__ |
__.__ |
__.__ |
__.__
|
Ammunition
| Penetration statistics
|
| Ammunition
|
Type of
warhead
|
Penetration @ 0° Angle of Attack (mm)
|
| 10 m |
100 m |
500 m |
1,000 m |
1,500 m |
2,000 m
|
| M74B1 |
AP |
79 |
76 |
65 |
54 |
45 |
37
|
| M51B1/B2 |
APCBC |
87 |
84 |
73 |
60 |
50 |
41
|
| Shell details
|
| Ammunition
|
Type of
warhead
|
Velocity
(m/s)
|
Projectile
Mass (kg)
|
Fuse delay
(m)
|
Fuse sensitivity
(mm)
|
Explosive Mass
(TNT equivalent) (g)
|
Ricochet
|
| 0% |
50% |
100%
|
| M74B1 |
AP |
883 |
0.87 |
N/A |
N/A |
N/A |
47° |
60° |
65°
|
| M51B1/B2 |
APCBC |
883 |
0.87 |
N/A |
N/A |
N/A |
48° |
63° |
71°
|
Full
ammo
|
1st
rack empty
|
2nd
rack empty
|
3rd
rack empty
|
4th
rack empty
|
Visual
discrepancy
|
| 174 |
131 (+43) |
87 (+87) |
44 (+130) |
1 (+173) |
Yes
|
Machine guns
The M3A3 has two 7.62 mm M1919A4 machine guns, one being coaxial to the main gun and the other roof-mounted. The two machine guns can quickly incapacitate the exposed crews on some vehicles or do some serious damage to those low-passing planes. The machine gun is only enough to destroy poorly protected vehicles such as AS 42, FlakPz I and GAZ-AAA. The penetration of around 10 mm is not enough to go through the frontal armour of those not-so-weakly-armoured tanks like SU-5-1, Panzerjager 1 or 15cm sIG 33 B Sfl. If you are skilled the two machine gun can effectively damage low-flying biplanes.
| 7.62 mm M1919A4
|
| Mount |
Capacity (Belt) |
Fire rate |
Vertical |
Horizontal
|
| Pintle |
4,300 (250) |
500 |
-10°/+70° |
-60°/+15°
|
| Coaxial |
3,200 (250) |
500 |
N/A |
N/A
|
Usage in battles
The M3A3 Stuart is best used as a point-capper and a hit-n-run tank. Its extreme mobility gives the player uncountable ways to play with the enemy. At the start of a battle, it can quickly cap a nearby point first, but note that some wheeled vehicles, like the Sd.Kfz.234 series in a mixed battle can still outrun the M3A3 on-road, therefore posing a great threat. Or it can get to an ambush position near the point and wait until the prey comes. With its reliable gun, the M3A3 should be able to destroy the first wave of enemies easily and quickly.
In the middle stages of a battle, the M3A3 can utilise its excellent mobility and get to wherever needs help while carefully looking around. If the M3A3 unexpectedly encounter an enemy in its path, don't panic! Circle around the enemy and try to force it to turn, this way it usually cannot aim at the M3A3 accurately, then reduce the M3A3's speed down under 10 km/h and keep moving. Now the M3A3's stabiliser will give the tank a great chance to hit while on the move as it stabilises the gun when the tank is under 10 km/h, making it easier time to put the gun on target while moving compared to the enemy.
The frontal armour of this tank is also quite good at a distance. Find a building or a big rock as cover and angle the hull for about 40 degrees. When ready to fire, go out of cover and stop once the 37 mm gun is exposed, don't go out too much or the thin side armour will be exposed to be hit. Keep in mind that with this tactic the player should only engage the low-penetrating enemies at more than 400 m, as their penetration will drop significantly at that distance while the M3A3 can still penetrate 73 mm of armour, which is enough to go through most of its opponents like the T-50, SU-76M or Crusader Mk III.
Enemies worth noting:
Specific enemy vehicles that bear mentioning are firstly any Germans with the 20 mm KwK/FlaK38 cannon, this gun might be small but can have up to 64 mm of penetration, which is enough to go through the M3A3 almost anywhere. These guns can also fire 10 rounds at 280 rounds/min before having to reload the clip, meaning that they will very easily take out your crew before you have a chance to respond. To counter, the best chance you have is to angle your frontal armour which can make it difficult for the PzGr 40 rounds to penetrate. The Russian T-50 and T-126 are vehicles you will also see commonly, these have fairly thick and angled frontal armour that will prevent you from easily getting through. These tanks can also carry an APHEBC round that will destroy you in one shot with little difficulty, to counter you should use your speed to attempt to get a side shot into either the turret or engine. If the T-50 cannot move you can outrun its turret and finish it without much difficulty.
It is likely that the M3A3 will encounter some rough heavies, like the Matilda III and the B1 bis. The best tactic against these types of targets is to use the M3A3's fast speed, get within 200 m from them and attack, with shooting at point-blank range being the most effective way. Before conducting an attack, check the M3A3's and the enemy's surroundings to make sure no one will ambush the M3A3. While charging, use the M3A3's quick turns to suddenly change direction to avoid being shot if they are aiming and firing at the M3A3. Once the tank is at the ideal distance, manoeuvre so that the gun is perpendicular to their armour. Do not shoot if the enemy is angling! The small calibre 37 mm gun is very likely to bounce off or not penetrate against sloped armour.
For the Matilda III, shoot at the middle of the near-vertical frontal plate to knock out the driver first, since the 37 mm shell is not enough to knock out the gunner after penetrating. Once it is immobile, go to its side and finish it by shooting its hull sides. Or, shoot the right side of the gun mantlet to disable its gunner. For the best chance of penetration, do not shoot its turret side.
For the B1, either aim for the near-vertical frontal armour plate at the right side of the hull, or the turret ring to incapacitate the commander/gunner, or simply move to its side and knock out the crews one by one by hitting its flat side armour.
Modules
| Tier
|
Mobility
|
Protection
|
Firepower
|
| I
|
Tracks
|
|
Parts
|
Horizontal Drive
|
M51B1/B2
|
| II
|
Suspension
|
Brake System
|
FPE
|
Adjustment of Fire
|
Airstrike
|
| III
|
Filters
|
|
Crew Replenishment
|
Elevation Mechanism
|
|
| IV
|
Transmission
|
Engine
|
|
Artillery Support
|
Improved optics
|
Pros and cons
Pros:
- Great firepower: cannon has good penetration, excellent rate of fire and gun depression of -10 degrees, allowing the M3 to manoeuvre to any terrain and adapt to it well
- Excellent acceleration, top speed and turning ability on all terrains; easily outruns common opponents like the Pz.III and Crusader
- Access to a vertical stabiliser which most tanks don't have, giving it an advantage in a sudden encounter
- Respectable sloped armour that, if angled, might bounce some shells from a distance, such as the 37 mm M6 on other M3 Stuarts
- Small turret profile makes it harder to get hit
Cons:
- Weak armour against high-penetration shells like the 76 mm F-34/ZIS-5
- Its shells do not have explosive filler, severely limiting the post-penetration effect especially against spacious tanks like the LVT(A)(1)
- Inefficient brakes when trying to stop the tank at full speed
- Hull is fairly tall for a light tank and the crews are closely packed, reducing its survivability
- While fast, it is still slower than the Sd.Kfz.234 series on the road
History
The US lend-leased a total of 651 light tanks to the Free French forces, including 273 M3A3s, delivered prior to D-Day. All the light tanks of 2nd French Armoured Div. were M3A3s during the 1944 fighting in France. 1st and 5th Divisions had a mix of M3A3 and M5A1. Three of the five armoured recon battalions integral to the Free French infantry divisions also had a mixed fleet, while the 2 non-divisional armoured recon battalions, the 1st and 2nd Spahis Algeriens, were entirely M3A3-equipped. They would continue in service from D-Day until the end of the war in Europe.
Media
Excellent additions to the article would be video guides, screenshots from the game, and photos.
See also
Links to the articles on the War Thunder Wiki that you think will be useful for the reader, for example:
- reference to the series of the vehicles;
- links to approximate analogues of other nations and research trees.
External links
Paste links to sources and external resources, such as:
- topic on the official game forum;
- encyclopedia page on the tank;
- other literature.
.jpg)
.png)
