Difference between pages "Swift F.1" and "Stormer HVM"
(Created page) |
Inceptor57 (talk | contribs) m |
||
| Line 1: | Line 1: | ||
| − | {{Specs-Card|code= | + | {{Specs-Card|code=uk_stormer_hvm}} |
== Description == | == Description == | ||
| − | <!-- | + | <!--In the description, the first part should be about the history of the creation and combat usage of the vehicle, as well as its key features. In the second part, tell the reader about the ground vehicle in the game. Insert a screenshot of the vehicle, so that if the novice player does not remember the vehicle by name, he will immediately understand what kind of vehicle the article is talking about.--> |
| − | + | ||
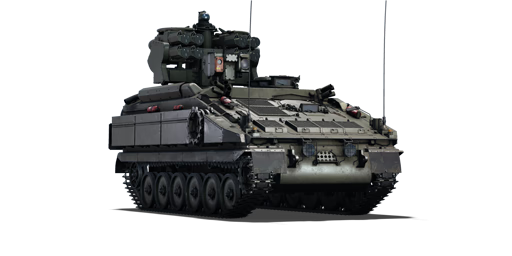
| − | {{break}} | + | [[File:GarageImage Stormer HVM.jpg|420px|thumb|left]] |
| − | The '''{{Specs|name}}''' is a rank {{Specs|rank}} British | + | {{break}} |
| + | The '''{{Specs|name}}''' is a rank {{Specs|rank}} British self-propelled anti-aircraft vehicle {{Battle-rating}}. It was introduced in [[Update 1.89 "Imperial Navy"]]. | ||
== General info == | == General info == | ||
| − | === | + | === Survivability and armour === |
| − | ''Describe how the | + | <!--''Describe armour protection. Note the most well protected and key weak areas. Appreciate the layout of modules as well as the number and location of crew members. Is the level of armour protection sufficient, is the placement of modules helpful for survival in combat?'' |
| + | |||
| + | ''If necessary use a visual template to indicate the most secure and weak zones of the armour.''--> | ||
| + | |||
| + | This tank uses the chassis of Scorpion, which you might be familiar since [[Striker]]. As before, it can only take punishment from the front and it's best to avoid anything more serious than autocannon armed light tanks or [[KPz-70]], since most 9.0+ tanks have at least 100 mm gun along with their coaxial weapons. It is easy to "hull break" the hull by hitting it with 105 mm chemicals, artillery direct hits and 120 mm kinetic shells. | ||
| + | |||
| + | The launcher on the back was replaced with a turret carrying Starstreak HVM and search optics. The usually small camera next to commander cupola now has heavy optics and is much bigger as a result. The turret is much higher than the old launcher and is very hard to hide. | ||
| + | |||
| + | The missiles do not have any protection this time around and you should avoid being bombed and shot by artillery '''at any cost'''. Even a 7.62 mm machine gun can ignite missiles on a good hit. Even close artillery or HE miss might set off Starstreaks and cause your entire rack to explode, annihilating your carrier and probably taking your allies nearby with you in process. | ||
| + | |||
| + | As such, you should avoid fighting anything directly, if possible. To ensure not a single aircraft knows about your presence, an IRST system is used instead of radar - not even best helicopters around can detect you. In arcade mode, they can still see the Stormer, but you can be assured that optronic system will allow you to destroy them before they have even a chance to aim at it. | ||
| + | |||
| + | === Mobility === | ||
| + | <!--''Write about the mobility of the ground vehicle. Estimate the specific power and manoeuvrability, as well as the maximum speed forwards and backwards.''--> | ||
| + | As with [[Striker]], the tank is capable of driving both forward and backwards relatively fast even with no upgrades. The ability to drive forward and turn around at same time still relies on driver being maxed out, so your crew must be very high level. | ||
| + | |||
| + | The more you upgrade the chassis and engine, the more obscure position you can climb and take over in order to avoid being spotted and destroyed by other tanks. | ||
| + | |||
| + | Do not race against japanese [[Type 90]] and italian scout tank [[Centauro ROMOR]], they are much faster. | ||
| + | |||
| + | == Armaments == | ||
| + | === Main armament === | ||
| + | <!--''Give the reader information about the characteristics of the main gun. Assess its effectiveness in a battle based on the reloading speed, ballistics and the power of shells. Do not forget about the flexibility of the fire, that is how quickly the cannon can be aimed at the target, open fire on it and aim at another enemy. Add a link to the main article on the gun: <code><nowiki>{{main|Name of the weapon}}</nowiki></code>. Describe in general terms the ammunition available for the main gun. Give advice on how to use them and how to fill the ammunition storage.''--> | ||
| + | |||
| + | Main article: [[Starstreak HVM]] | ||
| + | |||
| + | Stormer HVM is using surface-to-air [[Starstreak HVM]] missiles and their unique properties make it hard to use them for anything else. | ||
| + | |||
| + | There are 8 of them mounted on the turret and there are 8 more spares in the back of the tank. | ||
| + | |||
| + | When first launched, the carrier missile drags the actual missiles away from Stormer and unleashes them at about ~600 m range. Until that point, the missile can be used as a weak form of HE ATGM and if it hits enemy light tank or SPG weak spot or suspension wheel it can do catastrophic damage. | ||
| + | |||
| + | Unfortunately, most of BR 9-10 medium tanks have either ERA or NERA screens all over them and will not take any damage from single missile and firing them randomly isn't going to do anything to them. Firing multiple missiles into their weak spots might take too much time and attracts their attention, resulting in inevitable Stormer HVM destruction. For this reason, fighting medium tanks of proper BR shouldn't be your priority. | ||
| + | |||
| + | Overall, at short ranges other SPAA, SPG and light tanks are fair game and you should try to destroy them via hull break if they try to attack Stormer HVM, as simply running away from them is rather difficult. | ||
| + | |||
| + | After 600 m, three missiles disassemble from carrier missile and start increasing their speed to the extreme. To not lose control over their movement due to speed, they constantly spiral. Each one of them can be approximately counted as 105 mm HE with reduced shrapnel amount. Due to their spiraling nature, aiming them at ground forces is practically pointless, unless you try to disintegrate tanks which have little to no armour, like [[Object 685]] - in the case of such tanks, if you somehow hit their weak spot, they still can hull break even from smaller missiles. | ||
| + | |||
| + | To helicopters, the missiles usually are fatal, as they are almost bound to get hit by at least one of Starstreaks, and explosion either tears off the tail or knocks out the pilot. However, even in the case of this missile, there are cases when Support helicopters somehow survived a direct hit, so you might want to launch another one if you aren't sure that they are done for. | ||
| + | |||
| + | To use the missiles properly, you need to lock on to an aerial target. The IRST system cannot tell you where the targets really are, just the direction they're in. Instead of wasting time while looking for them manually, simply lock onto any target on your "radar" display via hotkeys like with [[Chieftain Marksman]] and turret will near instantaneously turn towards them by itself. | ||
| + | |||
| + | [[File:Stormer HMV passive system lock on.jpg|none|thumb|500x400px|Make sure there aren't any trees around or the lock will become unstable.]] | ||
| + | |||
| + | As could be seen on the screenshot above, in full IRST mode sniper crosshair tries to imitate the drag of missile as it tracks the aircraft, and by keeping sniper crosshairs on plane or helicopter you can guide your missiles towards an aircraft. Keeping '''an actual missile''' on target is more important, however, as system accuracy is generally far from stellar and it shouldn't be trusted too much. | ||
| + | |||
| + | {{Notice| "Targeting" and "leadership" on your crew should be maxed out. This SPAA cannot track targets properly without it and should not be used by a level 1 crew. You have been warned.|!}} | ||
| + | |||
| + | Do note, that a plane approaching at a sharp angle will mess with turret automatic guidance, due to it passing by too fast. | ||
| + | |||
| + | [[File:Stormer HVM hit with weird lock-on data.jpg|none|thumb|500x400px]] | ||
| + | |||
| + | Stormer HVM has huge gaps in optics: 10-40X optics, which can be manually adjusted during AA duty, simply hitting "maximum zoom" will probably result in a miss at some angles of attack. | ||
| + | |||
| + | Since it is extremely inconvenient to toggle zoom level every time, one can remain in sniper seat and use radar display to lock-on to targets around. To toggle between targets on radar display use button "Select radar target to lock on" (default ALT+T) and then press "lock on" to lock onto it without looking for it manually or going out of sniper seat and messing up with your preferred zoom level. This also makes the inability to tell the range towards enemy aircraft more tolerable. | ||
| + | |||
| + | ===Optics and night vision=== | ||
| + | |||
| + | <!-- | ||
| + | ''Try to fill in the specifications of the tank optics. If you are having problems with it, refer to the [[Optics|optics gallery]] or [[Night Vision Devices|Night vision]] pages for examples. Remember, not every tank has optic magnification specified in X-ray and each NVD can only be used from their designated point of view. | ||
| + | |||
| + | Try to explain how optics affect your gameplay on a tank. A comparison to rival tanks of the rank is welcome. If the vehicle optic devices are unique in some way, or the way the optics are placed on a tank is affecting the gameplay in a meaningful way, or damage to optics can disable some features or weapons of a tank, specify it here as well.'' | ||
| + | --> | ||
{| class="wikitable" style="text-align:center" | {| class="wikitable" style="text-align:center" | ||
| + | ! colspan="7" | {{PAGENAME}} [[Optics]] | ||
|- | |- | ||
| − | ! | + | ! rowspan="3" |Type of optic |
| − | + | ! rowspan="3" |Magnification | |
| − | ! | + | ! colspan="5" |[[Night Vision Devices]] |
| − | |||
| − | |||
| − | |||
| − | ! colspan=" | ||
| − | |||
| − | |||
| − | |||
| − | |||
|- | |- | ||
| − | | | + | ! colspan="3" |Image Intensifier |
| + | ! rowspan="2" |{{Annotation|Thermal Imager<br>Resolution|The higher the resolution the clearer and more detailed the image is}} | ||
| + | ! rowspan="2" |Notes | ||
|- | |- | ||
| − | ! | + | ! {{Annotation|Resolution|The higher the resolution the clearer and more detailed the image is}} |
| + | ! {{Annotation|Light Mult|By how much the image intensifier amplifies the existing light, primarily useful for comparing image intensifiers}} | ||
| + | ! {{Annotation|Noise Level|How much noise is present in the image (how grainy the image is)}} | ||
|- | |- | ||
| − | ! | + | ! Gunner's Sight |
| − | + | | X10 - X40 || N/A || N/A || N/A || 500X300 || Only useable with tier 3 upgrade | |
| − | |||
| − | |||
| − | |||
|- | |- | ||
| − | ! | + | ! Commander's View |
| + | | X6 || 1600X1200 || ? || High || Not fitted || Only useable with tier 3 upgrade | ||
|- | |- | ||
| − | | | + | ! Driver's View |
| + | | X1 / 3PV || 800X600 || ? || High || Not fitted || Only useable with tier 3 upgrade | ||
|- | |- | ||
|} | |} | ||
| − | === | + | *Zoom specified in X-ray. Strongest optics in the game so far. |
| + | |||
| + | Optics are pivotal for this tank's gameplay. Current zoom level affects the tracking quality of the turret. The player's role in this is to find optimal zoom levels for tracking the current target and to check if the sensor system is keeping the missile on target properly. If it does not, just correct missiles yourself. | ||
| + | |||
| + | In case of the enemy plane escaping your system's grasp, you still can hit the "maximum zoom" button and try to chase it with missiles manually. | ||
| + | |||
| + | Due to half-manual aim of the tank, unlocking Night Vision Devices is a priority - If you cannot see your target during the night, it will be '''extremely''' hard for you to compensate for system errors. | ||
| + | |||
| + | In case of <600 m tank duels, maximum zoom can be exploited to aim missile straight into the enemy tank weak spot. Do not shake the scope after the missile launch, or it will miss. | ||
| + | |||
| + | ===Sensor System=== | ||
| + | |||
| + | Stormer HMV uses special infrared search devices to detect targets. While they have a significantly shorter range than radar and cannot tell the range towards target until specifically locked onto it, they can tell which targets are friendly and do not target them, or at least specifically mark them as "friendly". They also scan Stormer HVM surroundings approximately 3 times a second even when locked on, which makes bypassing it next to impossible. | ||
| + | |||
| + | Infrared detectors are invisible to "radar detectors" and will not alert helicopters or sonic jets of your presence or lock-on. There is no benefit in powering it down as of now. | ||
| + | |||
| + | Trees completely block IRST system - if you cannot see your opponent yourself, neither will the system. | ||
| + | |||
{| class="wikitable" style="text-align:center" | {| class="wikitable" style="text-align:center" | ||
| + | ! colspan="5" | Thales ADAD - Passive Infared Search | ||
|- | |- | ||
| − | ! | + | ! {{Annotation|Maximum<br/>Detection<br/>Range|The maximum possible range at which a target can be detected}} |
| + | ! {{Annotation|Minimum<br/>Detection<br/>Range|The range, below which, a target cannot be detected}} | ||
| + | ! {{Annotation|Max Azimuth<br/>Scan Angle|How far to each side the radar can scan (widest search mode)}} | ||
| + | ! {{Annotation|Max Elevation<br/>Scan Angle|How far up and down the radar can scan (widest search mode)}} | ||
| + | ! {{Annotation|Minimum<br/>relative speed|The minimum speed a target must be moving, relative to the radar, in order to be detectable by the radar}} | ||
|- | |- | ||
| − | + | | ~7,000? m || N/A || 360° || ??? || N/A | |
|- | |- | ||
| − | | | + | ! colspan="5" | Thales ADAD - Passive Infared Track |
|- | |- | ||
| − | + | ! {{Annotation|Maximum<br/>Tracking<br/>Range|The maximum range at which a target can be tracked}} | |
| − | + | ! {{Annotation|Minimum<br/>Tracking<br/>Range|The range below which targets cannot be tracked by the radar}} | |
| − | {| | + | ! {{Annotation|Azimuth Tracking<br/>Angle|How far to each side the radar can track a target}} |
| − | | | + | ! {{Annotation|Elevation Tracking<br/>Angle|How far up and down the radar can track a target}} |
| − | ! | + | ! {{Annotation|Minimum<br/>target speed|The minimum speed a target must be moving, relative to the radar, in order to be tracked by the radar}} |
| − | | | ||
| − | ! | ||
| − | ! | ||
| − | ! | ||
| − | |||
| − | |||
| − | |||
|- | |- | ||
| − | | | + | | ~6,000? m || N/A || 360° || ??? || N/A |
|- | |- | ||
|} | |} | ||
| − | + | ==Usage in battles== | |
| − | + | ''Describe the tactics of playing in the vehicle, the features of using vehicles in the team and advice on tactics. Refrain from creating a "guide" - do not impose a single point of view but instead give the reader food for thought. Describe the most dangerous enemies and give recommendations on fighting them. If necessary, note the specifics of the game in different modes (AB, RB, SB).'' | |
| − | + | ||
| − | + | It is best to hide from sight of others when using this SPAA - move around battlefield and use terrain and caves as a hiding spot for yourself. Exploit mobility upgrades to stand on mountain edges, if necessary. | |
| − | + | ||
| − | + | Avoid participating in combat with medium tanks at any cost, as you definitely will not help in winning the fight and they might use the gigantic ammo rack as a way to destroy your allies. The only logical exception is if you are supporting allied ATGM tank by removing hostile tank ERA and turning their attention towards you, then immediately retreat. | |
| − | + | ||
| − | + | In case if you managed to spot hostile SAM, you can try to remove them by igniting their missiles to help your team achieve air superiority, however, remember that you cannot fire on move, so if they will notice you and have actual guns, the tables will turn immediately. | |
| − | + | ||
| − | + | Using forests as cover is less reliable than just using terrain, as IRST will likely fail to detect your opponents through trees, unlike radar which only get its signal halved in power. | |
| − | |||
| − | |||
| − | {| class="wikitable" | + | ===Modules=== |
| + | {| class="wikitable" | ||
| + | ! Tier | ||
| + | ! colspan="2"|Mobility | ||
| + | ! Protection | ||
| + | ! Firepower | ||
|- | |- | ||
| − | + | | I | |
| + | | Tracks|| | ||
| + | | Parts | ||
| + | | | ||
|- | |- | ||
| − | + | | II | |
| + | | Suspension||Brake System | ||
| + | | FPE | ||
| + | | | ||
|- | |- | ||
| − | + | | III | |
| − | + | | Filters|| | |
| − | + | | Crew Replenishment | |
| + | | Smoke grenade | ||
|- | |- | ||
| − | | | + | | IV |
| + | | Transmission||Engine | ||
| + | | | ||
| + | | Artillery Support | ||
|- | |- | ||
|} | |} | ||
| − | + | ===Pros and cons=== | |
| − | + | <!--Summarise and briefly evaluate the vehicle in terms of its characteristics and combat effectiveness. Mark its pros and cons in a bulleted list. Try not to use more than 6 points for each of the characteristics. Avoid using categorical definitions such as "bad", "good" and the like - use substitutions with softer forms such as "inadequate" and "effective".--> | |
| − | |||
| − | |||
| − | |||
| − | |||
| − | |||
| − | |||
| − | |||
| − | |||
| − | |||
| − | |||
| − | |||
| − | |||
| − | |||
| − | |||
| − | === Pros and cons === | ||
| − | |||
'''Pros:''' | '''Pros:''' | ||
| − | * | + | * Unique anti-air missiles - triple missile with one of the highest speeds in-game |
| + | * Missile acts as a form of HE ATGM at up to about 600 m range, can be used to attack enemy light tank weak spots and chassis, or to create a huge dust cloud in RB | ||
| + | * Good speed of chassis | ||
| + | * X10-40 optics allow it to track enemy until the very end | ||
| + | * Invisible to anti-radar (helicopters) | ||
'''Cons:''' | '''Cons:''' | ||
| − | * | + | * High profile of ammo rack, which is also a weak spot, which can be ignited even by 7.64 MG |
| + | * On top of high profile, ammo racks visually remind players of [[ADATS]] and will likely make ground forces drop everything and immediately attack it - stealth approach is required at all times | ||
| + | * Hull defences are inadequate against tanks with weapons bigger than 20 mm autocannon, even if your ammo rack happened to be empty | ||
| + | * Lock-on does not provide a 100% accurate targeting solution | ||
| + | * Lock-on can become unstable around trees and breaks if visual contact is lost | ||
| + | * Turret and the optical system sometimes fail to track planes properly, relying on the crew and operator skills to compensate, especially noticeable when the inappropriate zoom level is used | ||
| + | * Due to a huge gap in optics zoom levels, the operator is often required to manually adjust scope, instead of just hitting "maximum zoom" button, and to lock on different planes by using radar display without leaving sniper seat to save time | ||
| + | * After dispersing, triple missiles constantly spiral, making precise long-range aiming at ground forces pointless, not to mention that most tanks in its natural BR range are immune to triple missile attack even from the side and they can only hull break light tanks or other SPAA when hit them in a weak spot | ||
== History == | == History == | ||
| − | + | <!--Describe the history of the creation and combat usage of the ground vehicle in more detail than in the introduction. If the historical reference turns out to be too long, take it to a separate article, taking a link to the article about the vehicle and adding a block "/ History" (example: <nowiki>https://wiki.warthunder.com/(Vehicle-name)/History</nowiki>) and add a link to it here using the <code>main</code> template. Be sure to reference text and sources by using <code><nowiki><ref></nowiki></code>, as well as adding them at the end of the article. This section may also include the vehicle's dev blog entry (if applicable) and the in-game encyclopedia description (under <code><nowiki>=== In-game description ===</nowiki></code>, also if applicable).--> | |
| + | In the mid-1980’s it became clear that supersonic aircraft and strike helicopters proved to be dangerous against ground troops. To counter these threats back in 1986, the British Ministry of Defence began development of the “Starstreak HVM” (High-Velocity Missile) anti-aircraft missile system. The production was done by the Shorts Missile Systems company. On the 1st of September in 1997, the famous Starstreak anti-aircraft missile system had been put into service by the British Army. Initially, it was developed in 3 different variants: portable, stationary and mobile, although later they additionally developed an air version but it didn’t find a practical application. | ||
| + | |||
| + | The armoured personnel carrier Stormer was created by using the propulsion system, the transmission and chassis of the light scouting FV101 Scorpion tank for the mobile version of the system. In 1975 on the base of this armoured personnel carrier, the self-propelled anti-tank missile system FV102 Striker was created. Since the vehicle proved itself well, it was decided to additionally create the self-propelled anti-aircraft system Alvis Stormer HVM on its platform. | ||
| + | |||
| + | ''- From [[wt:en/news/6208-development-alvis-stormer-hvm-control-of-the-skies-en|Devblog]]'' | ||
== Media == | == Media == | ||
| Line 127: | Line 214: | ||
== See also == | == See also == | ||
''Links to the articles on the War Thunder Wiki that you think will be useful for the reader, for example:'' | ''Links to the articles on the War Thunder Wiki that you think will be useful for the reader, for example:'' | ||
| − | * ''reference to the series of the | + | * ''reference to the series of the vehicles;'' |
* ''links to approximate analogues of other nations and research trees.'' | * ''links to approximate analogues of other nations and research trees.'' | ||
== External links == | == External links == | ||
| − | + | <!--Paste links to sources and external resources, such as: | |
* ''topic on the official game forum;'' | * ''topic on the official game forum;'' | ||
| − | * ''encyclopedia page on the | + | * ''encyclopedia page on the tank;'' |
| − | * ''other literature.'' | + | * ''other literature.''--> |
| + | * [[wt:en/news/6208-development-alvis-stormer-hvm-control-of-the-skies-en|[Devblog<nowiki>]</nowiki> Alvis Stormer HVM: Control of the skies!]] | ||
| − | {{Britain | + | {{Britain anti-aircraft vehicles}} |
Revision as of 16:38, 13 November 2019
Contents
Description

The FV4333 Stormer HVM is a rank VII British self-propelled anti-aircraft vehicle
with a battle rating of 10.3 (AB/RB/SB). It was introduced in Update 1.89 "Imperial Navy".
General info
Survivability and armour
This tank uses the chassis of Scorpion, which you might be familiar since Striker. As before, it can only take punishment from the front and it's best to avoid anything more serious than autocannon armed light tanks or KPz-70, since most 9.0+ tanks have at least 100 mm gun along with their coaxial weapons. It is easy to "hull break" the hull by hitting it with 105 mm chemicals, artillery direct hits and 120 mm kinetic shells.
The launcher on the back was replaced with a turret carrying Starstreak HVM and search optics. The usually small camera next to commander cupola now has heavy optics and is much bigger as a result. The turret is much higher than the old launcher and is very hard to hide.
The missiles do not have any protection this time around and you should avoid being bombed and shot by artillery at any cost. Even a 7.62 mm machine gun can ignite missiles on a good hit. Even close artillery or HE miss might set off Starstreaks and cause your entire rack to explode, annihilating your carrier and probably taking your allies nearby with you in process.
As such, you should avoid fighting anything directly, if possible. To ensure not a single aircraft knows about your presence, an IRST system is used instead of radar - not even best helicopters around can detect you. In arcade mode, they can still see the Stormer, but you can be assured that optronic system will allow you to destroy them before they have even a chance to aim at it.
Mobility
As with Striker, the tank is capable of driving both forward and backwards relatively fast even with no upgrades. The ability to drive forward and turn around at same time still relies on driver being maxed out, so your crew must be very high level.
The more you upgrade the chassis and engine, the more obscure position you can climb and take over in order to avoid being spotted and destroyed by other tanks.
Do not race against japanese Type 90 and italian scout tank Centauro ROMOR, they are much faster.
Armaments
Main armament
Main article: Starstreak HVM
Stormer HVM is using surface-to-air Starstreak HVM missiles and their unique properties make it hard to use them for anything else.
There are 8 of them mounted on the turret and there are 8 more spares in the back of the tank.
When first launched, the carrier missile drags the actual missiles away from Stormer and unleashes them at about ~600 m range. Until that point, the missile can be used as a weak form of HE ATGM and if it hits enemy light tank or SPG weak spot or suspension wheel it can do catastrophic damage.
Unfortunately, most of BR 9-10 medium tanks have either ERA or NERA screens all over them and will not take any damage from single missile and firing them randomly isn't going to do anything to them. Firing multiple missiles into their weak spots might take too much time and attracts their attention, resulting in inevitable Stormer HVM destruction. For this reason, fighting medium tanks of proper BR shouldn't be your priority.
Overall, at short ranges other SPAA, SPG and light tanks are fair game and you should try to destroy them via hull break if they try to attack Stormer HVM, as simply running away from them is rather difficult.
After 600 m, three missiles disassemble from carrier missile and start increasing their speed to the extreme. To not lose control over their movement due to speed, they constantly spiral. Each one of them can be approximately counted as 105 mm HE with reduced shrapnel amount. Due to their spiraling nature, aiming them at ground forces is practically pointless, unless you try to disintegrate tanks which have little to no armour, like Object 685 - in the case of such tanks, if you somehow hit their weak spot, they still can hull break even from smaller missiles.
To helicopters, the missiles usually are fatal, as they are almost bound to get hit by at least one of Starstreaks, and explosion either tears off the tail or knocks out the pilot. However, even in the case of this missile, there are cases when Support helicopters somehow survived a direct hit, so you might want to launch another one if you aren't sure that they are done for.
To use the missiles properly, you need to lock on to an aerial target. The IRST system cannot tell you where the targets really are, just the direction they're in. Instead of wasting time while looking for them manually, simply lock onto any target on your "radar" display via hotkeys like with Chieftain Marksman and turret will near instantaneously turn towards them by itself.

As could be seen on the screenshot above, in full IRST mode sniper crosshair tries to imitate the drag of missile as it tracks the aircraft, and by keeping sniper crosshairs on plane or helicopter you can guide your missiles towards an aircraft. Keeping an actual missile on target is more important, however, as system accuracy is generally far from stellar and it shouldn't be trusted too much.
| "Targeting" and "leadership" on your crew should be maxed out. This SPAA cannot track targets properly without it and should not be used by a level 1 crew. You have been warned. |
Do note, that a plane approaching at a sharp angle will mess with turret automatic guidance, due to it passing by too fast.

Stormer HVM has huge gaps in optics: 10-40X optics, which can be manually adjusted during AA duty, simply hitting "maximum zoom" will probably result in a miss at some angles of attack.
Since it is extremely inconvenient to toggle zoom level every time, one can remain in sniper seat and use radar display to lock-on to targets around. To toggle between targets on radar display use button "Select radar target to lock on" (default ALT+T) and then press "lock on" to lock onto it without looking for it manually or going out of sniper seat and messing up with your preferred zoom level. This also makes the inability to tell the range towards enemy aircraft more tolerable.
Optics and night vision
| Stormer HVM Optics | ||||||
|---|---|---|---|---|---|---|
| Type of optic | Magnification | Night Vision Devices | ||||
| Image Intensifier | Thermal Imager Resolution |
Notes | ||||
| Resolution | Light Mult | Noise Level | ||||
| Gunner's Sight | X10 - X40 | N/A | N/A | N/A | 500X300 | Only useable with tier 3 upgrade |
| Commander's View | X6 | 1600X1200 | ? | High | Not fitted | Only useable with tier 3 upgrade |
| Driver's View | X1 / 3PV | 800X600 | ? | High | Not fitted | Only useable with tier 3 upgrade |
- Zoom specified in X-ray. Strongest optics in the game so far.
Optics are pivotal for this tank's gameplay. Current zoom level affects the tracking quality of the turret. The player's role in this is to find optimal zoom levels for tracking the current target and to check if the sensor system is keeping the missile on target properly. If it does not, just correct missiles yourself.
In case of the enemy plane escaping your system's grasp, you still can hit the "maximum zoom" button and try to chase it with missiles manually.
Due to half-manual aim of the tank, unlocking Night Vision Devices is a priority - If you cannot see your target during the night, it will be extremely hard for you to compensate for system errors.
In case of <600 m tank duels, maximum zoom can be exploited to aim missile straight into the enemy tank weak spot. Do not shake the scope after the missile launch, or it will miss.
Sensor System
Stormer HMV uses special infrared search devices to detect targets. While they have a significantly shorter range than radar and cannot tell the range towards target until specifically locked onto it, they can tell which targets are friendly and do not target them, or at least specifically mark them as "friendly". They also scan Stormer HVM surroundings approximately 3 times a second even when locked on, which makes bypassing it next to impossible.
Infrared detectors are invisible to "radar detectors" and will not alert helicopters or sonic jets of your presence or lock-on. There is no benefit in powering it down as of now.
Trees completely block IRST system - if you cannot see your opponent yourself, neither will the system.
| Thales ADAD - Passive Infared Search | ||||
|---|---|---|---|---|
| Maximum Detection Range |
Minimum Detection Range |
Max Azimuth Scan Angle |
Max Elevation Scan Angle |
Minimum relative speed |
| ~7,000? m | N/A | 360° | ??? | N/A |
| Thales ADAD - Passive Infared Track | ||||
| Maximum Tracking Range |
Minimum Tracking Range |
Azimuth Tracking Angle |
Elevation Tracking Angle |
Minimum target speed |
| ~6,000? m | N/A | 360° | ??? | N/A |
Usage in battles
Describe the tactics of playing in the vehicle, the features of using vehicles in the team and advice on tactics. Refrain from creating a "guide" - do not impose a single point of view but instead give the reader food for thought. Describe the most dangerous enemies and give recommendations on fighting them. If necessary, note the specifics of the game in different modes (AB, RB, SB).
It is best to hide from sight of others when using this SPAA - move around battlefield and use terrain and caves as a hiding spot for yourself. Exploit mobility upgrades to stand on mountain edges, if necessary.
Avoid participating in combat with medium tanks at any cost, as you definitely will not help in winning the fight and they might use the gigantic ammo rack as a way to destroy your allies. The only logical exception is if you are supporting allied ATGM tank by removing hostile tank ERA and turning their attention towards you, then immediately retreat.
In case if you managed to spot hostile SAM, you can try to remove them by igniting their missiles to help your team achieve air superiority, however, remember that you cannot fire on move, so if they will notice you and have actual guns, the tables will turn immediately.
Using forests as cover is less reliable than just using terrain, as IRST will likely fail to detect your opponents through trees, unlike radar which only get its signal halved in power.
Modules
| Tier | Mobility | Protection | Firepower | |
|---|---|---|---|---|
| I | Tracks | Parts | ||
| II | Suspension | Brake System | FPE | |
| III | Filters | Crew Replenishment | Smoke grenade | |
| IV | Transmission | Engine | Artillery Support | |
Pros and cons
Pros:
- Unique anti-air missiles - triple missile with one of the highest speeds in-game
- Missile acts as a form of HE ATGM at up to about 600 m range, can be used to attack enemy light tank weak spots and chassis, or to create a huge dust cloud in RB
- Good speed of chassis
- X10-40 optics allow it to track enemy until the very end
- Invisible to anti-radar (helicopters)
Cons:
- High profile of ammo rack, which is also a weak spot, which can be ignited even by 7.64 MG
- On top of high profile, ammo racks visually remind players of ADATS and will likely make ground forces drop everything and immediately attack it - stealth approach is required at all times
- Hull defences are inadequate against tanks with weapons bigger than 20 mm autocannon, even if your ammo rack happened to be empty
- Lock-on does not provide a 100% accurate targeting solution
- Lock-on can become unstable around trees and breaks if visual contact is lost
- Turret and the optical system sometimes fail to track planes properly, relying on the crew and operator skills to compensate, especially noticeable when the inappropriate zoom level is used
- Due to a huge gap in optics zoom levels, the operator is often required to manually adjust scope, instead of just hitting "maximum zoom" button, and to lock on different planes by using radar display without leaving sniper seat to save time
- After dispersing, triple missiles constantly spiral, making precise long-range aiming at ground forces pointless, not to mention that most tanks in its natural BR range are immune to triple missile attack even from the side and they can only hull break light tanks or other SPAA when hit them in a weak spot
History
In the mid-1980’s it became clear that supersonic aircraft and strike helicopters proved to be dangerous against ground troops. To counter these threats back in 1986, the British Ministry of Defence began development of the “Starstreak HVM” (High-Velocity Missile) anti-aircraft missile system. The production was done by the Shorts Missile Systems company. On the 1st of September in 1997, the famous Starstreak anti-aircraft missile system had been put into service by the British Army. Initially, it was developed in 3 different variants: portable, stationary and mobile, although later they additionally developed an air version but it didn’t find a practical application.
The armoured personnel carrier Stormer was created by using the propulsion system, the transmission and chassis of the light scouting FV101 Scorpion tank for the mobile version of the system. In 1975 on the base of this armoured personnel carrier, the self-propelled anti-tank missile system FV102 Striker was created. Since the vehicle proved itself well, it was decided to additionally create the self-propelled anti-aircraft system Alvis Stormer HVM on its platform.
- From Devblog
Media
Excellent additions to the article would be video guides, screenshots from the game, and photos.
See also
Links to the articles on the War Thunder Wiki that you think will be useful for the reader, for example:
- reference to the series of the vehicles;
- links to approximate analogues of other nations and research trees.
External links
| Britain anti-aircraft vehicles | |
|---|---|
| Crusader AA | Crusader AA Mk I · Crusader AA Mk II |
| Wheeled | Staghound AA · AEC AA |
| Radar SPAAG | Chieftain Marksman |
| Missile SPAA | Stormer HVM |
| Other | Light AA Mk I · Falcon |
| Canada | Skink |
| South Africa | Ystervark · Bosvark · ZA-35 |
