Difference between revisions of "ZTZ96A (P)"
m (Noted the vehicle's better turret traverse in comparison to its Russian contemporaries) (Tag: Visual edit) |
m (update ERA protection to 2.33.0.42) |
||
| (12 intermediate revisions by 6 users not shown) | |||
| Line 12: | Line 12: | ||
== Description == | == Description == | ||
<!-- ''In the description, the first part should be about the history of the creation and combat usage of the vehicle, as well as its key features. In the second part, tell the reader about the ground vehicle in the game. Insert a screenshot of the vehicle, so that if the novice player does not remember the vehicle by name, he will immediately understand what kind of vehicle the article is talking about.'' --> | <!-- ''In the description, the first part should be about the history of the creation and combat usage of the vehicle, as well as its key features. In the second part, tell the reader about the ground vehicle in the game. Insert a screenshot of the vehicle, so that if the novice player does not remember the vehicle by name, he will immediately understand what kind of vehicle the article is talking about.'' --> | ||
| − | The '''{{Specs|name}}''' | + | The '''{{Specs|name}}''' was the failed prototype of what would have been known as the WZ122R where certain tank designers opted for an irregular, needle-nosed turret applique armour for what would later become the ZTZ96A. Due to undisclosed reasons, this design was ditched by PLAGF and the known design of what is now known as ZTZ96A won the competition; this prototype was then lost in history and only very few images could prove its existence. |
| − | + | Introduced in [[Update "Wind of Change"]], the ZTZ96A (P) is a prototype of the [[ZTZ96A]]. It has a different turret armour arrangement from the serial production version: instead of the arrowhead-shaped ERA mount, it has high-hardness spaced armour in an interesting "needle-nose" shape reminiscent of the [[Chieftain Mk 3|Chieftain]]'s profile. But the main selling point is the soft-kill APS system consisting of two JD-3 jammers mounted on the turret sides, which function similarly to the [[T-90A]]'s "Shtora" and are a first for Chinese ground vehicles. This prototype trades some turret protection in exchange for the ability to disrupt the guidance of enemy ATGMs. In all other respects the ZTZ96A (P) is practically identical to the production version, with thermal sights and a powerful gun, and makes a good partner for a lineup. | |
== General info == | == General info == | ||
| Line 20: | Line 20: | ||
{{Specs-Tank-Armour}} | {{Specs-Tank-Armour}} | ||
<!-- ''Describe armour protection. Note the most well protected and key weak areas. Appreciate the layout of modules as well as the number and location of crew members. Is the level of armour protection sufficient, is the placement of modules helpful for survival in combat? If necessary use a visual template to indicate the most secure and weak zones of the armour.'' --> | <!-- ''Describe armour protection. Note the most well protected and key weak areas. Appreciate the layout of modules as well as the number and location of crew members. Is the level of armour protection sufficient, is the placement of modules helpful for survival in combat? If necessary use a visual template to indicate the most secure and weak zones of the armour.'' --> | ||
| − | This tank, the failed bid for the ZTZ96A, shares the same chassis of its tech tree counterpart, having the same LFP with little to no protection while the UFP is among one of the strongest at its tier thanks to the FY-4 ERA blocks. The turret is another story - this prototype has an oddly shaped wedge mounted on the front of turret, so players can tell this tank apart from the main tree one right away. The pair of wedges does provide sufficient protection against kinetic or chemical shells at similar tier, though this only applies to the part in front of the turret but not the area in front of the | + | This tank, the failed bid for the ZTZ96A, shares the same chassis of its tech tree counterpart, having the same LFP with little to no protection while the UFP is among one of the strongest at its tier thanks to the FY-4 ERA blocks. The turret is another story - this prototype has an oddly shaped wedge mounted on the front of turret, so players can tell this tank apart from the main tree one right away. The pair of wedges does provide sufficient protection against kinetic or chemical shells at similar tier, though this only applies to the part in front of the turret but not the area in front of the mantlet - this part has only 340 mm RHA equivalent protection so it will be penetrated with ease. Another note is that the wedges don't provide full protection, and they should not be angled as this will decrease the protection severely. |
The internal design of this prototype is identical to the ZTZ96A so the crew of 3 and its ammo carousel sit at the very same place on both tanks, a penetrated shot up front will either knock down either of the crews or set off the carousel and sent the turret sky high. | The internal design of this prototype is identical to the ZTZ96A so the crew of 3 and its ammo carousel sit at the very same place on both tanks, a penetrated shot up front will either knock down either of the crews or set off the carousel and sent the turret sky high. | ||
| Line 26: | Line 26: | ||
In fact, both ZTZ96A prototypes installed a JD-3 IR jammer during testing; while the production run canceled this design, this prototype still retained the pair of jammers, giving it some chance of jamming missiles that use laser guidance. | In fact, both ZTZ96A prototypes installed a JD-3 IR jammer during testing; while the production run canceled this design, this prototype still retained the pair of jammers, giving it some chance of jamming missiles that use laser guidance. | ||
| − | '''Armour type:''' | + | '''Armour type:''' |
| − | |||
| − | |||
* Rolled homogeneous armour (hull, turret) | * Rolled homogeneous armour (hull, turret) | ||
| Line 36: | Line 34: | ||
{| class="wikitable" | {| class="wikitable" | ||
|- | |- | ||
| − | !Armour!!Front (Slope angle)!!Sides!!Rear!!Roof | + | ! Armour !! Front (Slope angle) !! Sides !! Rear !! Roof |
|- | |- | ||
| − | | Hull || 20 mm (69°) ''Outer UFP''<br>100 mm (67°) ''Inner UFP''<br> 60 mm (51°) ''Lower glacis ''|| 50 mm || 45 mm (52°) ''Top''<br> 52 mm (15°) ''Bottom'' || 20-30 mm | + | | Hull || 20 mm (69°) ''Outer UFP''<br>100 mm (67°) ''Inner UFP''<br> 60 mm (51°) ''Lower glacis ''|| 50 mm || 45 mm (52°) ''Top''<br> 52 mm (15°) ''Bottom'' || 20 mm (2-21°) <br> 30 mm ''Centre and rear'' <br> 10 mm ''Engine vents'' |
|- | |- | ||
| Turret || 15 mm ''Turret outer layer''<br>220 mm ''Turret front''<br>310 mm ''Gun mantlet'' || 50-80 mm || 20 mm || 30 mm | | Turret || 15 mm ''Turret outer layer''<br>220 mm ''Turret front''<br>310 mm ''Gun mantlet'' || 50-80 mm || 20 mm || 30 mm | ||
| Line 47: | Line 45: | ||
{| class="wikitable" | {| class="wikitable" | ||
| − | !Composite armour | + | ! Composite armour !! Frontal effective protection |
| − | !Frontal effective protection | ||
| − | |||
|- | |- | ||
| − | |Hull || '''Upper glacis:'''<br> | + | | Hull || '''Upper glacis (ERA counted):'''<br>540 mm ''Kinetic'' / 1,050 mm ''Chemical'' |
|- | |- | ||
| − | |Turret || '''Turret front:'''<br>400 | + | | Turret || '''Turret front:'''<br>400 mm ''Kinetic'' / 520 mm ''Chemical'' |
|} | |} | ||
{| class="wikitable" | {| class="wikitable" | ||
| − | !Explosive Reactive Armour | + | ! Explosive Reactive Armour !! Frontal effective protection !! Sides effective protection |
| − | ! | ||
| − | !Sides | ||
|- | |- | ||
| − | |Hull || '''FY-4:''' | + | | Hull || '''FY-4:''' 180 mm ''Kinetic'' / 550 mm ''Chemical'' || N/A |
| − | |N/A | + | |- |
| + | | Turret || N/A || '''FY-4:''' 50 mm ''Kinetic'' / 350 mm ''Chemical'' | ||
|- | |- | ||
| − | |||
|} | |} | ||
| − | + | '''Notes:''' | |
| − | '''Notes:''' | ||
| − | |||
* Suspension wheels, tracks, and torsion bars are 20 mm thick. | * Suspension wheels, tracks, and torsion bars are 20 mm thick. | ||
| Line 96: | Line 88: | ||
{| class="wikitable" style="text-align:center" width="100%" | {| class="wikitable" style="text-align:center" width="100%" | ||
|- | |- | ||
| − | ! colspan="5" | [[Type 88C (125 mm)|125 mm Type 88C]] || colspan="5" | Turret rotation speed (°/s) | | + | ! colspan="5" | [[Type 88C (125 mm)|125 mm Type 88C]] || colspan="5" | Turret rotation speed (°/s) || Reloading rate (seconds) |
|- | |- | ||
! Mode !! Capacity !! Vertical !! Horizontal !! Stabilizer | ! Mode !! Capacity !! Vertical !! Horizontal !! Stabilizer | ||
! Stock !! Upgraded !! Full !! Expert !! Aced | ! Stock !! Upgraded !! Full !! Expert !! Aced | ||
| − | ! | + | ! Autoloader |
|- | |- | ||
! ''Arcade'' | ! ''Arcade'' | ||
| − | | rowspan="2" | 40 || rowspan="2" | -5°/+12° || rowspan="2" | ±180° || rowspan="2" | Two-plane || 28.6 || 39.5 || 48.0 || 53.1 || 56.5 | + | | rowspan="2" | 40 || rowspan="2" | -5°/+12° || rowspan="2" | ±180° || rowspan="2" | Two-plane || 28.6 || 39.5 || 48.0 || 53.1 || 56.5 || rowspan="2" | 7.10 |
|- | |- | ||
! ''Realistic'' | ! ''Realistic'' | ||
| Line 111: | Line 103: | ||
==== Ammunition ==== | ==== Ammunition ==== | ||
| − | { | + | {{:Type 88C (125 mm)/Ammunition|DTP-125, DTB-125, 125-I}} |
| − | |||
| − | |||
| − | |||
| − | |||
| − | |||
| − | |||
| − | |||
| − | |||
| − | |||
| − | |||
| − | |||
| − | |||
| − | |||
| − | |||
| − | |||
| − | |||
| − | |||
| − | |||
| − | |||
| − | |||
| − | |||
| − | |||
| − | |||
| − | |||
| − | |||
| − | |||
| − | |||
| − | |||
| − | |||
| − | | DTP-125 | ||
| − | |||
| − | |||
| − | |||
| − | |||
| − | |||
| − | |||
All three ZTZ96s in-game share the same shells so players from the main tech tree ones will soon find themselves home; since this is a premium tank, all the ammunition comes unlocked with the tank. | All three ZTZ96s in-game share the same shells so players from the main tech tree ones will soon find themselves home; since this is a premium tank, all the ammunition comes unlocked with the tank. | ||
| Line 153: | Line 109: | ||
The first ammunition is DTP-125 HEATFS, sharing the same penetration of NATO 120 mm HEATFS while having the mass of Warsaw Pact 125 mm HEATFS. Since ERA is commonplace at this tier, this round is best used against enemies showing their sides or light targets - its explosive mass is sufficient to knock them out right away. | The first ammunition is DTP-125 HEATFS, sharing the same penetration of NATO 120 mm HEATFS while having the mass of Warsaw Pact 125 mm HEATFS. Since ERA is commonplace at this tier, this round is best used against enemies showing their sides or light targets - its explosive mass is sufficient to knock them out right away. | ||
| − | The second ammunition, DTB-125 HEFS, is infamous for its explosive mass at nearly 5.5 kg, which is still the highest among any explosive rounds of all MBTs; as a research paper from NORINCO suggested that DTB-125 is suited for knocking enemies down with its explosive mass, this also applies to any enemies you might face at similar tiers - a precise hit to weakspots that trigger overpressure damage can send even the toughest enemies straight back to the | + | The second ammunition, DTB-125 HEFS, is infamous for its explosive mass at nearly 5.5 kg, which is still the highest among any explosive rounds of all MBTs; as a research paper from NORINCO suggested that DTB-125 is suited for knocking enemies down with its explosive mass, this also applies to any enemies you might face at similar tiers - a precise hit to weakspots that trigger overpressure damage can send even the toughest enemies straight back to the hangar with ease, let alone light vehicles. In case of sniping hiding enemies or needing a quick knock-out on light vehicles, bringing some HEFS is viable. |
The third ammunition is the 125-I dart. Thanks to its high velocity, it can penetrate 466 mm at point-blank range; the sheer penetration is more than enough to finish most NATO or Warsaw Pact tanks with very few exceptions. This would be the go to shell for the ZTZ96A (P). | The third ammunition is the 125-I dart. Thanks to its high velocity, it can penetrate 466 mm at point-blank range; the sheer penetration is more than enough to finish most NATO or Warsaw Pact tanks with very few exceptions. This would be the go to shell for the ZTZ96A (P). | ||
| Line 191: | Line 147: | ||
! Mount !! Capacity (Belt) !! Fire rate !! Vertical !! Horizontal | ! Mount !! Capacity (Belt) !! Fire rate !! Vertical !! Horizontal | ||
|- | |- | ||
| − | | Pintle || | + | | Pintle || 600 (150) || 600 || -6°/+85° || ±180° |
|- | |- | ||
|} | |} | ||
| Line 200: | Line 156: | ||
! Mount !! Capacity (Belt) !! Fire rate !! Vertical !! Horizontal | ! Mount !! Capacity (Belt) !! Fire rate !! Vertical !! Horizontal | ||
|- | |- | ||
| − | | Coaxial || 2,500 (250) || 700 || | + | | Coaxial || 2,500 (250) || 700 || - || - |
|- | |- | ||
|} | |} | ||
| Line 215: | Line 171: | ||
'''Pros:''' | '''Pros:''' | ||
| − | * Infrared jammer is effective against | + | * Infrared jammer is effective against SACLOS ATGMs |
* Sturdy UFP and turret front against common foes such as the [[XM-1 (GM)|XM-1]] | * Sturdy UFP and turret front against common foes such as the [[XM-1 (GM)|XM-1]] | ||
* Adequate mobility allows it to follow the team's advance | * Adequate mobility allows it to follow the team's advance | ||
| Line 221: | Line 177: | ||
* 125-I APFSDS has great penetration and damage against common tanks like the [[T-72 (Family)|T-72]], [[XM-1 (GM)|XM-1]], [[Leopard 1 (Family)|Leopard 1]], etc | * 125-I APFSDS has great penetration and damage against common tanks like the [[T-72 (Family)|T-72]], [[XM-1 (GM)|XM-1]], [[Leopard 1 (Family)|Leopard 1]], etc | ||
* Roof-mounted 12.7 mm HMG is effective against light armour and helicopters | * Roof-mounted 12.7 mm HMG is effective against light armour and helicopters | ||
| − | * | + | * 4 salvos of smoke grenades can cover the tank's retreat |
| − | |||
'''Cons:''' | '''Cons:''' | ||
| Line 234: | Line 189: | ||
== History == | == History == | ||
<!-- ''Describe the history of the creation and combat usage of the vehicle in more detail than in the introduction. If the historical reference turns out to be too long, take it to a separate article, taking a link to the article about the vehicle and adding a block "/History" (example: <nowiki>https://wiki.warthunder.com/(Vehicle-name)/History</nowiki>) and add a link to it here using the <code>main</code> template. Be sure to reference text and sources by using <code><nowiki><ref></ref></nowiki></code>, as well as adding them at the end of the article with <code><nowiki><references /></nowiki></code>. This section may also include the vehicle's dev blog entry (if applicable) and the in-game encyclopedia description (under <code><nowiki>=== In-game description ===</nowiki></code>, also if applicable).'' --> | <!-- ''Describe the history of the creation and combat usage of the vehicle in more detail than in the introduction. If the historical reference turns out to be too long, take it to a separate article, taking a link to the article about the vehicle and adding a block "/History" (example: <nowiki>https://wiki.warthunder.com/(Vehicle-name)/History</nowiki>) and add a link to it here using the <code>main</code> template. Be sure to reference text and sources by using <code><nowiki><ref></ref></nowiki></code>, as well as adding them at the end of the article with <code><nowiki><references /></nowiki></code>. This section may also include the vehicle's dev blog entry (if applicable) and the in-game encyclopedia description (under <code><nowiki>=== In-game description ===</nowiki></code>, also if applicable).'' --> | ||
| − | The overall information on this failed design on upgrading the | + | The overall information on this failed design on upgrading the later ZTZ96s with new appliqué armour was minimal; both ZTZ96A (WZ122R) were designed in the early 2000s in view of an upgrade scheme for later ZTZ96s in production line. While both tanks retained the same firepower and mobility, as well as a pair of Shtora-1-like IR jammers known as JD-3 developed domestically on the side of the turret (some suggest that JD-3 was based on the Ukrainian's Shtora-1 equivalent model of IR jammer), they have a very different turret designs, where this design has a pair of wedge blocks of appliqué armour in the front of the turret. |
| + | |||
| + | ''(Note: the trio of ZTZ96/96A/96B couldn't be upgraded from one another due to design differences and costs)'' | ||
Due to unknown reasons, this design failed the bid for PLAGF and the later ZTZ96A/WZ122R became what is today's standard, with an arrow-shaped turret like those on ZTZ99-II and the IR jammer removed, likely for cost reductions. | Due to unknown reasons, this design failed the bid for PLAGF and the later ZTZ96A/WZ122R became what is today's standard, with an arrow-shaped turret like those on ZTZ99-II and the IR jammer removed, likely for cost reductions. | ||
| Line 240: | Line 197: | ||
== Media == | == Media == | ||
<!-- ''Excellent additions to the article would be video guides, screenshots from the game, and photos.'' --> | <!-- ''Excellent additions to the article would be video guides, screenshots from the game, and photos.'' --> | ||
| − | + | ||
| + | ;Skins | ||
| + | |||
| + | * [https://live.warthunder.com/feed/camouflages/?vehicle=cn_ztz_96a_prot Skins and camouflages for the {{PAGENAME}} from live.warthunder.com.] | ||
== See also == | == See also == | ||
| Line 261: | Line 221: | ||
{{China medium tanks}} | {{China medium tanks}} | ||
{{China premium ground vehicles}} | {{China premium ground vehicles}} | ||
| + | [[Category:Ground vehicles with active protection system]] | ||
Latest revision as of 11:26, 26 December 2023
| This page is about the Chinese medium tank ZTZ96A (P). For other versions, see ZTZ96 (Family). |
.jpg)
_001.jpg)
Contents
Description
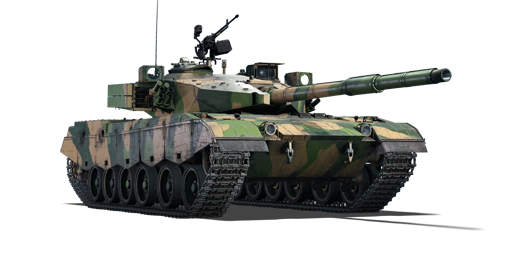
The ZhuangJia Tanke ZhuZhan 96A, Prototype was the failed prototype of what would have been known as the WZ122R where certain tank designers opted for an irregular, needle-nosed turret applique armour for what would later become the ZTZ96A. Due to undisclosed reasons, this design was ditched by PLAGF and the known design of what is now known as ZTZ96A won the competition; this prototype was then lost in history and only very few images could prove its existence.
Introduced in Update "Wind of Change", the ZTZ96A (P) is a prototype of the ZTZ96A. It has a different turret armour arrangement from the serial production version: instead of the arrowhead-shaped ERA mount, it has high-hardness spaced armour in an interesting "needle-nose" shape reminiscent of the Chieftain's profile. But the main selling point is the soft-kill APS system consisting of two JD-3 jammers mounted on the turret sides, which function similarly to the T-90A's "Shtora" and are a first for Chinese ground vehicles. This prototype trades some turret protection in exchange for the ability to disrupt the guidance of enemy ATGMs. In all other respects the ZTZ96A (P) is practically identical to the production version, with thermal sights and a powerful gun, and makes a good partner for a lineup.
General info
Survivability and armour
This tank, the failed bid for the ZTZ96A, shares the same chassis of its tech tree counterpart, having the same LFP with little to no protection while the UFP is among one of the strongest at its tier thanks to the FY-4 ERA blocks. The turret is another story - this prototype has an oddly shaped wedge mounted on the front of turret, so players can tell this tank apart from the main tree one right away. The pair of wedges does provide sufficient protection against kinetic or chemical shells at similar tier, though this only applies to the part in front of the turret but not the area in front of the mantlet - this part has only 340 mm RHA equivalent protection so it will be penetrated with ease. Another note is that the wedges don't provide full protection, and they should not be angled as this will decrease the protection severely.
The internal design of this prototype is identical to the ZTZ96A so the crew of 3 and its ammo carousel sit at the very same place on both tanks, a penetrated shot up front will either knock down either of the crews or set off the carousel and sent the turret sky high.
In fact, both ZTZ96A prototypes installed a JD-3 IR jammer during testing; while the production run canceled this design, this prototype still retained the pair of jammers, giving it some chance of jamming missiles that use laser guidance.
Armour type:
- Rolled homogeneous armour (hull, turret)
- Cast homogeneous armour (gun mantlet, commander cupola)
- Rubber-fabric screens (side skirts)
| Armour | Front (Slope angle) | Sides | Rear | Roof |
|---|---|---|---|---|
| Hull | 20 mm (69°) Outer UFP 100 mm (67°) Inner UFP 60 mm (51°) Lower glacis |
50 mm | 45 mm (52°) Top 52 mm (15°) Bottom |
20 mm (2-21°) 30 mm Centre and rear 10 mm Engine vents |
| Turret | 15 mm Turret outer layer 220 mm Turret front 310 mm Gun mantlet |
50-80 mm | 20 mm | 30 mm |
| Cupola | 30 mm (Cylindrical) | 30 mm | ||
| Composite armour | Frontal effective protection |
|---|---|
| Hull | Upper glacis (ERA counted): 540 mm Kinetic / 1,050 mm Chemical |
| Turret | Turret front: 400 mm Kinetic / 520 mm Chemical |
| Explosive Reactive Armour | Frontal effective protection | Sides effective protection |
|---|---|---|
| Hull | FY-4: 180 mm Kinetic / 550 mm Chemical | N/A |
| Turret | N/A | FY-4: 50 mm Kinetic / 350 mm Chemical |
Notes:
- Suspension wheels, tracks, and torsion bars are 20 mm thick.
- Belly armour is 20 mm thick.
- Side skirts are 8 mm thick.
- Mudguards and storage boxes are 4 mm thick.
Mobility
Since one of the major upgrades of the ZTZ96A is the engine, it was upgraded to a NORINCO 12150ZLD 800 hp engine; the ZTZ96A (P) is no exception. Although it might not have the overall mobility of NATO tanks, the power/weight ratio (at 18.6 hp/t) is higher than most Soviet tanks, giving a better handling.
| Game Mode | Max Speed (km/h) | Weight (tons) | Engine power (horsepower) | Power-to-weight ratio (hp/ton) | |||
|---|---|---|---|---|---|---|---|
| Forward | Reverse | Stock | Upgraded | Stock | Upgraded | ||
| Arcade | 66 | 7 | 43 | 1240 | 1,526 | 28.84 | 35.49 |
| Realistic | 60 | 6 | 708 | 800 | 16.47 | 18.6 | |
Modifications and economy
| Mobility | Protection | Firepower | ||||||||||||||||||||||||
|---|---|---|---|---|---|---|---|---|---|---|---|---|---|---|---|---|---|---|---|---|---|---|---|---|---|---|
|
|
|
Armaments
Main armament
The ZTZ96A (P) inherited the same 125 mm ZPT88C cannon from ZTZ96, which is one of the best tank cannons at its tier; both the prototype and production tanks share the same traits - high velocity shells, sufficient turret traverse speed and the same autoloader with fixed 7.1 second reload between shots.
| 125 mm Type 88C | Turret rotation speed (°/s) | Reloading rate (seconds) | ||||||||
|---|---|---|---|---|---|---|---|---|---|---|
| Mode | Capacity | Vertical | Horizontal | Stabilizer | Stock | Upgraded | Full | Expert | Aced | Autoloader |
| Arcade | 40 | -5°/+12° | ±180° | Two-plane | 28.6 | 39.5 | 48.0 | 53.1 | 56.5 | 7.10 |
| Realistic | 17.9 | 21.0 | 25.5 | 28.2 | 30.0 | |||||
Ammunition
| Penetration statistics | |||||||
|---|---|---|---|---|---|---|---|
| Ammunition | Type of warhead |
Penetration @ 0° Angle of Attack (mm) | |||||
| 10 m | 100 m | 500 m | 1,000 m | 1,500 m | 2,000 m | ||
| DTP-125 | HEATFS | 480 | 480 | 480 | 480 | 480 | 480 |
| DTB-125 | HE | 45 | 45 | 45 | 45 | 45 | 45 |
| 125-I | APFSDS | 466 | 464 | 458 | 450 | 442 | 434 |
| Shell details | ||||||||||||
|---|---|---|---|---|---|---|---|---|---|---|---|---|
| Ammunition | Type of warhead |
Velocity (m/s) |
Projectile mass (kg) |
Fuse delay (m) |
Fuse sensitivity (mm) |
Explosive mass (TNT equivalent) (kg) |
Ricochet | |||||
| 0% | 50% | 100% | ||||||||||
| DTP-125 | HEATFS | 905 | 18 | 0.05 | 0.1 | 2.62 | 65° | 72° | 77° | |||
| DTB-125 | HE | 850 | 23 | 0.3 | 0.1 | 5.46 | 79° | 80° | 81° | |||
| 125-I | APFSDS | 1,730 | 4.02 | - | - | - | 78° | 80° | 81° | |||
All three ZTZ96s in-game share the same shells so players from the main tech tree ones will soon find themselves home; since this is a premium tank, all the ammunition comes unlocked with the tank.
The first ammunition is DTP-125 HEATFS, sharing the same penetration of NATO 120 mm HEATFS while having the mass of Warsaw Pact 125 mm HEATFS. Since ERA is commonplace at this tier, this round is best used against enemies showing their sides or light targets - its explosive mass is sufficient to knock them out right away.
The second ammunition, DTB-125 HEFS, is infamous for its explosive mass at nearly 5.5 kg, which is still the highest among any explosive rounds of all MBTs; as a research paper from NORINCO suggested that DTB-125 is suited for knocking enemies down with its explosive mass, this also applies to any enemies you might face at similar tiers - a precise hit to weakspots that trigger overpressure damage can send even the toughest enemies straight back to the hangar with ease, let alone light vehicles. In case of sniping hiding enemies or needing a quick knock-out on light vehicles, bringing some HEFS is viable.
The third ammunition is the 125-I dart. Thanks to its high velocity, it can penetrate 466 mm at point-blank range; the sheer penetration is more than enough to finish most NATO or Warsaw Pact tanks with very few exceptions. This would be the go to shell for the ZTZ96A (P).
Ammo racks
| Full ammo |
Ammo part |
1st rack empty |
2nd rack empty |
3rd rack empty |
4th rack empty |
5th rack empty |
6th rack empty |
7th rack empty |
8th rack empty |
9th rack empty |
Visual discrepancy |
|---|---|---|---|---|---|---|---|---|---|---|---|
| 40 | Projectiles Propellants |
40 (+0) 39 (+1) |
38 (+2) 38 (+2) |
37 (+3) 37 (+3) |
35 (+5) 31 (+9) |
32 (+8) 27 (+13) |
29 (+11) 23 (+17) |
24 (+16) 39 (+1) |
23 (+17) N/A |
39 (+1) N/A |
No |
Machine guns
| 12.7 mm QJC88A | ||||
|---|---|---|---|---|
| Mount | Capacity (Belt) | Fire rate | Vertical | Horizontal |
| Pintle | 600 (150) | 600 | -6°/+85° | ±180° |
| 7.62 mm Type 86 | ||||
|---|---|---|---|---|
| Mount | Capacity (Belt) | Fire rate | Vertical | Horizontal |
| Coaxial | 2,500 (250) | 700 | - | - |
Usage in battles
Since the ZTZ96A prototype shares the same chassis of the mass-production version, the protection all-round is identical to the ZTZ96A. The LFP will be the greatest concern players might have during gameplay; the relatively large LFP doesn't have enough protection against common shell types at its tier, and a penetration will certainly lead to a crew knock-out or detonation of ammunition, so keep it hidden as much as possible. Meanwhile, the UFP has blocks of FY-4 ERA that provide up to 500 mm protection at certain angles, making it one of the toughest MBTs at its tier in this regard; the blocks are one-off protection however so beware of subsequent shots on unprotected areas. As for the turret, the design of applique armour provides similar protection to the ZTZ96A against shells at this tier, but the overall design is flawed where the lower part of the wedge block and areas in front of the mantlet provide lesser protection. Aside from that, any angling of turret will result in easy penetration of the applique armour since the angling cancels out the frontal arc protection, so do keep your turret aiming at enemies.
The overall playstyle is very similar to that of a ZTZ96A, it might not have the best mobility at this tier, but it can still keep up with the main forces with its 800 hp engine; your UFP and turret is your best friend, misplaced shots from the enemies are very likely do nothing on the ZTZ96A (P) while your gun can do lethal damage to enemies thanks to its penetration and autoloader. Rushing with the ZTZ96A (P) could be fatal due to its lesser flexibility to retreat back to cover with a slow reverse at barely 5 km/h, planning ahead before assaulting enemies is the key. Thanks to the JD-3 jammer on the sides of the turret, some missiles that are in the way of your turret frontal arc will find it impossible to do any harm to you; do keep in mind that this only applies to SACLOS missiles, wire-guided or beam-riding missiles can still do lethal damage since those are not affected by the jammer.
Pros and cons
Pros:
- Infrared jammer is effective against SACLOS ATGMs
- Sturdy UFP and turret front against common foes such as the XM-1
- Adequate mobility allows it to follow the team's advance
- 2nd generation thermal sight for the gunner is useful for spotting targets, especially at night
- 125-I APFSDS has great penetration and damage against common tanks like the T-72, XM-1, Leopard 1, etc
- Roof-mounted 12.7 mm HMG is effective against light armour and helicopters
- 4 salvos of smoke grenades can cover the tank's retreat
Cons:
- Frontal weak spots are obvious and fatal: large and weak LFP and gun mantlet can be easily penetrated
- Slow reverse speed of only -5 km/h cannot pull it out of danger in time, and heavily limits tactical agility
- IR jammer has narrow vertical range, cannot defend missiles from above
- Side protection is weak, can be easily penetrated by tanks like the BMP-2 and aircraft like the A-10
- Turret add-on armour gives much less protection than the ERA on the regular ZTZ96A
History
The overall information on this failed design on upgrading the later ZTZ96s with new appliqué armour was minimal; both ZTZ96A (WZ122R) were designed in the early 2000s in view of an upgrade scheme for later ZTZ96s in production line. While both tanks retained the same firepower and mobility, as well as a pair of Shtora-1-like IR jammers known as JD-3 developed domestically on the side of the turret (some suggest that JD-3 was based on the Ukrainian's Shtora-1 equivalent model of IR jammer), they have a very different turret designs, where this design has a pair of wedge blocks of appliqué armour in the front of the turret.
(Note: the trio of ZTZ96/96A/96B couldn't be upgraded from one another due to design differences and costs)
Due to unknown reasons, this design failed the bid for PLAGF and the later ZTZ96A/WZ122R became what is today's standard, with an arrow-shaped turret like those on ZTZ99-II and the IR jammer removed, likely for cost reductions.
Media
- Skins
See also
Links to the articles on the War Thunder Wiki that you think will be useful for the reader, for example:
- reference to the series of the vehicles;
- links to approximate analogues of other nations and research trees.
External links
| China North Industries Corporation - NORINCO 中国兵器工业集团有限公司 | |
|---|---|
| Light Tanks/IFV | |
| WZ501 | ZBD86 |
| WZ131 | ▂Type 62 · Type 62 |
| WZ211 | Type 63 · ZTS63 |
| WZ502 | ZBD04A |
| Main Battle Tanks | |
| WZ120 | Type 59 · ZTZ59A · ZTZ59D1 |
| WZ121 | Type 69 · Type 69-IIa** · T-69 II G** |
| WZ122 | ZTZ88B · ZTZ88A · ZTZ96 · ZTZ96A · ZTZ96A (P) |
| WZ123 | ZTZ99-II · ZTZ99-III |
| WZ1001 | WZ1001(E) LCT · ZTZ99A |
| Export MBT | MBT2000** · VT-4A1** |
| Tank Destroyers | AFT09 · PTL02 · WMA301** · PTZ89 · ZLT11 |
| SPH | PLZ83 |
| SPAA | ZSD63/PG87* · WZ305** · PGZ09 · PGZ04A |
| *Field modifications | |
| **Export vehicles | |
| China medium tanks | |
|---|---|
| ZTZ59 | Type 59 · ZTZ59A · ZTZ59D1 |
| ZTZ69 | Type 69 · Type 69-IIa · T-69 II G |
| ZTZ88/96 | ZTZ88A · ZTZ88B |
| ZTZ96 · ZTZ96A · ZTZ96A (P) | |
| ZTZ99 | ZTZ99-II · ZTZ99-III |
| ZTZ99A | ZTZ99A · WZ1001(E) LCT |
| Export series | MBT2000 · VT-4A1 |
| ROC | CM11 |
| Other | Т-34-85 Gai · Object 122MT "MC" |
| Japan | ␗Chi-Ha · ␗Chi-Ha Kai |
| USA | ␗M4A4 · ␗M4A4 (1st PTG) · ␗M4A1 (75) W · ␗M48A1 · ␗M60A3 TTS |
| USSR | ␗T-34 (1943) · ␗Т-34-85 (S-53) · T-34-85 No.215 · Т-62 №545 |
| China premium ground vehicles | |
|---|---|
| Light tanks | T-26 No.531 · ␗M3A3 (1st PTG) · ␗M41A3 · M64 · WMA301 |
| Medium tanks | ␗M4A4 (1st PTG) · T-34-85 No.215 · Т-62 №545 · ZTZ59A · Type 69-IIa · T-69 II G · ZTZ96A (P) |
| Heavy tanks | IS-2 No.402 |
- Ground vehicles
- China ground vehicles
- Seventh rank ground vehicles
- Premium ground vehicles
- Medium tanks
- Gift ground vehicles
- Ground vehicles with explosive reactive armour
- Ground vehicles with composite armour
- Ground vehicles with smoke grenades
- Ground vehicles with engine smoke generating system
- Ground vehicles with night vision device
- Ground vehicles with thermal sight
- Ground vehicles with autoloader
- Ground vehicles with gun stabilizer
- Ground vehicles with active protection system
