Difference between revisions of "ZSD63/PG87"
(→Pros and cons) (Tag: Visual edit) |
(Edits) |
||
| Line 7: | Line 7: | ||
The '''{{Specs|name}}''' is a rank {{Specs|rank}} Chinese SPAA {{Battle-rating}}. It was introduced in [[Update "Starfighters"]]. | The '''{{Specs|name}}''' is a rank {{Specs|rank}} Chinese SPAA {{Battle-rating}}. It was introduced in [[Update "Starfighters"]]. | ||
| − | The ZSD63 is currently the first vehicle in the Chinese SPAA line and offers some much needed anti-air capabilities to Chinese tankers. Though it looks rather like a jury-rigged technical from the Middle East, having a turret with twin autocannons grafted on an APC chassis, it packs some serious firepower for its rank. A slight brush from the ZSD63's rapid-fire cannons will tear most aircraft to shreds. Lightly | + | The ZSD63 is currently the first vehicle in the Chinese SPAA line and offers some much needed anti-air capabilities to Chinese tankers. Though it looks rather like a jury-rigged technical from the Middle East, having a turret with twin autocannons grafted on an APC chassis, it packs some serious firepower for its rank. A slight brush from the ZSD63's rapid-fire cannons will tear most aircraft to shreds. Lightly armoured ground vehicles will also learn to fear the onslaught of AP rounds, which cut through them like a buzzsaw. While it has excellent firepower, the defensive capabilities are very lacking; the large size and paper-thin armour make it an attractive target to anything on the battlefield. Other issues include the limited belt size, with each gun only having 40 rounds, and the truly abysmal reload speed. Despite these challenges, the ZSD63 can be a very fun vehicle to play and will serve well as an anti-air vehicle even beyond its lowly rank; the succeeding Chinese SPAAs have a much lower rate of fire and are harder to use against aerial targets until the [[WZ305]] and its fused shells are researched. |
== General info == | == General info == | ||
=== Survivability and armour === | === Survivability and armour === | ||
<!-- ''Describe armour protection. Note the most well protected and key weak areas. Appreciate the layout of modules as well as the number and location of crew members. Is the level of armour protection sufficient, is the placement of modules helpful for survival in combat? If necessary use a visual template to indicate the most secure and weak zones of the armour.'' --> | <!-- ''Describe armour protection. Note the most well protected and key weak areas. Appreciate the layout of modules as well as the number and location of crew members. Is the level of armour protection sufficient, is the placement of modules helpful for survival in combat? If necessary use a visual template to indicate the most secure and weak zones of the armour.'' --> | ||
| − | |||
| − | |||
| − | |||
| − | |||
{| class="wikitable" | {| class="wikitable" | ||
|- | |- | ||
| − | ! Armour !! Front (Slope angle) !! Sides !! Rear | + | ! Armour !! Front (Slope angle) !! Sides !! Rear |
|- | |- | ||
| − | | Hull || 12 mm || 8 mm || 8 mm | + | | Hull || 12 mm || 8 mm || 8 mm |
|- | |- | ||
| − | | Turret || 8 mm || 8 mm || 8 mm | + | | Turret || 8 mm || 8 mm || 8 mm |
|- | |- | ||
|} | |} | ||
| − | + | Despite its armoured box look, one would be hard pressed to call the ZSD63 "armoured". The armour is almost entirely 8 mm thick all-around, save for the 12 mm upper glacis. The near vertical sides may as well be unprotected. Adding insult to injury is the high mounted open top turret with the crews' heads exposed on top like pumpkins. Even coaxial rifle-calibre machine guns stand a fair chance of penetrating this vehicle. While you might survive a few glancing bullets or have shots pass through the empty rear compartment, the best survival tactic is to avoid being seen and stay close to cover for quick retreats after firing off a few bursts. | |
| − | + | ||
| + | Note that the ZSD63 can be hull-broken. Avoid being hit by HEAT or HE rounds. | ||
=== Mobility === | === Mobility === | ||
<!-- ''Write about the mobility of the ground vehicle. Estimate the specific power and manoeuvrability, as well as the maximum speed forwards and backwards.'' --> | <!-- ''Write about the mobility of the ground vehicle. Estimate the specific power and manoeuvrability, as well as the maximum speed forwards and backwards.'' --> | ||
| − | |||
{{tankMobility}} | {{tankMobility}} | ||
| + | |||
| + | Mobility is good, though somewhat underwhelming compared to what the statistics might suggest. With 19 hp/ton, the ZSD63 accelerates to 60 km/h forward on paved roads and the suspension works quite nicely on all kinds of terrain. Off-road speed is less impressive, topping at around 30-35 km/h. The 8 km/h reverse speed leaves something to be desired but is better than most contemporary vehicles. Overall, the ZSD63 is mobile enough to follow teammates and flank, though it is not exactly lightning fast and there should be no expectation of arriving at the battlefield far ahead of everyone else. | ||
== Armaments == | == Armaments == | ||
=== Main armament === | === Main armament === | ||
| − | <!--''Give the reader information about the characteristics of the main gun. Assess its effectiveness in a battle based on the reloading speed, ballistics and the power of shells. Do not forget about the flexibility of the fire, that is how quickly the cannon can be aimed at the target, open fire on it and aim at another enemy. Add a link to the main article on the gun: <code><nowiki>{{main|Name of the weapon}}</nowiki></code>. Describe in general terms the ammunition available for the main gun. Give advice on how to use them and how to fill the ammunition storage.'' --> | + | <!-- ''Give the reader information about the characteristics of the main gun. Assess its effectiveness in a battle based on the reloading speed, ballistics and the power of shells. Do not forget about the flexibility of the fire, that is how quickly the cannon can be aimed at the target, open fire on it and aim at another enemy. Add a link to the main article on the gun: <code><nowiki>{{main|Name of the weapon}}</nowiki></code>. Describe in general terms the ammunition available for the main gun. Give advice on how to use them and how to fill the ammunition storage.'' --> |
| + | {{main|PG87 (25 mm)}} | ||
| − | The {{PAGENAME}} is arguably the most lethal autocannon system at its rank in-game. | + | The {{PAGENAME}} is arguably the most lethal autocannon system at its rank in-game. Each cannon fires a staggering 10 rounds per second (600 rpm) with extremely high velocity and precision. The excellent turret traverse speed makes tracking targets very easy. Aircraft are instant confetti under its FI-T rounds. Although the AP-T penetration at 100 meters is only 60 mm, declining to 47 mm at 500 meters, the high fire rate and high velocity allow multiple hits at weak points until a kill shot is made. Light tanks, tank destroyers, and other SPAAs are generally easy targets. Medium units should not be too difficult to eliminate either, and even heavy tanks can be disabled by the cannons when aimed at vulnerable locations. The weaknesses are the limited belt capacity and the extremely long reload time, so be highly conservative with your fire control. This monster will be just as effective in Rank VII as in Rank II. |
| − | The default belt is a 50/50 mix of AP-T and FI-T. | + | The default belt is a 50/50 mix of AP-T and FI-T. This does a pretty good job for anti-air operations, but for anti-tank usage the pure AP-T load is far better. If the ZSD63 is brought out at the start of a game, take mostly AP-T to deal with ground targets and switch to the default belt when aircraft begin to show up. There is also a pure FI-T belt that is high effective versus aircraft but essentially useless against ground targets; it is not of much use since the default belt is almost as effective and can still deal with ground targets in a pinch. |
Avoid trying to switch belts in the middle of combat as might be done for other SPAAs. Doing so will put the guns out of commission for potentially more than 30 seconds, which is unhelpful to say the least if there are enemies around. This is also why it's important to have some AP-T rounds in the belts at all times. | Avoid trying to switch belts in the middle of combat as might be done for other SPAAs. Doing so will put the guns out of commission for potentially more than 30 seconds, which is unhelpful to say the least if there are enemies around. This is also why it's important to have some AP-T rounds in the belts at all times. | ||
| − | |||
| − | |||
{| class="wikitable" style="text-align:center" width="100%" | {| class="wikitable" style="text-align:center" width="100%" | ||
| Line 57: | Line 54: | ||
|- | |- | ||
! ''Arcade'' | ! ''Arcade'' | ||
| − | | rowspan="2" | 480 (40) || rowspan="2" | 600 || rowspan="2" | -10°/+90° || rowspan="2" | ±180° || rowspan="2" | N/A || 47.6 || __.__ || __.__ || __.__ ||67.93|| rowspan="2" |32.5|| rowspan="2" | _.__ || rowspan="2" | _.__ || rowspan="2" |25 | + | | rowspan="2" | 480 (40) || rowspan="2" | 600 || rowspan="2" | -10°/+90° || rowspan="2" | ±180° || rowspan="2" | N/A || 47.6 || __.__ || __.__ || __.__ || 67.93 || rowspan="2" |32.5|| rowspan="2" | _.__ || rowspan="2" | _.__ || rowspan="2" | 25 |
|- | |- | ||
! ''Realistic'' | ! ''Realistic'' | ||
| − | |32.1|| __.__ || __.__ || __.__ ||45.9 | + | | 32.1 || __.__ || __.__ || __.__ || 45.9 |
|- | |- | ||
|} | |} | ||
==== Ammunition ==== | ==== Ammunition ==== | ||
| − | |||
* '''Default:''' {{Annotation|AP-T|Armour-piercing tracer}}{{-}}{{Annotation|FI-T|Fragmentation incendiary tracer}} | * '''Default:''' {{Annotation|AP-T|Armour-piercing tracer}}{{-}}{{Annotation|FI-T|Fragmentation incendiary tracer}} | ||
* '''Type 87 AP:''' {{Annotation|AP-T|Armour-piercing tracer}} | * '''Type 87 AP:''' {{Annotation|AP-T|Armour-piercing tracer}} | ||
| Line 71: | Line 67: | ||
{| class="wikitable sortable" style="text-align:center" width="100%" | {| class="wikitable sortable" style="text-align:center" width="100%" | ||
| − | ! colspan=" | + | ! colspan="8" | Penetration statistics |
|- | |- | ||
| − | ! rowspan="2" data-sort-type="text" | | + | ! rowspan="2" data-sort-type="text" | Belt |
! colspan="6" | '''Penetration @ 0° Angle of Attack (mm)''' | ! colspan="6" | '''Penetration @ 0° Angle of Attack (mm)''' | ||
|- | |- | ||
| Line 80: | Line 76: | ||
| Default || 63 || 60 || 47 || 35 || 26 || 19 | | Default || 63 || 60 || 47 || 35 || 26 || 19 | ||
|- | |- | ||
| − | | Type 87 AP || | + | | Type 87 AP || 63 || 60 || 47 || 35 || 26 || 19 |
|- | |- | ||
| − | | Type 87 HE || | + | | Type 87 HE || 2 || 2 || 2 || 2 || 2 || 2 |
|- | |- | ||
|} | |} | ||
| Line 88: | Line 84: | ||
! colspan="10" | Belt details | ! colspan="10" | Belt details | ||
|- | |- | ||
| − | ! rowspan="2" data-sort-type="text" | | + | ! rowspan="2" data-sort-type="text" | Belt |
! rowspan="2" | Type of<br>warhead | ! rowspan="2" | Type of<br>warhead | ||
! rowspan="2" | Velocity<br>(m/s) | ! rowspan="2" | Velocity<br>(m/s) | ||
| Line 99: | Line 95: | ||
! 0% !! 50% !! 100% | ! 0% !! 50% !! 100% | ||
|- | |- | ||
| − | | Type 87 AP || AP-T || | + | | Type 87 AP || AP-T || 1,050 || 0.25 || N/A || N/A || N/A || 47° || 60° || 65° |
|- | |- | ||
| − | | Type 87 HE || FI-T || | + | | Type 87 HE || FI-T || 1,050 || 0.25 || N/A || 0.1 || 19 || 47° || 56° || 65° |
|- | |- | ||
|} | |} | ||
| Line 118: | Line 114: | ||
! Visual<br>discrepancy | ! Visual<br>discrepancy | ||
|- | |- | ||
| − | | '''6''' || __ ''(+__)'' || __ ''(+__)'' || __ ''(+__)'' || __ ''(+__)'' || __ ''(+__)'' || __ ''(+__)'' || __ | + | | '''6''' || __ ''(+__)'' || __ ''(+__)'' || __ ''(+__)'' || __ ''(+__)'' || __ ''(+__)'' || __ ''(+__)'' || __ |
|- | |- | ||
|} | |} | ||
| Line 125: | Line 121: | ||
<!-- ''Describe the tactics of playing in the vehicle, the features of using vehicles in the team and advice on tactics. Refrain from creating a "guide" - do not impose a single point of view but instead give the reader food for thought. Describe the most dangerous enemies and give recommendations on fighting them. If necessary, note the specifics of the game in different modes (AB, RB, SB).'' --> | <!-- ''Describe the tactics of playing in the vehicle, the features of using vehicles in the team and advice on tactics. Refrain from creating a "guide" - do not impose a single point of view but instead give the reader food for thought. Describe the most dangerous enemies and give recommendations on fighting them. If necessary, note the specifics of the game in different modes (AB, RB, SB).'' --> | ||
| − | When attacking ground units, be extremely cautious and avoid exposing your weak | + | When attacking ground units, be extremely cautious and avoid exposing your weak armour. Choose a pure AP (AP-T) load to double the chance of penetrating hits and head straight to good ambush spots. Wide flanking manoeuvres are a good idea, allowing you to attack the weak sides of light targets. Going wide, you will likely encounter other weakly armoured units like the popular [[M24 (Family)|M24 Chaffee]], which is very vulnerable to the 25 mm cannons. Know your targets and aim for weak points. The ubiquitous Shermans are generally tough customers from the front, where at most the transmission housings or perhaps ventilators can be penetrated, but the terrible hull side armour is a good target. The lower side armour behind the tracks is an especially good weak point if facing Shermans with applique side armour, and spraying a wide burst in that area can knock out the transmission, ammo, and driver. Other medium tanks like the [[Pz.IV F2]] and [[Chi-Nu]] are vulnerable from the front at close range. T-34s are tougher targets and can only be reliably penetrated frontally in the turret cheeks (for "small turret" models like the [[T-34 (1940)]]) or the turret ring at close range. The hull sides are thicker and better sloped than other medium tanks and also have fuel tanks protecting the turret crew, so during flanking attacks, try to shoot the lower hull armour to knock out the engine and driver/machine gunner before going for the turret side. |
| − | For self | + | For self-defence, it is important to know how to disable opponents quickly and efficiently, with minimal time and ammunition expenditure. Obviously the optimal situation is to knock out a target's crew before they can attack the ZSD63, but this will not always be possible. The twin cannons can destroy tracks and tires almost instantly, but for turreted vehicles this will not prevent the target from returning fire. If only one track is destroyed, even a casemate tank destroyer can potentially scoot around enough to fire back (though this can expose their sides). Destroying the engine is a good move when shooting from the sides or rear for this reason. Destroying gun barrels is also a good idea, but this can be difficult if said barrel is pointed directly at you, presenting a small cross section. Destroying turret rings can also be helpful, but this is not really possible outside of close quarters, and some tanks like Shermans don't even have vulnerable turret rings. Juggling these techniques takes practice, and some may end up using a lot of ammo, so it's best not to use the ZSD63 offensively against multiple well-armoured opponents. Damage targets just enough to save yourself and allow your teammates to finish them off. A target with upgraded crew skills might be able to repair their damage before the ZSD63 can reload! |
Avoid firing continuously for longer than 1 second or so. The cannons have noticeable recoil and the limited ammunition capacity does not allow for much "Spray and Pray". Firing measured bursts and adjusting the fire as necessary will lead to cleaner results, though if a very nice firing solution is available, don't be afraid to let loose. Against aircraft in particular, fire conservatively if the target is not flying directly towards or away from the ZSD63. Planes diving straight towards the ZSD63 are very threatening, but at the same time they would have signed their own death warrant; move a bit and put a nice spray of 25 mm rounds in their flight path, even a few successful FI-T impacts will do the job. The AP round does not have explosive filler so multiple penetrating hits are needed to defeat a tank. Remember that the ZSD63 also has access to artillery, a very useful spoiler to keep your targets off balance. | Avoid firing continuously for longer than 1 second or so. The cannons have noticeable recoil and the limited ammunition capacity does not allow for much "Spray and Pray". Firing measured bursts and adjusting the fire as necessary will lead to cleaner results, though if a very nice firing solution is available, don't be afraid to let loose. Against aircraft in particular, fire conservatively if the target is not flying directly towards or away from the ZSD63. Planes diving straight towards the ZSD63 are very threatening, but at the same time they would have signed their own death warrant; move a bit and put a nice spray of 25 mm rounds in their flight path, even a few successful FI-T impacts will do the job. The AP round does not have explosive filler so multiple penetrating hits are needed to defeat a tank. Remember that the ZSD63 also has access to artillery, a very useful spoiler to keep your targets off balance. | ||
| − | Expect to go to allied cap | + | Expect to go to allied cap zones more than most vehicles to replenish ammo and possibly another crew member. |
| − | |||
=== Modules === | === Modules === | ||
| Line 142: | Line 137: | ||
|- | |- | ||
| I | | I | ||
| − | |Tracks | + | | Tracks |
| | | | ||
| − | |Parts | + | | Parts |
| − | |Horizontal Drive | + | | Horizontal Drive |
| − | |Type 87 HE | + | | Type 87 HE |
|- | |- | ||
| II | | II | ||
| − | |Suspension | + | | Suspension |
| − | |Brake System | + | | Brake System |
| − | |FPE | + | | FPE |
| − | |Adjustment of Fire | + | | Adjustment of Fire |
| − | |Type 87 AP | + | | Type 87 AP |
|- | |- | ||
| III | | III | ||
| − | |Filters | + | | Filters |
| | | | ||
| − | |Crew Replenishment | + | | Crew Replenishment |
| − | |Elevation Mechanism | + | | Elevation Mechanism |
| | | | ||
|- | |- | ||
| IV | | IV | ||
| − | |Transmission | + | | Transmission |
| − | |Engine | + | | Engine |
| | | | ||
| − | |Artillery Support | + | | Artillery Support |
| | | | ||
|- | |- | ||
| Line 177: | Line 172: | ||
* Excellent firepower against both planes and light & medium tanks | * Excellent firepower against both planes and light & medium tanks | ||
| − | * Great -10 degrees gun depression allows sneaky shots in hilly | + | * Great -10 degrees gun depression allows sneaky shots in hilly terrain |
* High top speed allows it to get to positions in time | * High top speed allows it to get to positions in time | ||
| − | * Thin | + | * Thin armour can lead to some shells over-penetrating without detonation (e.g. 122 mm) |
* Huge gap behind the driving compartment and below the turret can absorb shells | * Huge gap behind the driving compartment and below the turret can absorb shells | ||
* Great gunsight magnification allows easy snipes from long range | * Great gunsight magnification allows easy snipes from long range | ||
| Line 185: | Line 180: | ||
'''Cons:''' | '''Cons:''' | ||
| − | * Very poor survivability due to its light | + | * Very poor survivability due to its light armour and open-topped turret |
* Fuel tanks are easily set on fire | * Fuel tanks are easily set on fire | ||
* Extremely long reload time of up to 32 seconds | * Extremely long reload time of up to 32 seconds | ||
* High profile makes it easier to get spotted and shot at | * High profile makes it easier to get spotted and shot at | ||
* Requires expert fire control since the firerate can empty the magazine quickly and the reload is very long | * Requires expert fire control since the firerate can empty the magazine quickly and the reload is very long | ||
| − | * AP is still not enough to penetrate heavy tanks even point blank | + | * AP is still not enough to penetrate heavy tanks even point blank range |
== History == | == History == | ||
<!-- ''Describe the history of the creation and combat usage of the vehicle in more detail than in the introduction. If the historical reference turns out to be too long, take it to a separate article, taking a link to the article about the vehicle and adding a block "/History" (example: <nowiki>https://wiki.warthunder.com/(Vehicle-name)/History</nowiki>) and add a link to it here using the <code>main</code> template. Be sure to reference text and sources by using <code><nowiki><ref></ref></nowiki></code>, as well as adding them at the end of the article with <code><nowiki><references /></nowiki></code>. This section may also include the vehicle's dev blog entry (if applicable) and the in-game encyclopedia description (under <code><nowiki>=== In-game description ===</nowiki></code>, also if applicable).'' --> | <!-- ''Describe the history of the creation and combat usage of the vehicle in more detail than in the introduction. If the historical reference turns out to be too long, take it to a separate article, taking a link to the article about the vehicle and adding a block "/History" (example: <nowiki>https://wiki.warthunder.com/(Vehicle-name)/History</nowiki>) and add a link to it here using the <code>main</code> template. Be sure to reference text and sources by using <code><nowiki><ref></ref></nowiki></code>, as well as adding them at the end of the article with <code><nowiki><references /></nowiki></code>. This section may also include the vehicle's dev blog entry (if applicable) and the in-game encyclopedia description (under <code><nowiki>=== In-game description ===</nowiki></code>, also if applicable).'' --> | ||
| − | The 装甲输送车 (Zhuangjia Shusong Che, Armoured Personnel Carrier) ZSD63 was China's first domestic | + | The 装甲输送车 (Zhuangjia Shusong Che, Armoured Personnel Carrier) ZSD63 was China's first domestic armoured vehicle design. China initiated the work in 1958 with a prototype finished in 1960. It is also sometimes called the "Type 63", both a name system used to refer to Julian year of production start. The basic steel box design is simple and functional, designed for small arms protection and have all terrain operation with amphibious capabilities. Although it is a domestic Chinese design, the Soviet design influence is strongly visible. Thousands have been produced with hundreds sold to other countries making it one of the most successful military vehicles built. |
| − | This SPAA version mounts a turret on the roof armed with twin PG87 which is based on the Soviet ZU-23-2 | + | This SPAA version mounts a turret on the roof armed with twin PG87 which is based on the Soviet ZU-23-2 23 mm auto cannon which was modified to use domestically produced 25x183B 25 mm rounds. As the name suggests, this weapon was put in production in 1987 making for a retrofit of an approximately 23 year old chassis. This turret seems to be literally mounted on the roof, as there is no hole into the hull of the ZSD, likely an attempt to maintain is amphibious ability despite additional weight. In addition, a pair of extending feet for stabilization were added, but are not functional in-game. It is likely in real world operation the vehicle had to be stationary, feet planted, and crew externally passing the large and heavy ammo magazines to the loaders on top. |
== Media == | == Media == | ||
| Line 208: | Line 203: | ||
* ''links to approximate analogues of other nations and research trees.'' --> | * ''links to approximate analogues of other nations and research trees.'' --> | ||
''Links to the articles on the War Thunder Wiki that you think will be useful for the reader, for example:'' | ''Links to the articles on the War Thunder Wiki that you think will be useful for the reader, for example:'' | ||
| − | |||
* ''reference to the series of the vehicles;'' | * ''reference to the series of the vehicles;'' | ||
* ''links to approximate analogues of other nations and research trees.'' | * ''links to approximate analogues of other nations and research trees.'' | ||
| Line 217: | Line 211: | ||
* ''encyclopedia page on the tank;'' | * ''encyclopedia page on the tank;'' | ||
* ''other literature.'' --> | * ''other literature.'' --> | ||
| − | |||
* [[wt:en/news/6702-development-zsd-63-twin-barrel-mower-en|[Devblog] ZSD63: twin-barrel mower]] | * [[wt:en/news/6702-development-zsd-63-twin-barrel-mower-en|[Devblog] ZSD63: twin-barrel mower]] | ||
{{China anti-aircraft vehicles}} | {{China anti-aircraft vehicles}} | ||
Revision as of 10:52, 12 June 2020
Contents
Description
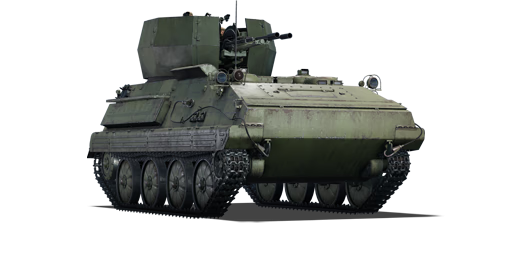
The ZSD63/PG87, Dual-Barrel AA is a rank III Chinese SPAA
with a battle rating of 5.0 (AB) and 4.7 (RB/SB). It was introduced in Update "Starfighters".
The ZSD63 is currently the first vehicle in the Chinese SPAA line and offers some much needed anti-air capabilities to Chinese tankers. Though it looks rather like a jury-rigged technical from the Middle East, having a turret with twin autocannons grafted on an APC chassis, it packs some serious firepower for its rank. A slight brush from the ZSD63's rapid-fire cannons will tear most aircraft to shreds. Lightly armoured ground vehicles will also learn to fear the onslaught of AP rounds, which cut through them like a buzzsaw. While it has excellent firepower, the defensive capabilities are very lacking; the large size and paper-thin armour make it an attractive target to anything on the battlefield. Other issues include the limited belt size, with each gun only having 40 rounds, and the truly abysmal reload speed. Despite these challenges, the ZSD63 can be a very fun vehicle to play and will serve well as an anti-air vehicle even beyond its lowly rank; the succeeding Chinese SPAAs have a much lower rate of fire and are harder to use against aerial targets until the WZ305 and its fused shells are researched.
General info
Survivability and armour
| Armour | Front (Slope angle) | Sides | Rear |
|---|---|---|---|
| Hull | 12 mm | 8 mm | 8 mm |
| Turret | 8 mm | 8 mm | 8 mm |
Despite its armoured box look, one would be hard pressed to call the ZSD63 "armoured". The armour is almost entirely 8 mm thick all-around, save for the 12 mm upper glacis. The near vertical sides may as well be unprotected. Adding insult to injury is the high mounted open top turret with the crews' heads exposed on top like pumpkins. Even coaxial rifle-calibre machine guns stand a fair chance of penetrating this vehicle. While you might survive a few glancing bullets or have shots pass through the empty rear compartment, the best survival tactic is to avoid being seen and stay close to cover for quick retreats after firing off a few bursts.
Note that the ZSD63 can be hull-broken. Avoid being hit by HEAT or HE rounds.
Mobility
| Game Mode | Max Speed (km/h) | Weight (tons) | Engine power (horsepower) | Power-to-weight ratio (hp/ton) | |||
|---|---|---|---|---|---|---|---|
| Forward | Reverse | Stock | Upgraded | Stock | Upgraded | ||
| Arcade | 66 | 10 | 14 | _,___ | 496 | __.__ | 35.43 |
| Realistic | 61 | 9 | _,___ | 260 | __.__ | 18.57 | |
Mobility is good, though somewhat underwhelming compared to what the statistics might suggest. With 19 hp/ton, the ZSD63 accelerates to 60 km/h forward on paved roads and the suspension works quite nicely on all kinds of terrain. Off-road speed is less impressive, topping at around 30-35 km/h. The 8 km/h reverse speed leaves something to be desired but is better than most contemporary vehicles. Overall, the ZSD63 is mobile enough to follow teammates and flank, though it is not exactly lightning fast and there should be no expectation of arriving at the battlefield far ahead of everyone else.
Armaments
Main armament
The ZSD63/PG87 is arguably the most lethal autocannon system at its rank in-game. Each cannon fires a staggering 10 rounds per second (600 rpm) with extremely high velocity and precision. The excellent turret traverse speed makes tracking targets very easy. Aircraft are instant confetti under its FI-T rounds. Although the AP-T penetration at 100 meters is only 60 mm, declining to 47 mm at 500 meters, the high fire rate and high velocity allow multiple hits at weak points until a kill shot is made. Light tanks, tank destroyers, and other SPAAs are generally easy targets. Medium units should not be too difficult to eliminate either, and even heavy tanks can be disabled by the cannons when aimed at vulnerable locations. The weaknesses are the limited belt capacity and the extremely long reload time, so be highly conservative with your fire control. This monster will be just as effective in Rank VII as in Rank II.
The default belt is a 50/50 mix of AP-T and FI-T. This does a pretty good job for anti-air operations, but for anti-tank usage the pure AP-T load is far better. If the ZSD63 is brought out at the start of a game, take mostly AP-T to deal with ground targets and switch to the default belt when aircraft begin to show up. There is also a pure FI-T belt that is high effective versus aircraft but essentially useless against ground targets; it is not of much use since the default belt is almost as effective and can still deal with ground targets in a pinch.
Avoid trying to switch belts in the middle of combat as might be done for other SPAAs. Doing so will put the guns out of commission for potentially more than 30 seconds, which is unhelpful to say the least if there are enemies around. This is also why it's important to have some AP-T rounds in the belts at all times.
| 25 mm PG87 (x2) | Turret rotation speed (°/s) | Reloading rate (seconds) | ||||||||||||
|---|---|---|---|---|---|---|---|---|---|---|---|---|---|---|
| Mode | Capacity (Belt) | Fire rate | Vertical | Horizontal | Stabilizer | Stock | Upgraded | Full | Expert | Aced | Stock | Full | Expert | Aced |
| Arcade | 480 (40) | 600 | -10°/+90° | ±180° | N/A | 47.6 | __.__ | __.__ | __.__ | 67.93 | 32.5 | _.__ | _.__ | 25 |
| Realistic | 32.1 | __.__ | __.__ | __.__ | 45.9 | |||||||||
Ammunition
- Default: AP-T · FI-T
- Type 87 AP: AP-T
- Type 87 HE: FI-T
| Penetration statistics | |||||||
|---|---|---|---|---|---|---|---|
| Belt | Penetration @ 0° Angle of Attack (mm) | ||||||
| 10 m | 100 m | 500 m | 1,000 m | 1,500 m | 2,000 m | ||
| Default | 63 | 60 | 47 | 35 | 26 | 19 | |
| Type 87 AP | 63 | 60 | 47 | 35 | 26 | 19 | |
| Type 87 HE | 2 | 2 | 2 | 2 | 2 | 2 | |
| Belt details | |||||||||
|---|---|---|---|---|---|---|---|---|---|
| Belt | Type of warhead |
Velocity (m/s) |
Projectile Mass (kg) |
Fuse delay (m) |
Fuse sensitivity (mm) |
Explosive Mass (TNT equivalent) (g) |
Ricochet | ||
| 0% | 50% | 100% | |||||||
| Type 87 AP | AP-T | 1,050 | 0.25 | N/A | N/A | N/A | 47° | 60° | 65° |
| Type 87 HE | FI-T | 1,050 | 0.25 | N/A | 0.1 | 19 | 47° | 56° | 65° |
Ammo racks
| Full ammo |
1st rack empty |
2nd rack empty |
3rd rack empty |
4th rack empty |
5th rack empty |
6th rack empty |
Visual discrepancy |
|---|---|---|---|---|---|---|---|
| 6 | __ (+__) | __ (+__) | __ (+__) | __ (+__) | __ (+__) | __ (+__) | __ |
Usage in battles
When attacking ground units, be extremely cautious and avoid exposing your weak armour. Choose a pure AP (AP-T) load to double the chance of penetrating hits and head straight to good ambush spots. Wide flanking manoeuvres are a good idea, allowing you to attack the weak sides of light targets. Going wide, you will likely encounter other weakly armoured units like the popular M24 Chaffee, which is very vulnerable to the 25 mm cannons. Know your targets and aim for weak points. The ubiquitous Shermans are generally tough customers from the front, where at most the transmission housings or perhaps ventilators can be penetrated, but the terrible hull side armour is a good target. The lower side armour behind the tracks is an especially good weak point if facing Shermans with applique side armour, and spraying a wide burst in that area can knock out the transmission, ammo, and driver. Other medium tanks like the Pz.IV F2 and Chi-Nu are vulnerable from the front at close range. T-34s are tougher targets and can only be reliably penetrated frontally in the turret cheeks (for "small turret" models like the T-34 (1940)) or the turret ring at close range. The hull sides are thicker and better sloped than other medium tanks and also have fuel tanks protecting the turret crew, so during flanking attacks, try to shoot the lower hull armour to knock out the engine and driver/machine gunner before going for the turret side.
For self-defence, it is important to know how to disable opponents quickly and efficiently, with minimal time and ammunition expenditure. Obviously the optimal situation is to knock out a target's crew before they can attack the ZSD63, but this will not always be possible. The twin cannons can destroy tracks and tires almost instantly, but for turreted vehicles this will not prevent the target from returning fire. If only one track is destroyed, even a casemate tank destroyer can potentially scoot around enough to fire back (though this can expose their sides). Destroying the engine is a good move when shooting from the sides or rear for this reason. Destroying gun barrels is also a good idea, but this can be difficult if said barrel is pointed directly at you, presenting a small cross section. Destroying turret rings can also be helpful, but this is not really possible outside of close quarters, and some tanks like Shermans don't even have vulnerable turret rings. Juggling these techniques takes practice, and some may end up using a lot of ammo, so it's best not to use the ZSD63 offensively against multiple well-armoured opponents. Damage targets just enough to save yourself and allow your teammates to finish them off. A target with upgraded crew skills might be able to repair their damage before the ZSD63 can reload!
Avoid firing continuously for longer than 1 second or so. The cannons have noticeable recoil and the limited ammunition capacity does not allow for much "Spray and Pray". Firing measured bursts and adjusting the fire as necessary will lead to cleaner results, though if a very nice firing solution is available, don't be afraid to let loose. Against aircraft in particular, fire conservatively if the target is not flying directly towards or away from the ZSD63. Planes diving straight towards the ZSD63 are very threatening, but at the same time they would have signed their own death warrant; move a bit and put a nice spray of 25 mm rounds in their flight path, even a few successful FI-T impacts will do the job. The AP round does not have explosive filler so multiple penetrating hits are needed to defeat a tank. Remember that the ZSD63 also has access to artillery, a very useful spoiler to keep your targets off balance.
Expect to go to allied cap zones more than most vehicles to replenish ammo and possibly another crew member.
Modules
| Tier | Mobility | Protection | Firepower | ||
|---|---|---|---|---|---|
| I | Tracks | Parts | Horizontal Drive | Type 87 HE | |
| II | Suspension | Brake System | FPE | Adjustment of Fire | Type 87 AP |
| III | Filters | Crew Replenishment | Elevation Mechanism | ||
| IV | Transmission | Engine | Artillery Support | ||
Pros and cons
Pros:
- Excellent firepower against both planes and light & medium tanks
- Great -10 degrees gun depression allows sneaky shots in hilly terrain
- High top speed allows it to get to positions in time
- Thin armour can lead to some shells over-penetrating without detonation (e.g. 122 mm)
- Huge gap behind the driving compartment and below the turret can absorb shells
- Great gunsight magnification allows easy snipes from long range
Cons:
- Very poor survivability due to its light armour and open-topped turret
- Fuel tanks are easily set on fire
- Extremely long reload time of up to 32 seconds
- High profile makes it easier to get spotted and shot at
- Requires expert fire control since the firerate can empty the magazine quickly and the reload is very long
- AP is still not enough to penetrate heavy tanks even point blank range
History
The 装甲输送车 (Zhuangjia Shusong Che, Armoured Personnel Carrier) ZSD63 was China's first domestic armoured vehicle design. China initiated the work in 1958 with a prototype finished in 1960. It is also sometimes called the "Type 63", both a name system used to refer to Julian year of production start. The basic steel box design is simple and functional, designed for small arms protection and have all terrain operation with amphibious capabilities. Although it is a domestic Chinese design, the Soviet design influence is strongly visible. Thousands have been produced with hundreds sold to other countries making it one of the most successful military vehicles built.
This SPAA version mounts a turret on the roof armed with twin PG87 which is based on the Soviet ZU-23-2 23 mm auto cannon which was modified to use domestically produced 25x183B 25 mm rounds. As the name suggests, this weapon was put in production in 1987 making for a retrofit of an approximately 23 year old chassis. This turret seems to be literally mounted on the roof, as there is no hole into the hull of the ZSD, likely an attempt to maintain is amphibious ability despite additional weight. In addition, a pair of extending feet for stabilization were added, but are not functional in-game. It is likely in real world operation the vehicle had to be stationary, feet planted, and crew externally passing the large and heavy ammo magazines to the loaders on top.
Media
Excellent additions to the article would be video guides, screenshots from the game, and photos.
See also
Links to the articles on the War Thunder Wiki that you think will be useful for the reader, for example:
- reference to the series of the vehicles;
- links to approximate analogues of other nations and research trees.
External links
| China anti-aircraft vehicles | |
|---|---|
| Radar SPAAG | PGZ09 |
| Gun and Missile SPAAG | PGZ04A |
| Other | ZSD63/PG87 · WZ305 |
| Germany | ␗Sd.Kfz.222 |
| North Vietnam | Phòng không T-34 |
| USA | CCKW 353 (M45) · ␗M42 |
| USSR | Tor-M1 |
