Difference between pages "Leopard I" and "Spitfire F Mk IX"
m (→Pros and cons) (Tag: Visual edit) |
|||
| Line 1: | Line 1: | ||
| − | {{Specs-Card|code= | + | {{Specs-Card |
| + | |code=spitfire_ix_early | ||
| + | |cockpit=442894/1521728 | ||
| + | }} | ||
{{About | {{About | ||
| − | | about = | + | | about = British fighter '''{{PAGENAME}}''' |
| − | | usage = other | + | | usage = other versions |
| − | | link = | + | | link = Spitfire (Family) |
}} | }} | ||
== Description == | == Description == | ||
| − | <!--''In the description, the first part | + | <!-- ''In the description, the first part should be about the history of and the creation and combat usage of the aircraft, as well as its key features. In the second part, tell the reader about the aircraft in the game. Insert a screenshot of the vehicle, so that if the novice player does not remember the vehicle by name, he will immediately understand what kind of vehicle the article is talking about.'' --> |
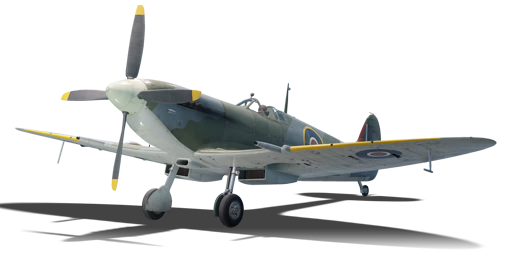
| − | [[File: | + | [[File:GarageImage_{{PAGENAME}}.jpg|420px|thumb|left]] |
{{break}} | {{break}} | ||
| − | The '''{{Specs|name}}''' is a | + | The '''{{Specs|name}}''' is a rank {{Specs|rank}} British fighter {{Battle-rating}}. It was introduced in [[Update 1.35]]. |
| − | + | Because the muzzle velocity of both the Hispanos (870 m/s) and the MGs (854 m/s) is practically the same you could put tracers on the MGs and air targets belt on the Hispanos. This is a great way for players to get a feel of where to aim in RB and it's easier to hit your shots maximising your efficiency and potentially saving ammo. A downside to this is that the element of surprise is short lived as your enemy will see the tracers flying past him and he will quickly react. Another thing is that short bursts are required with the cannons especially without the cannon upgrades as they overheat (and thus jam) very quickly. | |
| − | |||
| − | |||
| − | |||
| − | |||
== General info == | == General info == | ||
| − | === | + | === Flight performance === |
| − | + | ''Describe how the aircraft behaves in the air. Speed, manoeuvrability, acceleration and allowable loads - these are the most important characteristics of the vehicle.'' | |
| − | + | {| class="wikitable" style="text-align:center" | |
| − | + | |- | |
| − | + | ! colspan="8" | Characteristics | |
| − | + | |- | |
| − | + | ! colspan="8" | ''Stock'' | |
| − | + | |- | |
| − | + | ! colspan="2" | Max Speed<br>(km/h at 8,537 m) | |
| − | + | ! rowspan="2" | Max altitude<br>(meters) | |
| − | {| | + | ! colspan="2" | Turn time<br>(seconds) |
| + | ! colspan="2" | Rate of climb<br>(meters/second) | ||
| + | ! rowspan="2" | Take-off run<br>(meters) | ||
| + | |- | ||
| + | ! AB !! RB !! AB !! RB !! AB !! RB | ||
| + | |- | ||
| + | | 627 || 609 || {{Specs|ceiling}} || 18.1 || 18.7 || 15.8 || 15.8 || 380 | ||
| + | |- | ||
| + | ! colspan="8" | ''Upgraded'' | ||
|- | |- | ||
| − | ! | + | ! colspan="2" | Max Speed<br>(km/h at 8,537 m) |
| + | ! rowspan="2" | Max altitude<br>(meters) | ||
| + | ! colspan="2" | Turn time<br>(seconds) | ||
| + | ! colspan="2" | Rate of climb<br>(meters/second) | ||
| + | ! rowspan="2" | Take-off run<br>(meters) | ||
|- | |- | ||
| − | + | ! AB !! RB !! AB !! RB !! AB !! RB | |
|- | |- | ||
| − | | | + | | 676 || 650 || {{Specs|ceiling}} || 16.4 || 17.2 || 24.4 || 19.5 || 380 |
|- | |- | ||
|} | |} | ||
| − | |||
| − | |||
| − | |||
| − | |||
| − | |||
| − | |||
| − | |||
| − | |||
| − | |||
| − | |||
| − | |||
| − | |||
| − | |||
| − | |||
| + | ==== Details ==== | ||
{| class="wikitable" style="text-align:center" | {| class="wikitable" style="text-align:center" | ||
|- | |- | ||
| − | ! colspan=" | + | ! colspan="5" | Features |
|- | |- | ||
| − | ! | + | ! Combat flaps |
| − | ! | + | ! Take-off flaps |
| − | ! | + | ! Landing flaps |
| − | ! | + | ! Air brakes |
| + | ! Arrestor gear | ||
|- | |- | ||
| − | | | + | | X || X || ✓ || X || X <!-- ✓ --> |
|- | |- | ||
| − | + | |} | |
| − | + | ||
| − | + | {| class="wikitable" style="text-align:center" | |
| − | |||
| − | |||
| − | |||
| − | |||
| − | |||
| − | |||
| − | |||
|- | |- | ||
| − | | | + | ! colspan="5" | Limits |
|- | |- | ||
| − | ! | + | ! rowspan="2" | Wing-break speed<br>(km/h) |
| + | ! rowspan="2" | Gear limit<br>(km/h) | ||
| + | ! rowspan="2" | Combat flaps<br>(km/h) | ||
| + | ! colspan="2" | Max Static G | ||
|- | |- | ||
| − | ! | + | ! + |
| − | + | ! - | |
| − | |||
| − | ! | ||
|- | |- | ||
| − | | | + | | {{Specs|destruction|constructions}} || {{Specs|destruction|chassis}} || 290 || ~10 || ~5 |
|- | |- | ||
|} | |} | ||
| − | + | {| class="wikitable" style="text-align:center" | |
| − | {| class="wikitable | ||
| − | |||
|- | |- | ||
| − | + | ! colspan="4" | Optimal velocities | |
| − | |||
| − | ! colspan=" | ||
|- | |- | ||
| − | ! | + | ! Ailerons<br>(km/h) |
| − | ! | + | ! Rudder<br>(km/h) |
| − | ! | + | ! Elevators<br>(km/h) |
| − | ! | + | ! Radiator<br>(km/h) |
| − | |||
| − | |||
|- | |- | ||
| − | | | + | | < 321 || < 400 || < 350 || > 470 |
|- | |- | ||
| − | | | + | |} |
| + | |||
| + | {| class="wikitable" style="text-align:center" | ||
|- | |- | ||
| − | | | + | ! colspan="3" | Compressor (RB/SB) |
|- | |- | ||
| − | + | ! colspan="3" | Setting 1 | |
| − | |||
| − | ! colspan=" | ||
|- | |- | ||
| − | ! | + | ! Optimal altitude |
| − | ! | + | ! 100% Engine power |
| − | ! | + | ! WEP Engine power |
| − | |||
| − | |||
| − | |||
| − | |||
| − | |||
| − | |||
| − | |||
| − | |||
|- | |- | ||
| − | + | | 4,100 m || 1,400 hp || 1,624 hp | |
| − | |||
| − | |||
|- | |- | ||
| − | | | + | ! colspan="3" | Setting 2 |
|- | |- | ||
| − | + | ! Optimal altitude | |
| + | ! 100% Engine power | ||
| + | ! WEP Engine power | ||
|- | |- | ||
| − | | | + | | 8,000 m || 1,160 hp || 1,346 hp |
|- | |- | ||
|} | |} | ||
| − | '' | + | === Survivability and armour === |
| + | <!-- ''Examine the survivability of the aircraft. Note how vulnerable the structure is and how secure the pilot is, whether the fuel tanks are armoured, etc. Describe the armour, if there is any, and also mention the vulnerability of other critical aircraft systems.'' --> | ||
| + | |||
| + | * 38 mm Bulletproof glass - Armoured windscreen | ||
| + | * 3 mm Steel - Armour plate on top of fuel tanks | ||
| + | * 4 mm Steel - Armour plate on pilot's seat. Behind pilot is another 6-7 mm steel plate | ||
| + | * 3 mm Steel - Armour plates around ammunition | ||
| + | |||
| + | == Armaments == | ||
| + | === Offensive armament === | ||
| + | <!-- ''Describe the offensive armament of the aircraft, if any. Describe how effective the cannons and machine guns are in a battle, and also what belts or drums are better to use. If there is no offensive weaponry, delete this subsection.'' --> | ||
| + | {{main|Hispano Mk.II (20 mm)|Browning .303 (7.7 mm)}} | ||
| + | |||
| + | The '''''{{PAGENAME}}''''' is armed with: | ||
| + | |||
| + | * 2 x 20 mm Hispano Mk.II cannons, wing-mounted (120 rpg = 240 total) | ||
| + | * 4 x 7.7 mm Browning .303 machine guns, wing-mounted (350 rpg = 1,400 total) | ||
| − | + | === Suspended armament === | |
| + | <!-- ''Describe the aircraft's suspended armament: additional cannons under the wings, bombs, rockets and torpedoes. This section is especially important for bombers and attackers. If there is no suspended weaponry remove this subsection.'' --> | ||
| + | {{main|G.P. 250 lb Mk.IV (250 lb)}} | ||
| − | ''' | + | The '''''{{PAGENAME}}''''' can be outfitted with the following ordnance: |
| + | * Without load | ||
| + | * 1 x 250 lb G.P. 250 lb Mk.IV bomb (250 lb total) | ||
| − | == | + | == Usage in battles == |
| − | + | <!--''Describe the tactics of playing in an aircraft, the features of using aircraft in a team and advice on tactics. Refrain from creating a "guide" - do not impose a single point of view, but instead, give the reader food for thought. Examine the most dangerous enemies and give recommendations on fighting them. If necessary, note the specifics of the game in different modes (AB, RB, SB).''--> | |
| − | + | As a Spitfire Mk IX at its realistic mode battle rating, the most common and dangerous opponents are Bf 109's, normally the G2/Trop and F4 variants both of which often benefit from a better team composition on the axis side. When facing them you should never attempt to hold an extended dogfight above 5,000 m as you will lose a significant portion of the engine power in comparison to them, instead, you should take the fight below 5 km where you can outrun a Bf 109 F4, although Fw 190's and the German variant P-47 will catch up easily at the lower altitude. | |
| − | |||
| − | |||
| − | |||
| − | |||
| − | |||
| − | |||
| − | |||
| − | |||
| − | |||
| − | |||
| − | |||
| − | |||
| − | + | The advantages of your plane in both an up-tier and down-tier remain largely the same in that you can out-turn almost anything except all models of the A6M 'Zero' and the A7M 'Reppu' along with earlier spitfires you might face such as the Italian Spitfire Mk Vb/Trop. In this scenario you should play cautiously and try to energy fight them, extending away and climbing. For head-ons, since the armament of 2 x 20 mm and 4 x 7.7 mm machine guns are rather lacklustre. You usually should avoid these. If you really want to, though, use stealth rounds and fire from 1,000-1,400 metres away from the target while using a 500 m convergence. However, this spitfire does best at mid-close ranges (200-600 metres) with either 400 m or 300 m convergence. The wing-mounted guns aren't really good for head-ons. | |
| − | + | Another aspect to consider and adjust your playstyle to is that while the acceleration and turn time is good, engine overheating in RB and SB should be managed using manual engine controls and pulling more than 9G's while rolling puts you at risk of ripping your wing off. Additionally, since the Inline engine is very vulnerable to damage and the Spitfire requires lots of time on target, practice proper methods of attacking bombers using boom and zoom tactics as tail-sitting enemy bombers with decent defensive armaments like the Me 264 and the He 177 is not likely to end well at all. | |
| − | |||
| − | |||
| + | === Manual Engine Control === | ||
{| class="wikitable" style="text-align:center" | {| class="wikitable" style="text-align:center" | ||
|- | |- | ||
| − | ! colspan="7" | | + | ! colspan="7" | MEC elements |
| − | |||
| − | |||
| − | |||
| − | |||
| − | |||
| − | |||
| − | |||
| − | |||
| − | |||
| − | |||
| − | |||
| − | |||
| − | |||
| − | |||
|- | |- | ||
| − | ! colspan=" | + | ! rowspan="2" | Mixer |
| + | ! rowspan="2" | Pitch | ||
| + | ! colspan="3" | Radiator | ||
| + | ! rowspan="2" | Supercharger | ||
| + | ! rowspan="2" | Turbocharger | ||
|- | |- | ||
| − | ! | + | ! Oil |
| − | ! | + | ! Water |
| − | ! | + | ! Type |
| − | |||
|- | |- | ||
| − | | | + | | Controllable || Controllable<br>Not auto controlled || Not controllable<br>Not auto controlled || Controllable<br>Auto control available || Combined || Controllable<br>2 gears || Not controllable |
|- | |- | ||
|} | |} | ||
| − | + | === Modules === | |
| − | |||
| − | |||
| − | |||
| − | |||
| − | |||
| − | |||
| − | |||
| − | |||
| − | |||
| − | |||
| − | |||
| − | |||
| − | ===Modules=== | ||
{| class="wikitable" | {| class="wikitable" | ||
| − | !Tier | + | ! Tier |
| − | ! colspan="2" | | + | ! colspan="2" | Flight performance |
| − | ! | + | ! Survivability |
| − | ! colspan=" | + | ! colspan="2" | Weaponry |
|- | |- | ||
| − | |I | + | | I |
| − | | | + | | Fuselage repair |
| + | | Radiator | ||
| | | | ||
| − | | | + | | Offensive 7 mm |
| − | | | + | | Offensive 20 mm |
| − | | | + | |- |
| + | | II | ||
| | | | ||
| + | | Compressor | ||
| + | | Airframe | ||
| + | | New 7 mm MGs | ||
| + | | New 20 mm cannons | ||
|- | |- | ||
| − | | | + | | III |
| − | | | + | | Wings repair |
| − | | | + | | Engine |
| − | |||
| − | |||
| − | |||
| | | | ||
| + | | SBC mark 25 | ||
| + | | Mk.II year 1942 | ||
|- | |- | ||
| − | | | + | | IV |
| − | |||
| | | | ||
| − | | | + | | Engine injection |
| − | | | + | | Cover |
| − | |||
| | | | ||
| − | | | + | | Mk.II year 1943 |
| − | |||
| − | |||
| − | |||
| − | |||
| − | |||
| − | |||
| − | |||
|- | |- | ||
|} | |} | ||
| + | |||
=== Pros and cons === | === Pros and cons === | ||
| − | <!--'' | + | <!-- ''Summarise and briefly evaluate the vehicle in terms of its characteristics and combat effectiveness. Mark its pros and cons in the bulleted list. Try not to use more than 6 points for each of the characteristics. Avoid using categorical definitions such as "bad", "good" and the like - use substitutions with softer forms such as "inadequate" and "effective".'' --> |
| + | |||
'''Pros:''' | '''Pros:''' | ||
| − | * | + | * Great maneuverability |
| − | * | + | * Good roll rate |
| − | * | + | * Good low-level performance |
| − | * | + | * Larger ammo supply of 120 RPG for the 20 mm cannons, compared to the Spitfires with the Type 'B' wings with 60 RPG |
| − | * | + | * Machine gun ammo pool of 350 RPG makes for good, prolonged backup weapons |
| − | + | * Faster than previous Spitfire versions due to a newer engine | |
| − | * | + | * Performing quick negative G manoeuvres will not shut off the engine (RB/SB) |
| − | * | + | * You can actually use tracers belts for machine guns, which means this aircraft can help new RB player with shooting. |
| − | * | + | * Like previous versions of British planes, the tracer belts are composed entirely of incendiary bullets (IT and AP-I). |
| − | * | + | * Incredibly fast climber, out-climbs 109s when upgraded |
| − | |||
| − | |||
| − | * | ||
'''Cons:''' | '''Cons:''' | ||
| − | * | + | * Ammunition pool for 20 mm still relatively small, must be conservative when shooting |
| − | * | + | * Cannons overheat and jam quickly, when not in 1942/1943 configuration |
| − | * | + | * When 20 mm runs out or jams, the plane is left with only four 7.7 mm machine guns |
| − | * | + | * Poor high altitude performance (above 5000m) |
| − | * | + | * Poor acceleration |
| − | * | + | * Roll rate starts stiffening at ~400 km/h |
| − | * | + | * Liquid-cooled engines mean one hit to the cooling system can force a return to the airfield for repairs (RB/SB) |
| − | * | + | * Very difficult to attack bombers, as the engine is very susceptible to damage from enemy gunners |
| − | * | + | * Fragile airframe |
| − | * | + | * Catches fire easily, not all fuel tanks are self sealing |
| + | * 20mm incredibly inaccurate even at close ranges when stock | ||
== History == | == History == | ||
| − | + | ''Describe the history of the creation and combat usage of the aircraft in more detail than in the introduction. If the historical reference turns out to be too long, take it to a separate article, taking a link to the article about the vehicle and adding a block "/ History" (example: <nowiki>https://wiki.warthunder.com/(Vehicle-name)/History</nowiki>) and add a link to it here using the <code>main</code> template. Be sure to reference text and sources by using <code><nowiki><ref></ref></nowiki></code>, as well as adding them at the end of the article with <code><nowiki><references /></nowiki></code>. This section may also include the vehicle's dev blog entry (if applicable) and the in-game encyclopedia description (under <code><nowiki>=== In-game description ===</nowiki></code>, also if applicable).'' | |
| − | === | ||
| − | |||
| − | In | + | === In-game description === |
| − | + | The Supermarine Spitfire was a British single-engine, all-metal, low-wing monoplane fighter. While the Mk VII and Mk VIII variants was being designed, a Spitfire Mk III was tested in September 1941 with the new Rolls Royce 60 in the hopes of developing an interim fighter to use as a stop gap measure. The new Spitfire performed exceptionally well, and was rushed into production as the Mk IX. The Air Fighting Development Unit described the Mk IX as 'outstandingly better than the Mk V especially at heights above 20,000 feet' and even though it was not fitted with the modified control surfaces under development for the Mk VII and Mk VIII, the Mk IX was more than capable of meeting the Focke-Wulf FW190 on favourable terms. The Mk IX was fitted with the Type C 'universal' wing and originally carried the tried and tested combination of two 20mm cannon and four 0.303 inch machine guns, but in later versions the four 0.303 machine guns were replaced with two .50 calibre guns. | |
| − | |||
| − | |||
| − | |||
| − | |||
| − | |||
| − | |||
| − | |||
| − | |||
| − | |||
| − | |||
| − | |||
| − | |||
| − | |||
| − | |||
| − | |||
| − | |||
| − | |||
| − | |||
| − | |||
| − | |||
| − | |||
| − | |||
| − | |||
| − | |||
| − | |||
| − | |||
| − | |||
| − | |||
| − | |||
| − | |||
| − | |||
| − | |||
| − | |||
| − | |||
| − | |||
| − | |||
| − | + | A total of 5,665 Mk IX were produced and 262 more Mk Vs were converted to Mk IX. Intended as a transitional stop-gap measure for the Mk VII and Mk VIII, the variant remained in production until the end of the war, ultimately becoming the most mass-produced Spitfire version. This mark was also used as a fighter-bomber and as a reconnaissance aircraft. Further modifications were incorporated into the Mk IX throughout its service life, such as a gyroscopic gunsight, bubble canopy and modified engine intercooler. Widely considered to be the most capable fighter in the world at the time of its introduction, it would take the introduction of the Rolls Royce Griffon engine to push the Spitfire into its next stage of evolution. | |
| − | |||
| − | + | === Notable pilots === | |
| − | + | <div><ul> | |
| + | <li style="display: inline-block;"> [[File:Douglas_Bader_profile.jpg|thumb|none|220px|User:U64962917#Bader,_Douglas_R.S.B.|The '''{{PAGENAME}}''' was the fighter in which '''[[User:U64962917#Bader,_Douglas_R.S.B.|Douglas Bader]]''' flew as flight lead of 300 aircraft over London for a victory flyover in June 1945.]] </li><!-- | ||
| + | <li style="display: inline-block;"> [[File:X.jpg|thumb|none|200px|"Image Description"]] </li> | ||
| + | <li style="display: inline-block;"> [[File:X.jpg|thumb|none|200px|"Image Description"]] </li> | ||
| + | <li style="display: inline-block;"> [[File:X.jpg|thumb|none|250px|"Image Description"]] </li>--> | ||
| + | </ul></div> | ||
== Media == | == Media == | ||
<!--Excellent additions to the article would be video guides, screenshots from the game, and photos.--> | <!--Excellent additions to the article would be video guides, screenshots from the game, and photos.--> | ||
| + | {{Youtube-gallery|9_txEPailKc|'''The Shooting Range #92''' - ''Metal Beasts'' section at 05:10 discusses the Spitfire F Mk IX.}} | ||
| − | + | == See also == | |
| + | ''Links to the articles on the War Thunder Wiki that you think will be useful for the reader, for example:'' | ||
| − | + | * ''reference to the series of the aircraft;'' | |
| − | |||
| − | |||
| − | |||
| − | |||
| − | |||
| − | |||
| − | |||
| − | |||
| − | |||
| − | * ''reference to the series of the | ||
* ''links to approximate analogues of other nations and research trees.'' | * ''links to approximate analogues of other nations and research trees.'' | ||
| − | |||
| − | |||
| − | |||
| − | |||
| − | == | + | == External links == |
''Paste links to sources and external resources, such as:'' | ''Paste links to sources and external resources, such as:'' | ||
* ''topic on the official game forum;'' | * ''topic on the official game forum;'' | ||
| + | * ''encyclopedia page on the aircraft;'' | ||
* ''other literature.'' | * ''other literature.'' | ||
| − | {{ | + | {{AirManufacturer Supermarine}} |
| + | {{Britain fighters}} | ||
Revision as of 12:01, 27 May 2020
Contents
| This page is about the British fighter Spitfire F Mk IX. For other versions, see Spitfire (Family). |
Description

The Spitfire F Mk IX is a rank III British fighter
with a battle rating of 4.3 (AB/RB) and 4.7 (SB). It was introduced in Update 1.35.
Because the muzzle velocity of both the Hispanos (870 m/s) and the MGs (854 m/s) is practically the same you could put tracers on the MGs and air targets belt on the Hispanos. This is a great way for players to get a feel of where to aim in RB and it's easier to hit your shots maximising your efficiency and potentially saving ammo. A downside to this is that the element of surprise is short lived as your enemy will see the tracers flying past him and he will quickly react. Another thing is that short bursts are required with the cannons especially without the cannon upgrades as they overheat (and thus jam) very quickly.
General info
Flight performance
Describe how the aircraft behaves in the air. Speed, manoeuvrability, acceleration and allowable loads - these are the most important characteristics of the vehicle.
| Characteristics | |||||||
|---|---|---|---|---|---|---|---|
| Stock | |||||||
| Max Speed (km/h at 8,537 m) |
Max altitude (meters) |
Turn time (seconds) |
Rate of climb (meters/second) |
Take-off run (meters) | |||
| AB | RB | AB | RB | AB | RB | ||
| 627 | 609 | 11500 | 18.1 | 18.7 | 15.8 | 15.8 | 380 |
| Upgraded | |||||||
| Max Speed (km/h at 8,537 m) |
Max altitude (meters) |
Turn time (seconds) |
Rate of climb (meters/second) |
Take-off run (meters) | |||
| AB | RB | AB | RB | AB | RB | ||
| 676 | 650 | 11500 | 16.4 | 17.2 | 24.4 | 19.5 | 380 |
Details
| Features | ||||
|---|---|---|---|---|
| Combat flaps | Take-off flaps | Landing flaps | Air brakes | Arrestor gear |
| X | X | ✓ | X | X |
| Limits | ||||
|---|---|---|---|---|
| Wing-break speed (km/h) |
Gear limit (km/h) |
Combat flaps (km/h) |
Max Static G | |
| + | - | |||
| 290 | ~10 | ~5 | ||
| Optimal velocities | |||
|---|---|---|---|
| Ailerons (km/h) |
Rudder (km/h) |
Elevators (km/h) |
Radiator (km/h) |
| < 321 | < 400 | < 350 | > 470 |
| Compressor (RB/SB) | ||
|---|---|---|
| Setting 1 | ||
| Optimal altitude | 100% Engine power | WEP Engine power |
| 4,100 m | 1,400 hp | 1,624 hp |
| Setting 2 | ||
| Optimal altitude | 100% Engine power | WEP Engine power |
| 8,000 m | 1,160 hp | 1,346 hp |
Survivability and armour
- 38 mm Bulletproof glass - Armoured windscreen
- 3 mm Steel - Armour plate on top of fuel tanks
- 4 mm Steel - Armour plate on pilot's seat. Behind pilot is another 6-7 mm steel plate
- 3 mm Steel - Armour plates around ammunition
Armaments
Offensive armament
The Spitfire F Mk IX is armed with:
- 2 x 20 mm Hispano Mk.II cannons, wing-mounted (120 rpg = 240 total)
- 4 x 7.7 mm Browning .303 machine guns, wing-mounted (350 rpg = 1,400 total)
Suspended armament
The Spitfire F Mk IX can be outfitted with the following ordnance:
- Without load
- 1 x 250 lb G.P. 250 lb Mk.IV bomb (250 lb total)
Usage in battles
As a Spitfire Mk IX at its realistic mode battle rating, the most common and dangerous opponents are Bf 109's, normally the G2/Trop and F4 variants both of which often benefit from a better team composition on the axis side. When facing them you should never attempt to hold an extended dogfight above 5,000 m as you will lose a significant portion of the engine power in comparison to them, instead, you should take the fight below 5 km where you can outrun a Bf 109 F4, although Fw 190's and the German variant P-47 will catch up easily at the lower altitude.
The advantages of your plane in both an up-tier and down-tier remain largely the same in that you can out-turn almost anything except all models of the A6M 'Zero' and the A7M 'Reppu' along with earlier spitfires you might face such as the Italian Spitfire Mk Vb/Trop. In this scenario you should play cautiously and try to energy fight them, extending away and climbing. For head-ons, since the armament of 2 x 20 mm and 4 x 7.7 mm machine guns are rather lacklustre. You usually should avoid these. If you really want to, though, use stealth rounds and fire from 1,000-1,400 metres away from the target while using a 500 m convergence. However, this spitfire does best at mid-close ranges (200-600 metres) with either 400 m or 300 m convergence. The wing-mounted guns aren't really good for head-ons.
Another aspect to consider and adjust your playstyle to is that while the acceleration and turn time is good, engine overheating in RB and SB should be managed using manual engine controls and pulling more than 9G's while rolling puts you at risk of ripping your wing off. Additionally, since the Inline engine is very vulnerable to damage and the Spitfire requires lots of time on target, practice proper methods of attacking bombers using boom and zoom tactics as tail-sitting enemy bombers with decent defensive armaments like the Me 264 and the He 177 is not likely to end well at all.
Manual Engine Control
| MEC elements | ||||||
|---|---|---|---|---|---|---|
| Mixer | Pitch | Radiator | Supercharger | Turbocharger | ||
| Oil | Water | Type | ||||
| Controllable | Controllable Not auto controlled |
Not controllable Not auto controlled |
Controllable Auto control available |
Combined | Controllable 2 gears |
Not controllable |
Modules
| Tier | Flight performance | Survivability | Weaponry | ||
|---|---|---|---|---|---|
| I | Fuselage repair | Radiator | Offensive 7 mm | Offensive 20 mm | |
| II | Compressor | Airframe | New 7 mm MGs | New 20 mm cannons | |
| III | Wings repair | Engine | SBC mark 25 | Mk.II year 1942 | |
| IV | Engine injection | Cover | Mk.II year 1943 | ||
Pros and cons
Pros:
- Great maneuverability
- Good roll rate
- Good low-level performance
- Larger ammo supply of 120 RPG for the 20 mm cannons, compared to the Spitfires with the Type 'B' wings with 60 RPG
- Machine gun ammo pool of 350 RPG makes for good, prolonged backup weapons
- Faster than previous Spitfire versions due to a newer engine
- Performing quick negative G manoeuvres will not shut off the engine (RB/SB)
- You can actually use tracers belts for machine guns, which means this aircraft can help new RB player with shooting.
- Like previous versions of British planes, the tracer belts are composed entirely of incendiary bullets (IT and AP-I).
- Incredibly fast climber, out-climbs 109s when upgraded
Cons:
- Ammunition pool for 20 mm still relatively small, must be conservative when shooting
- Cannons overheat and jam quickly, when not in 1942/1943 configuration
- When 20 mm runs out or jams, the plane is left with only four 7.7 mm machine guns
- Poor high altitude performance (above 5000m)
- Poor acceleration
- Roll rate starts stiffening at ~400 km/h
- Liquid-cooled engines mean one hit to the cooling system can force a return to the airfield for repairs (RB/SB)
- Very difficult to attack bombers, as the engine is very susceptible to damage from enemy gunners
- Fragile airframe
- Catches fire easily, not all fuel tanks are self sealing
- 20mm incredibly inaccurate even at close ranges when stock
History
Describe the history of the creation and combat usage of the aircraft in more detail than in the introduction. If the historical reference turns out to be too long, take it to a separate article, taking a link to the article about the vehicle and adding a block "/ History" (example: https://wiki.warthunder.com/(Vehicle-name)/History) and add a link to it here using the main template. Be sure to reference text and sources by using <ref></ref>, as well as adding them at the end of the article with <references />. This section may also include the vehicle's dev blog entry (if applicable) and the in-game encyclopedia description (under === In-game description ===, also if applicable).
In-game description
The Supermarine Spitfire was a British single-engine, all-metal, low-wing monoplane fighter. While the Mk VII and Mk VIII variants was being designed, a Spitfire Mk III was tested in September 1941 with the new Rolls Royce 60 in the hopes of developing an interim fighter to use as a stop gap measure. The new Spitfire performed exceptionally well, and was rushed into production as the Mk IX. The Air Fighting Development Unit described the Mk IX as 'outstandingly better than the Mk V especially at heights above 20,000 feet' and even though it was not fitted with the modified control surfaces under development for the Mk VII and Mk VIII, the Mk IX was more than capable of meeting the Focke-Wulf FW190 on favourable terms. The Mk IX was fitted with the Type C 'universal' wing and originally carried the tried and tested combination of two 20mm cannon and four 0.303 inch machine guns, but in later versions the four 0.303 machine guns were replaced with two .50 calibre guns.
A total of 5,665 Mk IX were produced and 262 more Mk Vs were converted to Mk IX. Intended as a transitional stop-gap measure for the Mk VII and Mk VIII, the variant remained in production until the end of the war, ultimately becoming the most mass-produced Spitfire version. This mark was also used as a fighter-bomber and as a reconnaissance aircraft. Further modifications were incorporated into the Mk IX throughout its service life, such as a gyroscopic gunsight, bubble canopy and modified engine intercooler. Widely considered to be the most capable fighter in the world at the time of its introduction, it would take the introduction of the Rolls Royce Griffon engine to push the Spitfire into its next stage of evolution.
Notable pilots
-
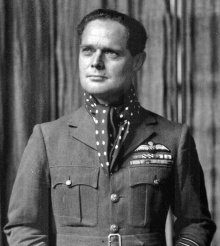 The Spitfire F Mk IX was the fighter in which Douglas Bader flew as flight lead of 300 aircraft over London for a victory flyover in June 1945.

Media
See also
Links to the articles on the War Thunder Wiki that you think will be useful for the reader, for example:
- reference to the series of the aircraft;
- links to approximate analogues of other nations and research trees.
External links
Paste links to sources and external resources, such as:
- topic on the official game forum;
- encyclopedia page on the aircraft;
- other literature.
| Supermarine | |
|---|---|
| Spitfires | |
| Merlin engine | Spitfire Mk Ia · Spitfire Mk IIa · Spitfire Mk.IIa Venture I · Spitfire Mk IIb |
| Spitfire Mk Vb · Spitfire Mk Vb/trop · Spitfire Mk Vc · Spitfire Mk Vc/trop | |
| Spitfire F Mk IX · Spitfire F Mk IXc · Spitfire F Mk XVI | |
| Spitfire LF Mk IX · Plagis' Spitfire LF Mk IXc | |
| Griffon engine | Spitfire F Mk XIVc · Spitfire F Mk XIVe · Prendergast's Spitfire FR Mk XIVe · Spitfire F Mk XVIIIe · Spitfire F Mk 22 · Spitfire F Mk 24 |
| Export | ▄Spitfire Mk Vb/trop · ▃Spitfire LF Mk IXc · ▂Spitfire Mk IXc · Spitfire Mk IXc · Spitfire Mk.IX (CW) · Spitfire LF Mk.IXe Weizman's |
| Seafires | Seafire LF Mk.III · Seafire F Mk XVII · Seafire FR 47 |
| Export | ▄Seafire LF Mk.III |
| Jet fighters | Attacker FB 1 · Attacker FB.2 · Scimitar F Mk.1 · Swift F.1 · Swift F.7 |
| Hydroplanes | Walrus Mk.I |
